Note
Access to this page requires authorization. You can try signing in or changing directories.
Access to this page requires authorization. You can try changing directories.
Use the following information to help you install and configure the Microsoft Rights Management (RMS) connector. These procedures cover steps 1 though 4 from Deploying the Microsoft Rights Management connector.
Before you begin:
Make sure that you have reviewed and checked the prerequisites for this deployment.
Make sure you are aware of the correct Azure sovereign cloud instance for your connector to be able to complete setup and configuration.
Installing the RMS connector
Identify the computers (minimum of two) to run the RMS connector. These computers must meet the minimum specification listed in the prerequisites.
Note
Install a single RMS connector (consisting of multiple servers for high availability) per tenant (Microsoft 365 tenant or Microsoft Entra tenant). Unlike Active Directory RMS, you do not have to install an RMS connector in each forest.
Download the source files for the RMS connector from the Microsoft Download Center.
To install the RMS connector, download RMSConnectorSetup.exe.
In addition, if you want to use the server configuration tool for the RMS connector, to automate the configuration of registry settings on your on-premises servers, also download GenConnectorConfig.ps1.
On the computer on which you want to install the RMS connector, run RMSConnectorSetup.exe with administrator privileges.
On the Welcome page of Microsoft Rights Management Connector Setup, select Install Microsoft Rights Management connector on the computer, and then click Next.
Read and accept the End-User License Agreement terms, and then click Next.
In the Authentication page, select the Cloud environment that matches your solution. For example, select AzureCloud for the Azure commercial offering. Otherwise, select one of the following options:
- AzureChinaCloud: Microsoft Azure Operated by 21Vianet
- AzureUSGovernment: Azure Government (GCC High/DoD)
- AzureUSGovernment2: Azure Government 2
- AzureUSGovernment3: Azure Government 3
Select Sign In to sign in to your account. Make sure you enter credentials for an account that has sufficient privileges to configure the RMS connector.
You can use an account that has one of the following privileges:
Global administrator for your tenant: An account that is a global administrator for your Microsoft 365 tenant or Microsoft Entra tenant.
Azure Rights Management global administrator: An account in Microsoft Entra ID that has been assigned the Azure RMS global administrator role.
Azure Rights Management connector administrator: An account in Microsoft Entra ID that has been granted rights to install and administer the RMS connector for your organization.
The Azure Rights Management global administrator role and Azure Rights Management connector administrator role are assigned to accounts by using the Add-AipServiceRoleBasedAdministrator cmdlet.
Note
If you have implemented onboarding controls, make sure that the account you specify is able to protect content.
For example, if you restricted the ability to protect content to the "IT department" group, the account that you specify here must be a member of that group. If not, you see the error message: The attempt to discover the location of the administration service and organization failed. Make sure Microsoft Rights Management service is enabled for your organization.
Tip
To run the RMS connector with least privileges, create a dedicated account for this purpose that you then assign the Azure RMS connector administrator role. For more information, see Create a dedicated account for the RMS connector.
On the final page of the wizard, do the following, and then click Finish:
If this is the first connector that you have installed, do not select Launch connector administrator console to authorize servers at this time. You will select this option after you have installed your second (or final) RMS connector. Instead, run the wizard again on at least one other computer. You must install a minimum of two connectors.
If you have installed your second (or final) connector, select Launch connector administrator console to authorize servers.
During the RMS connector installation process, all prerequisite software is validated and installed, Internet Information Services (IIS) is installed if not already present, and the connector software is installed and configured. Azure RMS is also prepared for configuration by creating the following:
An empty table of servers that are authorized to use the connector to communicate with Azure RMS. Add servers to this table later.
A set of security tokens for the connector, which authorize operations with Azure RMS. These tokens are downloaded from Azure RMS and installed on the local computer in the registry. They are protected by using the data protection application programming interface (DPAPI) and the Local System account credentials.
Create a dedicated account for the RMS connector
This procedure describes how to create a dedicated account to run the Azure RMS connector with the least privileges possible, to use when signing in during the RMS connector installation.
If you haven't already done so, download and install the AIPService PowerShell module. For more information, see Install the AIPService PowerShell module for the Azure Right Management service.
Start Windows PowerShell with the Run as administrator command, and connect to the protection service by using the Connect-AipService command:
Connect-AipService -EnvironmentName AzureChinaCloud //provide Microsoft 365 tenant administratoror Azure RMS global administrator credentialsRun the Add-AipServiceRoleBasedAdministrator command, using just one of the following parameters:
Add-AipServiceRoleBasedAdministrator -EmailAddress <email address> -Role"ConnectorAdministrator"Add-AipServiceRoleBasedAdministrator -ObjectId <object id> -Role"ConnectorAdministrator"Add-AipServiceRoleBasedAdministrator -SecurityGroupDisplayName <group Name> -Role"ConnectorAdministrator"For example, run:
Add-AipServiceRoleBasedAdministrator -EmailAddressmelisa@contoso.com -Role "ConnectorAdministrator"
Although these commands assign the connector administrator role, you can also use the GlobalAdministrator role instead.
Verify your installation
To verify whether the web services for the RMS connector are operational:
From a web browser, connect to http://<connectoraddress>/_wmcs/certification/servercertification.asmx, replacing <connectoraddress> with the server address or name that has the RMS connector installed.
A successful connection displays a ServerCertificationWebService page.
To verify user ability to read or modify RMS- or AIP-protected documents:
On the RMS connector machine, open the Event Viewer and go to the Application Windows Log. Find an entry from the Microsoft RMS Connector source, with a Level of Information.
The entry should have a message similar to the following:
The list of authorized accounts has been updated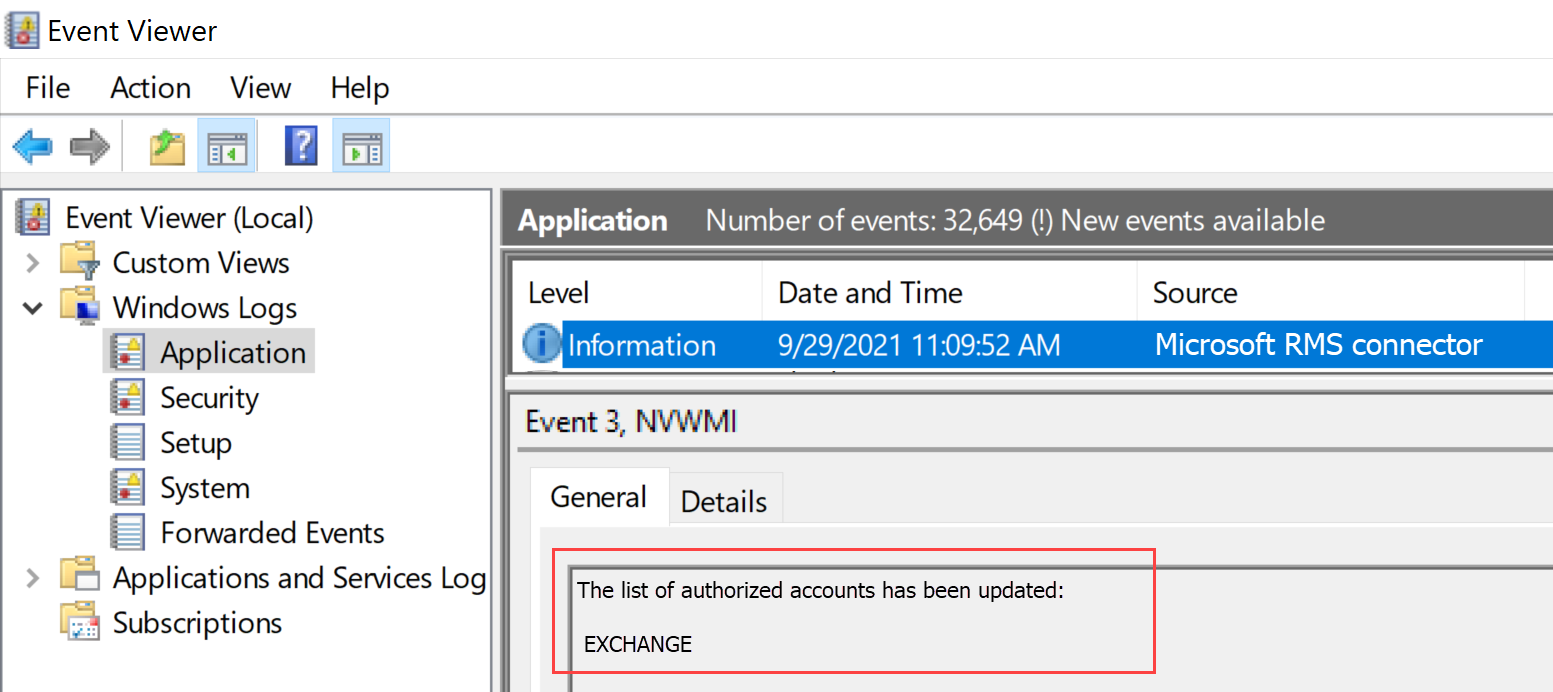
If you need to uninstall the RMS connector, uninstall via the system settings page, or by running the wizard again and selecting the uninstall option.
If you experience any problems during the installation, check the installation log: %LocalAppData%\Temp\Microsoft Rights Management connector_<date and time>.log
For example, your installation log might look similar to C:\Users\Administrator\AppData\Local\Temp\Microsoft Rights Management connector_20170803110352.log
Authorizing servers to use the RMS connector
When you have installed the RMS connector on at least two computers, you are ready to authorize the servers and services that you want to use the RMS connector. For example, servers running Exchange Server 2013 or SharePoint Server 2013.
To define these servers, run the RMS connector administration tool and add entries to the list of allowed servers. You can run this tool when you select Launch connector administration console to authorize servers at the end of the Microsoft Rights Management connector Setup wizard, or you can run it separately from the wizard.
When you authorize these servers, be aware of the following considerations:
Servers that you add are granted special privileges. All accounts that you specify for the Exchange Server role in the connector configuration are granted the super user role in Azure RMS, which gives them access to all content for this RMS tenant. The super user feature is automatically enabled at this point, if necessary. To avoid the security risk of elevation of privileges, be careful to specify only the accounts that are used by your organization’s Exchange servers. All servers configured as SharePoint servers or file servers that use FCI are granted regular user privileges.
You can add multiple servers as a single entry by specifying an Active Directory security or distribution group, or a service account that is used by more than one server. When you use this configuration, the group of servers shares the same RMS certificates and are all be considered owners for content that any of them have protected. To minimize administrative overheads, we recommend that you use this configuration of a single group rather than individual servers to authorize your organization’s Exchange servers or a SharePoint server farm.
On the Servers allowed to utilize the connector page, select Add.
Note
Authorizing servers is the equivalent configuration in Azure RMS to the AD RMS configuration of manually applying NTFS rights to ServerCertification.asmx for the service or server computer accounts, and manually granting user super rights to the Exchange accounts. Applying NTFS rights to ServerCertification.asmx is not required on the connector.
Add a server to the list of allowed servers
On the Allow a server to utilize the connector page, enter the name of the object, or browse to identify the object to authorize.
It is important that you authorize the correct object. For a server to use the connector, the account that runs the on-premises service (for example, Exchange or SharePoint) must be selected for authorization. For example, if the service is running as a configured service account, add the name of that service account to the list. If the service is running as Local System, add the name of the computer object (for example, SERVERNAME$). As a best practice, create a group that contains these accounts and specify the group instead of individual server names.
More information about the different server roles:
For servers that run Exchange: You must specify a security group and you can use the default group (Exchange Servers) that Exchange automatically creates and maintains of all Exchange servers in the forest.
For servers that run SharePoint:
If a SharePoint 2010 server is configured to run as Local System (it's not using a service account), manually create a security group in Active Directory Domain Services, and add the computer name object for the server in this configuration to this group.
If a SharePoint server is configured to use a service account (the recommended practice for SharePoint 2010 and the only option for SharePoint 2016 and SharePoint 2013), do the following:
Add the service account that runs the SharePoint Central Administration service to enable SharePoint to be configured from its administrator console.
Add the account that is configured for the SharePoint App Pool.
Tip
If these two accounts are different, consider creating a single group that contains both accounts to minimize the administrative overheads.
For file servers that use File Classification Infrastructure, the associated services run as the Local System account, so you must authorize the computer account for the file servers (for example, SERVERNAME$) or a group that contains those computer accounts.
When you have finished adding servers to the list, click Close.
If you haven’t already done so, you must now configure load balancing for the servers that have the RMS connector installed, and consider whether to use HTTPS for the connections between these servers and the servers that you have just authorized.
Configuring load balancing and high availability
After you have installed the second or final instance of the RMS connector, define a connector URL server name and configure a load-balancing system.
The connector URL server name can be any name under a namespace that you control. For example, you could create an entry in your DNS system for rmsconnector.contoso.com and configure this entry to use an IP address in your load-balancing system. There are no special requirements for this name and it doesn’t need to be configured on the connector servers themselves. Unless your Exchange and SharePoint servers are going to be communicating with the connector over the internet, this name doesn’t have to resolve on the internet.
Important
We recommend that you don’t change this name after you have configured Exchange or SharePoint servers to use the connector, because you have to then clear these servers of all IRM configurations and then reconfigure them.
After the name is created in DNS and is configured for an IP address, configure load balancing for that address, which directs traffic to the connector servers. You can use any IP-based load balancer for this purpose, which includes the Network Load Balancing (NLB) feature in Windows Server. For more information, see Load Balancing Deployment Guide.
Use the following settings to configure the NLB cluster:
Ports: 80 (for HTTP) or 443 (for HTTPS)
For more information about whether to use HTTP or HTTPS, see the next section.
Affinity: None
Distribution method: Equal
This name that you define for the load-balanced system (for the servers running the RMS connector service) is your organization’s RMS connector name that you use later, when you configure the on-premises servers to use Azure RMS.
Configuring the RMS connector to use HTTPS
Note
This configuration step is optional, but recommended for additional security.
Although the use of TLS or SSL is optional for the RMS connector, we recommend it for any HTTP-based security-sensitive service. This configuration authenticates the servers running the connector to your Exchange and SharePoint servers that use the connector. In addition, all data that is sent from these servers to the connector is encrypted.
To enable the RMS connector to use TLS, on each server that runs the RMS connector, install a server authentication certificate that contains the name that you use for the connector. For example, if your RMS connector name that you defined in DNS is rmsconnector.contoso.com, deploy a server authentication certificate that contains rmsconnector.contoso.com in the certificate subject as the common name. Or, specify rmsconnector.contoso.com in the certificate alternative name as the DNS value. The certificate does not have to include the name of the server. Then in IIS, bind this certificate to the Default Web Site.
If you use the HTTPS option, ensure that all servers that run the connector have a valid server authentication certificate that chains to a root CA that your Exchange and SharePoint servers trust. In addition, if the certification authority (CA) that issued the certificates for the connector servers publishes a certificate revocation list (CRL), the Exchange and SharePoint servers must be able to download this CRL.
Tip
You can use the following information and resources to help you request and install a server authentication certificate, and to bind this certificate to the Default Web Site in IIS:
If you use Active Directory Certificate Services (AD CS) and an enterprise certification authority (CA) to deploy these server authentication certificates, you can duplicate and then use the Web Server certificate template. This certificate template uses Supplied in the request for the certificate subject name, which means that you can provide the FQDN of the RMS connector name for the certificate subject name or subject alternative name when you request the certificate.
If you use a stand-alone CA or purchase this certificate from another company, see Configuring Internet Server Certificates (IIS 7) in the Web Server (IIS) documentation library on TechNet.
To configure IIS to use the certificate, see Add a Binding to a Site (IIS 7) in the Web Server (IIS) documentation library on TechNet.
Configuring the RMS connector for a web proxy server
If your connector servers are installed in a network that does not have direct internet connectivity and requires manual configuration of a web proxy server for outbound internet access, you must configure the registry on these servers for the RMS connector.
To configure the RMS connector to use a web proxy server
On each server running the RMS connector, open a registry editor, such as Regedit.
Navigate to HKEY_LOCAL_MACHINE\SOFTWARE\Microsoft\AADRM\Connector
Add the string value of ProxyAddress and then set the Data for this value to be http://<MyProxyDomainOrIPaddress>:<MyProxyPort>
For example:
https://proxyserver.contoso.com:8080Close the registry editor, and then restart the server or perform an IISReset command to restart IIS.
Installing the RMS connector administration tool on administrative computers
You can run the RMS connector administration tool from a computer that does not have the RMS connector installed, if that computer meets the following requirements:
A physical or virtual computer running Windows Server 2019, 2016, 2012 or Windows Server 2012 R2 (all editions), Windows 11, Windows 10, Windows 8.1, Windows 8.
At least 1 GB of RAM.
A minimum of 64 GB of disk space.
At least one network interface.
Access to the internet via a firewall (or web proxy).
.NET 4.7.2
To install the RMS connector administration tool, run the following file for a 64-bit computer: RMSConnectorSetup.exe
If you haven’t already downloaded these files, you can do so from the Microsoft Download Center.
For more information, see Prerequisites for the RMS connector.
Updating the RMS connector installation
Installing a new version of the RMS connector automatically both uninstalls any earlier versions and installs the required .NET 4.7.2. If you run into any issues, use the following instructions to manually uninstall a previous version and install .NET 4.7.2.
On your RMS connector machine, use the Apps & Features settings page to uninstall the Microsoft Rights Management Connector.
On legacy systems, you may find un-installation options in the Control Panel > Program and Features page.
Navigate through the wizard to uninstall the Microsoft Rights Management connector, selecting Finish at the end.
Verify that your machine has .NET 4.7.2 installed. For more information, see How to: Determine which .NET Framework versions are installed.
If you need to, download and install .NET version 4.7.2.
Restart your machine when prompted, and then continue with installing the new RMS connector version.
Enforce TLS 1.2 for the Azure RMS Connector
Microsoft will disable older, insecure TLS protocols, including TLS 1.0 and TLS 1.1 on RMS Services by default on March 1, 2022. To prepare for this change, you may want to turn off support for these older protocols on your RMS Connector servers and ensure that the system continues to work as expected.
This section describes the steps to disable the Transport Layer Security (TLS) 1.0 and 1.1 on the RMS Connector servers and force the use of TLS 1.2.
Turn off TLS 1.0 and 1.1 and force the use of TLS 1.2
Make sure that the .NET framework on the RMS Connector machine is version 4.7.2. For more information, see .NET framework version 4.7.2.
Download and install the latest available version of RMS Connector. For more information, see Installing the RMS connector.
Reboot your RMS Connector servers, and test the RMS Connector functionality. For example, make sure that on-premises RMS users are able to read their encrypted documents.
For more information, see:
Verify TLS 1.2 usage (advanced)
This procedure provides an example of how to verify that TLS 1.2 is being used, and requires prior knowledge of Fiddler.
Download and install Fiddler on your RMS Connector machine.
Open Fiddler, and then open the Microsoft RMS Connector administration tools.
Select Sign in, although you don't have to actually sign in to complete the verification.
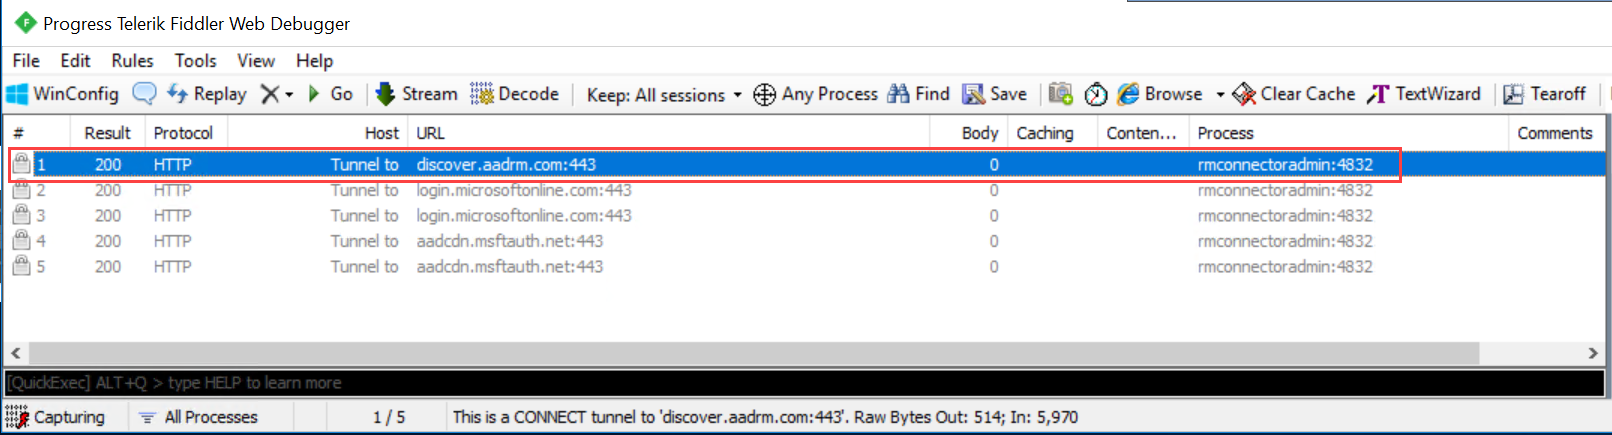
In the Fiddler window on the left, find the msconnectoradmin process. This process should be attempting to establish a secure connection with discover.aadrm.cn.
For example:
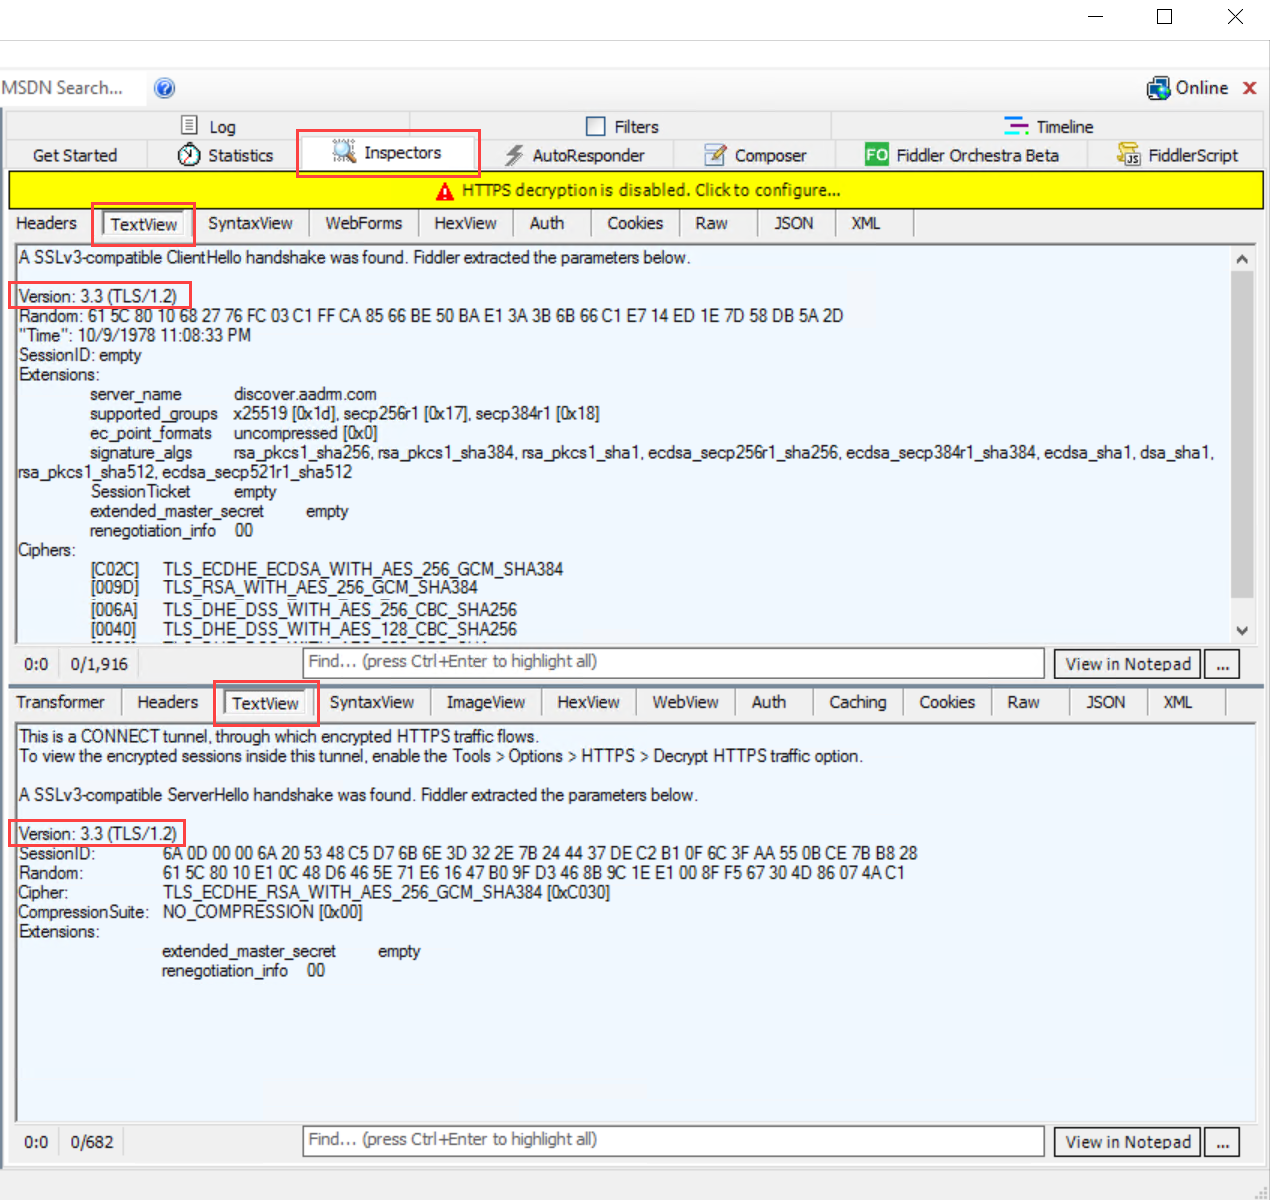
In the Fiddler window on the right, select the Inspectors tab, and view the Text View tabs for both the request and the response.
In those tabs, note that communication is performed using TLS 1.2. For example:
Manually force the use of TLS 1.2
If you need to manually force the use of TLS 1.2, turning off usage for any earlier versions, run the following PowerShell script on your RMS connector machine.
Caution
Using the script in this section turns off pre-TLS 1.2 communication on a per-machine basis. If other services on the machine require TLS 1.0 or 1.2, this script may break functionality on those services.
$ProtocolList = @("SSL 2.0", "SSL 3.0", "TLS 1.0", "TLS 1.1", "TLS 1.2")
$ProtocolSubKeyList = @("Client", "Server")
$DisabledByDefault = "DisabledByDefault"
$Enabled = "Enabled"
$registryPath = "HKLM:\\SYSTEM\CurrentControlSet\Control\SecurityProviders\SCHANNEL\Protocols\"
foreach ($Protocol in $ProtocolList) {
    foreach ($key in $ProtocolSubKeyList) {
        $currentRegPath = $registryPath + $Protocol + "\" + $key
        Write-Host " Current Registry Path $currentRegPath"
        if (!(Test-Path $currentRegPath)) {
            Write-Host "creating the registry"
            New-Item -Path $currentRegPath -Force | out-Null
        }
        if ($Protocol -eq "TLS 1.2") {
            Write-Host "Working for TLS 1.2"
            New-ItemProperty -Path $currentRegPath -Name $DisabledByDefault -Value "0" -PropertyType DWORD -Force | Out-Null
            New-ItemProperty -Path $currentRegPath -Name $Enabled -Value "1" -PropertyType DWORD -Force | Out-Null
        }
        else {
            Write-Host "Working for other protocol"
            New-ItemProperty -Path $currentRegPath -Name $DisabledByDefault -Value "1" -PropertyType DWORD -Force | Out-Null
            New-ItemProperty -Path $currentRegPath -Name $Enabled -Value "0" -PropertyType DWORD -Force | Out-Null
        }
    }
}
Next steps
Now that the RMS connector is installed and configured, you are ready to configure your on-premises servers to use it. Go to Configuring servers for the Microsoft Rights Management connector.