Note
Access to this page requires authorization. You can try signing in or changing directories.
Access to this page requires authorization. You can try changing directories.
In this quickstart, you create a simulated device on your Windows machine. The simulated device is configured to use the symmetric key attestation mechanism for authentication. After you configure your device, you then provision it to your IoT hub using the Azure IoT Hub Device Provisioning Service.
If you're unfamiliar with the process of provisioning, review the provisioning overview.
This quickstart demonstrates a solution for a Windows-based workstation. However, you can also perform the procedures on Linux. For a Linux example, see Tutorial: Provision for geo latency.
Prerequisites
If you don't have an Azure subscription, create a trial subscription before you begin.
Complete the steps in Quickstart: Set up IoT Hub Device Provisioning Service with the Azure portal.
- If you're using a Windows development environment, install Visual Studio 2019 or later with the 'Desktop development with C++' workload enabled. Visual Studio 2015 and Visual Studio 2017 are also supported. For Linux or macOS, see the appropriate section in Prepare your development environment in the SDK documentation.
Install .NET SDK 6.0 or later on your Windows-based machine. You can use the following command to check your version.
dotnet --info
- Install Node.js v4.0+.
- Install Python 3.7 or later installed on your Windows-based machine. You can check your version of Python by running
python --version.
Install Java SE Development Kit 8 or later installed on your machine.
Download and install Maven.
- Install the latest version of Git. Make sure that Git is added to the environment variables accessible to the command window. See Software Freedom Conservancy's Git client tools for the latest version of
gittools to install, which includes Git Bash, the command-line app that you can use to interact with your local Git repository.
Prepare your development environment
In this section, you prepare a development environment that's used to build the Azure IoT C SDK. The sample code attempts to provision the device, during the device's boot sequence.
Download the latest CMake build system.
Important
Confirm that the Visual Studio prerequisites (Visual Studio and the 'Desktop development with C++' workload) are installed on your machine, before starting the
CMakeinstallation. Once the prerequisites are in place, and the download is verified, install the CMake build system. Also, older versions of the CMake build system fail to generate the solution file used in this article. Make sure to use the latest version of CMake.Open a web browser, and go to the Release page of the Azure IoT C SDK.
Select the Tags tab at the top of the page.
Copy the tag name for the latest release of the Azure IoT C SDK.
Open a command prompt or Git Bash shell. Run the following commands to clone the latest release of the Azure IoT Device SDK for C GitHub repository. Replace
<release-tag>with the tag you copied in the previous step, for example:lts_03_2025.git clone -b <release-tag> https://github.com/Azure/azure-iot-sdk-c.git cd azure-iot-sdk-c git submodule update --initThis operation could take several minutes to complete.
When the operation is complete, run the following commands from the
azure-iot-sdk-cdirectory:mkdir cmake cd cmakeThe code sample uses a symmetric key to provide attestation. Run the following command to build a version of the SDK specific to your development client platform that includes the device provisioning client:
cmake -Dhsm_type_symm_key:BOOL=ON -Duse_prov_client:BOOL=ON ..Tip
If
cmakedoesn't find your C++ compiler, you might get build errors while running the previous command. If that happens, try running the command in the Visual Studio command prompt.When the build completes successfully, the last few output lines look similar to the following output:
$ cmake -Dhsm_type_symm_key:BOOL=ON -Duse_prov_client:BOOL=ON  ..
-- Building for: Visual Studio 16 2019
-- Selecting Windows SDK version 10.0.19041.0 to target Windows 10.0.19042.
-- The C compiler identification is MSVC 19.29.30040.0
-- The CXX compiler identification is MSVC 19.29.30040.0

...

-- Configuring done
-- Generating done
-- Build files have been written to: E:/IoT Testing/azure-iot-sdk-c/cmake
Open a Git CMD or Git Bash command-line environment.
Clone the Azure IoT SDK for .NET GitHub repository using the following command:
git clone https://github.com/Azure/azure-iot-sdk-csharp.git
Open a Git CMD or Git Bash command-line environment.
Clone the Azure IoT Node.js SDK GitHub repository using the following command:
git clone https://github.com/Azure/azure-iot-sdk-node.git --recursive
Open a Git CMD or Git Bash command-line environment.
Clone the Azure IoT Python SDK GitHub repository using the following command:
git clone -b v2 https://github.com/Azure/azure-iot-sdk-python.git --recursiveNote
The samples used in this tutorial are in the v2 branch of the azure-iot-sdk-python repository. The v3 branch of the Python SDK is available to use in beta.
Open a Git CMD or Git Bash command-line environment.
Clone the Azure IoT SDK for Java GitHub repository using the following command:
git clone https://github.com/Azure/azure-iot-sdk-java.git --recursiveGo to the root
azure-iot-sdk-javadirectory and build the project to download all needed packages. This step can take several minutes to complete.cd azure-iot-sdk-java mvn install -DskipTests=true
Create a device enrollment
The Azure IoT Device Provisioning Service supports two types of enrollments:
- Enrollment groups: Used to enroll multiple related devices.
- Individual enrollments: Used to enroll a single device.
This article demonstrates an individual enrollment for a single device to be provisioned with an IoT hub.
Sign in to the Azure portal and navigate to your Device Provisioning Service instance.
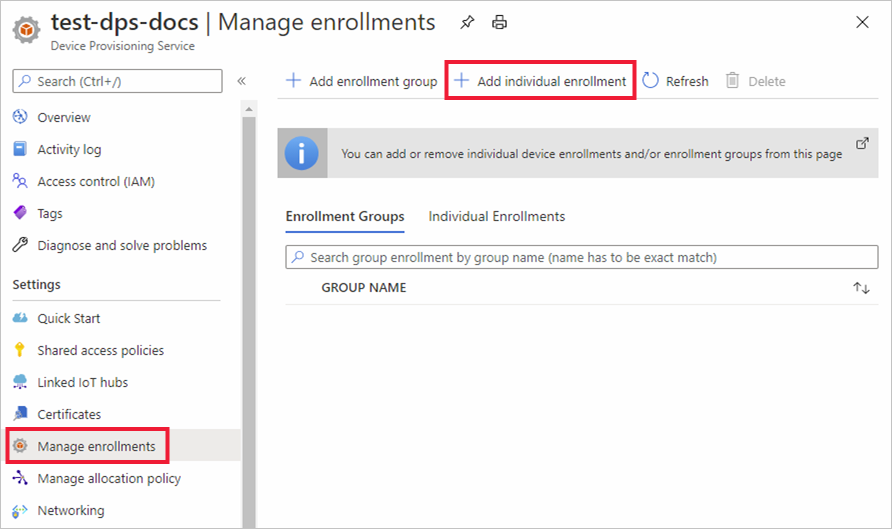
Select Manage enrollments from the Settings section of the navigation menu.
Select the Individual enrollments tab, then select Add individual enrollment.
On the Registration + provisioning of the Add enrollment page, provide the following information to configure the enrollment details:
Field Description Attestation Select Symmetric key as the Attestation mechanism. Symmetric key settings Check the Generate symmetric keys automatically box if you want to use randomly generated keys. Uncheck this box if you want to provide your own keys. Registration ID Provide a unique registration ID for the device. Provisioning status Check the Enable this enrollment box if you want this enrollment to be available to provision its device. Uncheck this box if you want the enrollment to be disabled. You can change this setting later. Reprovision policy Choose a reprovision policy that reflects how you want DPS to handle devices that request reprovisioning. For more information, see Reprovision policies. Select Next: IoT hubs.
On the IoT hubs tab of the Add enrollment page, provide the following information to determine which IoT hubs the enrollment can provision devices to:
Field Description Target IoT hubs Select one or more of your linked IoT hubs, or add a new link to an IoT hub. To learn more about linking IoT hubs to your DPS instance, see How to link and manage IoT hubs. Allocation policy If you selected more than one linked IoT hub, select how you want to assign devices to the different hubs. To learn more about allocation policies, see How to use allocation policies.
If you selected only one linked IoT hub, we recommend using the Evenly weighted distribution policy.Select Next: Device settings
On the Device settings tab of the Add enrollment page, provide the following information to define how newly provisioned devices are configured:
Field Description Device ID Provide a device ID that is assigned to the provisioned device in IoT Hub. If you don't provide a device ID, the registration ID is used. IoT Edge Check the Enable IoT Edge on provisioned devices if the provisioned device run Azure IoT Edge. Uncheck this box if this enrollment is for a non-IoT Edge-enabled device. Device tags Use this text box to provide any tags that you want to apply to the device twin of the provisioned device. Desired properties Use this text box to provide any desired properties that you want to apply to the device twin of the provisioned device. For more information, see Understand and use device twins in IoT Hub.
Select Next: Review + create.
On the Review + create tab, verify all of your values then select Create.
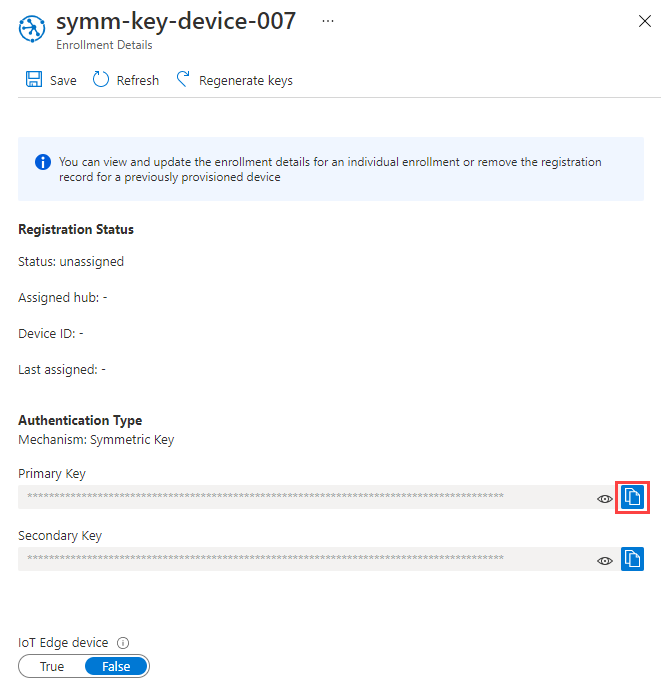
Once you create the individual enrollment, a primary key and secondary key are generated and added to the enrollment entry. You use the primary key in the device sample later in this quickstart.
To view your simulated symmetric key device enrollment, select the Individual enrollments tab.
Select your device's registration ID from the list of individual enrollments.
Copy the value of the generated Primary key.
Prepare and run the device provisioning code
In this section, you update the device sample code to send the device's boot sequence to your Device Provisioning Service instance. This boot sequence causes the device to be recognized, authenticated, and assigned to an IoT hub linked to the Device Provisioning Service instance.
The sample provisioning code accomplishes the following tasks, in order:
Authenticates your device with your Device Provisioning resource using the following three parameters:
- The ID Scope of your Device Provisioning Service instance
- The registration ID for your device enrollment.
- The primary symmetric key for your device enrollment.
Assigns the device to the IoT hub already linked to your Device Provisioning Service instance.
To update and run the provisioning sample with your device information:
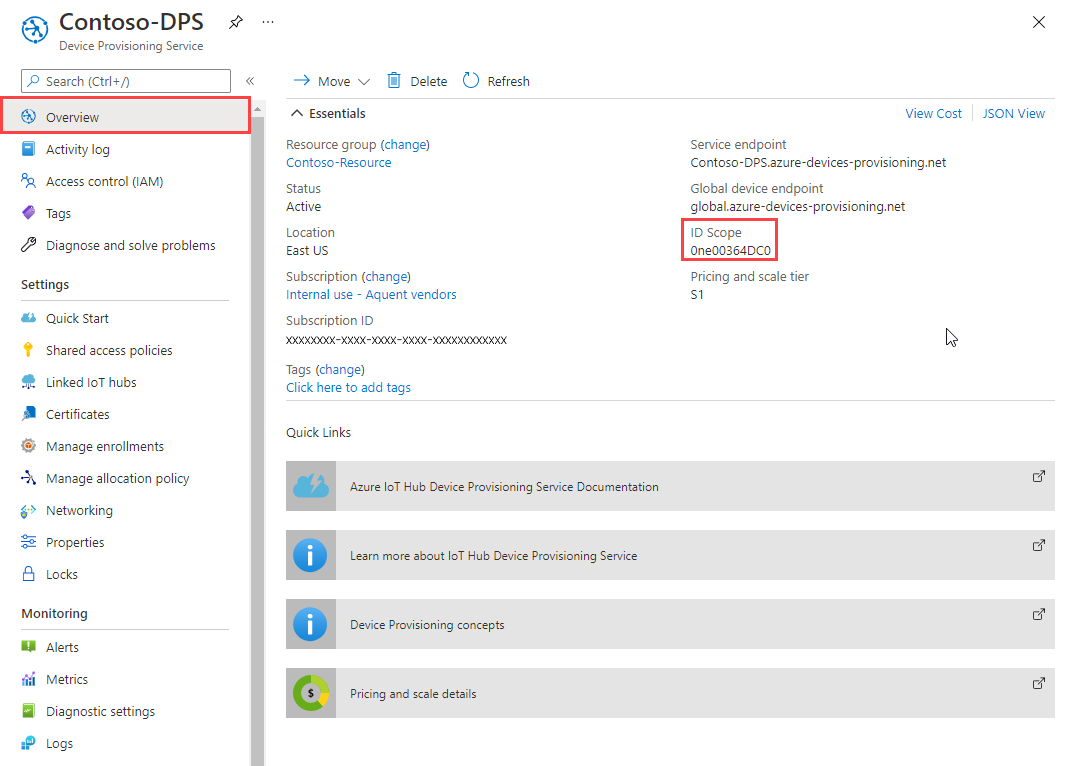
In the service menu of your Device Provisioning Service instance, select Overview.
Copy the ID Scope value.
In Visual Studio, open the azure_iot_sdks.sln solution file that was generated by running CMake. The solution file should be in the following location:
\azure-iot-sdk-c\cmake\azure_iot_sdks.slnTip
If the file wasn't generated in your cmake directory, make sure you used a recent version of the CMake build system.
In Visual Studio's Solution Explorer window, go to the Provision_Samples folder. Expand the sample project named prov_dev_client_sample. Expand Source Files, and open prov_dev_client_sample.c.
Find the
id_scopeconstant, and replace the value with the ID Scope value that you copied in step 2.static const char* id_scope = "0ne00002193";Find the definition for the
main()function in the same file. Make sure thehsm_typevariable is set toSECURE_DEVICE_TYPE_SYMMETRIC_KEYas shown in the following example:SECURE_DEVICE_TYPE hsm_type; //hsm_type = SECURE_DEVICE_TYPE_TPM; //hsm_type = SECURE_DEVICE_TYPE_X509; hsm_type = SECURE_DEVICE_TYPE_SYMMETRIC_KEY;Find the call to
prov_dev_set_symmetric_key_info()in prov_dev_client_sample.c that is commented out.// Set the symmetric key if using they auth type //prov_dev_set_symmetric_key_info("<symm_registration_id>", "<symmetric_Key>");Uncomment the function call, and replace the placeholder values (including the angle brackets) with your device's registration ID and the primary key value you copied earlier.
// Set the symmetric key if using they auth type
prov_dev_set_symmetric_key_info("symm-key-device-007", "your primary key here");
Save the file.
Right-click the prov_dev_client_sample project and select Set as Startup Project.
On the Visual Studio menu, select Debug > Start without debugging to run the solution. In the rebuild the project prompt, select Yes to rebuild the project before running.
The following output is an example of the device successfully connecting to the provisioning Service instance to be assigned to an IoT hub:
Provisioning API Version: 1.2.8

Registering Device

Provisioning Status: PROV_DEVICE_REG_STATUS_CONNECTED
Provisioning Status: PROV_DEVICE_REG_STATUS_ASSIGNING

Registration Information received from service:
test-docs-hub.azure-devices.cn, deviceId: device-007
Press enter key to exit:
The sample provisioning code accomplishes the following tasks:
Authenticates your device with your Device Provisioning resource using the following three parameters:
- The ID Scope of your Device Provisioning Service instance
- The registration ID for your device enrollment.
- The primary symmetric key for your device enrollment.
Assigns the device to the IoT hub already linked to your Device Provisioning Service instance.
Sends a test message to the IoT hub.
To update and run the provisioning sample with your device information:
In the service menu of your Device Provisioning Service instance, select Overview.
Copy the ID Scope value.

Open a command prompt and go to the SymmetricKeySample in the cloned sdk repository:
cd '.\azure-iot-sdk-csharp\provisioning\device\samples\how to guides\SymmetricKeySample\'In the SymmetricKeySample folder, open Parameters.cs in a text editor. This file shows the available parameters for the sample. Only the first three required parameters are used in this article when running the sample. Review the code in this file. No changes are needed.
Parameter Required Description --ior--IdScopeTrue The ID Scope of the DPS instance --ror--RegistrationIdTrue The registration ID is a case-insensitive string (up to 128 characters long) of alphanumeric characters plus the special characters: '-','.','_',':'. The last character must be alphanumeric or dash ('-').--por--PrimaryKeyTrue The primary key of the individual enrollment or the derived device key of the group enrollment. See the ComputeDerivedSymmetricKeySample for how to generate the derived key. --gor--GlobalDeviceEndpointFalse The global endpoint for devices to connect to. Defaults to global.azure-devices-provisioning.net--tor--TransportTypeFalse The transport to use to communicate with the device provisioning instance. Defaults to Mqtt. Possible values includeMqtt,Mqtt_WebSocket_Only,Mqtt_Tcp_Only,Amqp,Amqp_WebSocket_Only,Amqp_Tcp_only, andHttp1.In the SymmetricKeySample folder, open ProvisioningDeviceClientSample.cs in a text editor. This file shows how the SecurityProviderSymmetricKey class is used along with the ProvisioningDeviceClient class to provision your simulated symmetric key device. Review the code in this file. No changes are needed.
Build and run the sample code using the following command:
- Replace
<id-scope>with the ID Scope that you copied in step 2. - Replace
<registration-id>with the Registration ID that you provided for the device enrollment. - Replace
<primarykey>with the Primary Key that you copied from the device enrollment.
dotnet run --i <id-scope> --r <registration-id> --p <primarykey>- Replace
You should now see something similar to the following output. A "TestMessage" string is sent to the hub as a test message.
D:\azure-iot-sdk-csharp\provisioning\device\samples\how to guides\SymmetricKeySample>dotnet run --i 0ne00000A0A --r symm-key-csharp-device-01 --p sbDDeEzRuEuGKag+kQKV+T1QGakRtHpsERLP0yPjwR93TrpEgEh/Y07CXstfha6dhIPWvdD1nRxK5T0KGKA+nQ==

Initializing the device provisioning client...
Initialized for registration Id symm-key-csharp-device-01.
Registering with the device provisioning service...
Registration status: Assigned.
Device csharp-device-01 registered to ExampleIoTHub.azure-devices.cn.
Creating symmetric key authentication for IoT Hub...
Testing the provisioned device with IoT Hub...
Sending a telemetry message...
Finished.
Enter any key to exit.
The sample provisioning code accomplishes the following tasks, in order:
Authenticates your device with your Device Provisioning resource using the following four parameters:
PROVISIONING_HOSTPROVISIONING_IDSCOPEPROVISIONING_REGISTRATION_IDPROVISIONING_SYMMETRIC_KEY
Assigns the device to the IoT hub already linked to your Device Provisioning Service instance.
Sends a test message to the IoT hub.
To update and run the provisioning sample with your device information:
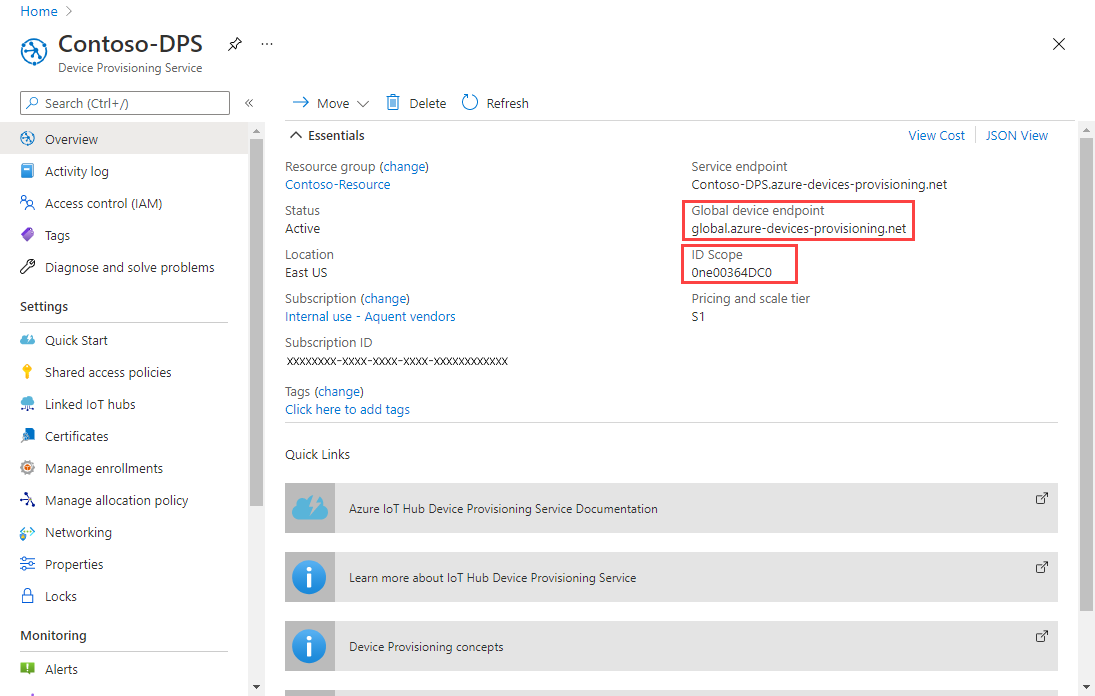
In the service menu of your Device Provisioning Service instance, select Overview.
Copy the ID Scope and Global device endpoint values.
Open a command prompt for executing Node.js commands, and go to the following directory:
cd azure-iot-sdk-node/provisioning/device/samplesIn the provisioning/device/samples folder, open register_symkey.js and review the code. Notice that the sample code sets a custom payload:
provisioningClient.setProvisioningPayload({a: 'b'});You can comment out this payload code for this quickstart. A custom payload would be required if you wanted to use a custom allocation function to assign your device to an IoT hub. For more information, see Tutorial: Use custom allocation policies.
The
provisioningClient.register()method attempts the registration of your device.No further changes are needed.
In the command prompt, run the following commands to set environment variables used by the sample:
- Replace
<provisioning-global-endpoint>with the Global device endpoint that you copied in step 2. - Replace
<id-scope>with the ID Scope that you copied in step 2. - Replace
<registration-id>with the Registration ID that you provided for the device enrollment. - Replace
<primarykey>with the Primary Key that you copied from the device enrollment.
set PROVISIONING_HOST=<provisioning-global-endpoint>set PROVISIONING_IDSCOPE=<id-scope>set PROVISIONING_REGISTRATION_ID=<registration-id>set PROVISIONING_SYMMETRIC_KEY=<primarykey>- Replace
Build and run the sample code using the following commands:
npm installnode register_symkey.jsYou should now see something similar to the following output. A "Hello World" string is sent to the hub as a test message.
D:\azure-iot-samples-csharp\provisioning\device\samples>node register_symkey.js
registration succeeded
assigned hub=ExampleIoTHub.azure-devices.cn
deviceId=nodejs-device-01
payload=undefined
Client connected
send status: MessageEnqueued
The sample provisioning code accomplishes the following tasks, in order:
Authenticates your device with your Device Provisioning resource using the following four parameters:
PROVISIONING_HOSTPROVISIONING_IDSCOPEPROVISIONING_REGISTRATION_IDPROVISIONING_SYMMETRIC_KEY
Assigns the device to the IoT hub already linked to your Device Provisioning Service instance.
Sends a test message to the IoT hub.
To update and run the provisioning sample with your device information:
In the service menu of your Device Provisioning Service instance, select Overview.
Copy the ID Scope and Global device endpoint values.

Open a command prompt and go to the directory where the sample file, provision_symmetric_key.py, is located.
cd azure-iot-sdk-python\samples\async-hub-scenariosIn the command prompt, run the following commands to set environment variables used by the sample:
- Replace
<provisioning-global-endpoint>with the Global device endpoint that you copied in step 2. - Replace
<id-scope>with the ID Scope that you copied in step 2. - Replace
<registration-id>with the Registration ID that you provided for the device enrollment. - Replace
<primarykey>with the Primary Key that you copied from the device enrollment.
set PROVISIONING_HOST=<provisioning-global-endpoint>set PROVISIONING_IDSCOPE=<id-scope>set PROVISIONING_REGISTRATION_ID=<registration-id>set PROVISIONING_SYMMETRIC_KEY=<primarykey>- Replace
Install the azure-iot-device library by running the following command.
pip install azure-iot-deviceRun the Python sample code in provision_symmetric_key.py.
python provision_symmetric_key.pyYou should now see something similar to the following output. Some example wind speed telemetry messages are also sent to the hub as a test.
D:\azure-iot-sdk-python\samples\async-hub-scenarios>python provision_symmetric_key.py
RegistrationStage(RequestAndResponseOperation): Op will transition into polling after interval 2. Setting timer.
The complete registration result is
python-device-008
docs-test-iot-hub.azure-devices.cn
initialAssignment
null
Will send telemetry from the provisioned device
sending message #8
sending message #9
sending message #3
sending message #10
sending message #4
sending message #2
sending message #6
sending message #7
sending message #1
sending message #5
done sending message #8
done sending message #9
done sending message #3
done sending message #10
done sending message #4
done sending message #2
done sending message #6
done sending message #7
done sending message #1
done sending message #5
The sample provisioning code accomplishes the following tasks, in order:
Authenticates your device with your Device Provisioning resource using the following four parameters:
GLOBAL_ENDPOINTSCOPE_IDREGISTRATION_IDSYMMETRIC_KEY
Assigns the device to the IoT hub already linked to your Device Provisioning Service instance.
Sends a test message to the IoT hub.
To update and run the provisioning sample with your device information:
In the service menu of your Device Provisioning Service instance, select Overview.
Copy the ID Scope and Global device endpoint values. These values are your
SCOPE_IDandGLOBAL_ENDPOINTparameters, respectively.
Open the Java device sample code for editing. The full path to the device sample code is:
azure-iot-sdk-java/provisioning/provisioning-device-client-samples/provisioning-symmetrickey-individual-sample/src/main/java/samples/com/microsoft/azure/sdk/iot/ProvisioningSymmetricKeyIndividualEnrollmentSample.javaSet the value of the following variables for your DPS and device enrollment:
- Replace
<id-scope>with the ID Scope that you copied in step 2. - Replace
<provisioning-global-endpoint>with the Global device endpoint that you copied in step 2. - Replace
<registration-id>with the Registration ID that you provided for the device enrollment. - Replace
<primarykey>with the Primary Key that you copied from the device enrollment.
private static final String SCOPE_ID = "<id-scope>"; private static final String GLOBAL_ENDPOINT = "<provisioning-global-endpoint>"; private static final String SYMMETRIC_KEY = "<primarykey>"; private static final String REGISTRATION_ID = "<registration-id>";- Replace
Open a command prompt for building. Go to the provisioning sample project folder of the Java SDK repository.
cd azure-iot-sdk-java\provisioning\provisioning-device-client-samples\provisioning-symmetrickey-individual-sampleBuild the sample.
mvn clean installGo to the
targetfolder and execute the created.jarfile. In thejavacommand, replace the{version}placeholder with the version in the.jarfilename on your machine.cd target java -jar ./provisioning-symmetrickey-individual-sample-{version}-with-deps.jarYou should now see something similar to the following output.
Starting...
Beginning setup.
Initialized a ProvisioningDeviceClient instance using SDK version 1.11.0
Starting provisioning thread...
Waiting for Provisioning Service to register
Opening the connection to device provisioning service...
Connection to device provisioning service opened successfully, sending initial device registration message
Authenticating with device provisioning service using symmetric key
Waiting for device provisioning service to provision this device...
Current provisioning status: ASSIGNING
Device provisioning service assigned the device successfully
IotHUb Uri : <Your IoT hub name>.azure-devices.cn
Device ID : java-device-007
Sending message from device to IoT Hub...
Press any key to exit...
Message received! Response status: OK_EMPTY
Confirm your device provisioning registration
Go to the Azure portal.
On the portal menu or on the portal page, select All resources.
Select the IoT hub to which your device was assigned.
In the service menu, under Device management, select Devices.
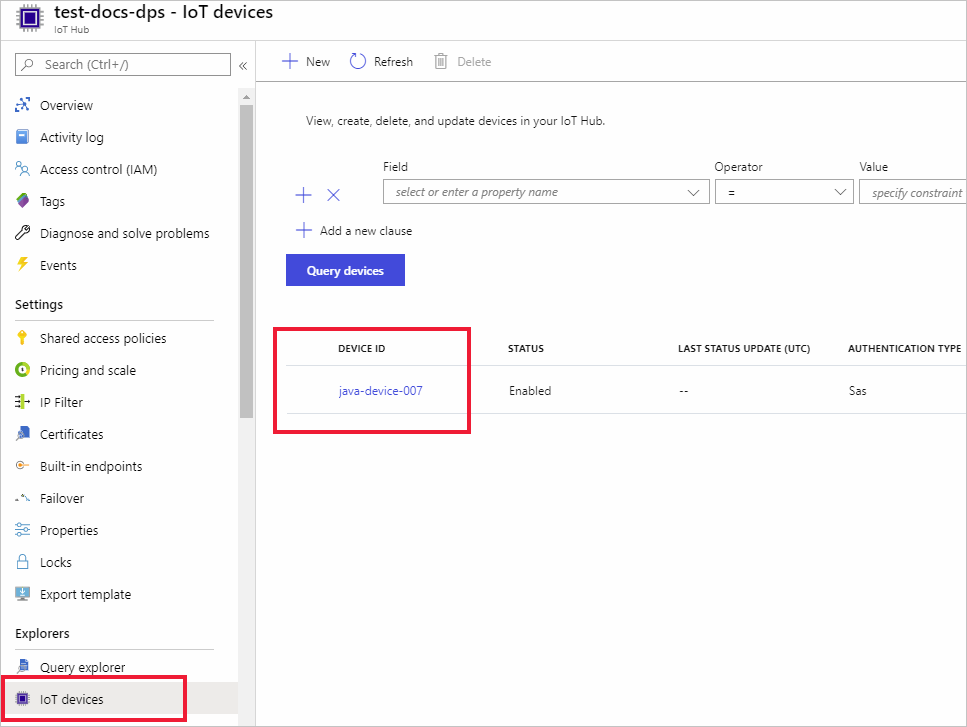
If your device was provisioned successfully, the device ID should appear in the list, with Status set as Enabled. If you don't see your device, select Refresh at the top of the pane.
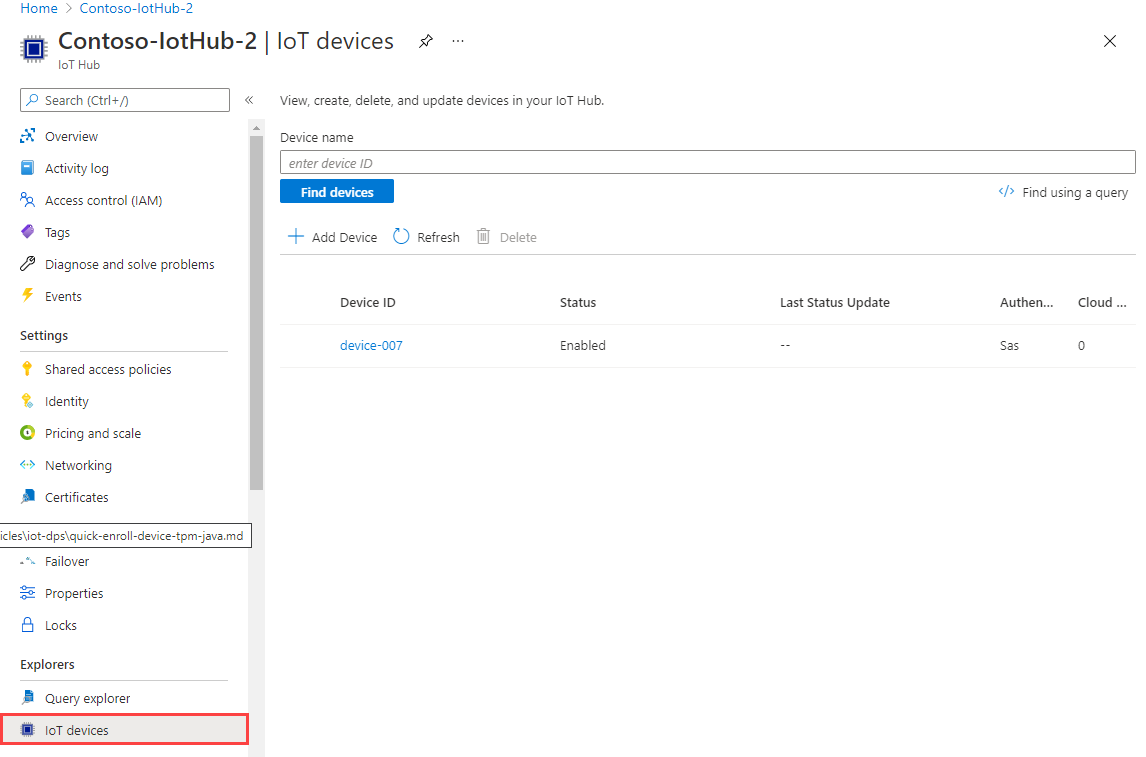
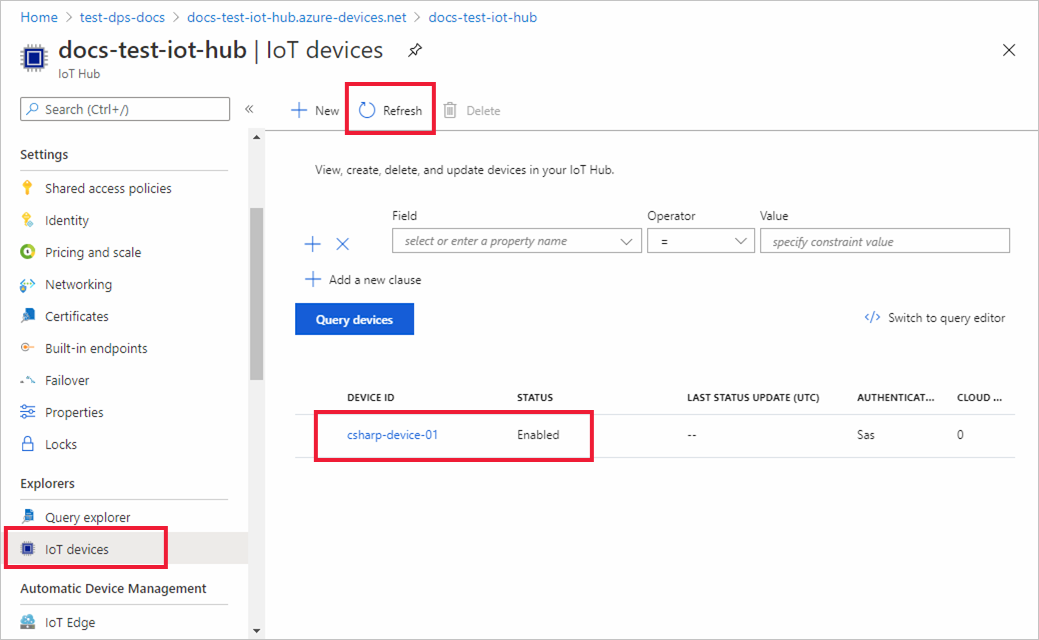
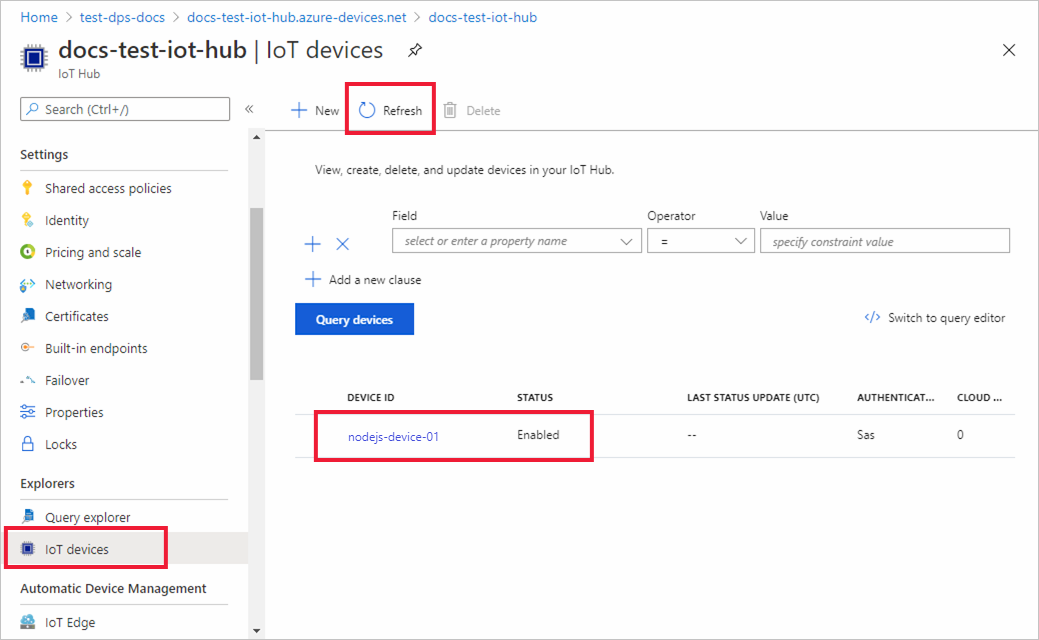
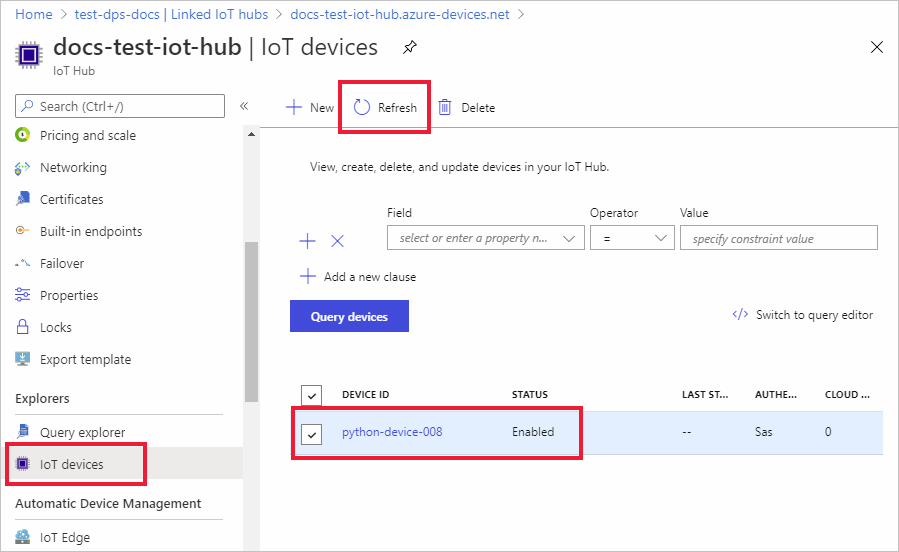
Note
If you changed the initial device twin state from the default value in the enrollment entry for your device, it can pull the desired twin state from the hub and act accordingly. For more information, see Understand and use device twins in IoT Hub.
Clean up resources
If you plan to continue working on and exploring the device client sample, don't clean up the resources created in this quickstart. If you don't plan to continue, use the following steps to delete all resources created by this quickstart.
Delete your device enrollment
Close the device client sample output window on your machine.
From the portal menu in the Azure portal, select All resources.
Select your Device Provisioning Service instance.
In the service menu, under Settings, select Manage enrollments.
In the working pane, select the Individual enrollments tab.
Select the check box next to the registration ID of the device you enrolled in this quickstart.
At the top of the pane, select Delete.
Delete your device registration from IoT Hub
From the portal menu in the Azure portal, select All resources.
Select your IoT hub.
In the service menu, under Device management, select Devices.
In the working pane, select the check box next to the device ID of the device you registered in this quickstart.
At the top of the pane, select Delete.
Next steps
In this quickstart, you provisioned a single device to your IoT hub using an individual enrollment. Next, learn how to provision multiple devices across multiple hubs.