Note
Access to this page requires authorization. You can try signing in or changing directories.
Access to this page requires authorization. You can try changing directories.
IoT Hub uses X.509 certificates to authenticate devices. X.509 authentication allows authentication of an IoT device as part of the Transport Layer Security (TLS) standard connection establishment.
This article describes how to use third-party managed X.509 CA certificates to authenticate devices connecting to IoT Hub.
Authentication and authorization
Authentication is the process of proving that you're who you say you are. Authentication verifies the identity of a user or device to IoT Hub. It's sometimes shortened to AuthN.
Authorization is the process of confirming permissions for an authenticated user or device on IoT Hub. It specifies what resources and commands you're allowed to access, and what you can do with those resources and commands. Authorization is sometimes shortened to AuthZ.
X.509 certificates are only used for authentication in IoT Hub, not authorization. Unlike with Microsoft Entra ID and shared access signatures, you can't customize permissions with X.509 certificates.
Microsoft vs third-party PKI
Public key infrastructure (PKI) uses digital certificates to authenticate and encrypt data between devices and services. PKI certificates secure scenarios like VPN, Wi-Fi, email, web, and device identity. Managing PKI certificates is challenging, costly, and complex, especially for organizations with many devices and users.
IoT Hub supports two types of PKI providers for X.509 certificate authentication:
| PKI provider | Integration required | Azure Device Registry (ADR) required | Device Provisioning Service (DPS) required |
|---|---|---|---|
| Azure-managed PKI | No. Configure certificate authorities directly in Azure Device Registry (ADR). | Yes | Yes |
| Third-party PKI (DigiCert, GlobalSign, etc.) | Yes. Manual integration required. | No | No |
Types of certificate authentication
An X.509 certificate authority (CA) certificate is a digital certificate that can sign other certificates. A digital certificate is considered an X.509 certificate if it conforms to the certificate formatting standard prescribed by IETF's RFC 5280 standard.
The X.509 CA feature enables device authentication to IoT Hub using a certificate authority (CA). It simplifies the initial device enrollment process and supply chain logistics during device manufacturing.
You can use any X.509 certificate to authenticate a device with IoT Hub by uploading either a certificate thumbprint or a certificate authority (CA) to IoT Hub.
X.509 CA signed - This option is recommended for production scenarios and is the focus of this article.
If your device has a CA-signed X.509 certificate, then you upload a root or intermediate CA certificate in the signing chain to IoT Hub before you register the device. The device has an X.509 certificate with the verified X.509 CA in its certificate chain of trust. When the device connects, it presents its full certificate chain and the IoT hub can validate it because it knows the X.509 CA. Multiple devices can authenticate against the same verified X.509 CA.
X.509 self-signed
If your device has a self-signed X.509 certificate, then you give IoT Hub a version of the certificate for authentication. When you register a device, you upload a certificate thumbprint, which is a hash of the device's X.509 certificate. When the device connects, it presents its certificate and the IoT hub can validate it against the hash it knows.
Enforce X.509 authentication
For extra security, an IoT hub can be configured to not allow SAS authentication for devices and modules, leaving X.509 as the only accepted authentication option. Currently, this feature isn't available in Azure portal. To configure, set disableDeviceSAS and disableModuleSAS to true on the IoT Hub resource properties:
az resource update -n <iothubName> -g <resourceGroupName> --resource-type Microsoft.Devices/IotHubs --set properties.disableDeviceSAS=true properties.disableModuleSAS=true
Benefits of X.509 CA certificate authentication
IoT Hub requires a unique identity for every device that connects. For certificate-based authentication, these identities are in the form of certificates.
A valid but inefficient way to provide a unique certificate on each device is to pregenerate certificates and to give all supply chain partners the corresponding private keys. This method comes with challenges that must be overcome to ensure trust, as follows:
Having to share device private keys with supply chain partners, besides ignoring PKI best practices of never sharing private keys, makes building trust in the supply chain expensive. It requires systems like secure rooms to house device private keys and processes like periodic security audits. Both add cost to the supply chain.
Securely accounting for devices in the supply chain, and later managing them in deployment through device retirement, becomes a one-to-one task for every key-to-device pair. This relationship precludes group management of devices unless the concept of groups is explicitly built into the process somehow. Secure accounting and device life-cycle management, therefore, becomes a heavy operations burden.
X.509 CA certificate authentication offers elegant solutions to these challenges by using certificate chains. A certificate chain results from a CA signing an intermediate CA that in turn signs another intermediate CA, and so on, until a final intermediate CA signs a device. Certificate chains create a one-to-many relationship between a CA certificate and its downstream devices. This relationship lets you register of any number of devices into IoT Hub by registering an X.509 CA certificate once.
X.509 CA authentication also simplifies supply chain logistics. A typical device manufacturing flow involves multiple steps and custodians. By using certificate authorities, you can sign each custodian into a cryptographic chain of trust rather than entrusting them with device private keys. Each custodian signs devices at their respective step of the manufacturing flow. The overall result is an optimal supply chain with built-in accountability through use of the cryptographic chain of trust.
This process yields the most security when devices protect their unique private keys. To this end, we recommend using Hardware Secure Modules (HSM) capable of internally generating private keys.
X.509 certificate flow
This section describes how to use X.509 CA certificates to authenticate devices connecting to IoT Hub, which includes the following steps:
- Get an X.509 CA certificate.
- Sign devices using X.509 CA certificates.
- Register the X.509 CA certificate to IoT Hub.
- Authenticate devices signed with X.509 CAs.
- Revoke a device certificate if it's compromised.
Get an X.509 CA certificate
The X.509 CA certificate is the top of the chain of certificates for each of your devices. You can purchase or create one depending on how you intend to use it.
For production environments, we recommend that you purchase an X.509 CA certificate from a professional certificate services provider.
You can also create a self-signed X.509 CA certificate for testing purposes. For more information about creating certificates for testing, see Create and upload certificates for testing. We don't recommend self-signed certificates for production environments.
Regardless of how you obtain your X.509 CA certificate, make sure to keep its corresponding private key secret and protected always.
Purchase a certificate
Purchasing a CA certificate has the benefit of having a well-known root CA act as a trusted third party to vouch for the legitimacy of IoT devices when the devices connect. Choose this option if your devices re part of an open IoT network where they interact with third-party products or services.
To purchase an X.509 CA certificate, choose a root certificate service provider. The root CA provider guides you on how to create the public/private key pair and how to generate a certificate signing request (CSR) for their services. A CSR is the formal process of applying for a certificate from a certificate authority. The outcome of this purchase is a certificate for use as an authority certificate. Given the ubiquity of X.509 certificates, the certificate is likely to have been properly formatted to IETF's RFC 5280 standard.
Create a self-signed certificate
The process to create a self-signed X.509 CA certificate is similar to purchasing one, except that it doesn't involve a third-party signer like the root certificate authority.
You might choose this option for testing until you're ready to purchase an authority certificate. You could also use a self-signed X.509 CA certificate in production if your devices don't connect to any third-party services outside of IoT Hub.
Sign devices into the certificate chain of trust
The owner of an X.509 CA certificate can cryptographically sign an intermediate CA that can in turn sign another intermediate CA, and so on, until the last intermediate CA signs a device certificate. The result is a cascaded chain of certificates known as a certificate chain of trust. This delegation of trust is important because it establishes a chain of custody and avoids the sharing of signing keys.
This cascade of certificates in the chain represents the logical hand-off of authority. Many supply chains follow this logical hand-off whereby each intermediate CA gets signed into the chain while receiving all upstream CA certificates. The last intermediate CA finally signs each device and injects all the authority certificates from the chain into the device.
The device certificate (also called a leaf certificate) must have its common name (CN) set to the device ID (CN=deviceId) that is used when registering the IoT device in Azure IoT Hub. This setting is required for authentication.
For modules using X.509 authentication, the module's certificate must have its common name (CN) formatted like CN=deviceId/moduleId.
Learn how to create a certificate chain as done when signing devices.
Register the X.509 CA certificate to IoT Hub
Register your X.509 CA certificate to IoT Hub, which uses it to authenticate your devices. An X.509 CA certificate can authenticate any device that has the CA in its certificate chain of trust. Registering the X.509 CA certificate is a two-step process that includes uploading the certificate file and then establishing proof of possession.
The upload process entails uploading a file that contains your certificate. This file should never contain any private keys.
The proof of possession step involves a cryptographic challenge and response process between you and IoT Hub to verify that you really own the CA certificate. You can choose to either automatically or manually verify ownership. For manual verification, IoT Hub generates a random challenge that you sign with the CA certificate's private key. If you kept the private key secret and protected as recommended, then only you possess the knowledge to complete this step. Secrecy of private keys is the source of trust in this method. After signing the challenge, you upload a file containing the results to complete verification.
Learn how to register your CA certificate.
Authenticate devices signed with X.509 CA certificates
With your X.509 CA certificate registered and devices signed with a certificate chain of trust, the final step is device authentication. When an X.509 CA-signed device connects, it uploads its certificate chain for validation. With this information, IoT Hub authenticates the device in a two-step process.
First, IoT Hub cryptographically validates the certificate chain for internal consistency. Then, IoT Hub issues a proof-of-possession challenge to the device. IoT Hub declares the device authentic on a successful proof-of-possession response from the device. This declaration assumes that the device's private key is protected and that only the device can successfully respond to this challenge. We recommend using secure chips like Hardware Secure Modules (HSM) in devices to protect private keys.
A successful device connection to IoT Hub completes the authentication process and is also indicative of a proper setup. Every time a device connects, IoT Hub renegotiates the TLS session and verifies the device’s X.509 certificate.
Revoke a device certificate
IoT Hub doesn't check certificate revocation lists from the certificate authority when authenticating devices with certificate-based authentication. If you have a device that needs to be blocked from connecting to IoT Hub because of a potentially compromised certificate, disable the device in the identity registry. For more information, see Disable or delete a device.
Example scenario
Company-X makes Smart-X-Widgets that are designed for professional installation. Company-X outsources both manufacturing and installation. Factory-Y manufactures the Smart-X-Widgets and Technician-Z installs them. Company-X wants the Smart-X-Widget shipped directly from Factory-Y to Technician-Z for installation and then for it to connect directly to Company-X's instance of IoT Hub. To make this happen, Company-X need to complete a few one-time setup operations to prepare the Smart-X-Widget for automatic connection. This end-to-end scenario includes the following steps:
Get the X.509 CA certificate
Register the X.509 CA certificate to IoT Hub
Sign devices into a certificate chain of trust
Connect the devices
These steps are demonstrated in Tutorial: Create and upload certificates for testing.
Get the certificate
Company-X can either purchase an X.509 CA certificate from a public root certificate authority or create one through a self-signed process. Either option entails two basic steps: generating a public/private key pair and signing the public key into a certificate.
Details on how to accomplish these steps differ with various service providers.

Register the certificate to IoT Hub
Company-X needs to register the X.509 CA to IoT Hub where it serves to authenticate Smart-X-Widgets as they connect. This one-time process enables the ability to authenticate and manage any number of Smart-X-Widget devices. The one-to-many relationship between CA certificate and device certificates is one of the main advantages of using the X.509 CA authentication method. The alternative would be to upload individual certificate thumbprints for each and every Smart-X-Widget device, thereby adding to operational costs.
Registering the X.509 CA certificate is a two-step process: upload the certificate then provide proof-of-possession.

Upload the certificate
The X.509 CA certificate upload process is just that: uploading the CA certificate to IoT Hub. IoT Hub expects the certificate in a file.
The certificate file must not under any circumstances contain any private keys. Best practices from standards governing Public Key Infrastructure (PKI) mandates that knowledge of Company-X's private key resides exclusively within Company-X.
Prove possession
The X.509 CA certificate, just like any digital certificate, is public information that is susceptible to eavesdropping. As such, an eavesdropper could intercept a certificate and try to upload it as their own. In our example, IoT Hub has to make sure that the CA certificate Company-X uploaded really belongs to Company-X. It does so by challenging Company-X to prove that they possess the certificate through a proof-of-possession (PoP) flow.
For the proof-of-possession flow, IoT Hub generates a random number for Company-X to sign using its private key. If Company-X followed PKI best practices and protected their private key, then only they would be able to correctly respond to the proof-of-possession challenge. IoT Hub proceeds to register the X.509 CA certificate upon a successful response of the proof-of-possession challenge.
A successful response to the proof-of-possession challenge from IoT Hub completes the X.509 CA registration.
Sign devices into a certificate chain of trust
In our example, certificate-based authentication means that every Smart-X-Widget must possess a unique device certificate. Rather than creating individual certificate/key pairs for each device, Company-X decides to use CA certificates and create a certificate chain of trust for each device.
In our example, Company-X signs Factory-Y, which in turn signs Technician-Z that finally signs Smart-X-Widget.

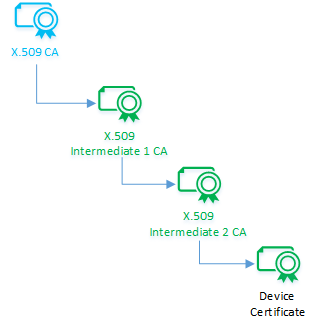
The following diagram shows how the certificate chain of trust comes together in our Smart-X-Widget example.

- Company-X never physically interacts with any of the Smart-X-Widgets. It initiates the certificate chain of trust by signing Factory-Y's intermediate CA certificate.
- Factory-Y now has its own intermediate CA certificate with a signature from Company-X. It passes copies of these items to each device. It also uses its intermediate CA certificate to sign Technician-Z's intermediate CA certificate and the Smart-X-Widget device certificates.
- Technician-Z now has its own intermediate CA certificate with a signature from Factory-Y. It passes copies of these items to each device. It also uses its intermediate CA certificate to sign the Smart-X-Widget device certificates.
- Every Smart-X-Widget device now has its own unique device certificate and copies of the public keys and signatures from each intermediate CA certificate that it interacted with throughout the supply chain. These certificates and signatures can be traced back to the original Company-X root.
The CA method of authentication infuses secure accountability into the device manufacturing supply chain. Because of the certificate chain process, the actions of every member in the chain are cryptographically recorded and verifiable.
This process relies on the assumption that the unique device public/private key pair is created independently and that the private key is protected within the device always. Fortunately, secure silicon chips exist in the form of Hardware Secure Modules (HSM) that are capable of internally generating keys and protecting private keys. Company-X only needs to add one such secure chip into Smart-X-Widget's component bill of materials.
Authenticate devices
Devices manufactured for X.509 CA authentication are equipped with unique device certificates and a certificate chain from their respective manufacturing supply chain. Device connection, even for the first time, happens in a two-step process: certificate chain upload and proof-of-possession.
In our example, each Smart-X-Widget uploads its unique device certificate together with Factory-Y and Technician-Z X.509 CA certificates and then responds to the proof-of-possession challenge from IoT Hub.
Using the preregistered X.509 CA certificate from Company-X, IoT Hub validates that the uploaded certificate chain is internally consistent and that the valid owner of the X.509 CA certificate originated the chain. As with the X.509 CA registration process, IoT Hub uses a proof-of-possession challenge-response process to ascertain that the chain, and therefore the device certificate, belongs to the device uploading it. A successful response triggers IoT Hub to accept the device as authentic and grant it connection.

The foundation of trust rests in protecting private keys, including device private keys. We therefore can't stress enough the importance of secure silicon chips in the form of Hardware Secure Modules (HSM) for protecting device private keys, and the overall best practice of never sharing private keys from any certificate in the chain.
Next steps
To learn more about the fields that make up an X.509 certificate, see X.509 certificates.
If you have a root CA certificate or subordinate CA certificate and you want to upload it to your IoT hub, you must verify that you own that certificate. For more information, see Tutorial: Create and upload certificates for testing.