Note
Access to this page requires authorization. You can try signing in or changing directories.
Access to this page requires authorization. You can try changing directories.
Applies to: ✔️ Fleet Manager with hub cluster
Azure Kubernetes Fleet Manager ResourcePlacement enables you to distribute and synchronize individual namespace-scoped resources - such as ConfigMaps, Deployments, and Services - across specific clusters in your fleet without propagating an entire namespace. This approach gives you fine-grained control over what gets deployed where, simplifying multi-cluster configuration management and reducing manual overhead. This article walks through using ResourcePlacement to distribute namespace-scoped resources to member clusters.
To distribute cluster-scoped resources or a namespace and all its child resources, see Use Azure Kubernetes Fleet Manager resource placement to deploy cluster-scoped resources across multiple clusters.
You can complete the steps in this article using either the Azure portal or the Azure CLI.
Note
You can use Fleet Manager's resource placement with AKS and Azure Arc-enabled Kubernetes clusters.
Before you begin
- If you don't have an Azure account, create a trial account before you begin.
- Read the conceptual overview of namespace-scoped resource placement to understand the concepts and terminology used in this article.
- You need a Fleet Manager with a hub cluster and member clusters. If you don't have one, see Create an Azure Kubernetes Fleet Manager resource and join member clusters by using the Azure CLI.
- You need access to the Kubernetes API of the hub cluster. If you don't have access, see Access the Kubernetes API for an Azure Kubernetes Fleet Manager hub cluster.
Establish the namespace across member clusters
Before you can use ResourcePlacement to deploy namespace-scoped resources, the target namespace must exist on the member clusters.
Let's see how to create a namespace on the Fleet Manager hub cluster and distribute it to member clusters by using a ClusterResourcePlacement. You ensure only the namespace is distributed by adding selectionScope: NamespaceOnly to the resourceSelector.
Set the following environment variables for your subscription ID, resource group, and Kubernetes Fleet resource:
export SUBSCRIPTION_ID=<subscription-id>
export GROUP=<resource-group-name>
export FLEET=<fleet-name>
Set the default Azure subscription by using the
az account setcommand:az account set \ --subscription ${SUBSCRIPTION_ID}Get the kubeconfig file of the Kubernetes Fleet hub cluster by using the
az fleet get-credentialscommand:az fleet get-credentials \ --resource-group ${GROUP} \ --name ${FLEET}Your output should look similar to the following.
Merged "hub" as current context in /home/fleet/.kube/configNote
If you receive an error of type
InvalidHubOperationwith the message indicating the fleet is hubless, add a hub cluster. For further information, see upgrade hub cluster type.Create a namespace on the hub cluster:
kubectl create namespace test-appSave the following YAML as
crp-distribute-namespace-only.yaml.apiVersion: placement.kubernetes-fleet.io/v1 kind: ClusterResourcePlacement metadata: name: distribute-test-app-namespace spec: resourceSelectors: - group: "" kind: Namespace name: test-app version: v1 selectionScope: NamespaceOnly policy: placementType: PickAllApply the placement manifest to the Fleet Manager hub cluster.
kubectl apply -f crp-distribute-namespace-only.yamlNote
The namespace rollout begins immediately when you apply the resource placement by using an implicit
RollingUpdatestrategy. To learn how to have additional controls over the rollout, see defining a rollout strategy for resource placement.Verify that the namespace was distributed successfully:
kubectl get clusterresourceplacement distribute-test-app-namespaceYour output should look similar to the following example:
NAME                            GEN   SCHEDULED   SCHEDULED-GEN   AVAILABLE   AVAILABLE-GEN   AGE
distribute-test-app-namespace   1     True        1               True        1               2m45s
In the Azure portal, go to your Fleet Manager.
On the service menu, under Fleet Resources, select Namespaces > + Create.
Note
If you don't see Fleet Resources, your Fleet Manager doesn't have a hub cluster. For further information on how to add one, see upgrade hub cluster type.
In the menu, select Namespace, enter a Name, and then select Create.
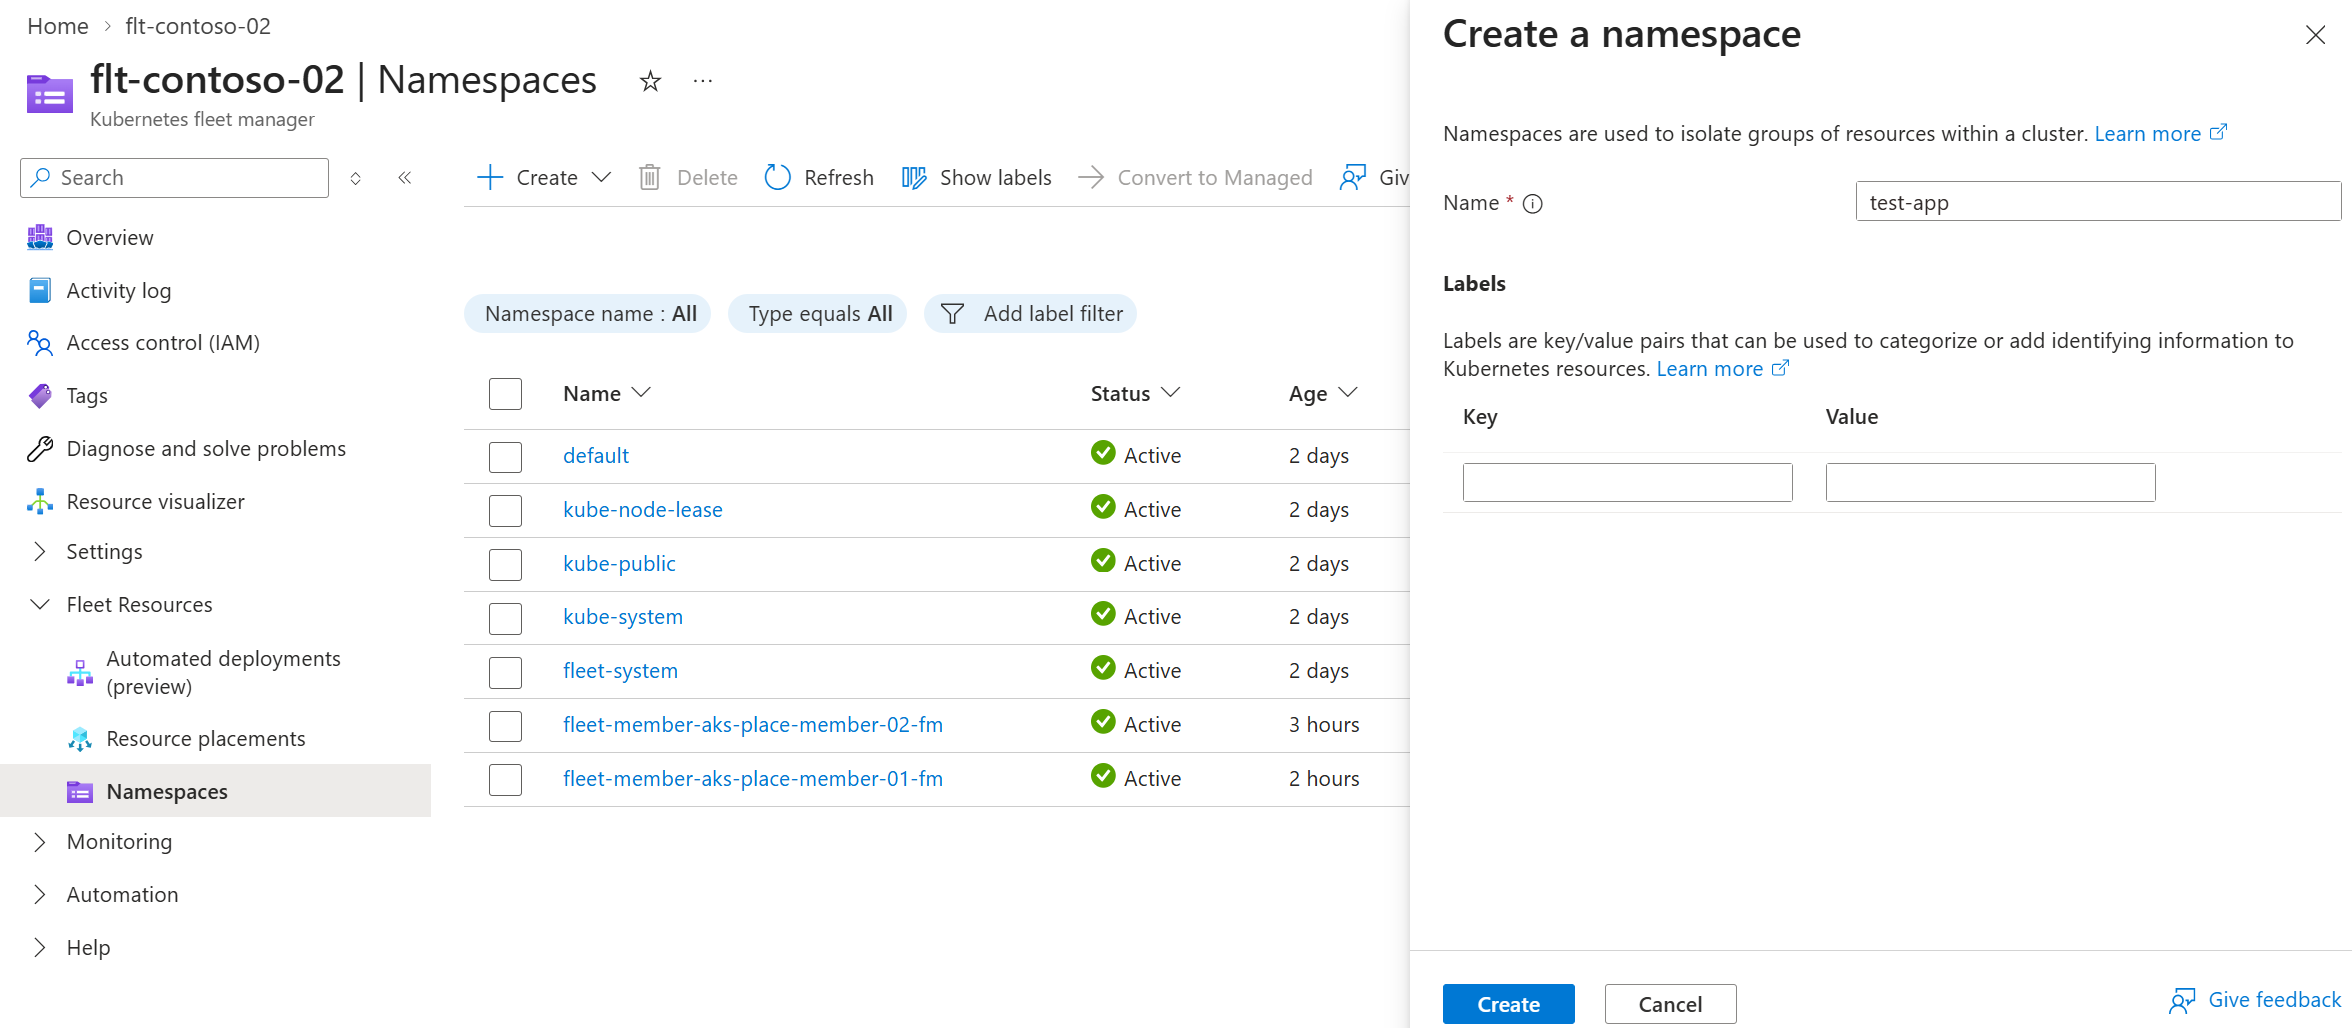
After a few moments, the page refreshes and the namespace appears in the list of namespaces on the Fleet Manager hub cluster. It's now ready to host any resources you want to distribute across member clusters.
On the service menu, under Fleet Resources, select Resource placements > + Create.
On the Basics tab, configure the following options:
In Placement details, enter a name for the placement.
Under Resource details, enter the Group Version Kind (GVK) and name of the resource to distribute. In this sample, use the following values.
group: ""
kind: Namespace
version: v1
name: test-app
selectionScope: NamespaceOnly
In Member cluster selection, choose All clusters.
For Rollout, leave the Rolling update strategy selected.
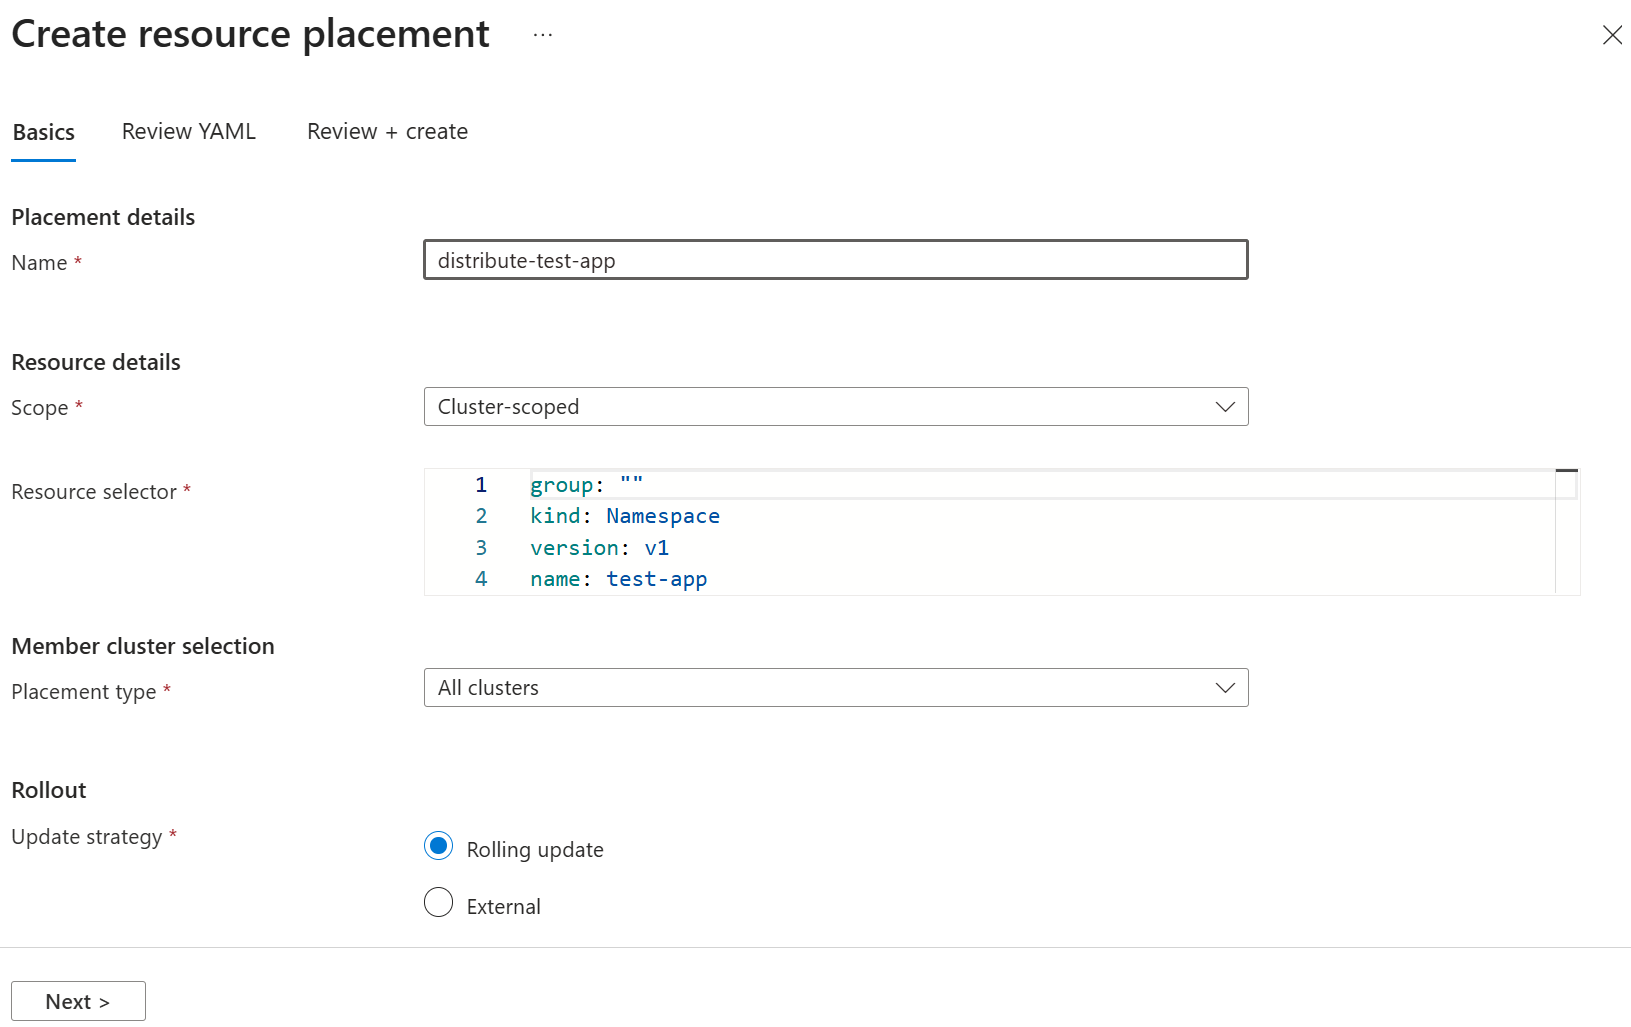
Select Next to review the resulting
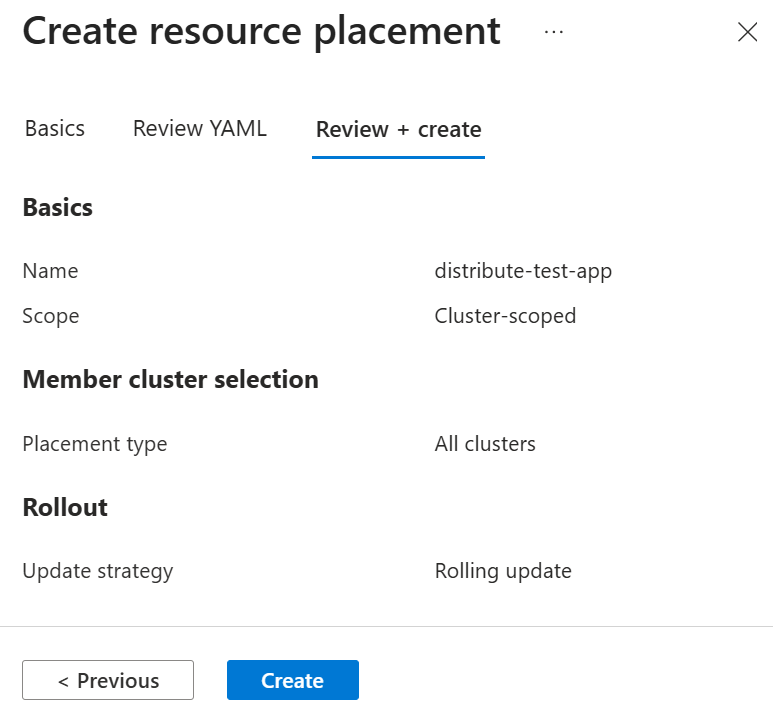
ClusterResourcePlacementmanifest. You can modify the manifest if required, validate by using the Validate (dry run) option, or select Review + create to proceed to final confirmation.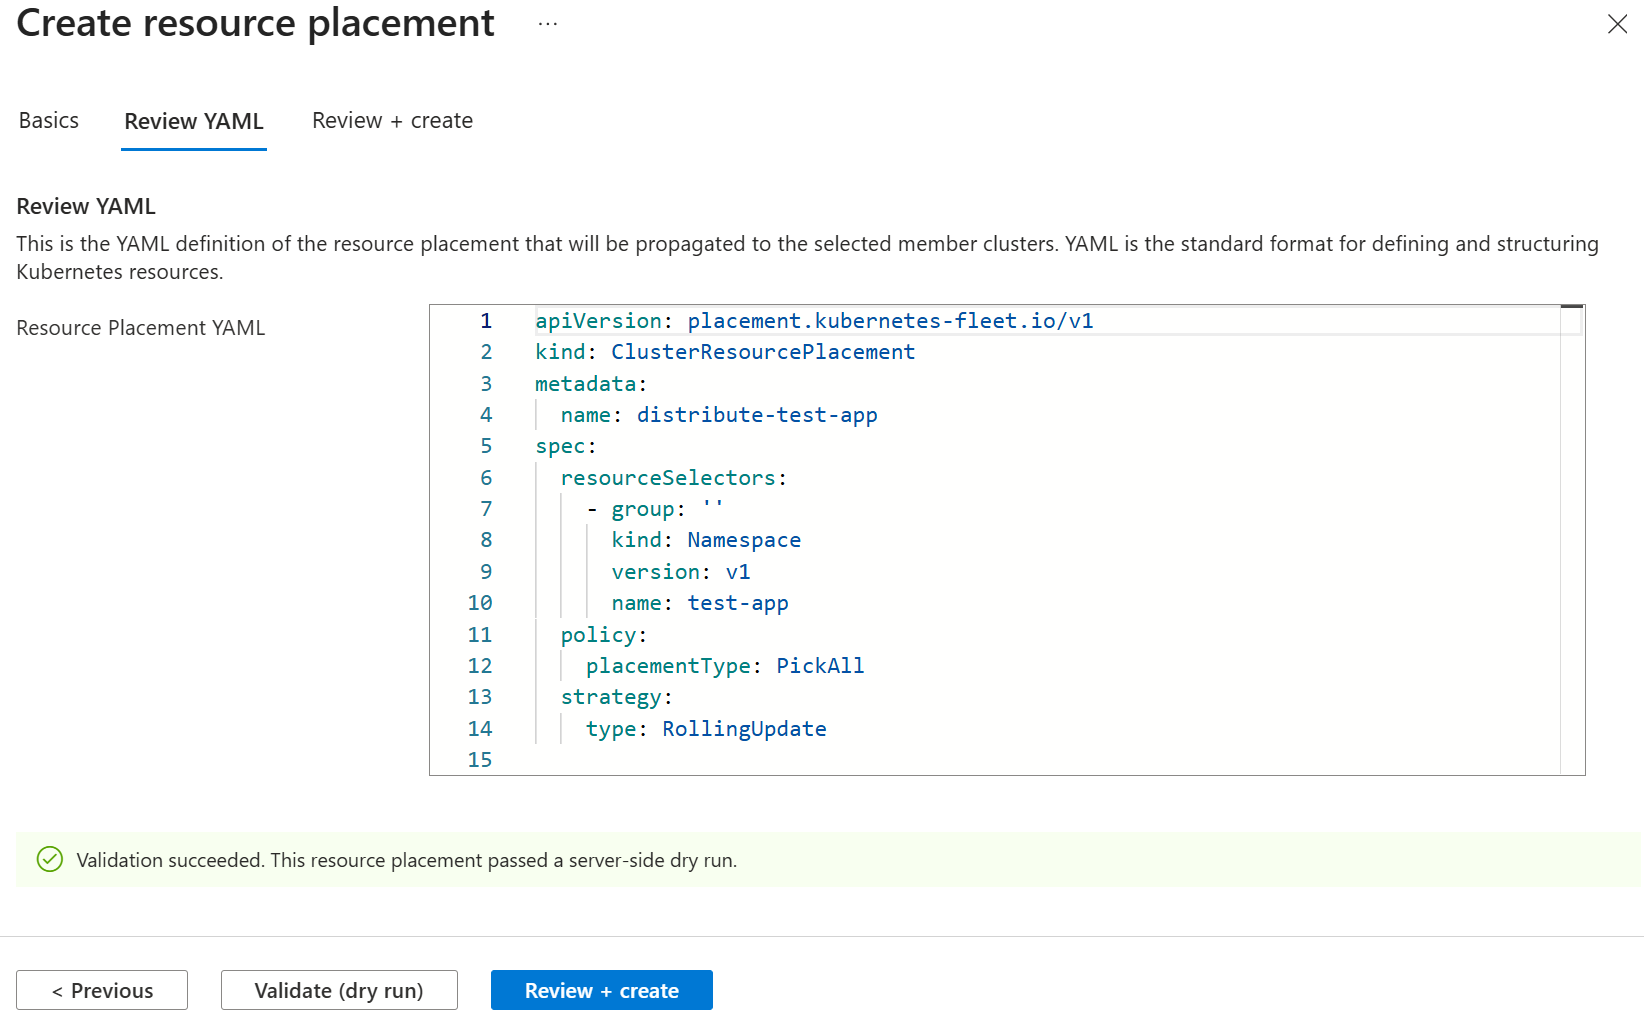
Select Create to start the distribution of the namespace immediately.
Note
The namespace resource rollout starts as soon as you apply the resource placement by using the selected
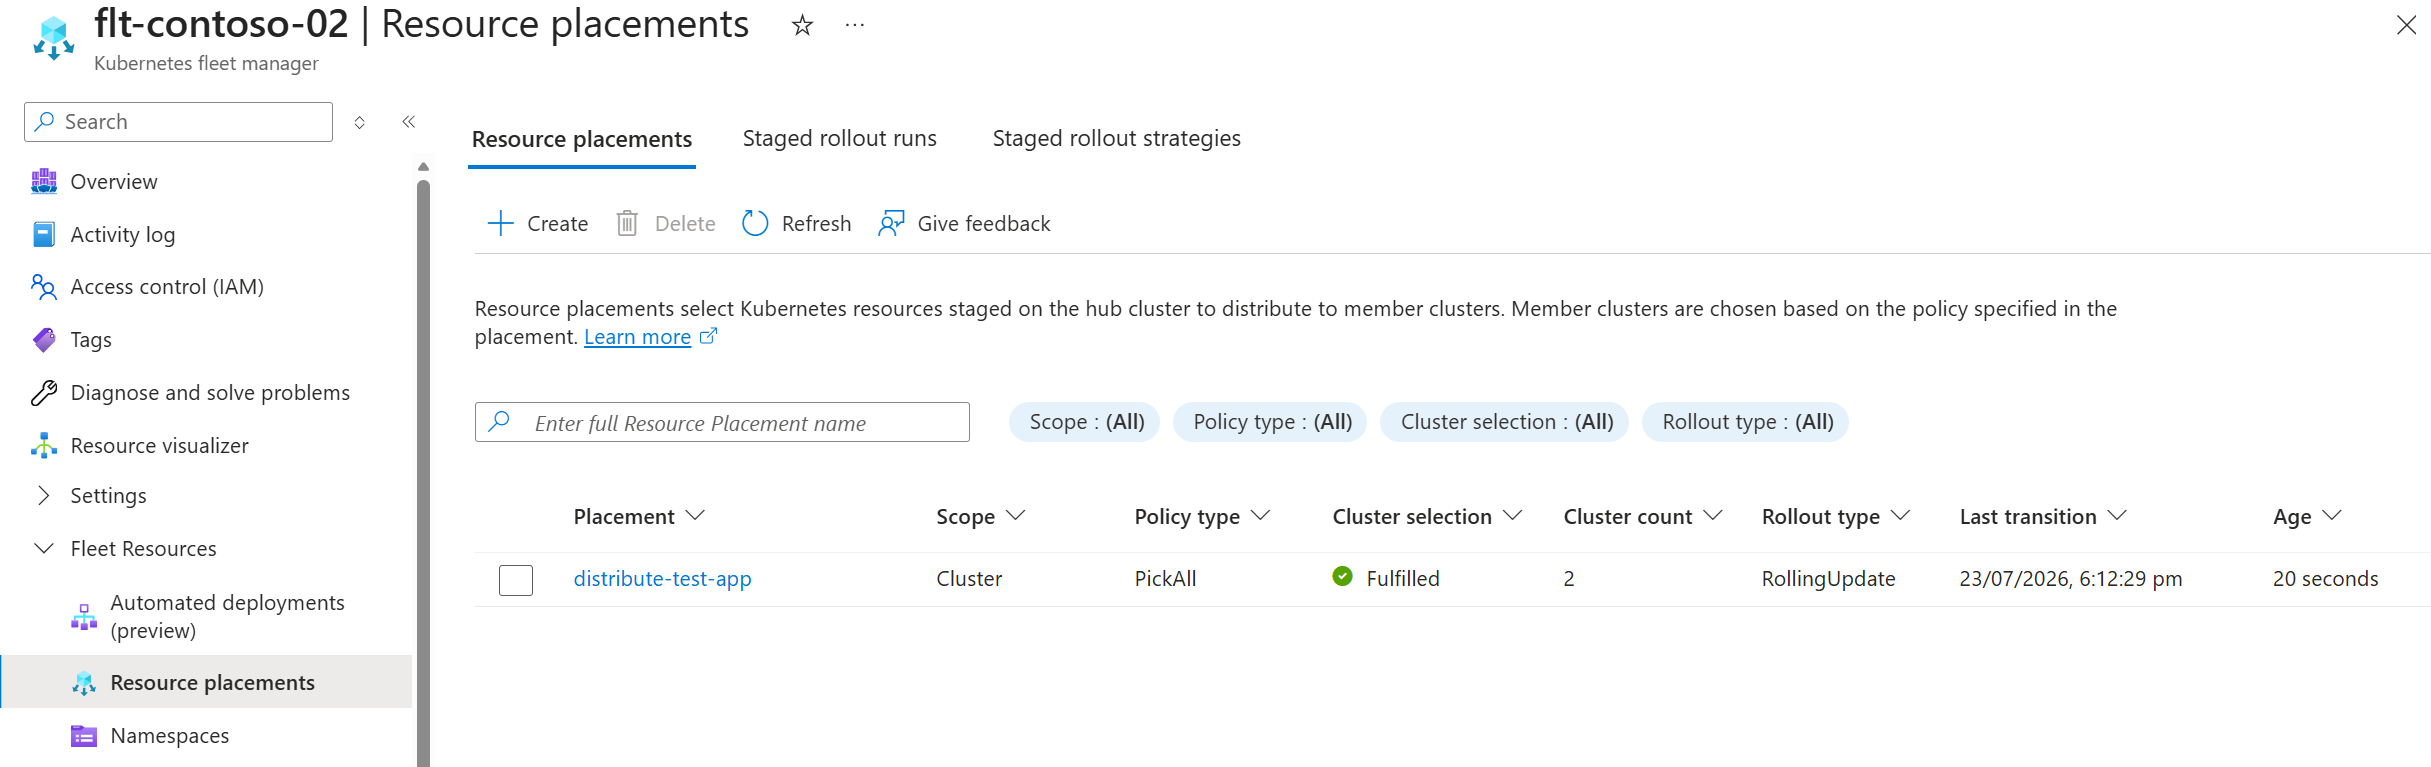
RollingUpdatestrategy. For more information about how to control the rollout, see defining a rollout strategy for resource placement.The page refreshes and the Resource placements list displays the newly created placement. It shows the number of clusters selected and whether the fleet scheduler can fulfill the placement policy.
View the rollout status of the placement by selecting the placement name in the list. Select individual clusters to view the resource rollout on that cluster.
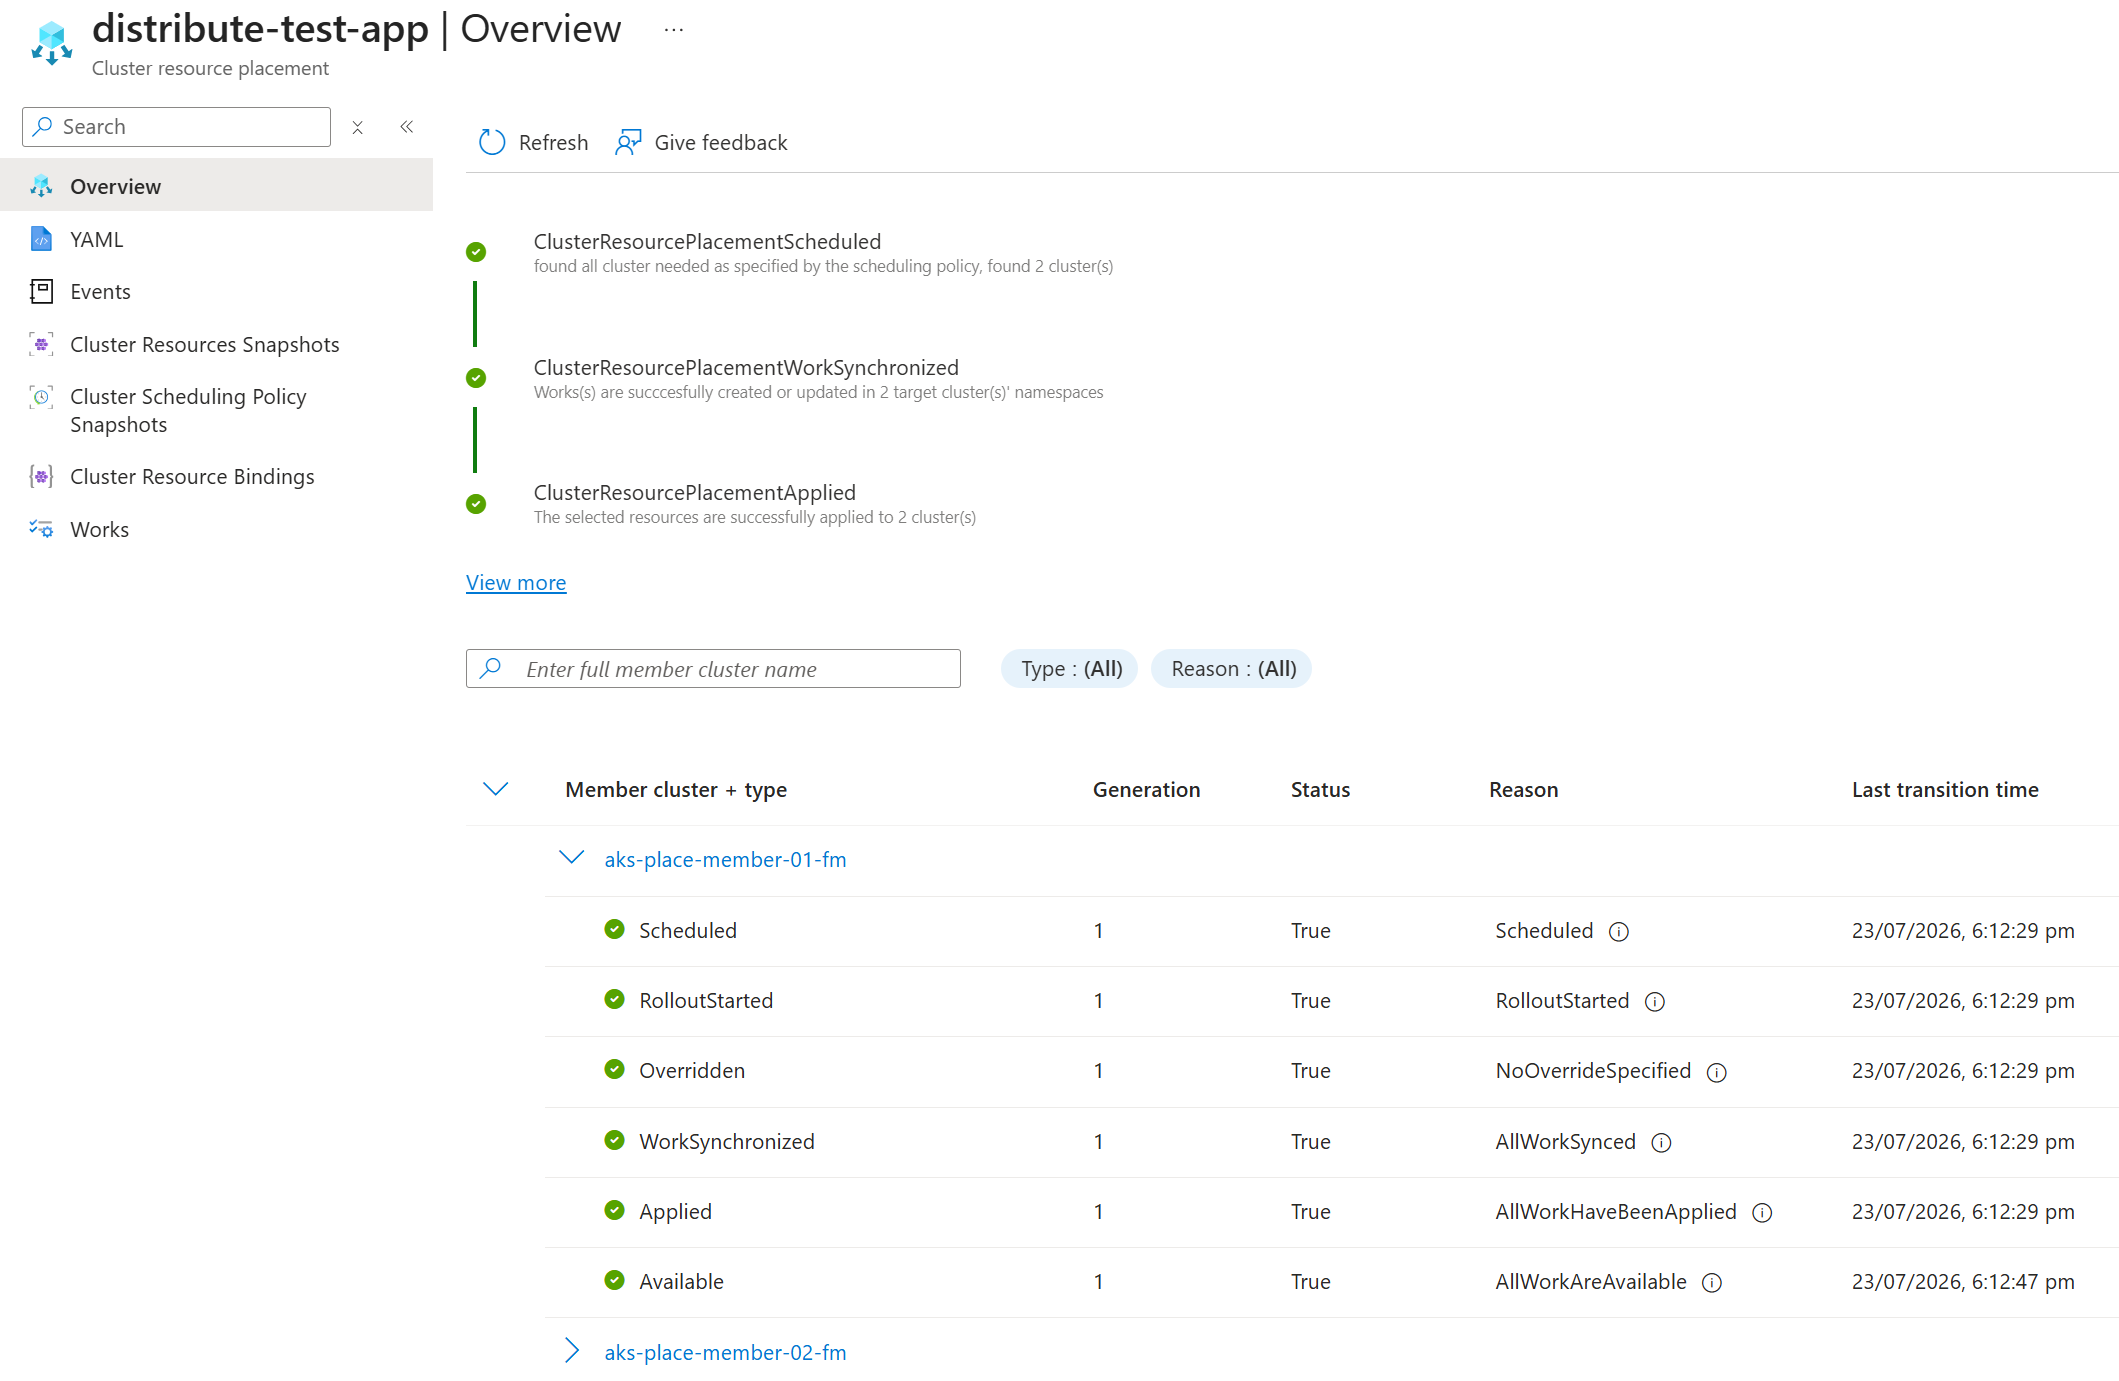
On the selected Kubernetes clusters, you find the namespace deployed.
Distribute namespace-scoped resources to member clusters
Use the simple scenario of deploying two ConfigMap resources across selected clusters in the fleet. You must create the ResourcePlacement in the namespace as the resources to distribute.
Create two
ConfigMapresources in the namespace on the hub cluster.kubectl create configmap app-config \ --from-literal=environment=production \ --from-literal=log-level=info \ -n test-app kubectl create configmap feature-flags \ --from-literal=new-ui=enabled \ --from-literal=api-v2=disabled \ -n test-appCreate a
ResourcePlacementto propagate the ConfigMaps. Save the following YAML to a file namedapp-configs-rp.yaml:apiVersion: placement.kubernetes-fleet.io/v1beta1 kind: ResourcePlacement metadata: name: distribute-app-configs namespace: test-app spec: resourceSelectors: - group: "" kind: ConfigMap version: v1 name: app-config - group: "" kind: ConfigMap version: v1 name: feature-flags policy: placementType: PickFixed clusterNames: - membercluster1 - membercluster2Note
Replace
membercluster1andmembercluster2with the actual names of your member clusters. Usekubectl get memberclustersto list available member clusters.Apply the
ResourcePlacementto the hub cluster:kubectl apply -f app-configs-rp.yamlCheck the progress of the resource propagation:
kubectl get resourceplacement distribute-app-configs -n test-appYour output should look similar to the following.
NAME                     GEN   SCHEDULED   SCHEDULED-GEN   AVAILABLE   AVAILABLE-GEN   AGE
distribute-app-configs   1     True        1               True        1               3m14s
View the details of the placement.
kubectl describe resourceplacement distribute-app-configs -n test-appYour output should look similar to the following.
Name:         distribute-app-configs
Namespace:    test-app
Labels:       <none>
Annotations:  <none>
API Version:  placement.kubernetes-fleet.io/v1
Kind:         ResourcePlacement
Metadata:
  Creation Timestamp:  2026-07-24T05:18:56Z
  Finalizers:
    kubernetes-fleet.io/crp-cleanup
    kubernetes-fleet.io/scheduler-cleanup
  Generation:        1
  Resource Version:  1306099
  UID:               3a7b7f54-9ef0-4a2d-b8a6-62258ed63f78
Spec:
  Policy:
    Cluster Names:
      aks-place-member-01-fm
      aks-place-member-02-fm
    Placement Type:  PickFixed
  Resource Selectors:
    Group:
    Kind:                  ConfigMap
    Name:                  app-config
    Selection Scope:       NamespaceWithResources
    Version:               v1
    Group:
    Kind:                  ConfigMap
    Name:                  feature-flags
    Selection Scope:       NamespaceWithResources
    Version:               v1
  Revision History Limit:  10
  Status Reporting Scope:  ClusterScopeOnly
  Strategy:
    Type:  RollingUpdate
Status:
  Conditions:
    Last Transition Time:   2026-07-24T05:18:56Z
    Message:                found all cluster needed as specified by the scheduling policy, found 2 cluster(s)
    Observed Generation:    1
    Reason:                 SchedulingPolicyFulfilled
    Status:                 True
    Type:                   ResourcePlacementScheduled
    Last Transition Time:   2026-07-24T05:18:56Z
    Message:                All 2 cluster(s) start rolling out the latest resource
    Observed Generation:    1
    Reason:                 RolloutStarted
    Status:                 True
    Type:                   ResourcePlacementRolloutStarted
    Last Transition Time:   2026-07-24T05:18:56Z
    Message:                No override rules are configured for the selected resources
    Observed Generation:    1
    Reason:                 NoOverrideSpecified
    Status:                 True
    Type:                   ResourcePlacementOverridden
    Last Transition Time:   2026-07-24T05:18:56Z
    Message:                Works(s) are successfully created or updated in 2 target cluster(s)' namespaces
    Observed Generation:    1
    Reason:                 WorkSynchronized
    Status:                 True
    Type:                   ResourcePlacementWorkSynchronized
    Last Transition Time:   2026-07-24T05:18:56Z
    Message:                The selected resources are successfully applied to 2 cluster(s)
    Observed Generation:    1
    Reason:                 ApplySucceeded
    Status:                 True
    Type:                   ResourcePlacementApplied
    Last Transition Time:   2026-07-24T05:18:56Z
    Message:                The selected resources in 2 cluster(s) are available now
    Observed Generation:    1
    Reason:                 ResourceAvailable
    Status:                 True
    Type:                   ResourcePlacementAvailable
  Observed Resource Index:  0
  Placement Statuses:
    Cluster Name:  aks-place-member-01-fm
    Conditions:
      Last Transition Time:   2026-07-24T05:18:56Z
      Message:                Successfully scheduled resources for placement in "aks-place-member-01-fm": picked by scheduling policy
      Observed Generation:    1
      Reason:                 Scheduled
      Status:                 True
      Type:                   Scheduled
      Last Transition Time:   2026-07-24T05:18:56Z
      Message:                Detected the new changes on the resources and started the rollout process
      Observed Generation:    1
      Reason:                 RolloutStarted
      Status:                 True
      Type:                   RolloutStarted
      Last Transition Time:   2026-07-24T05:18:56Z
      Message:                No override rules are configured for the selected resources
      Observed Generation:    1
      Reason:                 NoOverrideSpecified
      Status:                 True
      Type:                   Overridden
      Last Transition Time:   2026-07-24T05:18:56Z
      Message:                All of the works are synchronized to the latest
      Observed Generation:    1
      Reason:                 AllWorkSynced
      Status:                 True
      Type:                   WorkSynchronized
      Last Transition Time:   2026-07-24T05:18:56Z
      Message:                All corresponding work objects are applied
      Observed Generation:    1
      Reason:                 AllWorkHaveBeenApplied
      Status:                 True
      Type:                   Applied
      Last Transition Time:   2026-07-24T05:18:56Z
      Message:                All corresponding work objects are available
      Observed Generation:    1
      Reason:                 AllWorkAreAvailable
      Status:                 True
      Type:                   Available
    Observed Resource Index:  0
    Cluster Name:             aks-place-member-02-fm
    Conditions:
      Last Transition Time:   2026-07-24T05:18:56Z
      Message:                Successfully scheduled resources for placement in "aks-place-member-02-fm": picked by scheduling policy
      Observed Generation:    1
      Reason:                 Scheduled
      Status:                 True
      Type:                   Scheduled
      Last Transition Time:   2026-07-24T05:18:56Z
      Message:                Detected the new changes on the resources and started the rollout process
      Observed Generation:    1
      Reason:                 RolloutStarted
      Status:                 True
      Type:                   RolloutStarted
      Last Transition Time:   2026-07-24T05:18:56Z
      Message:                No override rules are configured for the selected resources
      Observed Generation:    1
      Reason:                 NoOverrideSpecified
      Status:                 True
      Type:                   Overridden
      Last Transition Time:   2026-07-24T05:18:56Z
      Message:                All of the works are synchronized to the latest
      Observed Generation:    1
      Reason:                 AllWorkSynced
      Status:                 True
      Type:                   WorkSynchronized
      Last Transition Time:   2026-07-24T05:18:56Z
      Message:                All corresponding work objects are applied
      Observed Generation:    1
      Reason:                 AllWorkHaveBeenApplied
      Status:                 True
      Type:                   Applied
      Last Transition Time:   2026-07-24T05:18:56Z
      Message:                All corresponding work objects are available
      Observed Generation:    1
      Reason:                 AllWorkAreAvailable
      Status:                 True
      Type:                   Available
    Observed Resource Index:  0
  Selected Resources:
    Kind:       ConfigMap
    Name:       app-config
    Namespace:  test-app
    Version:    v1
    Kind:       ConfigMap
    Name:       feature-flags
    Namespace:  test-app
    Version:    v1
Events:
  Type    Reason                        Age   From                  Message
  ----    ------                        ----  ----                  -------
  Normal  PlacementRolloutStarted       4m3s  placement-controller  Started rolling out the latest resources
  Normal  PlacementOverriddenSucceeded  4m3s  placement-controller  Placement has been successfully overridden
  Normal  PlacementWorkSynchronized     4m3s  placement-controller  Work(s) have been created or updated successfully for the selected cluster(s)
  Normal  PlacementApplied              4m3s  placement-controller  Resources have been applied to the selected cluster(s)
  Normal  PlacementAvailable            4m3s  placement-controller  Resources are available on the selected cluster(s)
  Normal  PlacementRolloutCompleted     4m3s  placement-controller  Placement has finished the rollout process and reached the desired status
In the Azure portal, go to your Fleet Manager.
On the service menu, under Fleet Resources, select Namespaces.
Note
If you don't see Fleet Resources, your Fleet Manager doesn't have a hub cluster. For further information on how to add one, see upgrade hub cluster type.
At the top of the namespace list, select + Create > Apply a YAML, and use the following samples.
apiVersion: v1
kind: ConfigMap
metadata:
  name: app-config
  namespace: test-app
data:
  environment: production
  log-level: info
apiVersion: v1 kind: ConfigMap metadata: name: feature-flags namespace: test-app data: new-ui: enabled api-v2: disabledCopy and paste the samples and apply them one at a time as shown in the following image.
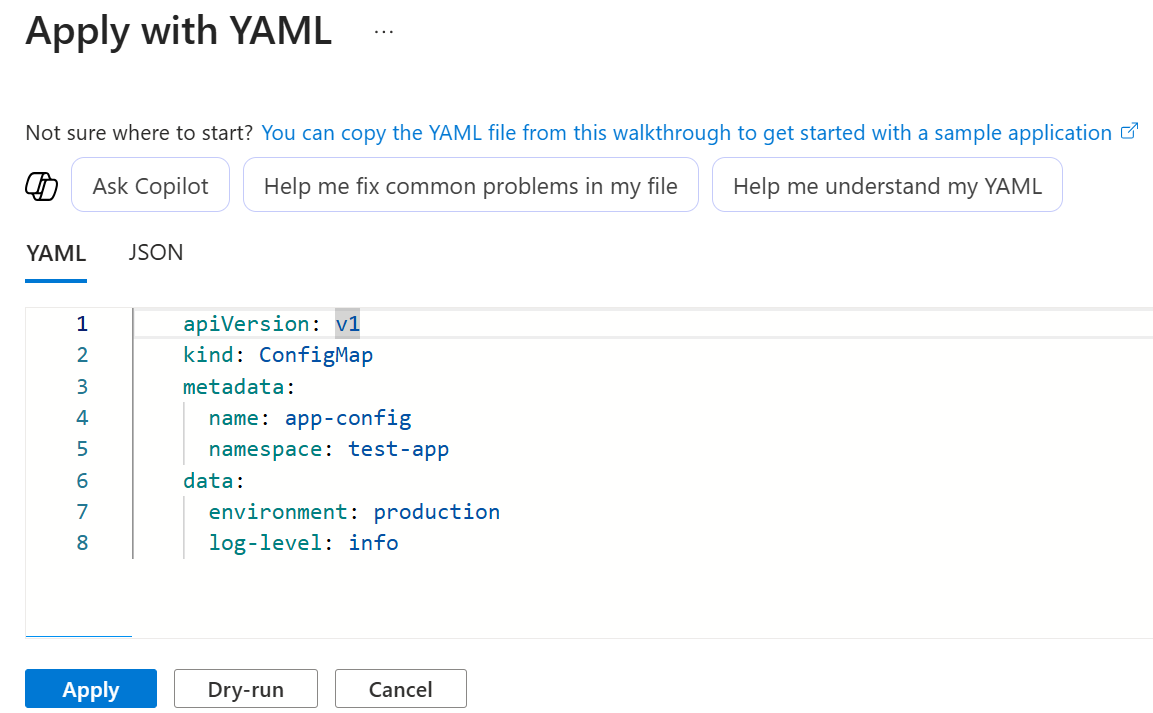
The two ConfigMap resources are now ready to distribute to member clusters by using a
ResourcePlacement.On the service menu, under Fleet Resources, select Resource placements > + Create.
On the Basics tab, configure the following options:
In Placement details, enter a name for the placement.
Under Resource details:
Set Scope as Namespace-scoped.
For Namespace, select the
test-appnamespace.Enter the Group Version Kind (GVK) and name of the resource to distribute. In this sample, use the following values.
group: ""
kind: ConfigMap
version: v1
name: app-config
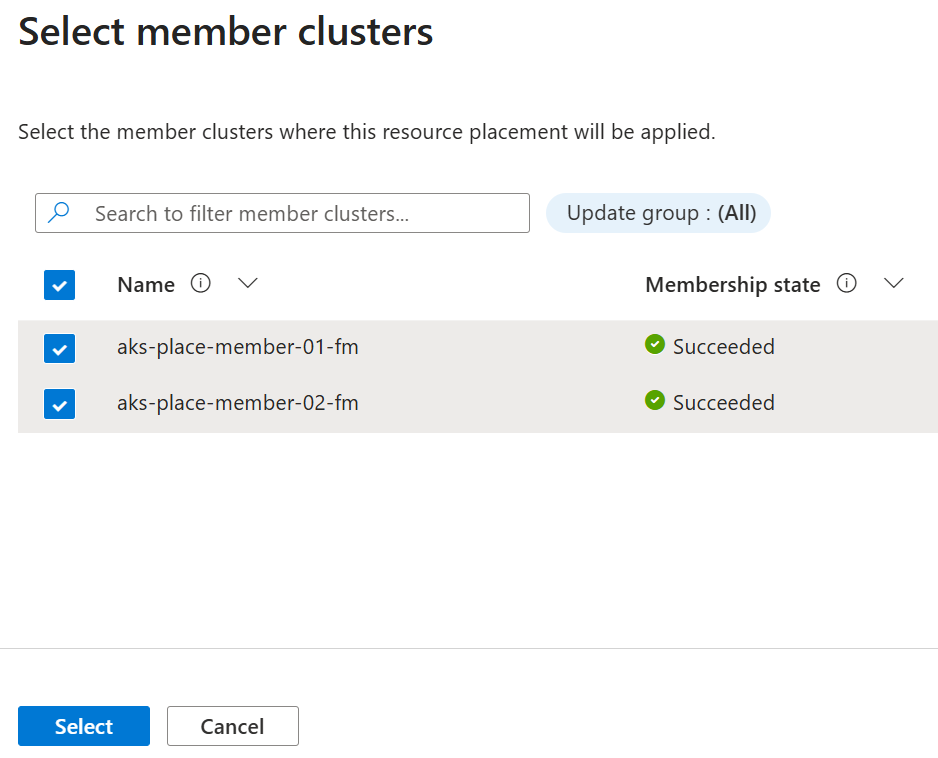
In Member cluster selection, for Placement type, select Select specific clusters.
Select Select member clusters, choose the member clusters that receive the resources, and then select Select.
- For Rollout, leave the Rolling update strategy selected.
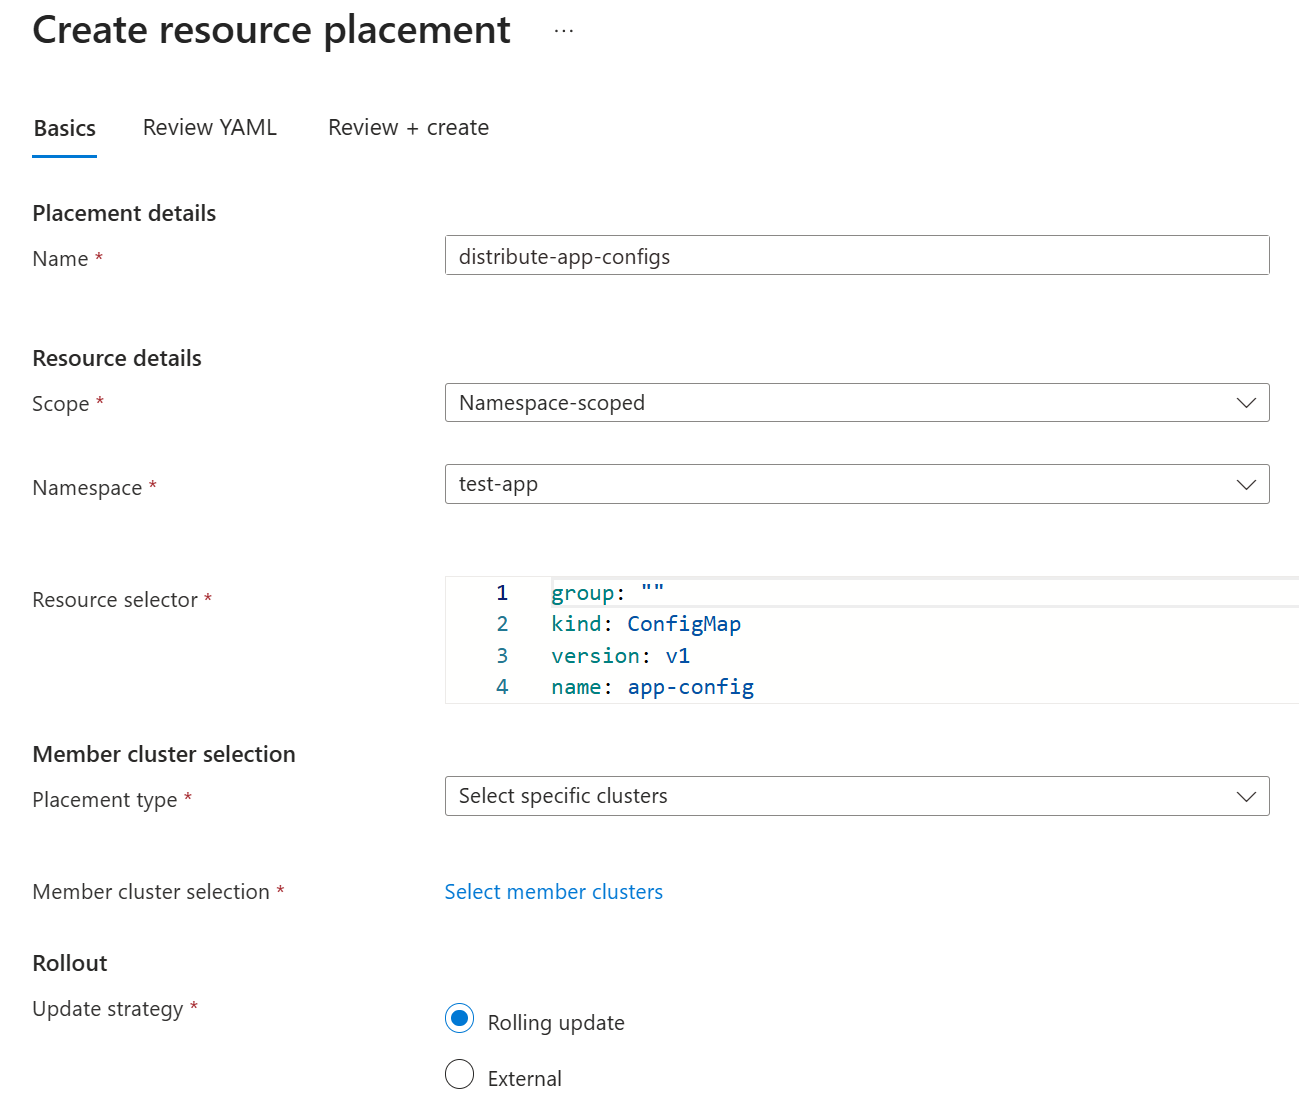
Select Next to review the resulting
ResourcePlacementmanifest.Add the second ConfigMap to distribute to the
resourceSelectorssection in the YAML dialog.group: "" kind: ConfigMap version: v1 name: feature-flagsBefore proceeding, validate the modified YAML by using the Validate (dry run) option. Select Review + create to proceed to final confirmation.
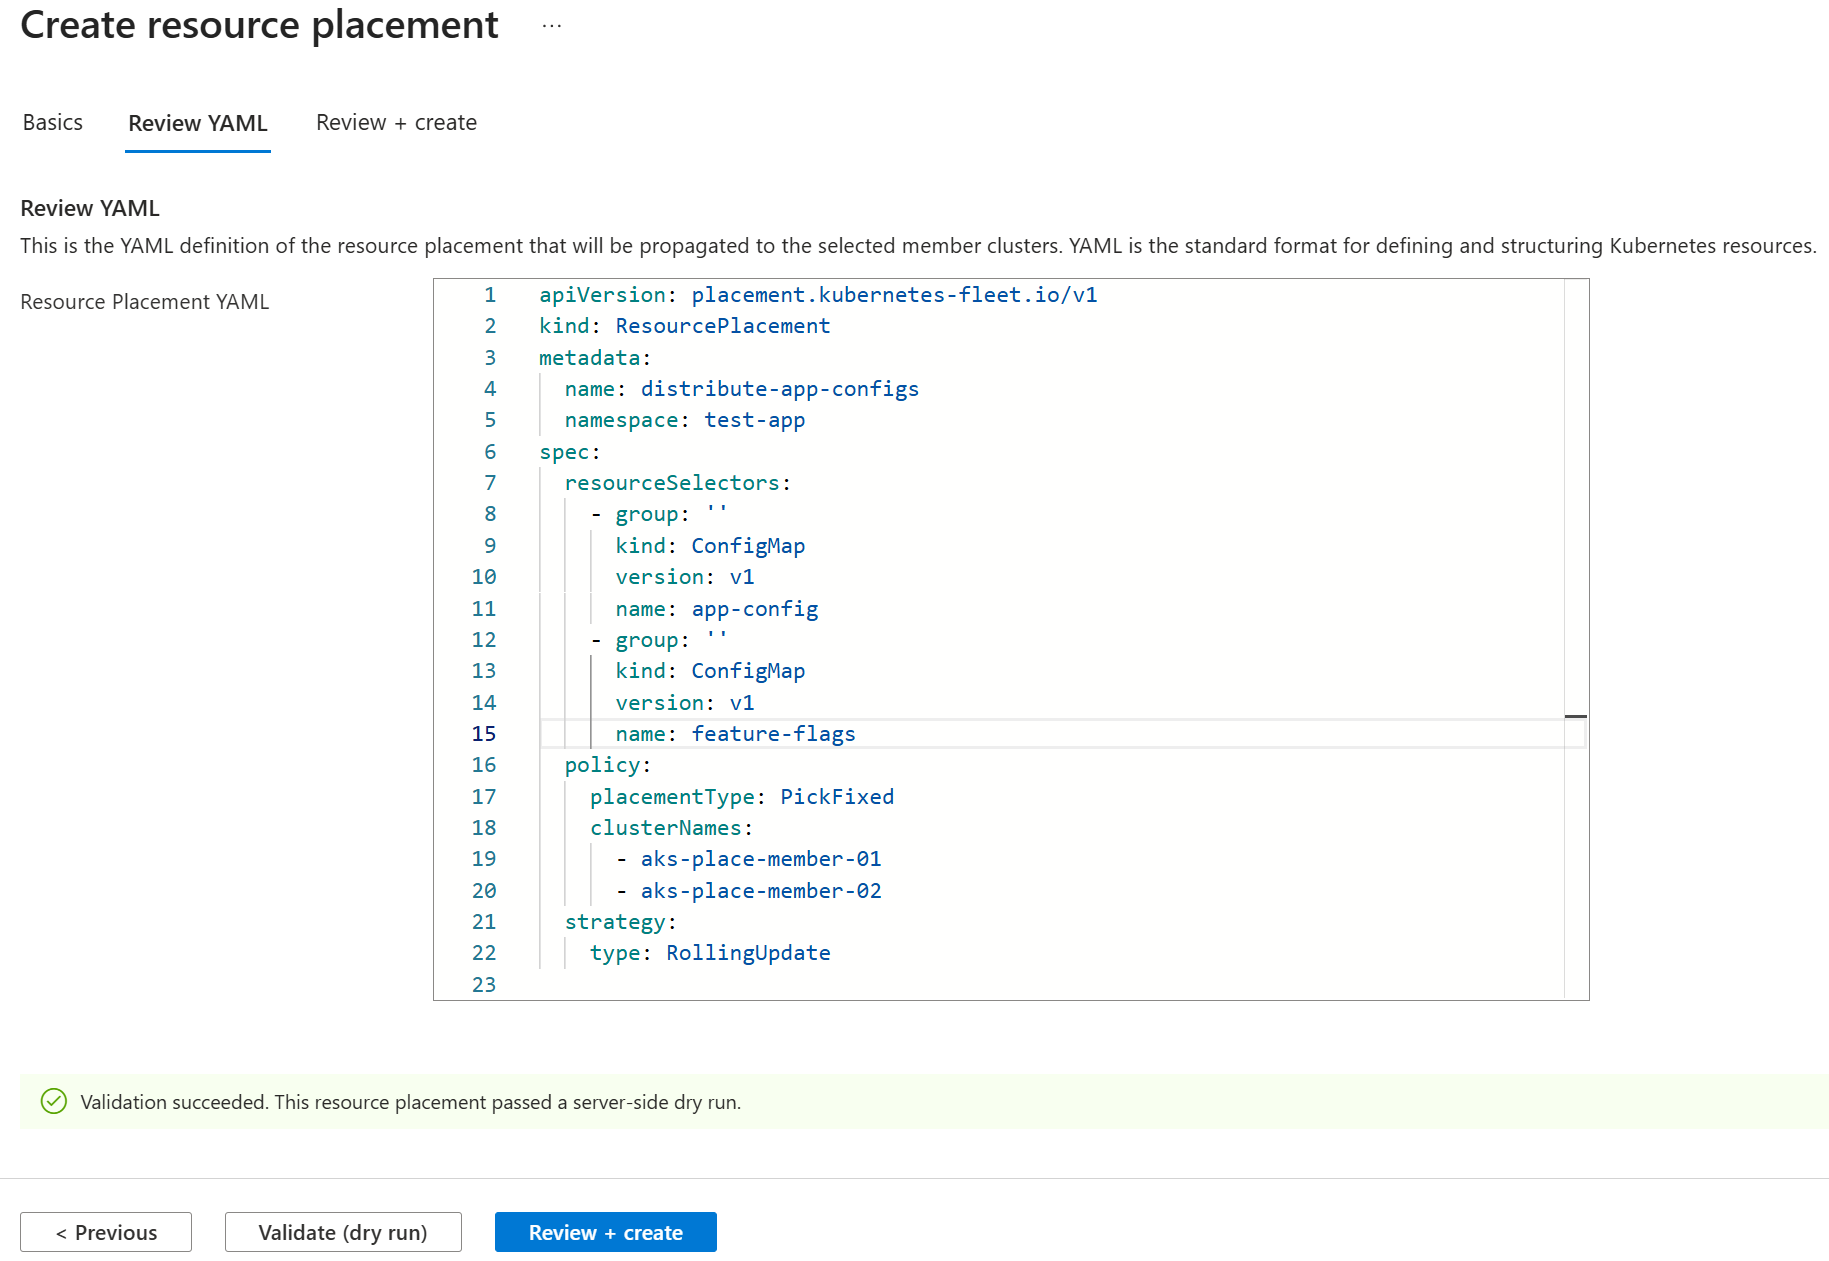
Select Create to start the distribution of the namespace immediately.
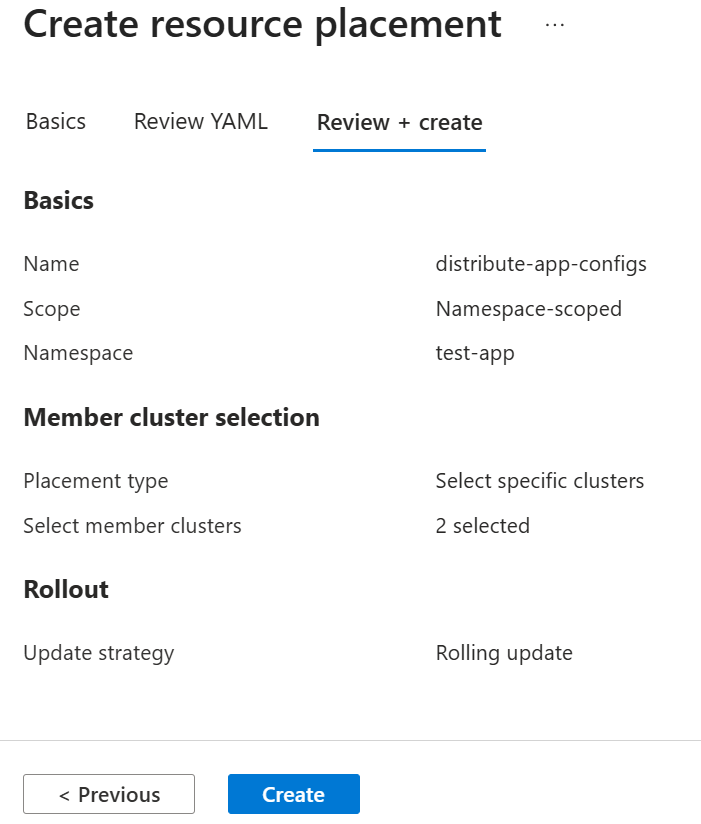
Note
The resource rollout begins immediately when you apply the resource placement by using the selected
RollingUpdatestrategy. To learn how to have additional controls over the rollout, see defining a rollout strategy for resource placement.The page refreshes and the Resource placements list displays the newly created placement. It shows the number of clusters selected and whether the fleet scheduler can fulfill the placement policy.
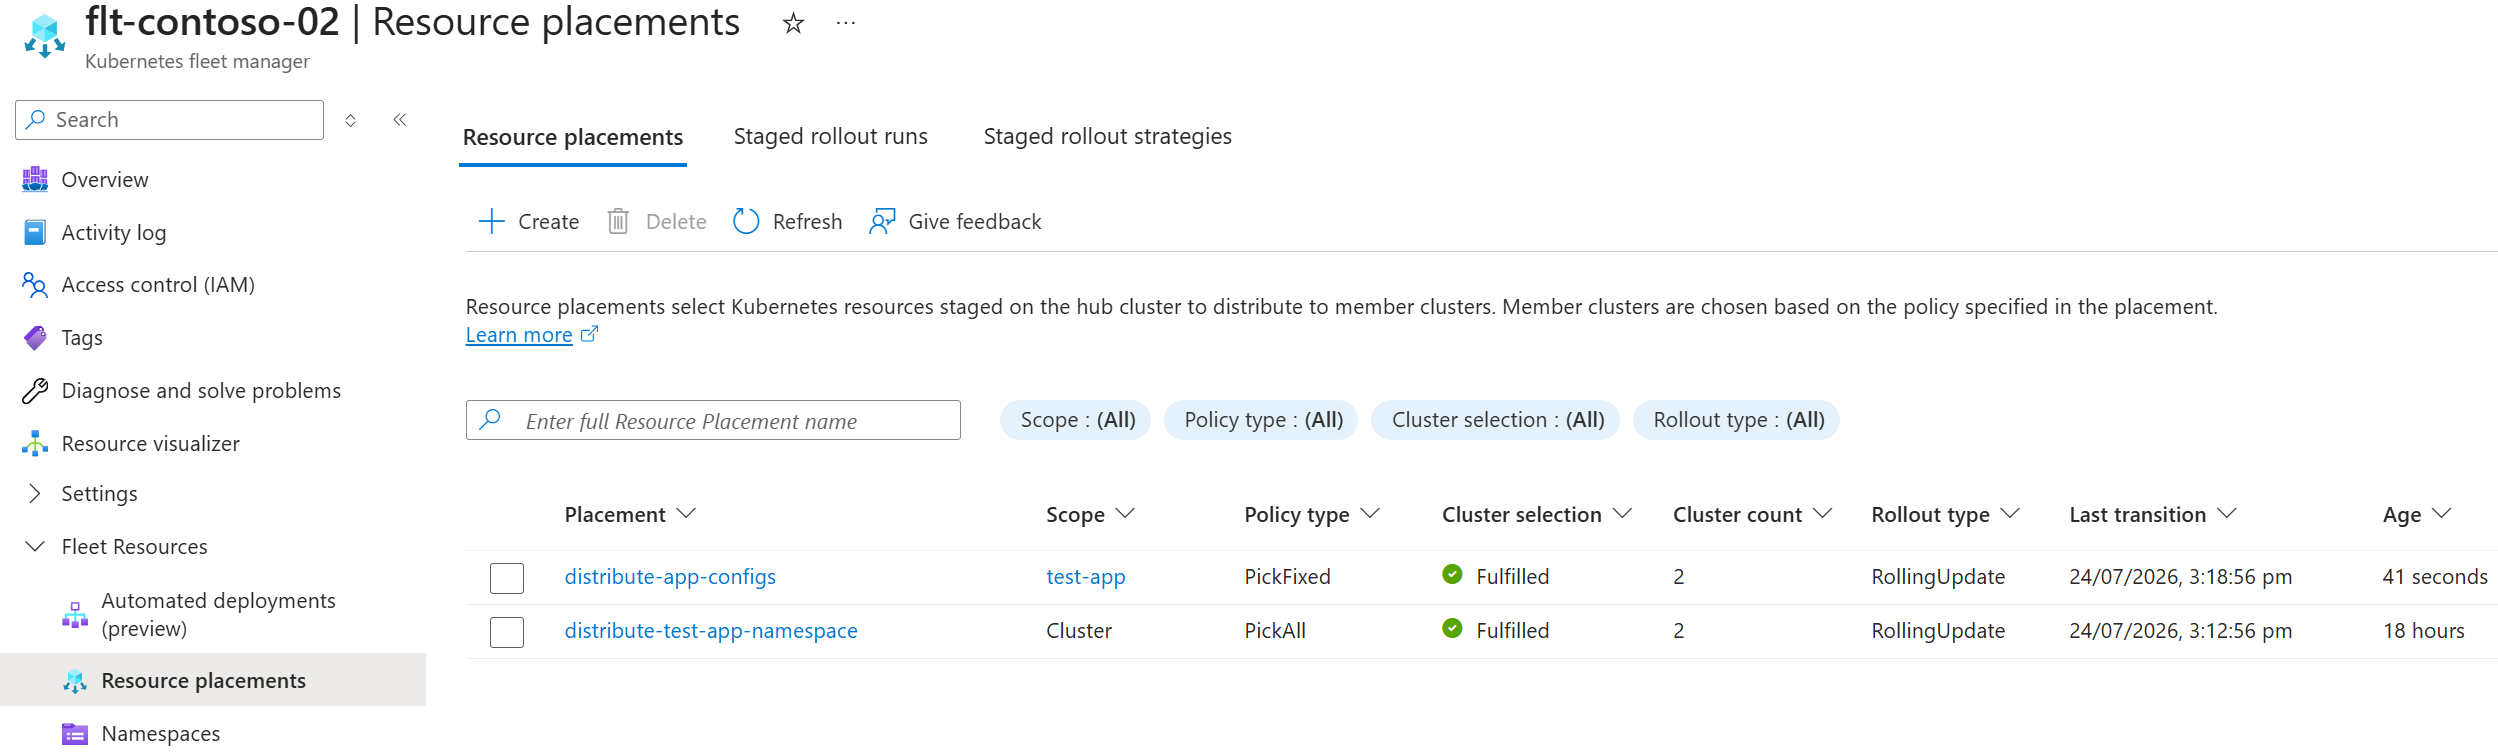
View the rollout status of the placement by selecting the placement name in the list. Select individual clusters to view the resource rollout on that cluster.
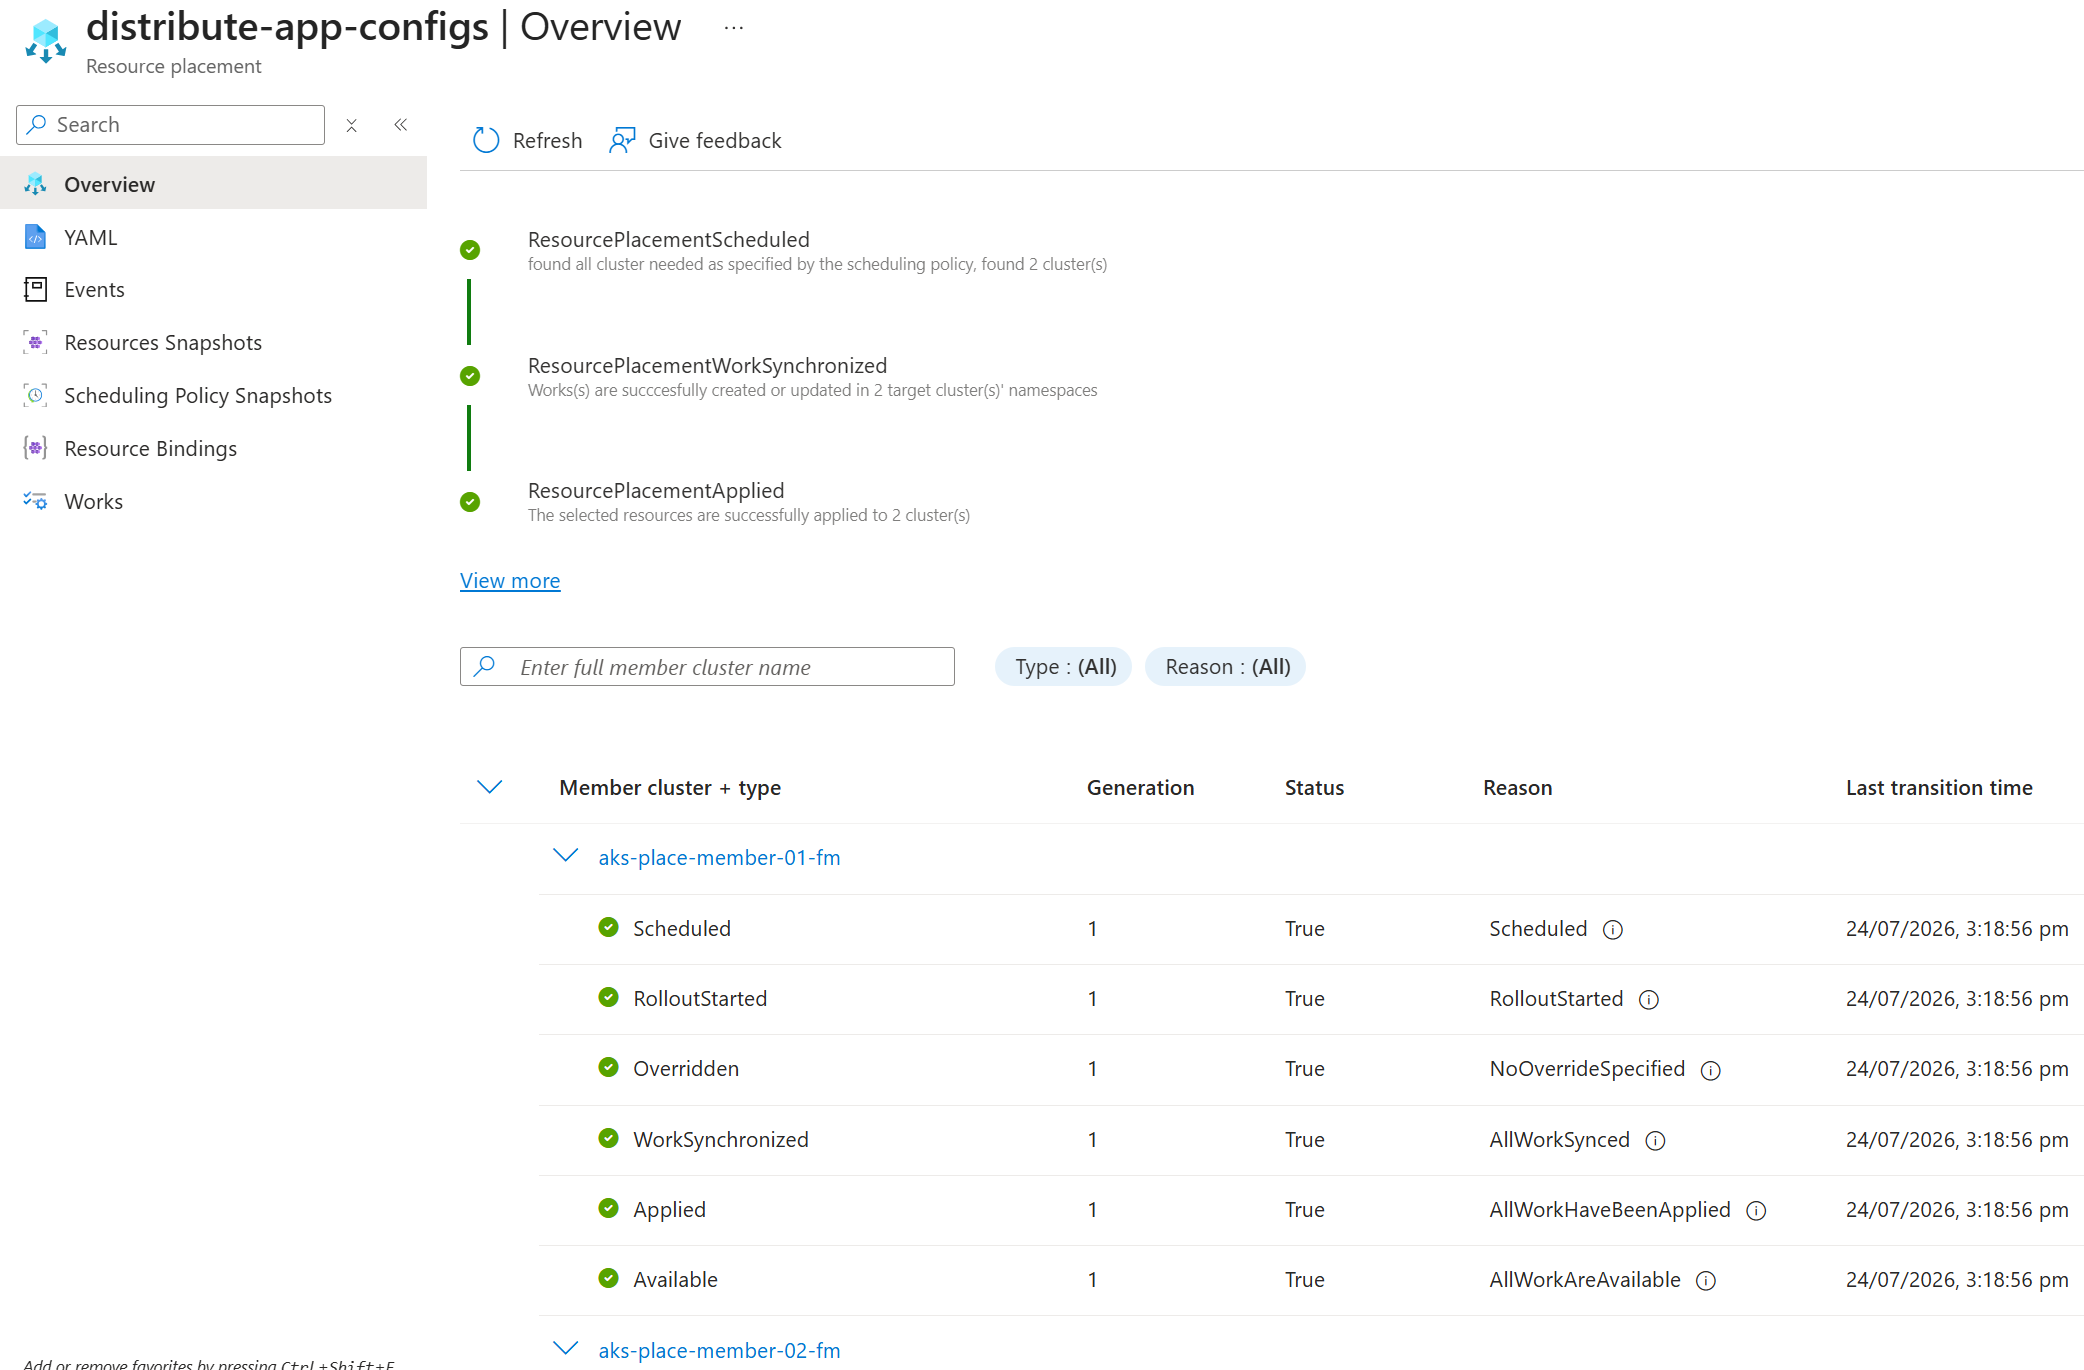
You can confirm the distributed resources are present on member clusters by directly connecting to the member clusters and inspecting the test-app namespace to view the two ConfigMap resources.
Delete the placement to remove resources
When you delete the resource placement on the Fleet Manager hub cluster, you remove the distributed resources from selected member clusters.
To remove the ConfigMap resources, delete the
ResourcePlacementon the Fleet Manager hub cluster.kubectl delete resourceplacement distribute-app-configsTo remove the namespace from member clusters, delete the
ClusterResourcePlacement.kubectl delete clusterresourceplacement distribute-test-app-namespace
On the service menu, under Fleet Resources, select Resource placements.
In the resource placements list, select the placement and select Delete.
On Delete, verify that you chose the correct placement. When you're ready, select Confirm delete > Delete.
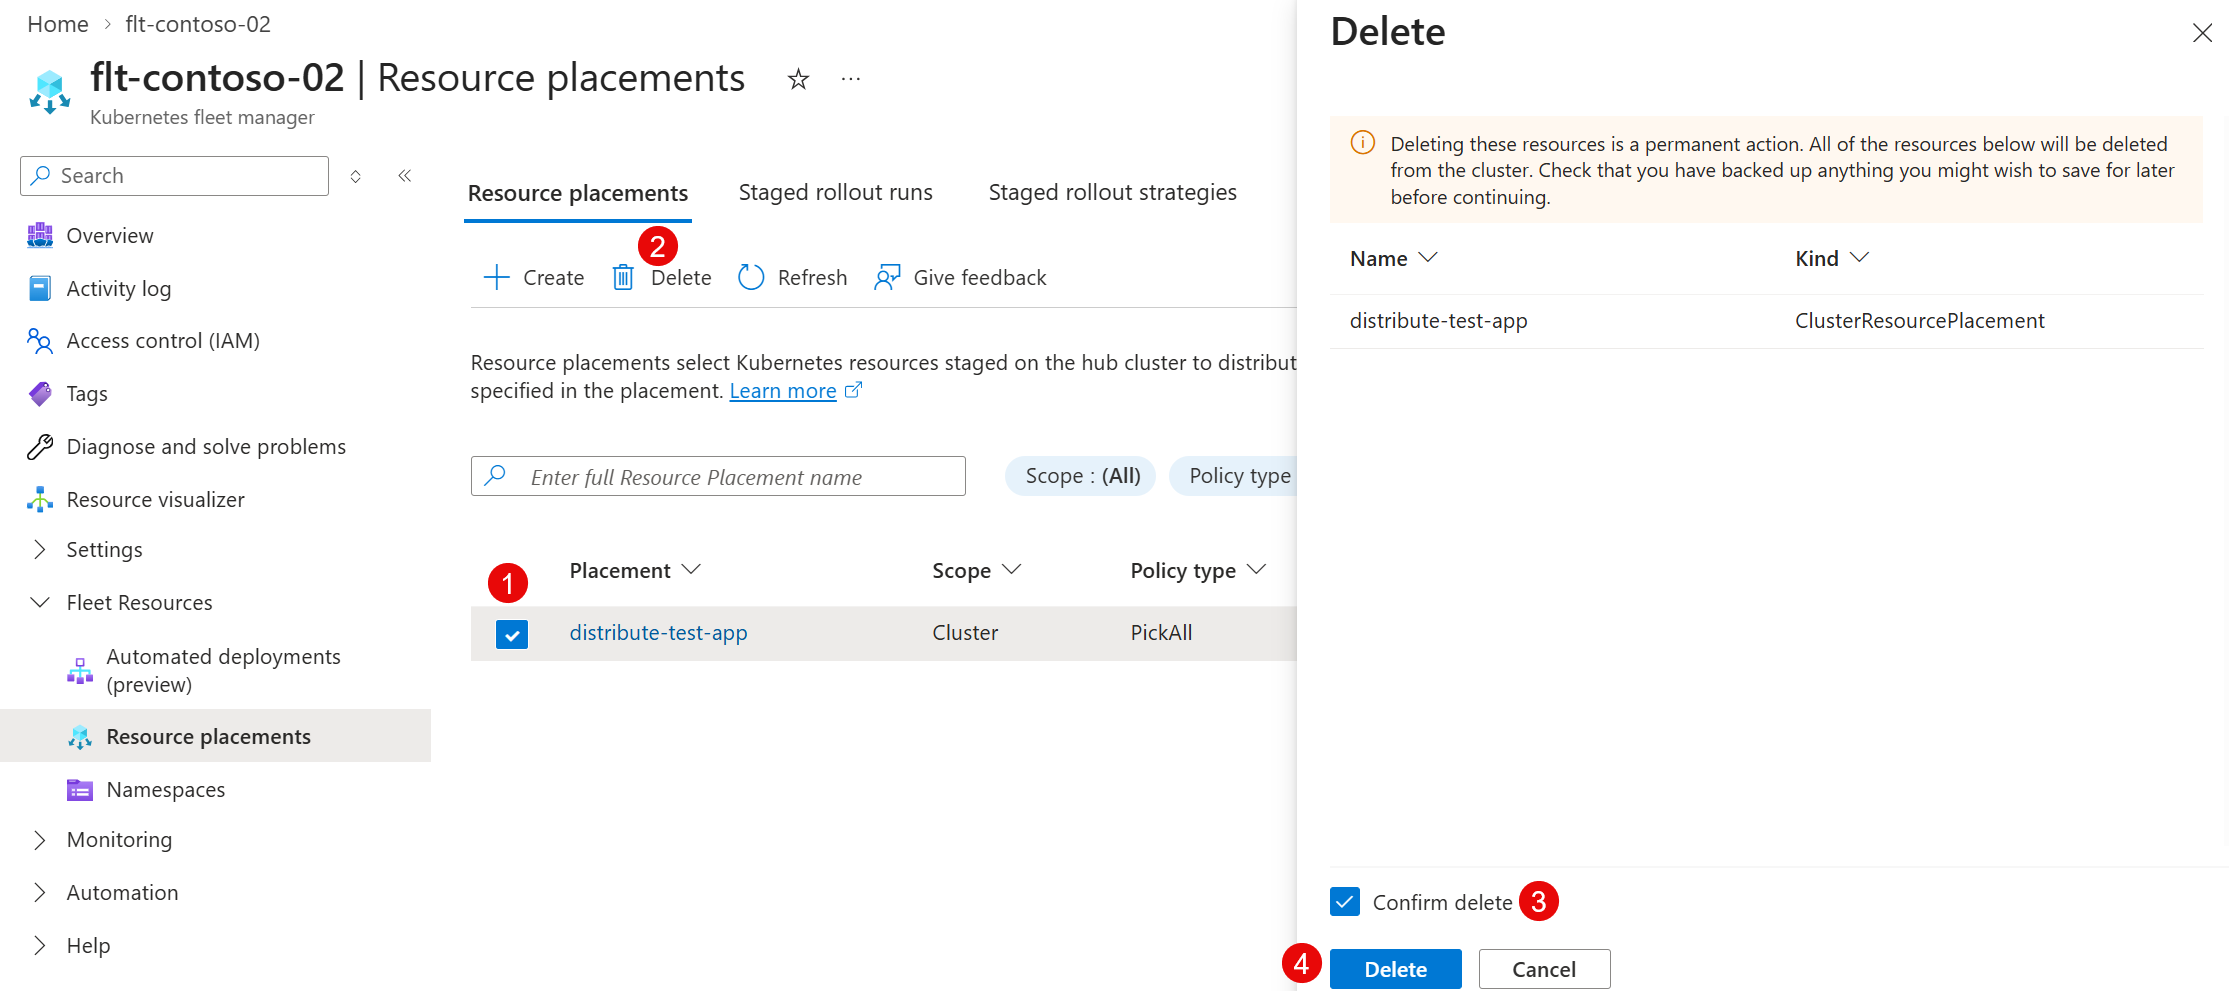
The page refreshes and the placement no longer appears in the list. The resources are removed from member clusters.
Repeat this process to remove the namespace that you placed as the first step.
Related content
To learn more about resource placement, see the following resources:
- Deploy cluster-scoped resources across multiple clusters.
- Understanding resource placement status output.
- Intelligent cross-cluster Kubernetes resource placement based on member clusters' properties.
- Controlling eviction and disruption for cluster resource placement.
- Defining a rollout strategy for a cluster resource placement.
- Cluster resource placement FAQs.
- Open-source KubeFleet ResourcePlacement documentation.