Note
Access to this page requires authorization. You can try signing in or changing directories.
Access to this page requires authorization. You can try changing directories.
Applies to: ✔️ Fleet Manager ✔️ Fleet Manager with hub cluster
Platform administrators often perform pre- and post-update checks when updating multiple clusters in an update run. These checks are to ensure that the clusters are ready to be updated, or that the update didn't adversely affect cluster operations.
Fleet Manager provides approval gates that allow platform administrators to either manually, or via automation, perform any checks required to allow the update run to proceed. For example, an approval gate between the test and production stages of an update run means health checks can be run on test clusters to make sure it's safe to proceed to production.
This article covers how to define approvals in update run and strategies, and how to approve them during update run execution.
Prerequisites
Read the conceptual overview of Fleet updates, which provides an explanation of update runs, stages, groups, and strategies referenced in this guide.
You must have a Fleet resource with one or more member clusters. If not, follow the quickstart to create a Fleet resource and join Azure Kubernetes Service (AKS) clusters as members.
Set the following environment variables:
export GROUP=<resource-group>
export FLEET=<fleet-name>
export CLUSTERID=<aks-cluster-resource-id>
export STRATEGY=<strategy-name>
If you're following the Azure CLI instructions in this article, you need Azure CLI version 2.70.0 or later installed. To install or upgrade, see Install the Azure CLI.
You also need the
fleetAzure CLI extension version 1.6.0 or later, which you can install by running the following command:az extension add --name fleetRun the
az extension updatecommand to update to the latest version of the extension released:az extension update --name fleet
Configure approvals in update strategies
Approvals can be configured when creating an update strategy, or when creating an update run with Stages as the update sequence type.
Note
Approvals can’t be used with a One-by-one update sequence.
Approvals can be placed on any update stage or update group in an update strategy and can either be before or after the stage or group is executed. Here are some examples of how this functionality can be used:
- An approval before your production stage means that production stage updates don't start until approval is granted. The approval confirmation can be manual, or via automation.
- An approval after each group means you can run health checks over the clusters in each of those groups. The approval waits until a user confirms that applications are running correctly on the updated clusters.
Configure stage and group approvals in an update strategy
In the Azure portal, navigate to your Azure Kubernetes Fleet Manager resource.
From the service menu, under Settings, select Multi-cluster update > Strategies, then Create.
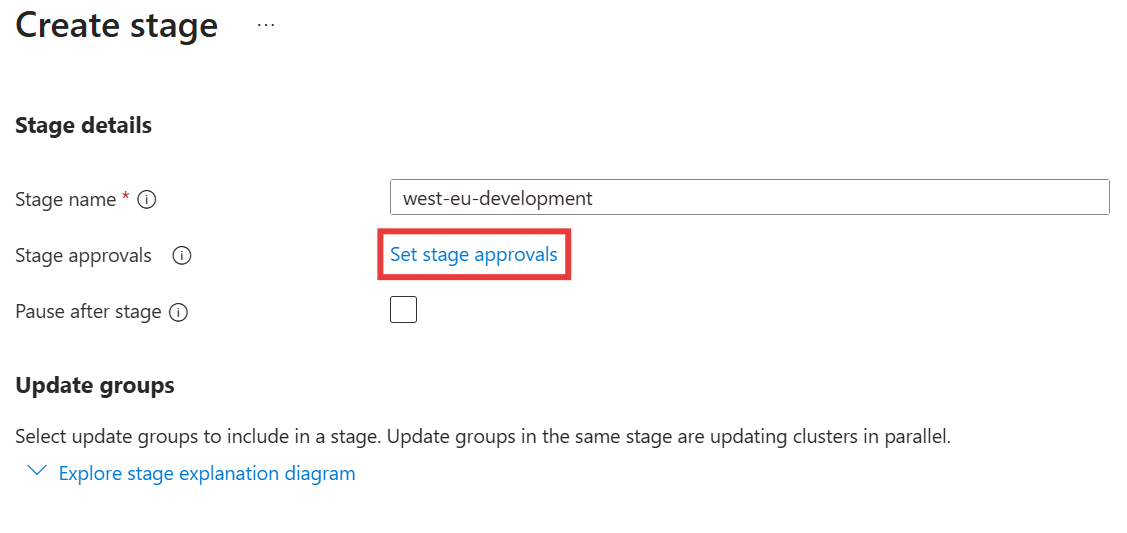
Enter a name for the strategy and then under Update sequence select Create Stage.
Enter a Stage name and then select Set stage approvals.
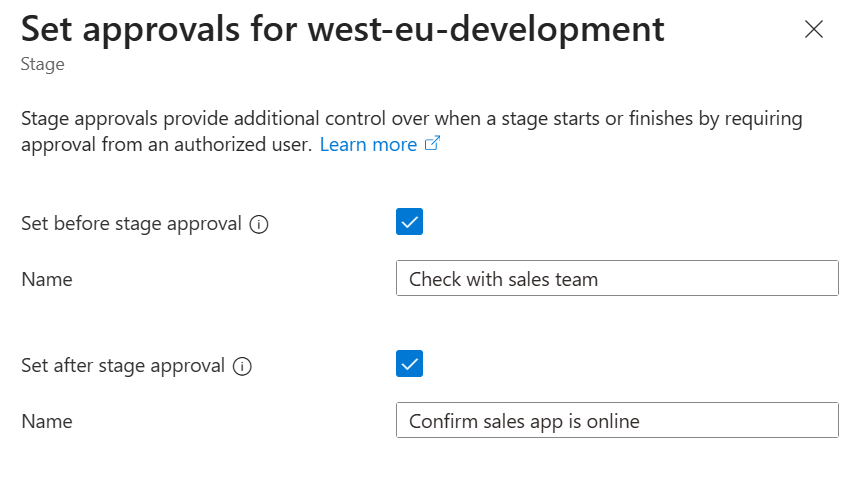
In the sidebar on the right, select whether you want before stage and/or after stage approvals.
Enter a Name for the approval. This name is shown when the update run is executing and can help provide context to the approver.
Select Save in the approvals sidebar.
Approvals can also be configured on individual groups. To do so, under Update groups select Set group approvals for the group you want to add approvals for.
As previously described for stages, use the approvals sidebar to configure a before and/or after approval and its name.
Select Save in the approvals sidebar.
Select Create.


Create a JSON file to define the stages and groups for the update run. Here's an example file that defines approval gates in all positions (example-stages.json):
{
    "stages": [
       {
         "name": "stage-1",
         "beforeGates": [
           {
             "displayName": "stage before gate",
             "type": "Approval"
           }
         ],
         "afterGates": [
           {
             "displayName": "stage after gate",
             "type": "Approval"
           }
         ],
         "groups": [
           {
             "name": "group-1",
             "beforeGates": [
               {
                 "displayName": "group before gate",
                 "type": "Approval"
               }
             ],
             "afterGates": [
               {
                 "displayName": "group after gate",
                 "type": "Approval"
               }
             ]
           }
         ]
       }
    ]
}
Create a new update strategy using the
az fleet updatestrategy createcommand with the--stagesflag set to the name of your JSON file.az fleet updatestrategy create \ --resource-group $GROUP \ --fleet-name $FLEET \ --name $STRATEGY \ --stages example-stages.json
For more information, read the guide to creating update strategies
Approvals can also be configured when defining groups and stages within an update run.
Understanding approval states
Approvals are represented as gates that control the flow of the update run. The gate’s state indicates whether or not it's approved. The update run itself also maintains the status of the gate. Here's a list of all the gate states that can be seen in the update run:
- Not Started: Until the update run reaches a gate, it's shown as
NotStarted. - Pending: While a gate is waiting to be approved, it's in state
Pending. - Skipped: If a group or stage is skipped, then all gates within that group or stage automatically move to
Skippedstate. - Completed: Once a gate is approved, it's shown as
Completed.
Granting approvals during an update run
Once an update run with a strategy containing approvals is started, the update run continues to execute until it reaches one of the configured approvals. At that point, the update run doesn't proceed further until you grant approval for it to do so.
Note
Update groups execute in parallel. As such, an approval for one group affects that group only and not any others. If you want to block multiple groups, then use a single stage approval or one group approval for each of them.
In the Azure portal, navigate to your Azure Kubernetes Fleet Manager resource.
From the service menu, under Settings, select Multi-cluster update.
Update runs that are waiting for approval are shown with Pending approval in the State column of the table.
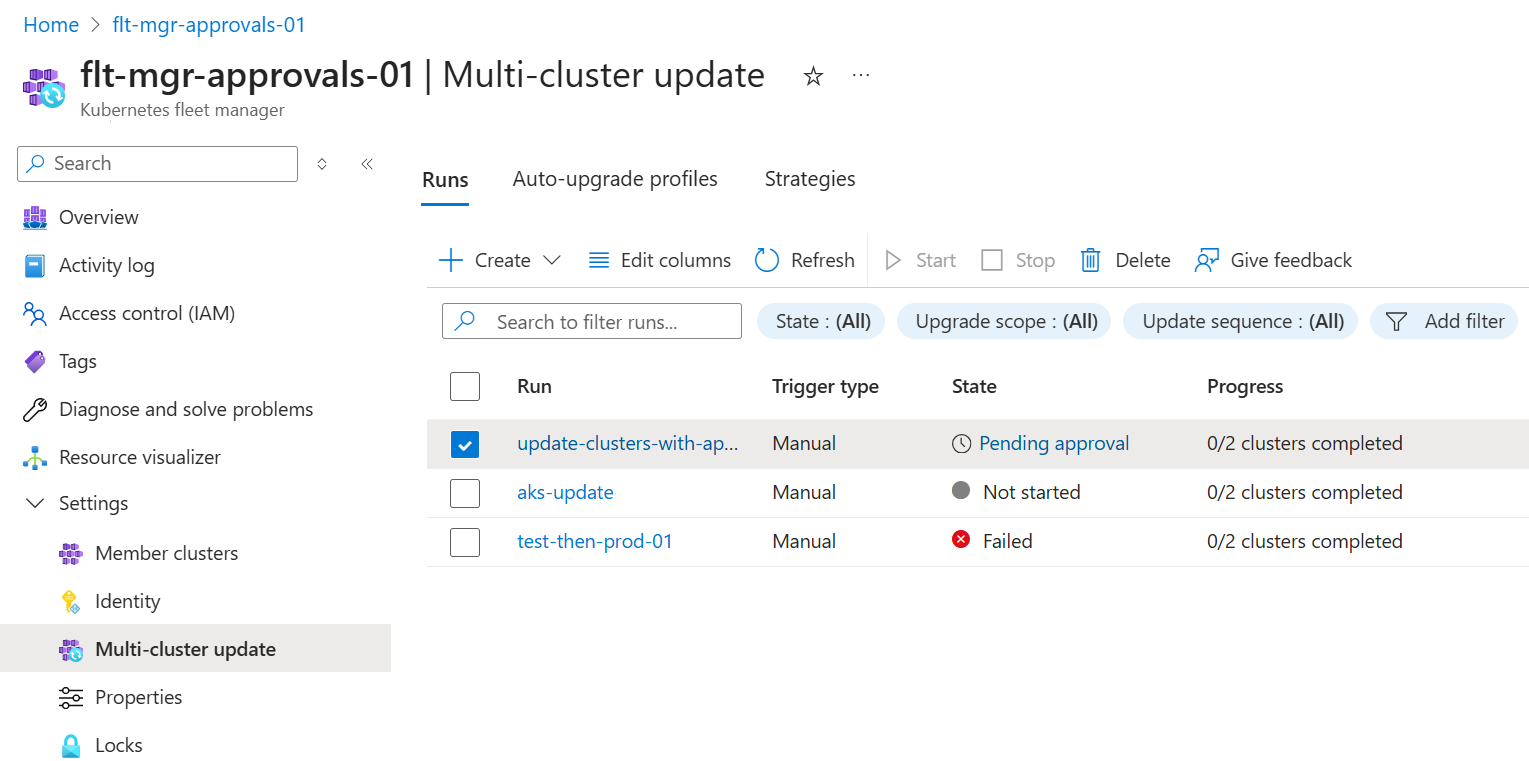
Select Pending approval for the update run where you want to grant approval.
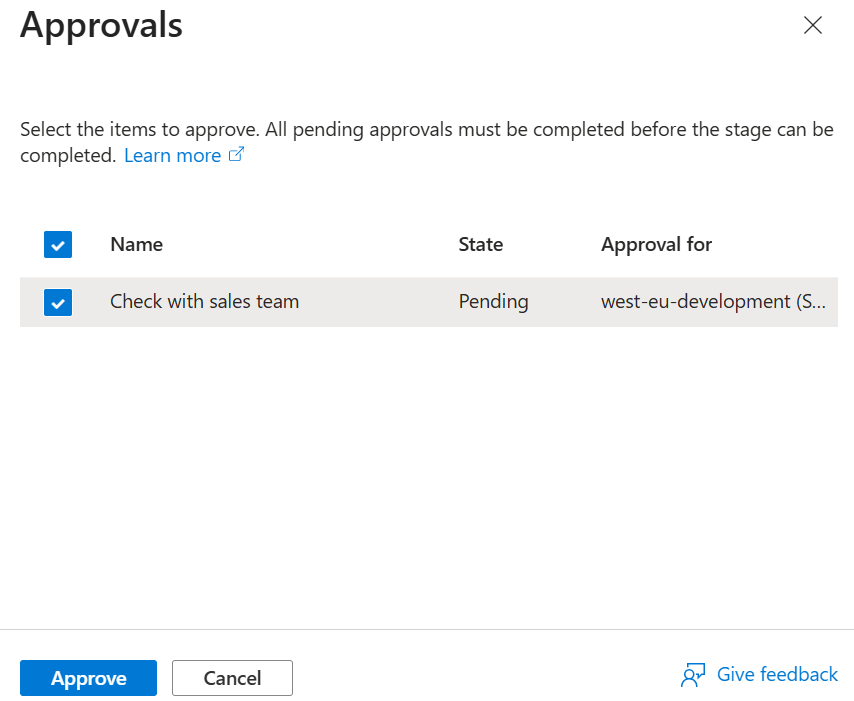
In the sidebar on the right, observe the details of the pending approval.
Select the approvals you want to grant.
Select Approve.


Retrieve the update run status using the
az fleet updaterun showcommand.az fleet updaterun show \ --resource-group $GROUP \ --fleet-name $FLEET \ --name <run-name>Under the
statusJSON object in the response, look for the stage or group where the approval was configured. Find the matchingbeforeGatesorafterGatesJSON object. In the example below:- The beforeGate with displayName
Do not start during business hours!is in state Pending. It's waiting for approval. - The afterGate with displayName
Run health checksis in state NotStarted. Because the update run isn't up to this gate yet, there's no linkedgateId.
{ "status": { "stages": [ { beforeGates": [ { "displayName": "Do not start during business hours!", "gateId": "/subscriptions/<subscription id>/resourceGroups/<resource group>/providers/Microsoft.ContainerService/fleets/<fleet name>/gates/aaaa0a0a-bb1b-cc2c-dd3d-eeeeee4e4e4e", "status": { "completedTime": null, "error": null, "startTime": "2025-08-08T06:20:46.283255+00:00", "state": "Pending" } } ], "afterGates": [ { "displayName": "Run health checks", "gateId": null, "status": { "completedTime": null, "error": null, "startTime": null, "state": "NotStarted" } } ], ... } ] } }- The beforeGate with displayName
The output can be large, making it difficult to find the approval you want to grant. Using a tool like jq can make it easier to find the beforeGate or afterGate in the update run response. For example, to retrieve all stage gates that are awaiting approval use the following command:
az fleet updaterun show \ --resource-group $GROUP \ --fleet-name $FLEET \ --name <run-name> \ | jq '.status.stages[] | .beforeGates + .afterGates | .[] | select(.status.state == "Pending")'Once you find the gate that you want to approve, identify its
gateId. Note down the last part of the gateId (after the final slash). For example, for the Pending approval in the prior example response use aaaa0a0a-bb1b-cc2c-dd3d-eeeeee4e4e4e.Grant the approval by using the
az fleet gate approvecommand. Use the identifier that you retrieved in the previous step as the argument to –name.az fleet gate approve \ --resource-group $GROUP \ --fleet-name $FLEET \ --name aaaa0a0a-bb1b-cc2c-dd3d-eeeeee4e4e4e
Alternatively, you can list all gates across all update runs in a fleet.
Note
The list response may be large as multiple approvals can be returned. It may be more difficult to find the gate that you want to approve this way.
Use the
az fleet gate listcommand, filtering for gates in Pending state.az fleet gate list \ --resource-group $GROUP \ --fleet-name $FLEET \ --state PendingAs described previously in step 5, grant the approval by using the
az fleet gate approvecommand. This time, use the name returned from the list command as the argument to –name.az fleet gate approve \ --resource-group $GROUP \ --fleet-name $FLEET \ --name aaaa0a0a-bb1b-cc2c-dd3d-eeeeee4e4e4e
Cleaning up
After your update run is complete, you may wish to clean up the gate resources that were created. Or if you see leftover approvals when listing all pending gates, then these steps can be used to remove them.
Note
Gates cannot be deleted directly. Instead, you must delete the update run associated with the gate. This automatically deletes all gates associated with the update run.
In the Azure portal, navigate to your Azure Kubernetes Fleet Manager resource.
From the service menu, under Settings, select Multi-cluster update.
Select the update run associated with the gate that you want to delete.
Select Delete.
In the sidebar on the right, confirm that the correct update run is shown and then select Delete.
In the popup, select Delete.
Identify the update run associated with the gate that you want to delete. The update run name can be found in the gate
target.updateRunProperties.namefield.Delete the update run:
az fleet updaterun delete \
 --resource-group $GROUP \
 --fleet-name $FLEET \
 --name <run-name>
All gates associated with the update run are now deleted.