Note
Access to this page requires authorization. You can try signing in or changing directories.
Access to this page requires authorization. You can try changing directories.
Applies to: Azure Logic Apps (Consumption + Standard)
To send and receive RosettaNet messages in workflows that you create using Azure Logic Apps, use the RosettaNet connector. This connector provides actions that support and manage communication that follows RosettaNet standards. These standards are commonly used for supply chain processes and are widespread in the semiconductor, electronics, and logistics industries. RosettaNet is based on XML and defines message guidelines, interfaces for business processes, and implementation frameworks for communication between companies.
The RosettaNet connector provides the following capabilities:
- Receive and decode RosettaNet messages.
- Send and encode RosettaNet messages.
- Wait for the response and generation of Notification of Failure.
This guide provides a short overview about RosettaNet and shows how to add the encoding and decoding actions for RosettaNet to an existing logic app workflow. The RosettaNet connector doesn't provide any triggers, so you can use any trigger to start your workflow. The examples in this guide use the Request trigger.
Understand RosettaNet concepts
RosettaNet is an organization that established standard processes for sharing business information. This organization creates and maintains Partner Interface Processes (PIPs), which provide common business process definitions for all RosettaNet message exchanges. For more information, visit the RosettaNet website.
The RosettaNet connector is based on the RosettaNet Implementation Framework (RNIF) version 2.0.01 and supports all PIPs defined by this version. RNIF is an open network application framework that facilitates business partners to collaboratively run RosettaNet PIPs. This framework defines the message structure, the need for acknowledgments, Multipurpose Internet Mail Extensions (MIME) encoding, and the digital signature. Communication between partners can be synchronous or asynchronous.
The following table describes RosettaNet concepts and terms:
| Concept | Description |
|---|---|
| PIP | A PIP provides common business process definitions for all RosettaNet message exchanges. PIPs are categorized by a high-level business function, or cluster, and a subfunction, or segment. For example, "3A4" is the PIP for Purchase Order, while "3" is the Order Management function, and "3A" is the Quote & Order Entry subfunction. Each PIP specification provides a document type definition (DTD) file and a message guideline document. The DTD file defines the service-content message structure. The message guideline document is a human-readable HTML file that specifies element-level constraints. Together, the PIP and DTD files provide a complete definition of the business process. For more information, visit the RosettaNet website. |
| Action | Action messages are part of a PIP and are business messages partners exchange with each other. |
| Signal | Signal messages are part of a PIP and are acknowledgments sent in response to action messages. |
| Single action and double action | For a PIP with a single action, the only response is an acknowledgment signal message. For a double-action PIP, the initiator receives a response message and replies with an acknowledgment along with the single-action message flow. |
Connector technical reference
The RosettaNet connector has different versions, based on logic app type and host environment.
| Logic app | Environment | Connector version |
|---|---|---|
| Consumption | Multitenant Azure Logic Apps | RosettaNet managed connector, which appears in the connector gallery under Shared. The RosettaNet connector provides only actions. You can use any trigger that works for your scenario. For more information, see: - RosettaNet operations - B2B protocol limits for message sizes |
| Standard | Single-tenant Azure Logic Apps, App Service Environment v3 (Windows plans only), and hybrid deployment | RosettaNet built-in connector, which appears in the connector gallery under Built-in. The RosettaNet connector provides only actions. You can use any trigger that works for your scenario. The built-in connector can directly access Azure virtual networks. You don't need an on-premises data gateway. For more information, see: - RosettaNet operations - B2B protocol limits for message sizes |
RosettaNet operations
The RosettaNet connector has no triggers. The following table describes the actions that the RosettaNet connector provides for establishing security and reliability when transmitting messages:
Prerequisites
An Azure account and subscription. Get a Azure account.
The logic app resource and workflow where you want to use the RosettaNet operations.
The workflow requires any trigger that works best for your scenario and any other actions that you want to run before you add a RosettaNet action.
For more information, see:
An integration account resource to define and store artifacts for use in enterprise integration and B2B workflows.
Both your integration account and logic app resource must exist in the same Azure subscription and Azure region.
Defines at least two trading partners that participate in the RosettaNet operation used in your workflow. Both partner definitions must use the same business identity qualifier, which is DUNS.
Important
Make sure that you select DUNS, which you can find near the bottom of the Qualifier list, and not 1 - D-U-N-S (Dun & Bradstreet).
Contains a PIP process configuration that stores all the PIP configuration characteristics. You use this configuration when you create an agreement between partners. If you don't have a process configuration, add a PIP process configuration.
Defines a RosettaNet agreement between the trading partners that participate in the RosettaNet operation. An agreement requires a host partner and a guest partner. The content in the messages between partners must match the agreement type. See Create a RosettaNet agreement.
Before you start working with RosettaNet operations, you must link your Consumption logic app or link your Standard logic app to the integration account.
Optional certificates for encrypting, decrypting, or signing the messages that you upload to the integration account. Certificates are required only if you use signing or encryption.
Add a PIP process configuration
If your integration account doesn't have a PIP process configuration, follow these steps to add a configuration:
In the Azure portal, go to your integration account resource.
On the resource sidebar, under Settings, select RosettaNet PIP. On the RosettaNet PIP page toolbar, select Add.
In the Add Partner Interface Process pane, enter the following PIP information:
Parameter Required Description Name Yes The PIP name. PIP Code Yes The three-character PIP code. For more information, see RosettaNet PIPs. PIP Version Yes The PIP version, which depends on the selected PIP code. For more information, visit the RosettaNet website.
The following example shows sample information for a PIP process configuration:
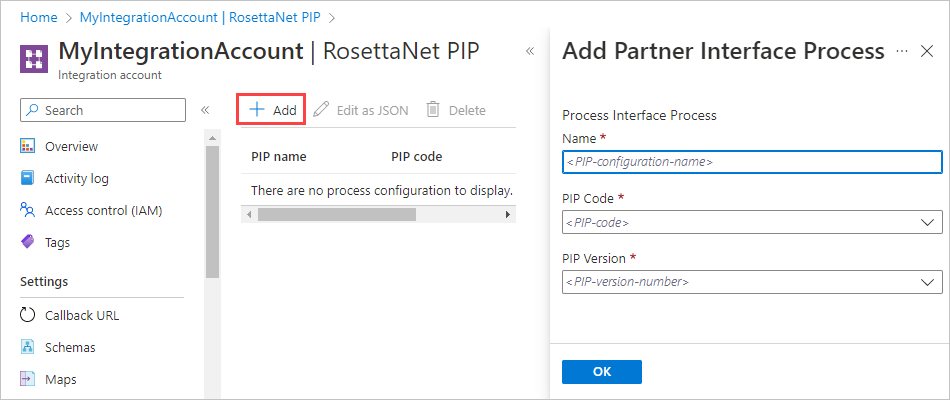
When you're done, select OK to create the PIP configuration.
To view or edit the process configuration, select the PIP. On the RosettaNet PIP page toolbar, select Edit as JSON.
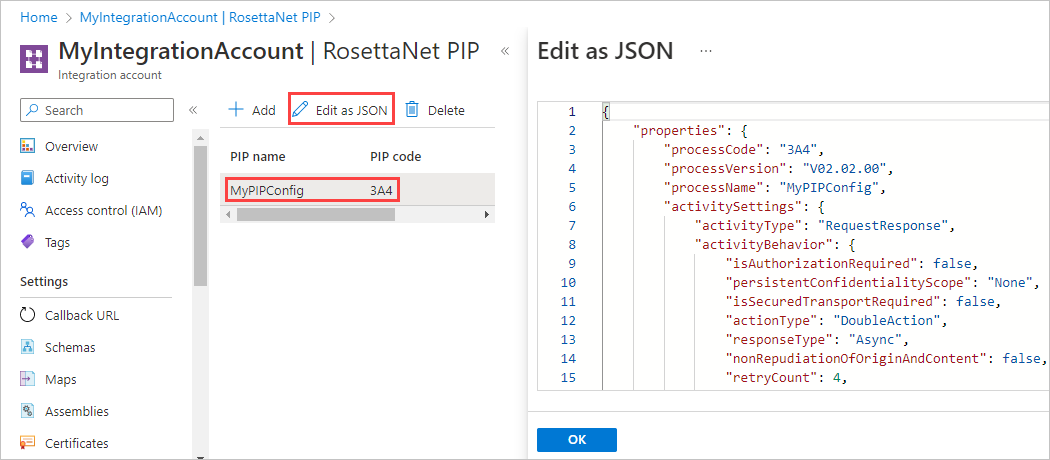
All process configuration settings come from the PIP's specifications. By default, Azure Logic Apps populates most settings with default values based on the most typically used values.
Confirm that the settings values correspond to the values in the appropriate PIP specification and meet your business needs. If necessary, update the values in the JSON editor and save the changes.
When you're done, select OK.


Create a RosettaNet agreement
If your integration account doesn't have RosettaNet agreement, follow these steps to create the agreement:
In the Azure portal, go to your integration account resource.
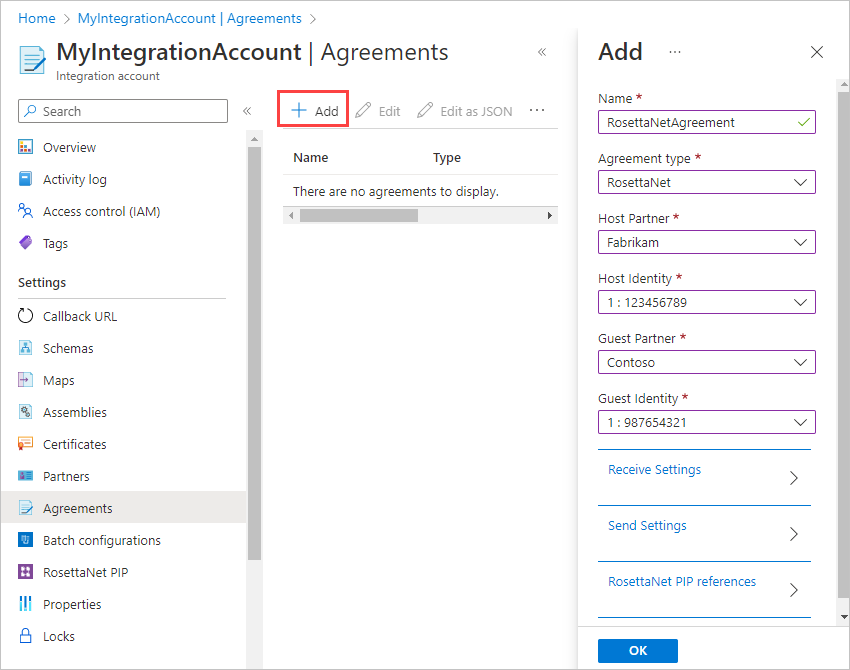
On the resource sidebar, under Settings, select Agreements. On the Agreements page toolbar, select Add.
On the Add pane, enter the following agreement information:
Parameter Required Description Name Yes The agreement name. Agreement type Yes The protocol type for the agreement. Select RosettaNet. Host Partner Yes The name for the host partner, which represents your organization. An agreement requires both a host and guest partner. Host Identity Yes The host partner identifier. Guest Partner Yes The name for the guest partner, which does business with the host partner. An agreement requires both a host and guest partner. Guest Identity Yes The guest partner identifier. Receive Settings Varies Properties that apply to all messages received by the host partner from the guest partner. Send Settings Varies Properties that apply to all messages sent by the host partner to the guest partner. RosettaNet PIP references Yes The PIP references for the agreement. All RosettaNet messages require PIP configurations. The following example shows sample information for a RosettaNet agreement:
To specify how the host partner receives messages from the guest partner, in the Add pane, select Receive Settings.
The Receive Settings pane shows the following settings:
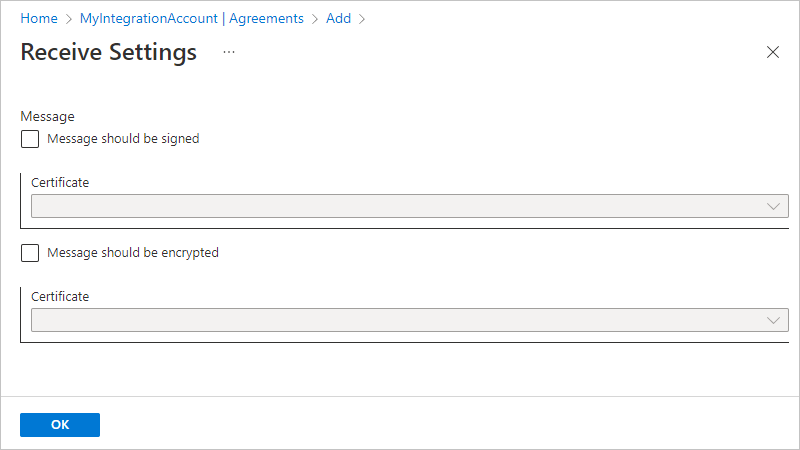
Setting Required Description Message should be signed No Sign incoming messages with the selected certificate. Certificate Yes, if signing is enabled The certificate to use for signing. Enable message encryption No Encrypt incoming messages with the selected certificate. Certificate Yes, if encryption is enabled The certificate to use for encryption. To enable signing, encryption, or both for incoming messages, under Message, select Message should be signed, Message should be encrypted, or both.
Under each selected setting, from the Certificate list, select the certificate from your integration account to use for signing, encryption, or both.
The following example shows the signing and encryption settings on the Receive Settings pane:
When you're done, select OK.
To specify how the host partner sends messages to the guest partner, in the Add pane, select Send Settings.
The Send Settings pane shows the following settings:
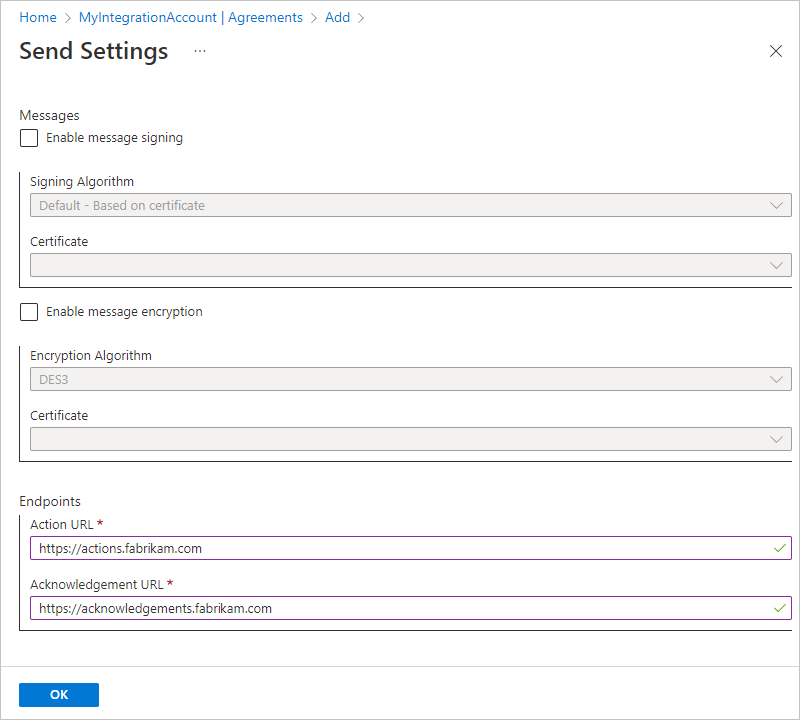
Setting Required Description Enable message signing No Sign outgoing messages with the selected signing algorithm and certificate. Signing Algorithm Yes, if signing is enabled The signing algorithm to use, based on the selected certificate. Certificate Yes, if signing is enabled The certificate to use for signing. Enable message encryption No Encrypt outgoing messages with the selected encryption algorithm and certificate. Encryption Algorithm Yes, if encryption is enabled The encryption algorithm to use, based on the selected certificate. Certificate Yes, if encryption is enabled The certificate to use for encryption. To enable signing, encryption, or both for outgoing messages, under Messages, select Enable message signing, Enable message encryption, or both.
Under each selected setting, from the algorithm list, select the algorithm to use. From the Certificate list, select the certificate from your integration account to use for signing, encryption, or both.
In the Endpoints section, specify the required URLs for sending action messages and acknowledgments:
Parameter Required Description Action URL Yes The URL to use for sending action messages. This URL is required for both synchronous and asynchronous messages. Acknowledgment URL Yes The URL to use for sending acknowledgment messages. This URL is required for asynchronous messages. The following example shows the signing, encryption, and endpoint URL settings on the Send Settings pane with some sample values:
When you're done, select OK.
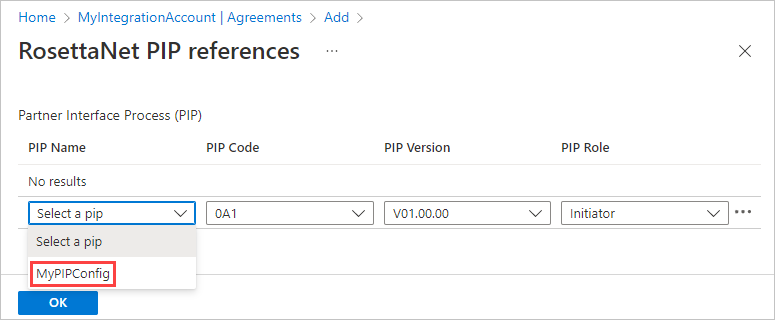
To specify the RosettaNet PIP references for the agreement, in the Add pane, select RosettaNet PIP references.
The RosettaNet PIP references page shows the PIP process configuration that you previously created and added.
In the PIP Name column, open the list, and select the PIP.
Your selection populates the remaining properties, which are based on the PIP in your integration account.
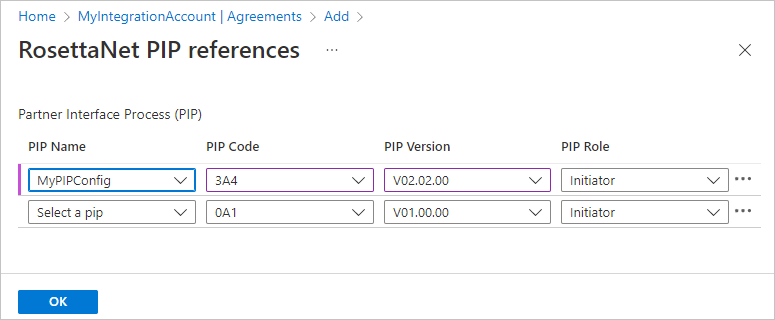
If necessary, you can change the PIP Role.
Continue to next section to receive RosettaNet messages.

Receive and decode RosettaNet messages
In the Azure portal, open your logic app resource. Open your workflow in the designer.
The workflow should already have a trigger and any other actions that you want to run before you add the RosettaNet action.
Follow these general steps to add the RosettaNet decode action to your workflow.
In the action information pane, provide the following values:
Parameter Required Description Message Yes The RosettaNet message to decode. Headers Yes The HTTP headers that provide the values for the version and response type as key-value pairs. The version is RNIF. The response type describes the partner communication type and can be synchronous or asynchronous.Role Yes The host partner role in the PIP. 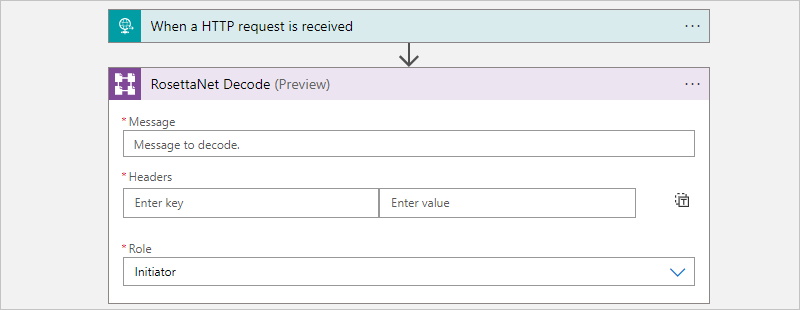

The output from the RosettaNet decode action includes an Outbound signal value. You can encode and return this output to the guest partner, or you can take a different action on this output.
Send and encode RosettaNet messages
In the Azure portal, open your logic app resource. Open your workflow in the designer.
The workflow should already have a trigger and any other actions that you want to run before you add the RosettaNet action.
Follow these general steps to add the RosettaNet encode action to your workflow.
In the action information pane, provide the following values:
Parameter Required Description RosettaNet process (PIP) instance identity Yes The instance ID for the message to encode. Host partner Yes The host partner name. Guest partner Yes The guest partner name. PIP code Yes The PIP code. PIP version Yes The PIP version. PIP instance identity Yes The unique identifier for this PIP message. Message type Yes The type for the message to encode. Role Yes The host partner role. 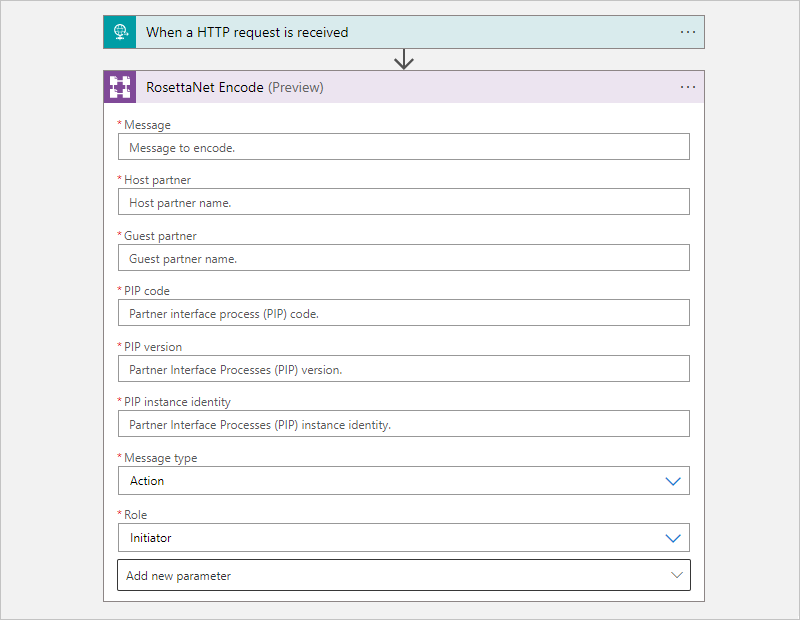
This action is now set up to encode and send the RosettaNet message to the guest partner.
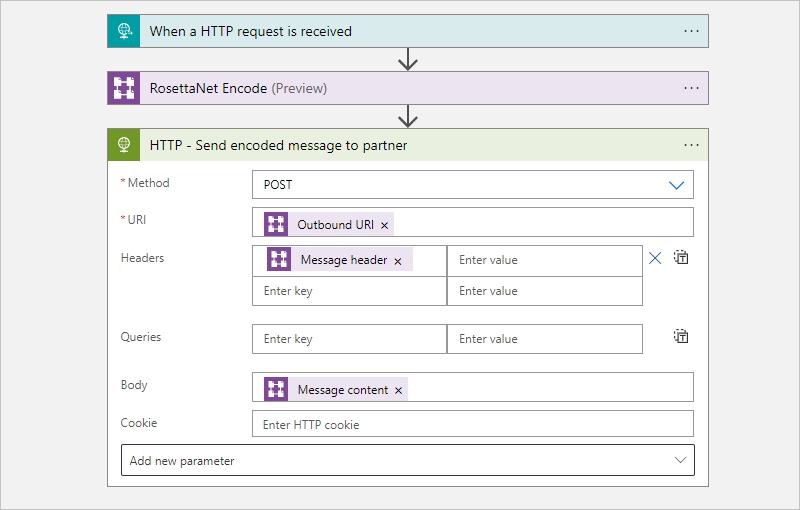
To send the encoded RosettaNet message, follow these general steps to add the appropriate action for your scenario. Provide the values that the action need to send the message.
This example uses the HTTP action, which is renamed HTTP - Send encoded message to partner. The values are outputs from the RosettaNet encode action and are added through the dynamic content list.
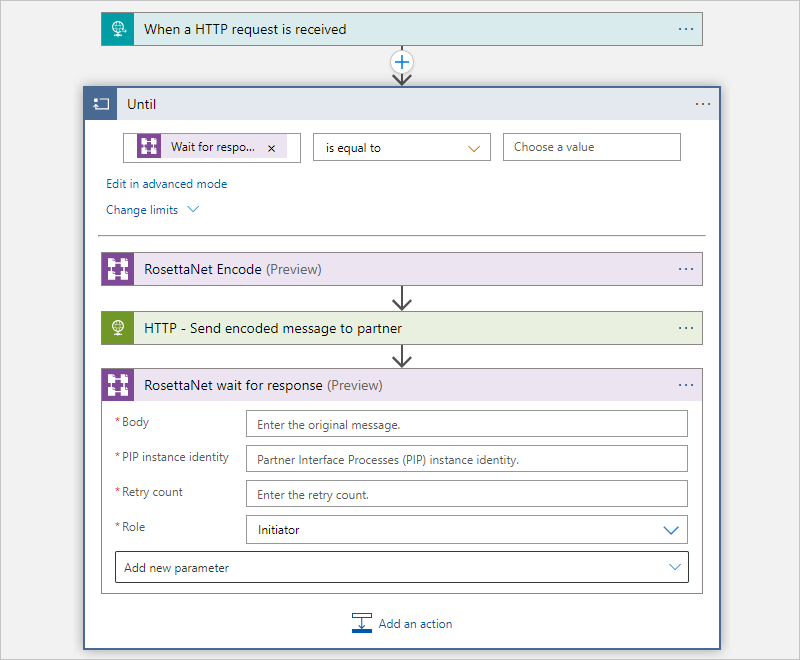
Based on RosettaNet standards, business transactions are complete only after all steps defined by the PIP are complete. After the host partner sends the encoded message to the guest partner, the host waits for the signal and acknowledgment.
In your workflow, add the RosettaNet action that waits for a response. In the action information pane, provide the following values:
Parameter Required Description Body Yes The original encoded message. PIP instance identity Yes The instance ID for the encoded message. Retry count Yes The number of retries to encode and send the message. Role Yes The host partner role. The RosettaNet action's wait duration and retry count are based on the PIP configuration.

If the RosettaNet action doesn't receive a response, the action generates a Notification of Failure.
To handle retry attempts, always put RosettaNet actions to send the encoded message and wait for a response inside an Until loop, for example: