Note
Access to this page requires authorization. You can try signing in or changing directories.
Access to this page requires authorization. You can try changing directories.
Applies to: Azure Logic Apps (Consumption + Standard)
To send and receive X12 messages in workflows that you create using Azure Logic Apps, use the X12 connector. This connector provides operations that support and manage X12 communication.
This guide shows how to add the encoding and decoding actions for X12 to an existing logic app workflow. You can use any trigger with the X12 actions. The examples in this guide use the Request trigger.
Connector technical reference
The X12 connector has different versions, based on logic app type and host environment.
| Logic app | Environment | Connector version |
|---|---|---|
| Consumption | Multitenant Azure Logic Apps | X12 managed connector, which appears in the connector gallery under Shared. The X12 connector has one trigger and multiple actions. You can use any trigger that works for your scenario. For more information, see: - X12 managed connector reference - X12 message limits |
| Standard | Single-tenant Azure Logic Apps, App Service Environment v3 (Windows plans only), and hybrid deployment | X12 built-in connector, which appears in the connector gallery under Built-in, and X12 managed connector, which appears in the connector gallery under Shared. The X12 managed connector has one trigger and multiple actions. The X12 built-in connector provides only actions. You can use any trigger that works for your scenario. The built-in version differs in the following ways: - The built-in version can directly access Azure virtual networks. You don't need an on-premises data gateway. - The built-in version provides higher throughput and lower latency. For more information, see: - X12 managed connector reference - X12 built-in connector operations - X12 message limits |
X12 built-in operations
The following sections describe the X12 built-in connector operations and their parameters:
Decode X12
Operation ID: x12Decode
Decodes an X12 message by converting flat file to XML format.
Parameters
| Display name | JSON name | Required | Type | Description |
|---|---|---|---|---|
| Message to decode | messageToDecode |
Yes | String | The X12 message to decode. |
| B2B tracking Id | b2bTrackingId |
No | String | The B2B tracking ID. |
Encode X12
Operation ID: x12Encode
Encodes an X12 message by converting XML to flat file format.
Parameters
| Display name | JSON name | Required | Type | Description |
|---|---|---|---|---|
| Message to encode | messageToEncode |
Yes | String | The X12 message to encode. |
| Sender identity Sender qualifier | senderIdentity.qualifier |
No | String | The sender qualifier. |
| Sender identity Sender identifier | senderIdentity.value |
No | String | The sender identifier. |
| Receiver identity Receiver qualifier | receiverIdentity.qualifier |
No | String | The receiver qualifier. |
| Receiver identity Receiver identifier | receiverIdentity.value |
No | String | The receiver identifier. |
| Name of X12 agreement | agreementName |
No | String | The name of the X12 agreement. |
| B2B tracking Id | b2bTrackingId |
No | String | The B2B tracking ID. |
Encode X12 batch
Operation ID: x12BatchEncode
Encodes an X12 message batch by converting XML to flat file format.
Parameters
| Display name | JSON name | Required | Type | Description |
|---|---|---|---|---|
| Batch messages | batchMessage.items |
Yes | Array | The X12 message to encode. |
| Message ID | batchMessage.items.messageId |
Yes | String | The unique ID of the batch item. |
| Content | batchMessage.items.content |
Yes | String | The batch item content. |
| Batch name | batchMessage.batchName |
No | String | The batch name. |
| Partition name | batchMessage.partitionName |
No | String | The partition name. |
| Sender identity Sender qualifier | senderIdentity.qualifier |
No | String | The sender qualifier. |
| Sender identity Sender identifier | senderIdentity.value |
No | String | The sender identifier. |
| Receiver identity Receiver qualifier | receiverIdentity.qualifier |
No | String | The receiver qualifier. |
| Receiver identity Receiver identifier | receiverIdentity.value |
No | String | The receiver identifier. |
| Name of X12 agreement | agreementName |
No | String | The name of the X12 agreement. |
| B2B tracking Id | b2bTrackingId |
No | String | The B2B tracking ID. |
Prerequisites
An Azure account and subscription. If you don't have an Azure subscription yet, sign up for a Azure account.
The logic app resource and workflow where you want to use the X12 operations.
For more information, see:
An integration account resource to define and store artifacts for use in enterprise integration and B2B workflows.
Both your integration account and logic app resource must exist in the same Azure subscription and Azure region.
Defines at least two trading partners that participate in the X12 operation used in your workflow. The definitions for both partners must use the same X12 business identity qualifier.
Defines an X12 agreement between the trading partners that participate in your workflow. Each agreement requires a host partner and a guest partner. The content in the messages between you and the other partner must match the agreement type. For information about agreement settings to use when receiving and sending messages, see X12 message settings.
Important
If you're working with Health Insurance Portability and Accountability Act (HIPAA) schemas, you must add a
schemaReferencessection to your agreement. For more information, see HIPAA schemas and message types.Defines the schemas to use for XML validation.
Important
If you're working with Health Insurance Portability and Accountability Act (HIPAA) schemas, make sure to review HIPAA schemas and message types.
Before you start working with X12 operations, you must link your Consumption logic app or link your Standard logic app to an integration account.
When you add an X12 operation, you must also create a connection to the integration account. You can create the connection when you add the X12 operation to your workflow.
Encode X12 messages
The Encode to X12 message operation performs the following tasks:
Resolves the agreement by matching sender and receiver context properties.
Serializes the Electronic Data Interchange (EDI) and converts XML-encoded messages into EDI transaction sets in the interchange.
Applies transaction set header and trailer segments.
Generates an interchange control number, a group control number, and a transaction set control number for each outgoing interchange.
Replaces separators in the payload data.
Validates EDI and partner-specific properties.
- Schema validation of transaction-set data elements against the message schema.
- EDI validation on transaction-set data elements.
- Extended validation on transaction-set data elements.
Requests a Technical and Functional Acknowledgment, if configured.
- Generates a Technical Acknowledgment as a result of header validation. The technical acknowledgment reports the status of the processing of an interchange header and trailer by the address receiver.
- Generates a Functional Acknowledgment as a result of body validation. The functional acknowledgment reports each error encountered while processing the received document.
To encode messages with the X12 connector, follow these steps:
In the Azure portal, open your logic app resource and workflow in the designer.
In the designer, follow these general steps to add the X12 action named Encode to X12 message by agreement name to your workflow.
Note
To use the Encode to X12 message by identities action instead, you must later provide different parameter values, such as the Sender identifier and Receiver identifier that's specified by your X12 agreement. You must also specify the XML message to encode value, which you can select as the output from the trigger or a preceding action.
When you're prompted to create a connection to your integration account, provide the following information:
Parameter Required Description Connection Name Yes A name for the connection. Integration Account ID Yes The resource ID for your integration account, which has the following format: /subscriptions/<Azure-subscription-ID>/resourceGroups/<resource-group-name>/providers/Microsoft.Logic/integrationAccounts/<integration-account-name>
For example:/subscriptions/a0a0a0a0-bbbb-cccc-dddd-e1e1e1e1e1e1/resourceGroups/integrationAccount-RG/providers/Microsoft.Logic/integrationAccounts/myIntegrationAccount
To find this resource ID, follow these steps:
1. In the Azure portal, open your integration account.
2. On the integration account sidebar, select Overview.
3. On the Overview page, select JSON View.
4. From the Resource ID property, copy the value.Integration Account SAS URL Yes The request endpoint URL that uses shared access signature (SAS) authentication to provide access to your integration account. This callback URL has the following format: https://<request-endpoint-URI>sp=<permissions>sv=<SAS-version>sig=<signature>
For example:https://prod-04.west-us.logic-azure.com:443/integrationAccounts/aaaaaaaa-0000-1111-2222-bbbbbbbbbbbb?api-version=2015-08-1-preview&sp=XXXXXXXXX&sv=1.0&sig=aB1cD2eF-3gH4iJ5kL6-mN7oP8qR
To find this URL, follow these steps:
1. In the Azure portal, open your integration account.
2. On the integration account sidebar, under Settings, select Callback URL.
3. From the Generated Callback URL property, copy the value.Size of Control Number Block No The block size of control numbers to reserve from an agreement for high throughput scenarios. For example:
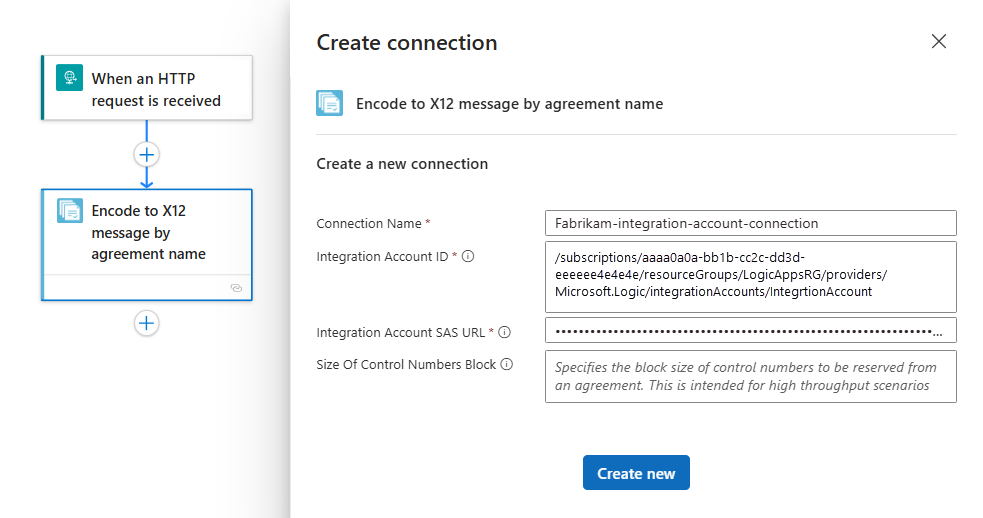
When you're done, select Create new.
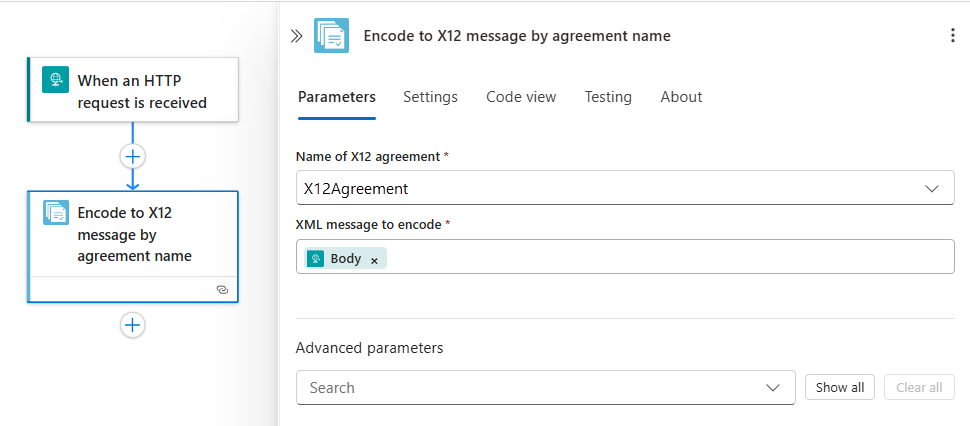
In the X12 action information pane, provide the following values:
Parameter Required Description Name of X12 agreement Yes The X12 agreement to use. XML message to encode Yes The XML message to encode. Advanced parameters No More parameters that you can select:
- Data element separator
- Component separator
- Replacement character
- Segment terminator
- Segment terminator suffix
- Control Version Number (ISA12)
- Application Sender Identifier/Code GS02
- Application Receiver Identifier/Code GS03
For more information, see X12 message settings.For example, you can use the Body content output from the Request trigger as the XML message payload.
To find and select this output, follow these steps:
Select inside XML message to encode box, then select the lightning icon to open the dynamic content list.
From the list, under When an HTTP message is received, select Body.


Decode X12 messages
The Decode X12 message operation performs the following tasks:
Validates the envelope against trading partner agreement.
Validates EDI and partner-specific properties.
- EDI structural validation and extended schema validation
- Interchange envelope structural validation
- Schema validation of the envelope against the control schema
- Schema validation of the transaction set data elements against the message schema
- EDI validation on transaction-set data elements
Verifies that the interchange, group, and transaction set control numbers aren't duplicates.
- Checks the interchange control number against previously received interchanges.
- Checks the group control number against other group control numbers in the interchange.
- Checks the transaction set control number against other transaction set control numbers in that group.
Splits an interchange into transaction sets, or preserves the entire interchange:
Split the interchange into transaction sets or suspend transaction sets on error: Parse each transaction set. The X12 decode action outputs only the transaction sets that fail validation to
badMessages, and outputs the remaining transactions sets togoodMessages.Split the interchange into transaction sets or suspend interchange on error: Parse each transaction set. If one or more transaction sets in the interchange fail validation, the X12 decode action outputs all the transaction sets in that interchange to
badMessages.Preserve the interchange or suspend transaction sets on error: Preserve the interchange and process the entire batched interchange. The X12 decode action outputs only the transaction sets that fail validation to
badMessages, and outputs the remaining transactions sets togoodMessages.Preserve the interchange or suspend interchange on error: Preserve the interchange and process the entire batched interchange. If one or more transaction sets in the interchange fail validation, the X12 decode action outputs all the transaction sets in that interchange to
badMessages.
Generates a Technical and Functional Acknowledgment, if configured.
- Generates a Technical Acknowledgment as a result of header validation. The technical acknowledgment reports the status of the processing of an interchange header and trailer by the address receiver.
- Generates a Functional Acknowledgment as a result of body validation. The functional acknowledgment reports each error encountered while processing the received document.
To decode X12 messages in your workflow with the X12 connector, follow these steps:
In the Azure portal, open your logic app resource and workflow in the designer.
In the designer, follow these general steps to add the X12 action named Decode X12 message to your workflow.
When you're prompted to create a connection to your integration account, provide the following information:
Parameter Required Description Connection Name Yes A name for the connection. Integration Account ID Yes The resource ID for your integration account, which has the following format: /subscriptions/<Azure-subscription-ID>/resourceGroups/<resource-group-name>/providers/Microsoft.Logic/integrationAccounts/<integration-account-name>
For example:/subscriptions/a0a0a0a0-bbbb-cccc-dddd-e1e1e1e1e1e1/resourceGroups/integrationAccount-RG/providers/Microsoft.Logic/integrationAccounts/myIntegrationAccount
To find this resource ID, follow these steps:
1. In the Azure portal, open your integration account.
2. On the integration account sidebar, select Overview.
3. On the Overview page, select JSON View.
4. From the Resource ID property, copy the value.Integration Account SAS URL Yes The request endpoint URL that uses shared access signature (SAS) authentication to provide access to your integration account. This callback URL has the following format: https://<request-endpoint-URI>sp=<permissions>sv=<SAS-version>sig=<signature>
For example:https://prod-04.west-us.logic-azure.com:443/integrationAccounts/aaaaaaaa-0000-1111-2222-bbbbbbbbbbbb?api-version=2015-08-1-preview&sp=XXXXXXXXX&sv=1.0&sig=aB1cD2eF-3gH4iJ5kL6-mN7oP8qR
To find this URL, follow these steps:
1. In the Azure portal, open your integration account.
2. On the integration account sidebar, under Settings, select Callback URL.
3. From the Generated Callback URL property, copy the value.Size of Control Number Block No The block size of control numbers to reserve from an agreement for high throughput scenarios. For example:
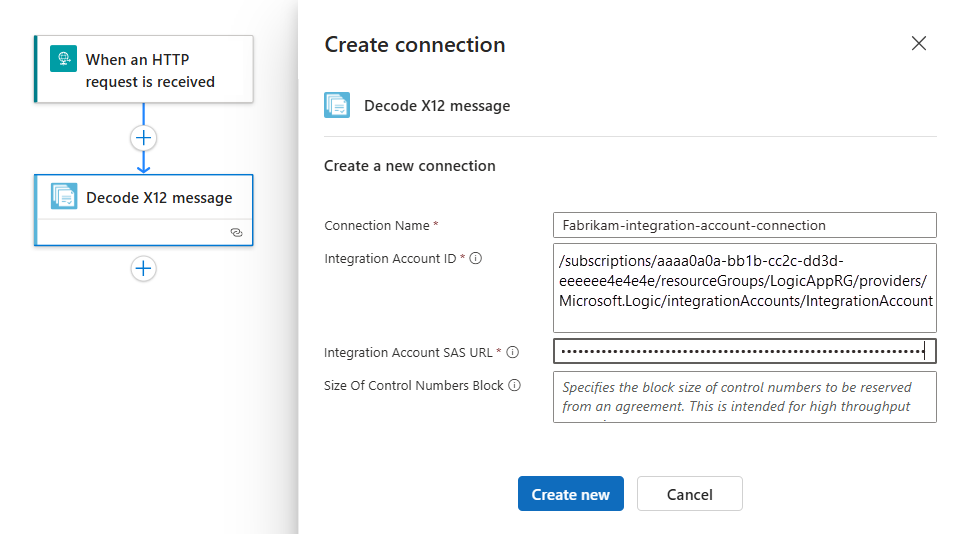
When you're done, select Create new.
In the X12 action information box, provide the following values:
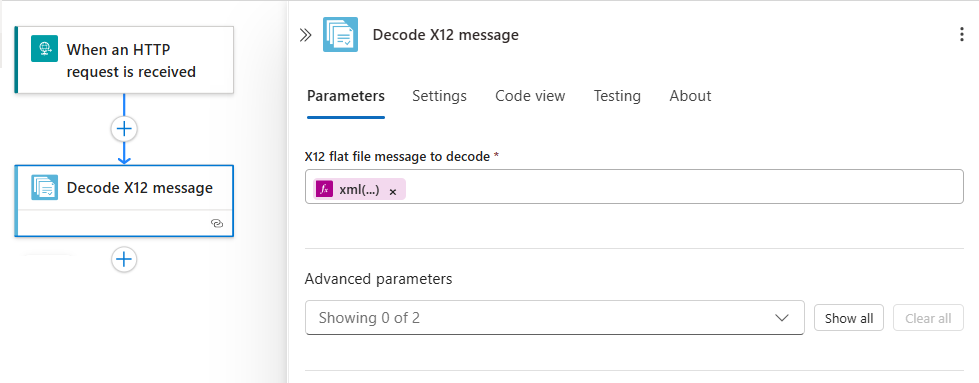
Parameter Required Description X12 flat file message to decode Yes The X12 message in flat file format to decode
Note: The XML message payload or content in a message array is base64 encoded. You must use an expression that processes this content. For example, the following expression processes the content in a message array as XML using thexml(),base64ToBinary(), anditem()functions:xml(base64ToBinary(item()?['Body']))Advanced parameters No This operation includes the following other parameters:
- Preserve Interchange
- Suspend Interchange on Error
For more information, see X12 message settings.For example, you can use the Body content output from the Request trigger as the XML message payload, but you must first process this content as shown in the following expression:
xml(base64ToBinary(item()?['Body']))To complete this task, follow these steps:
Select inside X12 flat file message to decode box, then select the function icon to open the expression editor.
In the expression editor box, enter the following expression, which references the Body output from the Request trigger:
xml(base64ToBinary(string(triggerBody())))When you're done, select Add.