Note
Access to this page requires authorization. You can try signing in or changing directories.
Access to this page requires authorization. You can try changing directories.
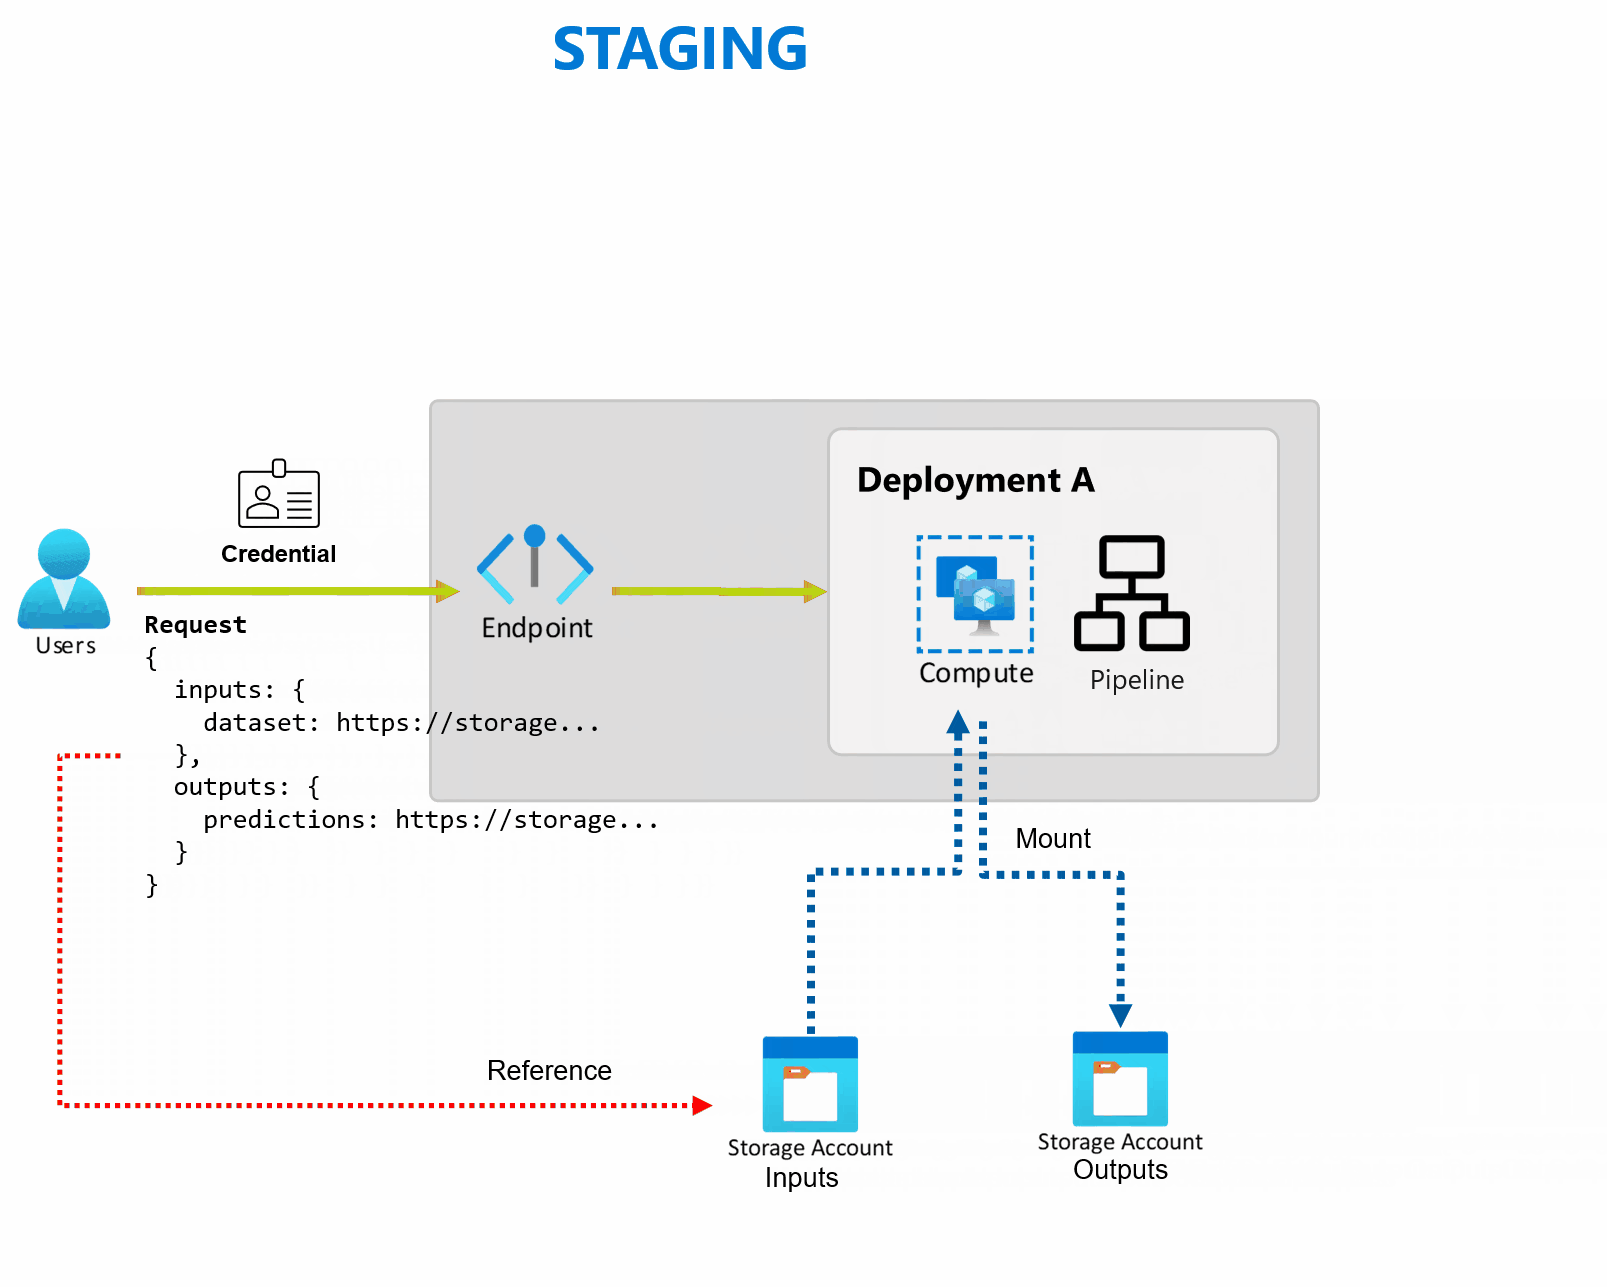
Azure Machine Learning allows you to implement batch endpoints and deployments to perform long-running, asynchronous inferencing with machine learning models and pipelines. When you train a machine learning model or pipeline, you need to deploy it so that others can use it with new input data to generate predictions. This process of generating predictions with the model or pipeline is called inferencing.
Batch endpoints receive pointers to data and run jobs asynchronously to process the data in parallel on compute clusters. Batch endpoints store outputs to a data store for further analysis. Use batch endpoints when:
- You have expensive models or pipelines that require a longer time to run.
- You want to operationalize machine learning pipelines and reuse components.
- You need to perform inference over large amounts of data, distributed in multiple files.
- You don't have low latency requirements.
- Your model's inputs are stored in an Storage Account or in an Azure Machine learning data asset.
- You can take advantage of parallelization.
Batch deployments
A deployment is a set of resources and computes required to implement the functionality that the endpoint provides. An endpoint can host multiple deployments, each with its own configuration, decoupling the endpoint interface from the deployment implementation details. When a batch endpoint is invoked, it automatically routes the client to its default deployment. This default deployment can be configured and changed at any time.

Model deployment
Model deployment enables the operationalization of model inferencing at scale, allowing you to process large amounts of data in a low latency and asynchronous way. Azure Machine Learning automatically instruments scalability by providing parallelization of the inferencing processes across multiple nodes in a compute cluster.
Use Model deployment when:
- You have expensive models that require a longer time to run inference.
- You need to perform inference over large amounts of data, distributed in multiple files.
- You don't have low latency requirements.
- You can take advantage of parallelization.
The main benefit of model deployments is that you can use the same assets that are deployed for real-time inferencing to online endpoints, but now, you get to run them at scale in batch. If your model requires simple preprocessing or post-processing, you can author an scoring script that performs the data transformations required.
To create a model deployment in a batch endpoint, you need to specify the following elements:
- Model
- Compute cluster
- Scoring script (optional for MLflow models)
- Environment (optional for MLflow models)
Cost management
Invoking a batch endpoint triggers an asynchronous batch inference job. Azure Machine Learning automatically provisions compute resources when the job starts, and automatically deallocates them as the job completes. This way, you only pay for compute when you use it.
Tip
When deploying models, you can override compute resource settings (like instance count) and advanced settings (like mini batch size, error threshold, and so on) for each individual batch inference job. By taking advantage of these specific configurations, you might be able to speed up execution and reduce cost.
Batch endpoints can also run on low-priority VMs. Batch endpoints can automatically recover from deallocated VMs and resume the work from where it was left when deploying models for inference. For more information on how to use low priority VMs to reduce the cost of batch inference workloads, see Use low-priority VMs in batch endpoints.
Finally, Azure Machine Learning doesn't charge you for batch endpoints or batch deployments themselves, so you can organize your endpoints and deployments as best suits your scenario. Endpoints and deployments can use independent or shared clusters, so you can achieve fine-grained control over which compute the jobs consume. Use scale-to-zero in clusters to ensure no resources are consumed when they're idle.
Streamline the MLOps practice
Batch endpoints can handle multiple deployments under the same endpoint, allowing you to change the implementation of the endpoint without changing the URL your consumers use to invoke it.
You can add, remove, and update deployments without affecting the endpoint itself.
Flexible data sources and storage
Batch endpoints read and write data directly from storage. You can specify Azure Machine Learning datastores, Azure Machine Learning data assets, or Storage Accounts as inputs. For more information on the supported input options and how to specify them, see Create jobs and input data to batch endpoints.
Security
Batch endpoints provide all the capabilities required to operate production level workloads in an enterprise setting. They support private networking on secured workspaces and Microsoft Entra authentication, either using a user principal (like a user account) or a service principal (like a managed or unmanaged identity). Jobs generated by a batch endpoint run under the identity of the invoker, which gives you the flexibility to implement any scenario. For more information on authorization while using batch endpoints, see How to authenticate on batch endpoints.