Note
Access to this page requires authorization. You can try signing in or changing directories.
Access to this page requires authorization. You can try changing directories.

在本教程中,你将在远程计算资源上训练一个机器学习模型。 你将在 Python Jupyter Notebook 中使用 Azure 机器学习的训练和部署工作流。 然后可以将 Notebook 用作模板,使用你自己的数据来定型机器学习。
本教程将 MNIST 数据集和 scikit-learn 与 Azure 机器学习配合使用来训练简单的逻辑回归。 MNIST 是包含 70,000 张灰度图像的常用数据集。 每个图像是 28 x 28 像素的手写数字,代表一个从零到九的数字。 目标是创建多类分类器,以确定给定图像代表的数字。
了解如何执行以下操作:
- 下载数据集并查看数据。
- 使用 MLflow 训练图像分类模型并记录指标。
- 部署模型以执行实时推理。
先决条件
- 完成快速入门:Azure 机器学习入门以执行以下操作:
- 创建工作区。
- 创建用于开发环境的基于云的计算实例。
在工作区中运行笔记本
Azure 机器学习在你的工作区中提供了一个云笔记本服务器,实现了免安装的预配置体验。 如果你希望控制环境、包和依赖项,请使用自己的环境。
克隆笔记本文件夹
在 Azure 机器学习工作室中完成以下试验设置并运行步骤。 此合并接口包括机器学习工具,所有技能级别的数据科学专业人员均可利用这些工具实现数据科学方案。
登录到 Azure 机器学习工作室。
选择创建的订阅和工作区。
在左侧选择“笔记本”。
在顶部选择“示例”选项卡。
打开 SDK v1 文件夹。
选择“教程”文件夹右侧的“…”按钮,然后选择“克隆” 。

文件夹列表显示访问该工作区的每个用户。 选择要将“tutorials”文件夹克隆到其中的文件夹。
打开克隆的笔记本
打开已克隆到“用户文件”部分的“tutorials”文件夹 。
从 tutorials/compute-instance-quickstarts/quickstart-azureml-in-10mins 文件夹中选择 quickstart-azureml-in-10mins.ipynb 文件。

安装包
运行计算实例并显示内核后,请添加新代码单元格以安装本教程所需的包。
在笔记本顶部,添加代码单元格。

将以下内容添加到单元格中,然后使用“运行”工具或使用 Shift+Enter 运行单元格。
%pip install scikit-learn==0.22.1
%pip install scipy==1.5.2
你可能会看到一些安装警告。 可以安全地忽略这些错误。
运行笔记本
如果希望在自己的本地环境中使用本教程及其附带的 utils.py 文件,也可以在 GitHub 上找到它。 如果不使用计算实例,请将 %pip install azureml-sdk[notebooks] azureml-opendatasets matplotlib 添加到上述安装。
重要
本文的其余部分包含的内容与在笔记本中看到的内容相同。
如果要在继续阅读时运行代码,请立即切换到 Jupyter Notebook。 若要在笔记本中运行单个代码单元,请单击代码单元,然后按 Shift+Enter。 或者,通过从顶部工具栏中选择“全部运行”来运行整个笔记本。
导入数据
训练模型之前,需要了解用于训练模型的数据。 本部分介绍以下操作:
- 下载 MNIST 数据集
- 显示一些示例图像
你会使用 Azure 开放数据集获取原始 MNIST 数据文件。 Azure 开放数据集是精选公共数据集,可用于将方案专属特征添加到机器学习解决方案,以实现更好的模型。 每个数据集都有相应的类(此例中为 MNIST),以便以不同的方式检索数据。
import os
from azureml.opendatasets import MNIST

data_folder = os.path.join(os.getcwd(), "/tmp/qs_data")
os.makedirs(data_folder, exist_ok=True)

mnist_file_dataset = MNIST.get_file_dataset()
mnist_file_dataset.download(data_folder, overwrite=True)
查看数据
将压缩文件加载到 numpy 数组。 然后,使用 matplotlib 从数据集随意绘制 30 张图像,并在上方附加标签。
请注意,此步骤需要 utils.py 文件中包含的 load_data 函数。 此文件与此笔记本放在同一文件夹中。 load_data 函数直接将压缩文件解析为 numpy 数组。
from utils import load_data
import matplotlib.pyplot as plt
import numpy as np
import glob


# note we also shrink the intensity values (X) from 0-255 to 0-1. This helps the model converge faster.
X_train = (
    load_data(
        glob.glob(
            os.path.join(data_folder, "**/train-images-idx3-ubyte.gz"), recursive=True
        )[0],
        False,
    )
    / 255.0
)
X_test = (
    load_data(
        glob.glob(
            os.path.join(data_folder, "**/t10k-images-idx3-ubyte.gz"), recursive=True
        )[0],
        False,
    )
    / 255.0
)
y_train = load_data(
    glob.glob(
        os.path.join(data_folder, "**/train-labels-idx1-ubyte.gz"), recursive=True
    )[0],
    True,
).reshape(-1)
y_test = load_data(
    glob.glob(
        os.path.join(data_folder, "**/t10k-labels-idx1-ubyte.gz"), recursive=True
    )[0],
    True,
).reshape(-1)


# now let's show some randomly chosen images from the traininng set.
count = 0
sample_size = 30
plt.figure(figsize=(16, 6))
for i in np.random.permutation(X_train.shape[0])[:sample_size]:
    count = count + 1
    plt.subplot(1, sample_size, count)
    plt.axhline("")
    plt.axvline("")
    plt.text(x=10, y=-10, s=y_train[i], fontsize=18)
    plt.imshow(X_train[i].reshape(28, 28), cmap=plt.cm.Greys)
plt.show()
上面的代码显示一组随机图像及其标签,类似于以下内容:

使用 MLflow 训练模型并记录指标
你会使用下面的代码训练模型。 请注意,你在使用 MLflow 自动日志记录来跟踪指标并记录模型生成工件。
你将使用 SciKit Learn 框架中的 LogisticRegression 分类器对数据进行分类。
备注
完成模型训练大约需要 2 分钟。**
# create the model
import mlflow
import numpy as np
from sklearn.linear_model import LogisticRegression
from azureml.core import Workspace

# connect to your workspace
ws = Workspace.from_config()

# create experiment and start logging to a new run in the experiment
experiment_name = "azure-ml-in10-mins-tutorial"

# set up MLflow to track the metrics
mlflow.set_tracking_uri(ws.get_mlflow_tracking_uri())
mlflow.set_experiment(experiment_name)
mlflow.autolog()

# set up the Logistic regression model
reg = 0.5
clf = LogisticRegression(
    C=1.0 / reg, solver="liblinear", multi_class="auto", random_state=42
)

# train the model
with mlflow.start_run() as run:
    clf.fit(X_train, y_train)
查看试验
在 Azure 机器学习工作室的左侧菜单中,选择“作业”,然后选择你的作业 (azure-ml-in10-mins-tutorial)。 作业是指定脚本或代码段中多个运行的分组。 可以将多个作业组合在一起,作为一种试验。
运行的信息存储在该作业下。 如果在提交作业时该名称不存在,则在选择运行时,会看到包含指标、日志、说明等的各种选项卡。
使用模型注册表对模型进行版本控制
可以使用模型注册在工作区中存储模型并控制模型版本。 按名称和版本标识已注册的模型。 每次使用与现有名称相同的名称来注册模型时,注册表都会将版本递增。 下面的代码会对上面训练的模型进行注册和版本控制。 执行以下代码单元后,你将能够通过在 Azure 机器学习工作室的左侧菜单中选择“模型”,在注册表中看到模型。
# register the model
model_uri = "runs:/{}/model".format(run.info.run_id)
model = mlflow.register_model(model_uri, "sklearn_mnist_model")
部署模型以执行实时推理
在此部分中,你会了解如何部署模型,以便应用程序可以通过 REST 使用(推理)模型。
创建部署配置
代码单元会获取一个特选环境,该环境指定托管模型所需的所有依赖项(例如 scikit-learn 这类包)。 此外还会创建一个部署配置,用于指定托管模型所需的计算量。 在此例中,计算会使用 1 个 CPU 和 1GB 内存。
# create environment for the deploy
from azureml.core.environment import Environment
from azureml.core.conda_dependencies import CondaDependencies
from azureml.core.webservice import AciWebservice

# get a curated environment
env = Environment.get(
    workspace=ws,
    name="AzureML-sklearn-0.24.1-ubuntu18.04-py37-cpu-inference",
    version=1
)
env.inferencing_stack_version='latest'

# create deployment config i.e. compute resources
aciconfig = AciWebservice.deploy_configuration(
    cpu_cores=1,
    memory_gb=1,
    tags={"data": "MNIST", "method": "sklearn"},
    description="Predict MNIST with sklearn",
)
部署模型
下一个代码单元将模型部署到 Azure 容器实例。
备注
完成部署大约需要 3 分钟。**
%%time
import uuid
from azureml.core.model import InferenceConfig
from azureml.core.environment import Environment
from azureml.core.model import Model

# get the registered model
model = Model(ws, "sklearn_mnist_model")

# create an inference config i.e. the scoring script and environment
inference_config = InferenceConfig(entry_script="score.py", environment=env)

# deploy the service
service_name = "sklearn-mnist-svc-" + str(uuid.uuid4())[:4]
service = Model.deploy(
    workspace=ws,
    name=service_name,
    models=[model],
    inference_config=inference_config,
    deployment_config=aciconfig,
)

service.wait_for_deployment(show_output=True)
可以在此笔记本所在的相同文件夹中找到以上代码中引用的评分脚本文件,该文件有两个函数:
- 在服务启动时执行一次的
init函数 - 在此函数中,通常会从注册表获取模型并设置全局变量 - 在每次调用服务时执行的
run(data)函数。 在此函数中,通常会设置输入数据的格式、运行预测并输出预测结果。
查看终结点
成功部署模型后,可以通过在 Azure 机器学习工作室的左侧菜单中导航到“终结点”来查看终结点。 你将能够查看终结点的状态(正常/不正常)、日志和使用情况(应用程序如何使用模型)。
测试模型服务
可以发送原始 HTTP 请求以测试 Web 服务,从而测试模型。
# send raw HTTP request to test the web service.
import requests

# send a random row from the test set to score
random_index = np.random.randint(0, len(X_test) - 1)
input_data = '{"data": [' + str(list(X_test[random_index])) + "]}"

headers = {"Content-Type": "application/json"}

resp = requests.post(service.scoring_uri, input_data, headers=headers)

print("POST to url", service.scoring_uri)
print("label:", y_test[random_index])
print("prediction:", resp.text)
清理资源
如果不打算继续使用此模型,请使用以下操作删除模型服务:
# if you want to keep workspace and only delete endpoint (it will incur cost while running)
service.delete()
如果要进一步控制成本,请通过选择“计算”下拉列表旁的“停止计算”按钮来停止计算实例。 然后在下次需要时再次启动计算实例。
删除所有内容
使用这些步骤可删除 Azure 机器学习工作区和所有计算资源。
重要
已创建的资源可用作其他 Azure 机器学习教程和操作方法文章的先决条件。
如果你不打算使用已创建的任何资源,请删除它们,以免产生任何费用:
在 Azure 门户中,选择最左侧的“资源组” 。
从列表中选择你创建的资源组。
选择“删除资源组”。
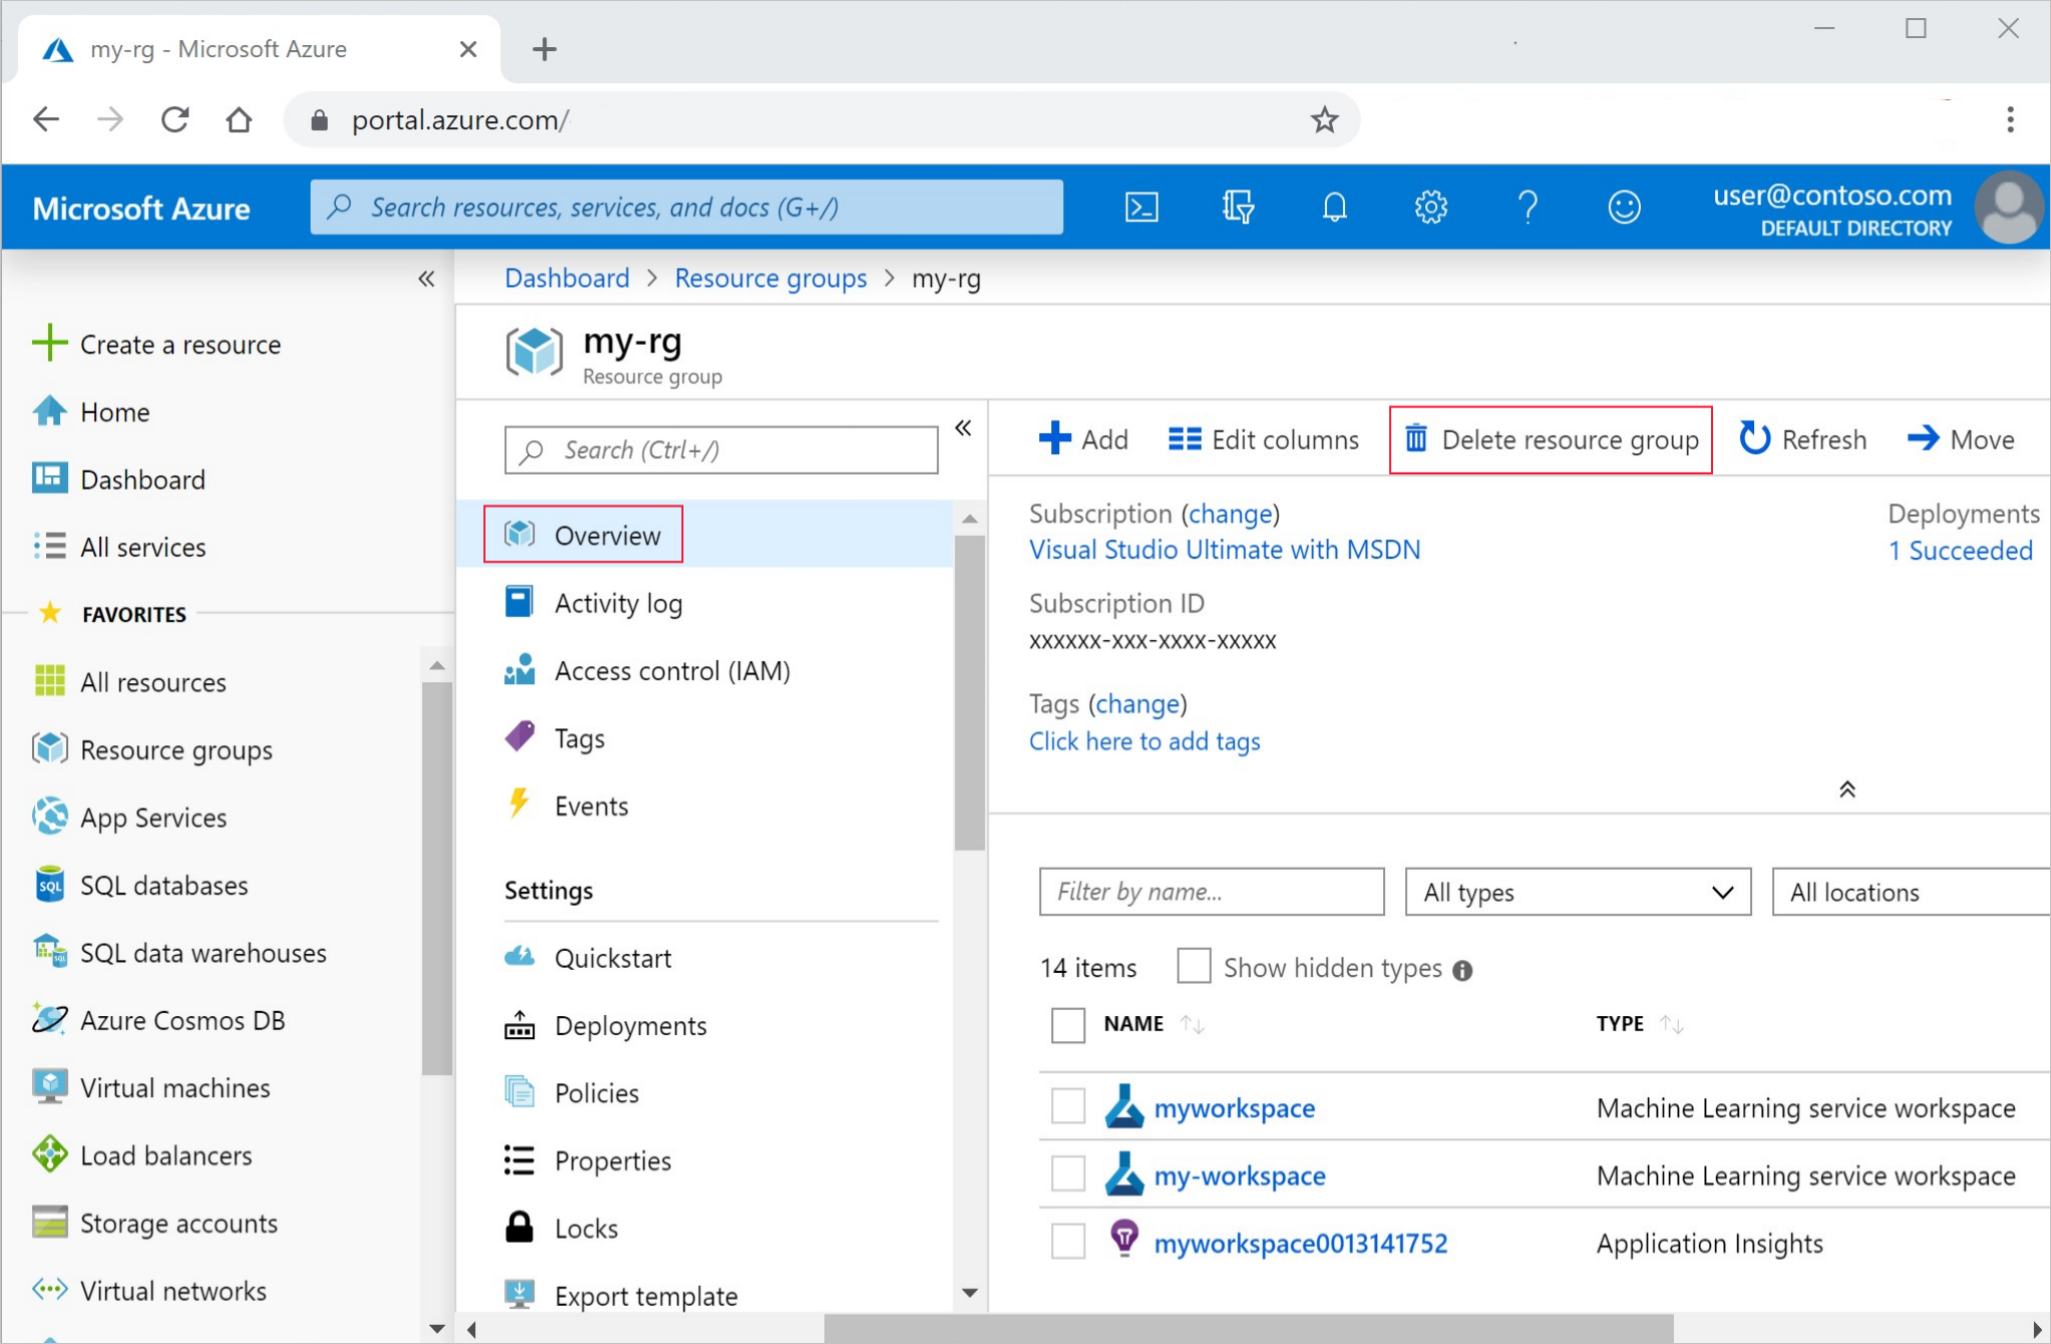
输入资源组名称。 然后选择“删除”。
后续步骤
- 了解 Azure 机器学习的所有部署选项。
- 了解如何向已部署的模型进行身份验证。
- 以异步方式对大量数据进行预测。
- 使用 Application Insights 监视 Azure 机器学习模型。