Note
Access to this page requires authorization. You can try signing in or changing directories.
Access to this page requires authorization. You can try changing directories.
Note
This article contains references to the term slave, a term that Microsoft no longer uses. When the term is removed from the software, we'll remove it from this article.
This article describes how to upgrade your MySQL major version in Azure Database for MySQL Flexible Server. This feature enables you to perform major version upgrades (for example, from MySQL 5.7 to 8.0 or 8.0 to 8.4) without moving data or changing application connection strings.
Important
- Duration of downtime varies based on the size of the database instance and the number of tables it contains.
- When initiating a major version upgrade for Azure Database for MySQL Flexible Server via REST API or SDK, avoid modifying other service properties in the same request. Simultaneous changes aren't permitted and might lead to unintended results or request failure. Conduct property modifications in separate operations after the upgrade is completed.
- Some workloads might not exhibit enhanced performance after a major version upgrade. Evaluate the performance of your workload by first creating a replica server (as a test server), then promoting it to a standalone server, and then running the workload on the test server before implementing the upgrade in a production environment.
- Upgrading the major MySQL version is irreversible. Your deployment might fail if validation identifies that the server is configured with any features that are removed or deprecated in the target version. You can make the necessary configuration changes on the server and try the upgrade again.
- If you're upgrading from Azure Database for MySQL 5.7 to MySQL 8.0 or 8.4, be aware that some older client libraries might not be fully compatible with newer MySQL major versions. For example, applications using legacy client libraries or MySQL drivers (such as EOL PHP Client) might encounter connection failures after the upgrade due to unsupported authentication methods, character sets, or protocol changes. Validate client compatibility before performing a major version upgrade in production. Create a test server or replica running the target MySQL version, connect your application using the same client libraries, and ensure all connections and workloads function correctly before upgrading your production server.
Prerequisites
- Upgrade read replicas that use an older MySQL version before upgrading the primary server. This upgrade sequence ensures replication compatibility between different MySQL versions. For more information, see Replication Compatibility between MySQL versions.
- Before upgrading your production servers, use the built-in Validate feature in the Azure portal. This tool checks your database schema's compatibility with the target MySQL version and highlights potential issues. Also, strongly consider using the official Oracle MySQL Upgrade checker tool to test your database schema compatibility. Perform necessary regression tests to verify application compatibility with features removed or deprecated in the new MySQL version.
- Trigger an on-demand backup before you perform a major version upgrade on your production server. Use backups taken before the upgrade to roll back to the previous version from the full on-demand backup.
- Ensure there are no active or pending XA transactions on the database before proceeding with the major version upgrade. Ongoing XA transactions can cause the upgrade process to fail. To avoid this issue, check for any XA transactions in the "prepared" state by running
XA RECOVER;. For any transactions identified, useXA ROLLBACK '{xid}'; to roll back each transaction, replacing {xid} with the transaction ID. Ensure all XA transactions are either committed or rolled back before initiating the upgrade to maintain transaction consistency and reduce the risk of upgrade failures.
Note
When you use Oracle's official tool to check schema compatibility, you might encounter some warnings indicating unexpected tokens in stored procedures, such as:
mysql.az_replication_change_master - at line 3,4255: unexpected token 'REPLICATION'
mysql.az_add_action_history - PROCEDURE uses obsolete NO_AUTO_CREATE_USER sql_mode
You can safely ignore these warnings. They refer to built-in stored procedures prefixed with mysql., which support Azure MySQL features. These warnings don't affect the functionality of your database.
Perform a planned major version upgrade by using the Azure portal for Burstable SKU servers
Performing a major version upgrade for an Azure Database for MySQL Burstable SKU compute tier requires a specialized workflow. Major version upgrades are resource-intensive, demanding significant CPU and memory. Burstable SKU instances, being credit-based, might struggle under these requirements, potentially causing the upgrade process to fail. Therefore, when you upgrade a Burstable SKU, the system first upgrades the compute tier to a General-Purpose SKU to ensure sufficient resources are available for the upgrade.
To perform a major version upgrade for an Azure Database for MySQL Burstable SKU compute tier by using the Azure portal, follow these steps:
In the Azure portal, select your existing Azure Database for MySQL Flexible Server instance.
Important
We recommend performing an upgrade first on a restored server copy rather than upgrading production directly. See how to perform point-in-time restore.
On the Overview page, in the toolbar, select Upgrade.
Important
Before upgrading, visit the link for the list of features removed in the target MySQL version. Verify deprecated sql_mode values and remove or deselect them from your current Azure Database for MySQL Flexible Server by using the Server Parameters pane on your Azure portal to avoid deployment failure. sql_mode with values
NO_AUTO_CREATE_USER,NO_FIELD_OPTIONS,NO_KEY_OPTIONS, andNO_TABLE_OPTIONSaren't supported in MySQL 8.0 and later.
Schema Compatibility Validation
Before proceeding with the upgrade, run Oracle's official MySQL Upgrade checker tool to validate that your current database schema is compatible with the target MySQL version. This step is crucial to ensure a smooth upgrade process.
Pre-Upgrade Decision
Before upgrading, choose the compute tier to upgrade to perform the major version upgrade. By default, the system upgrades from Burstable SKU to the most basic General Purpose SKU, but you can upgrade to a higher compute tier if needed. While your server operates in the "General Purpose" tier during the upgrade, you pay only for the actual "General Purpose" resources used during this period.
Post-Upgrade Decision
After the upgrade, decide whether to retain the General Purpose SKU or revert to Burstable SKU. This choice is prompted during the initial upgrade steps.
The system automatically upgrades your compute tier from Burstable SKU to the selected General Purpose SKU to support the major version upgrade.
Important
Before or after upgrade, the change of SKU compute tier can be unsuccessful in regions experiencing high capacity demand at that point of time. In such cases, retry the SKU compute tier change outside of peak business hours in that region.
Major Version Upgrade
Once the compute tier is upgraded, the system initiates the major version upgrade process. Monitor the upgrade progress through the Azure portal. The upgrade process might take some time, depending on the size and activity of your database. If the major version upgrade fails, the compute tier doesn't automatically revert to the previous Burstable SKU. This condition allows you to continue the major version upgrade without performing the compute tier upgrade again.
Automatic Reversion
Based on your preupgrade decision, the system either retains the General Purpose SKU or automatically reverts to Burstable SKU after the upgrade. If you automatically revert to Burstable SKU, the system reverts to the B2S SKU by default.
Perform a planned major version upgrade by using the Azure portal for general-purpose and business-critical SKU servers
To perform a major version upgrade of an Azure Database for MySQL Flexible Server by using the Azure portal, follow these steps:
In the Azure portal, select your existing Azure Database for MySQL Flexible Server instance.
Important
We recommend performing an upgrade first on a restored server copy rather than upgrading production directly. See how to perform point-in-time restore.
On the Overview page, in the toolbar, select Upgrade.
Important
Before upgrading, visit the link for the list of features removed in the target MySQL version. Verify deprecated sql_mode values and remove or deselect them from your current Azure Database for MySQL Flexible Server by using the Server Parameters pane on your Azure portal to avoid deployment failure. sql_mode with values
NO_AUTO_CREATE_USER,NO_FIELD_OPTIONS,NO_KEY_OPTIONS, andNO_TABLE_OPTIONSaren't supported in MySQL 8.0 and later.
Perform pre-upgrade validation
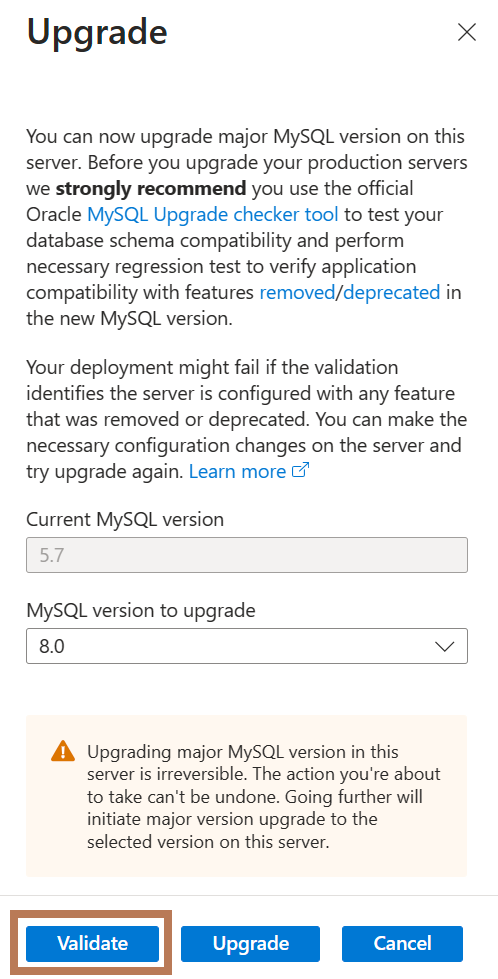
Before proceeding with the upgrade, select the Validate button to check the compatibility of your server with the target MySQL version.
Note
Online validation is currently in preview for 8.0 to 8.4 major version upgrade. Use the community tool to perform pre-upgrade validation. When you use the Validate feature to assess your database schema for compatibility with the target MySQL version, consider the following:
- Table locking during validation: The validation process involves locking tables to inspect the entire schema accurately. This action can lead to query timeouts if the database is under heavy load.
Recommendation: Avoid running validation during peak business hours or when the database handles high traffic. Instead, schedule the validation during low-activity periods to reduce the impact on operations.
- Potential for hanging due to large result sets: In some instances - particularly with complex databases containing many objects - the validation result might become too large to process or display within the online workflow. This condition might result in the Validate operation appearing to hang, time out, or remain in progress indefinitely.
Recommendation: If you encounter this issue, perform the validation locally by using Oracle's official client-side upgrade checker tool, such as the one included in MySQL Shell. This approach avoids platform-side result size limitations and provides a more detailed and reliable validation output.
- Recommended use cases for online validation: The online Validate feature is designed for simple or moderately complex schemas. For large-scale production environments - such as those with thousands of tables, views, routines, or other schema objects - use Oracle's client-side upgrade checker tool to perform the compatibility check. This method ensures the full schema is analyzed comprehensively and avoids potential issues related to result size or validation timeouts.
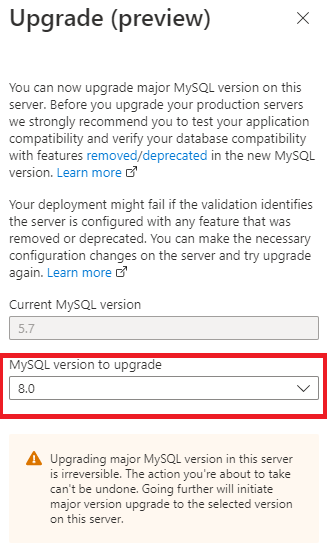
In the Upgrade sidebar, in the MySQL version to upgrade text box, verify the major MySQL version you want to upgrade to (for example, 8.0 or 8.4).
Before you can upgrade your primary server, you must first upgrade any associated read replica servers. Until you complete this step, Upgrade is disabled.
On the primary server, select the confirmation message to verify that all replica servers are upgraded, and then select Upgrade.
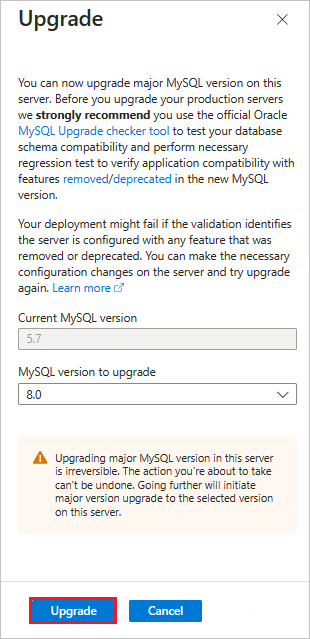
Upgrade is enabled by default on read replica and standalone servers.
Major version upgrade for servers with high availability enabled
When you enable high availability (HA), Azure Database for MySQL Flexible Server upgrades the standby server first, followed by the primary server. The service manages both stages as a single upgrade operation. You don't need to upgrade the HA standby separately.
Complete the prerequisites, including upgrading any read replicas, before you begin. The HA standby is separate from your read replicas. Start the upgrade by using the Azure portal or Azure CLI procedure in this article.
Upgrade sequence and application availability
HA doesn't provide a zero-downtime major version upgrade. Schedule the upgrade during a planned downtime window. Application availability changes as follows:
Upgrade the standby server. The service upgrades the standby to the target MySQL major version. During this stage, the primary continues to accept client connections and process read and write operations.
Upgrade the primary server. After the standby upgrade succeeds, the service places the primary in version upgrade mode and starts its upgrade. Client connections stop, and the primary is unavailable for read and write operations. Application downtime begins at this point and continues until the primary is available again.
Complete the upgrade. If the primary upgrade succeeds, both servers run the target major version, and the service reports the operation as successful. Your application can reconnect by using its existing connection string.
Downtime varies with your database size and number of tables. To estimate the impact on your workload, test the upgrade on a restored copy of your server before upgrading production.
Failure and rollback behavior
If either stage fails, the service rolls back the affected servers and reports the upgrade as failed.
| Failure stage | Rollback behavior | Application impact |
|---|---|---|
| Standby upgrade | The service rolls back the standby to its previous MySQL version. The primary upgrade doesn't start. | The primary continues to serve read and write traffic on the original version. |
| Primary upgrade | The service rolls back both the primary and standby to their previous MySQL version. | Application downtime continues until the primary is available again. |
Automatic rollback applies to a failed upgrade operation. After a successful upgrade, you can't downgrade the server to the previous major version. To return to that version, restore a backup taken before the upgrade to a new server.
After the operation finishes, check the upgrade result and MySQL version in the Azure portal. Confirm that HA is healthy and that your application can connect and perform its expected read and write operations. If the upgrade fails, review the error details and resolve the reported issues before retrying.
Perform a planned major version upgrade by using the Azure CLI
To perform a major version upgrade of an Azure Database for MySQL Flexible Server by using the Azure CLI, follow these steps:
Install the Azure CLI for Windows to run the upgrade commands.
This upgrade requires Azure CLI version 2.40.0 or later. Run
az versionto find the version and dependent libraries that are installed. To upgrade to the latest version, runaz upgrade.After you sign in, run the az MySQL server upgrade command.
az mysql flexible-server upgrade --name {your mysql server name} --resource-group {your resource group} --subscription {your subscription id} --version {target major version}Replace
{target major version}with the version you want to upgrade to (for example, 8 or 8.4).At the confirmation prompt, enter y to confirm or n to stop the upgrade process, and then select Enter.
Perform a major version upgrade on a read replica server by using the Azure portal
To perform a major version upgrade of an Azure Database for MySQL Flexible Server read replica server by using the Azure portal, follow these steps.
Select your existing Azure Database for MySQL Flexible Server and read replica server in the Azure portal.
On the Overview page, in the toolbar, select Upgrade.
Important
Before upgrading, visit the link for the list of features removed in the target MySQL version. Verify deprecated sql_mode values and remove or deselect them from your current Azure Database for MySQL Flexible Server by using the Server Parameters pane on your Azure portal to avoid deployment failure.
In Upgrade, select Upgrade to upgrade an Azure Database for MySQL Flexible Server read replica server to the target major version. A notification appears to confirm that the upgrade is successful.
On Overview, confirm that your Azure Database for MySQL Flexible Server read replica server is running the target version.
Go to your primary server and perform a major version upgrade.
Recommended major version upgrade procedure across major versions
To perform a major version upgrade of an Azure Database for MySQL Flexible Server with minimal downtime by using read replica servers or PITR, follow these steps.
Using a read replica
Select your existing Azure Database for MySQL Flexible Server instance in the Azure portal.
Create a read replica from your existing primary server.
Upgrade your read replica to the target major version.
After you confirm that the replica server is running the target version, stop your application from connecting to your primary server.
Check replication status to ensure that the replica caught up with the primary, so all data is in sync, and no new operations are being performed on the primary.
Confirm with the show replica status command on the replica server to view the replication status.
SHOW SLAVE STATUS\GIf the state of
Slave_IO_RunningandSlave_SQL_Runningis yes and the value ofSeconds_Behind_Masteris 0, replication works well.Seconds_Behind_Masterindicates how late the replica is. If the value isn't 0, the replica is still processing updates. After you confirm that the value ofSeconds_Behind_Masteris 0, it's safe to stop replication.Promote your read replica to primary by stopping replication.
Set server parameter
read_onlyto 0 (OFF) to start writing on the promoted primary.Update your application to point to the new primary (former replica) running the target version. Each server has a unique connection string.
Note
This scenario only incurs downtime during steps 4 through 7.
Using point-in-time restore (PITR)
Perform a point-in-time restore of your existing Azure Database for MySQL Flexible Server.
Upgrade the PITR instance to the target version.
Test and tune your production load/queries on the upgraded PITR instance until the result is satisfactory.
Update your application to point to the new primary (PITR instance) running the target version. Each server has a unique connection string.