Note
Access to this page requires authorization. You can try signing in or changing directories.
Access to this page requires authorization. You can try changing directories.
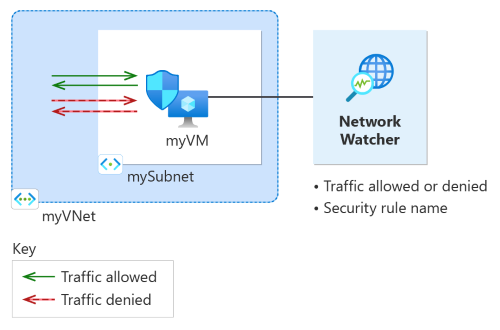
In this quickstart, you deploy a virtual machine and use Network Watcher IP flow verify to test the connectivity to and from different IP addresses. Using the IP flow verify results, you determine the security rule that's blocking the traffic and causing the communication failure and learn how you can resolve it. You also learn how to use the effective security rules for a network interface to determine why a security rule is allowing or denying traffic.

If you don't have an Azure subscription, create a trial subscription before you begin.
Prerequisites
An Azure account with an active subscription.
Azure PowerShell.
You can install Azure PowerShell locally to run the cmdlets. This quickstart requires the Az PowerShell module. For more information, see How to install Azure PowerShell. To find the installed version, run
Get-InstalledModule -Name Az. If you run PowerShell locally, sign in to Azure using the Connect-AzAccount -Environment AzureChinaCloud cmdlet.
Create a virtual machine
In this section, you create a virtual network and a subnet in the China East region. Then, you create a virtual machine in the subnet with a default network security group.
Create a resource group using New-AzResourceGroup. An Azure resource group is a logical container into which Azure resources are deployed and managed.
# Create a resource group.
New-AzResourceGroup -Name 'myResourceGroup' -Location 'chinaeast'
Create a subnet configuration for the virtual machine subnet and the Bastion host subnet using New-AzVirtualNetworkSubnetConfig.
# Create subnets configuration.
$Subnet = New-AzVirtualNetworkSubnetConfig -Name 'mySubnet' -AddressPrefix '10.0.0.0/24'
Create a virtual network using New-AzVirtualNetwork.
# Create a virtual network.
New-AzVirtualNetwork -Name 'myVNet' -ResourceGroupName 'myResourceGroup' -Location 'chinaeast' -AddressPrefix '10.0.0.0/16' -Subnet $Subnet
Create a default network security group using New-AzNetworkSecurityGroup.
# Create a network security group.
New-AzNetworkSecurityGroup -Name 'myVM-nsg' -ResourceGroupName 'myResourceGroup' -Location  'chinaeast'
Create a virtual machine using New-AzVM. When prompted, enter a username and password.
# Create a Linux virtual machine using the latest Ubuntu 20.04 LTS image.
New-AzVm -ResourceGroupName 'myResourceGroup' -Name 'myVM' -Location 'chinaeast' -VirtualNetworkName 'myVNet' -SubnetName 'mySubnet' -SecurityGroupName 'myVM-nsg' -Image 'Canonical:0001-com-ubuntu-server-focal:20_04-lts-gen2:latest'
Test network communication using IP flow verify
In this section, you use the IP flow verify capability of Network Watcher to test network communication to and from the virtual machine.
Use Test-AzNetworkWatcherIPFlow to test outbound communication from myVM to 13.107.21.200 using IP flow verify (
13.107.21.200is one of the public IP addresses used bywww.bing.com):# Place myVM configuration into a variable. $vm = Get-AzVM -ResourceGroupName 'myResourceGroup' -Name 'myVM' # Start the IP flow verify session to test outbound flow to www.bing.com. Test-AzNetworkWatcherIPFlow -Location 'chinaeast' -TargetVirtualMachineId $vm.Id -Direction 'Outbound' -Protocol 'TCP' -RemoteIPAddress '13.107.21.200' -RemotePort '80' -LocalIPAddress '10.0.0.4' -LocalPort '60000'After a few seconds, you get similar output to the following example:
Access RuleName
------ --------
Allow  defaultSecurityRules/AllowInternetOutBound
The test result indicates that access is allowed to 13.107.21.200 because of the default security rule AllowInternetOutBound. By default, Azure virtual machines can access the internet.
Change RemoteIPAddress to 10.0.1.10 and repeat the test. 10.0.1.10 is a private IP address in myVNet address space.
# Start the IP flow verify session to test outbound flow to 10.0.1.10.
Test-AzNetworkWatcherIPFlow -Location 'chinaeast' -TargetVirtualMachineId $vm.Id -Direction 'Outbound' -Protocol 'TCP' -RemoteIPAddress '10.0.1.10' -RemotePort '80' -LocalIPAddress '10.0.0.4' -LocalPort '60000'
After a few seconds, you get similar output to the following example:
Access RuleName
------ --------
Allow  defaultSecurityRules/AllowVnetOutBound
The result of the second test indicates that access is allowed to 10.0.1.10 because of the default security rule AllowVnetOutBound. By default, an Azure virtual machine can access all IP addresses in the address space of its virtual network.
Change RemoteIPAddress to 10.10.10.10 and repeat the test. 10.10.10.10 is a private IP address that isn't in myVNet address space.
# Start the IP flow verify session to test outbound flow to 10.10.10.10.
Test-AzNetworkWatcherIPFlow -Location 'chinaeast' -TargetVirtualMachineId $vm.Id -Direction 'Outbound' -Protocol 'TCP' -RemoteIPAddress '10.10.10.10' -RemotePort '80' -LocalIPAddress '10.0.0.4' -LocalPort '60000'
After a few seconds, you get similar output to the following example:
Access RuleName
------ --------
Allow  defaultSecurityRules/DenyAllOutBound
The result of the third test indicates that access is denied to 10.10.10.10 because of the default security rule DenyAllOutBound.
Change Direction to Inbound, the LocalPort to 80, and the RemotePort to 60000, and then repeat the test.
# Start the IP flow verify session to test inbound flow from 10.10.10.10.
Test-AzNetworkWatcherIPFlow -Location 'chinaeast' -TargetVirtualMachineId $vm.Id -Direction 'Inbound' -Protocol 'TCP' -RemoteIPAddress '10.10.10.10' -RemotePort '60000' -LocalIPAddress '10.0.0.4' -LocalPort '80'
After a few seconds, you get similar output to the following example:
Access RuleName
------ --------
Allow  defaultSecurityRules/DenyAllInBound
The result of the fourth test indicates that access is denied from 10.10.10.10 because of the default security rule DenyAllInBound. By default, all access to an Azure virtual machine from outside the virtual network is denied.
View details of a security rule
To determine why the rules in the previous section allow or deny communication, review the effective security rules for the network interface of myVM virtual machine using Get-AzEffectiveNetworkSecurityGroup cmdlet:
# Get the effective security rules for the network interface of myVM.
Get-AzEffectiveNetworkSecurityGroup -NetworkInterfaceName 'myVM' -ResourceGroupName 'myResourceGroup'
The returned output includes the following information for the AllowInternetOutbound rule that allowed outbound access to www.bing.com:
{
    "Name": "defaultSecurityRules/AllowInternetOutBound",
    "Protocol": "All",
    "SourcePortRange": [
        "0-65535"
    ],
    "DestinationPortRange": [
        "0-65535"
    ],
    "SourceAddressPrefix": [
        "0.0.0.0/0",
        "0.0.0.0/0"
    ],
    "DestinationAddressPrefix": [
        "Internet"
    ],
    "ExpandedSourceAddressPrefix": [],
    "ExpandedDestinationAddressPrefix": [
        "1.0.0.0/8",
        "2.0.0.0/7",
        "4.0.0.0/9",
        "4.144.0.0/12",
        "4.160.0.0/11",
        "4.192.0.0/10",
        "5.0.0.0/8",
        "6.0.0.0/7",
        "8.0.0.0/7",
        "11.0.0.0/8",
        "12.0.0.0/8",
        "13.0.0.0/10",
        "13.64.0.0/11",
        "13.104.0.0/13",
        "13.112.0.0/12",
        "13.128.0.0/9",
        "14.0.0.0/7",
        ...
        ...
        ...
        "200.0.0.0/5",
        "208.0.0.0/4"
    ],
    "Access": "Allow",
    "Priority": 65001,
    "Direction": "Outbound"
},
You can see in the output that address prefix 13.104.0.0/13 is among the address prefixes of AllowInternetOutBound rule. This prefix encompasses the IP address 13.107.21.200, which you utilized to test outbound communication to www.bing.com.
Similarly, you can check the other rules to see the source and destination IP address prefixes under each rule.
Clean up resources
When no longer needed, use Remove-AzResourceGroup to delete the resource group and all of the resources it contains:
# Delete the resource group and all resources it contains.
Remove-AzResourceGroup -Name 'myResourceGroup' -Force