Note
Access to this page requires authorization. You can try signing in or changing directories.
Access to this page requires authorization. You can try changing directories.
Overview
Push notification support in Azure enables you to access an easy-to-use, multi-platform, scaled-out push infrastructure, which greatly simplifies the implementation of push notifications for both consumer and enterprise applications for mobile platforms.
Due to regulatory or security constraints, sometimes an application might want to include something in the notification that cannot be transmitted through the standard push notification infrastructure. This tutorial describes how to achieve the same experience by sending sensitive information through a secure, authenticated connection between the client device and the app backend.
At a high level, the flow is as follows:
- The app back-end:
- Stores secure payload in back-end database.
- Sends the ID of this notification to the device (no secure information is sent).
- The app on the device, when receiving the notification:
- The device contacts the back-end requesting the secure payload.
- The app can show the payload as a notification on the device.
It is important to note that in the preceding flow (and in this tutorial), we assume that the device stores an authentication token in local storage, after the user logs in. This guarantees a completely seamless experience, as the device can retrieve the notification's secure payload using this token. If your application does not store authentication tokens on the device, or if these tokens can be expired, the device app, upon receiving the notification should display a generic notification prompting the user to launch the app. The app then authenticates the user and shows the notification payload.
This tutorial shows how to send a push notification securely. The tutorial builds on the Notify users tutorial, so you should complete the steps in that tutorial first.
Note
This tutorial assumes that you have created and configured your notification hub as described in Send notifications to Universal Windows Platform apps. Also, note that Windows Phone 8.1 requires Windows (not Windows Phone) credentials, and that background tasks do not work on Windows Phone 8.0 or Silverlight 8.1. For Windows Store applications, you can receive notifications via a background task only if the app is lock-screen enabled (click the checkbox in the Appmanifest).
WebAPI Project
In Visual Studio, open the AppBackend project that you created in the Notify Users tutorial.
In Notifications.cs, replace the entire Notifications class with the following code. Be sure to replace the placeholders with your connection string (with full access) for your notification hub, and the hub name. You can obtain these values from the Azure portal. This module now represents the different secure notifications that will be sent. In a complete implementation, the notifications will be stored in a database; for simplicity, in this case we store them in memory.
 public class Notification
 {
     public int Id { get; set; }
     public string Payload { get; set; }
     public bool Read { get; set; }
 }

 public class Notifications
 {
     public static Notifications Instance = new Notifications();

     private List<Notification> notifications = new List<Notification>();

     public NotificationHubClient Hub { get; set; }

     private Notifications() {
         Hub = NotificationHubClient.CreateClientFromConnectionString("{conn string with full access}",     "{hub name}");
     }

     public Notification CreateNotification(string payload)
     {
         var notification = new Notification() {
         Id = notifications.Count,
         Payload = payload,
         Read = false
         };

         notifications.Add(notification);

         return notification;
     }

     public Notification ReadNotification(int id)
     {
         return notifications.ElementAt(id);
     }
 }
In NotificationsController.cs, replace the code inside the NotificationsController class definition with the following code. This component implements a way for the device to retrieve the notification securely, and also provides a way (for the purposes of this tutorial) to trigger a secure push to your devices. Note that when sending the notification to the notification hub, we only send a raw notification with the ID of the notification (and no actual message):
 public NotificationsController()
 {
     Notifications.Instance.CreateNotification("This is a secure notification!");
 }

 // GET api/notifications/id
 public Notification Get(int id)
 {
     return Notifications.Instance.ReadNotification(id);
 }

 public async Task<HttpResponseMessage> Post()
 {
     var secureNotificationInTheBackend = Notifications.Instance.CreateNotification("Secure confirmation.");
     var usernameTag = "username:" + HttpContext.Current.User.Identity.Name;

     // windows
     var rawNotificationToBeSent = new Microsoft.Azure.NotificationHubs.WindowsNotification(secureNotificationInTheBackend.Id.ToString(),
                     new Dictionary<string, string> {
                         {"X-WNS-Type", "wns/raw"}
                     });
     await Notifications.Instance.Hub.SendNotificationAsync(rawNotificationToBeSent, usernameTag);

     // apns
     await Notifications.Instance.Hub.SendAppleNativeNotificationAsync("{\"aps\": {\"content-available\": 1}, \"secureId\": \"" + secureNotificationInTheBackend.Id.ToString() + "\"}", usernameTag);

     // gcm
     await Notifications.Instance.Hub.SendGcmNativeNotificationAsync("{\"data\": {\"secureId\": \"" + secureNotificationInTheBackend.Id.ToString() + "\"}}", usernameTag);

     return Request.CreateResponse(HttpStatusCode.OK);
 }
Note that the Post method now does not send a toast notification. It sends a raw notification that contains only the notification ID, and not any sensitive content. Also, make sure to comment the send operation for the platforms for which you do not have credentials configured on your notification hub, as they will result in errors.
- Now we will re-deploy this app to an Azure Website in order to make it accessible from all devices. Right-click on the AppBackend project and select Publish.
- Select Azure Website as your publish target. Sign in with your Azure account and select an existing or new Website, and make a note of the destination URL property in the Connection tab. We will refer to this URL as your backend endpoint later in this tutorial. Click Publish.
Modify the Windows Phone project
In the NotifyUserWindowsPhone project, add the following code to App.xaml.cs to register the push background task. Add the following line of code at the end of the
OnLaunched()method:RegisterBackgroundTask();Still in App.xaml.cs, add the following code immediately after the
OnLaunched()method:private async void RegisterBackgroundTask() { if (!Windows.ApplicationModel.Background.BackgroundTaskRegistration.AllTasks.Any(i => i.Value.Name == "PushBackgroundTask")) { var result = await BackgroundExecutionManager.RequestAccessAsync(); var builder = new BackgroundTaskBuilder(); builder.Name = "PushBackgroundTask"; builder.TaskEntryPoint = typeof(PushBackgroundComponent.PushBackgroundTask).FullName; builder.SetTrigger(new Windows.ApplicationModel.Background.PushNotificationTrigger()); BackgroundTaskRegistration task = builder.Register(); } }Add the following
usingstatements at the top of the App.xaml.cs file:using Windows.Networking.PushNotifications; using Windows.ApplicationModel.Background;From the File menu in Visual Studio, click Save All.
Create the push background component
The next step is to create the push background component.
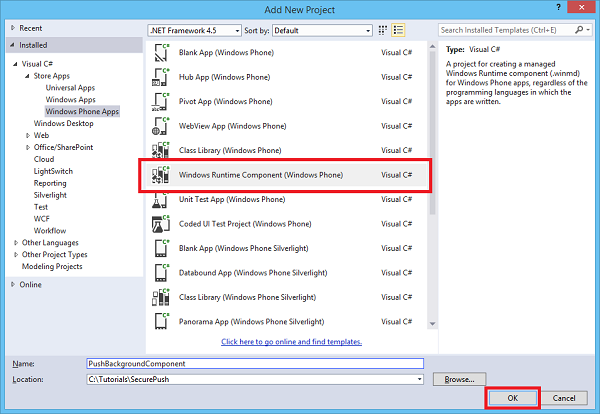
In Solution Explorer, right-click the top-level node of the solution (Solution SecurePush in this case), then click Add, then click New Project.
Expand Store Apps, then click Windows Phone Apps, then click Windows Runtime Component (Windows Phone). Name the project PushBackgroundComponent, and then click OK to create the project.

In Solution Explorer, right-click the PushBackgroundComponent (Windows Phone 8.1) project, then click Add, then click Class. Name the new class
PushBackgroundTask.cs. Click Add to generate the class.Replace the entire contents of the
PushBackgroundComponentnamespace definition with the following code, substituting the placeholder{back-end endpoint}with the back-end endpoint obtained while deploying your back-end:public sealed class Notification { public int Id { get; set; } public string Payload { get; set; } public bool Read { get; set; } } public sealed class PushBackgroundTask : IBackgroundTask { private string GET_URL = "{back-end endpoint}/api/notifications/"; async void IBackgroundTask.Run(IBackgroundTaskInstance taskInstance) { // Store the content received from the notification so it can be retrieved from the UI. RawNotification raw = (RawNotification)taskInstance.TriggerDetails; var notificationId = raw.Content; // retrieve content BackgroundTaskDeferral deferral = taskInstance.GetDeferral(); var httpClient = new HttpClient(); var settings = ApplicationData.Current.LocalSettings.Values; httpClient.DefaultRequestHeaders.Authorization = new AuthenticationHeaderValue("Basic", (string)settings["AuthenticationToken"]); var notificationString = await httpClient.GetStringAsync(GET_URL + notificationId); var notification = JsonConvert.DeserializeObject<Notification>(notificationString); ShowToast(notification); deferral.Complete(); } private void ShowToast(Notification notification) { ToastTemplateType toastTemplate = ToastTemplateType.ToastText01; XmlDocument toastXml = ToastNotificationManager.GetTemplateContent(toastTemplate); XmlNodeList toastTextElements = toastXml.GetElementsByTagName("text"); toastTextElements[0].AppendChild(toastXml.CreateTextNode(notification.Payload)); ToastNotification toast = new ToastNotification(toastXml); ToastNotificationManager.CreateToastNotifier().Show(toast); } }In Solution Explorer, right-click the PushBackgroundComponent (Windows Phone 8.1) project and then click Manage NuGet Packages.
On the left-hand side, click Online.
In the Search box, type Http Client.
In the results list, click Microsoft HTTP Client Libraries, and then click Install. Complete the installation.
Back in the NuGet Search box, type Json.net. Install the Json.NET package, then close the NuGet Package Manager window.
Add the following
usingstatements at the top of thePushBackgroundTask.csfile:using Windows.ApplicationModel.Background; using Windows.Networking.PushNotifications; using System.Net.Http; using Windows.Storage; using System.Net.Http.Headers; using Newtonsoft.Json; using Windows.UI.Notifications; using Windows.Data.Xml.Dom;In Solution Explorer, in the NotifyUserWindowsPhone (Windows Phone 8.1) project, right-click References, then click Add Reference.... In the Reference Manager dialog, check the box next to PushBackgroundComponent, and then click OK.
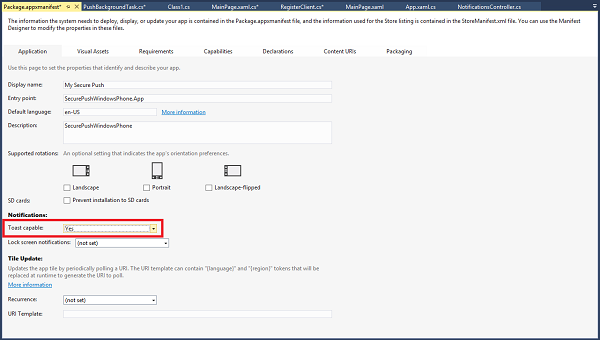
In Solution Explorer, double-click Package.appxmanifest in the NotifyUserWindowsPhone (Windows Phone 8.1) project. Under Notifications, set Toast Capable to Yes.

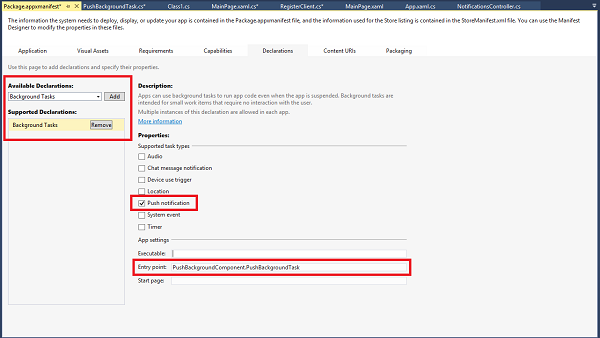
Still in Package.appxmanifest, click the Declarations menu near the top. In the Available Declarations dropdown, click Background Tasks, and then click Add.
In Package.appxmanifest, under Properties, check Push notification.
In Package.appxmanifest, under App Settings, type PushBackgroundComponent.PushBackgroundTask in the Entry Point field.

From the File menu, click Save All.
Run the application
To run the application, do the following:
- In Visual Studio, run the AppBackend Web API application. An ASP.NET web page is displayed.
- In Visual Studio, run the NotifyUserWindowsPhone (Windows Phone 8.1) Windows Phone app. The Windows Phone emulator runs and loads the app automatically.
- In the NotifyUserWindowsPhone app UI, enter a username and password. These can be any string, but they must be the same value.
- In the NotifyUserWindowsPhone app UI, click Log in and register. Then click Send push.