Note
Access to this page requires authorization. You can try signing in or changing directories.
Access to this page requires authorization. You can try changing directories.
This article covers the details for the new SHIR feature that is Kubernetes-based for Linux that improves the underlying infrastructure to provide several benefits:
- Scalability: Ability to scale to hundreds of machines.
- Performance: Improved performance in scanning workloads.
- Security (containerized): Ability to have containerized security on a Kubernetes cluster, instead of hosting SHIR on a Windows machine directly
This article covers the details to install and manage a Kubernetes supported self-hosted integration runtime.
Supported data sources
For a list of all supported sources, see the supported data sources for each integration runtime table.
Architecture
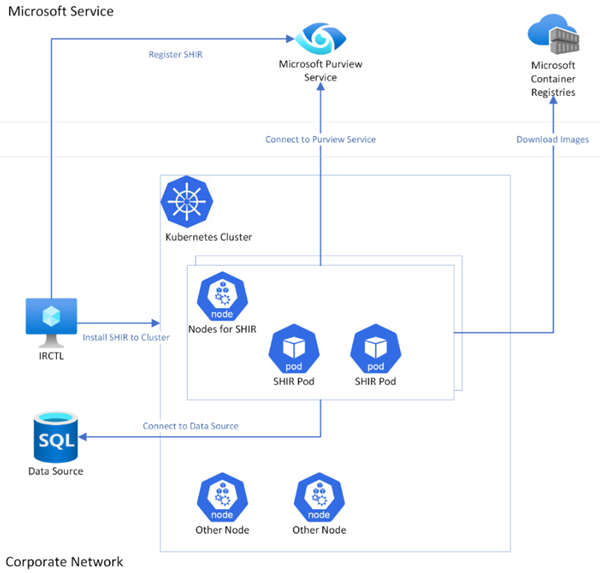
At a high-level architectural view, when a Kubernetes based SHIR is installed, several pods get autocreated on the nodes of users' Kubernetes cluster. This installation can be triggered by a command line tool named IRCTL (more detail in following sections). IRCTL connects to the Microsoft Purview Service to register the SHIR and connect to the Kubernetes cluster to install the SHIR.
During the installation, SHIR images are downloaded from MCR (Microsoft Container Registries) to the SHIR pods. After installation is done, the pods in users’ cluster will connect to the Microsoft Purview Service to pull scan jobs. As a scan job is pulled, it can connect users’ on-premises Data Source for Data Scanning.
Prerequisites
A Microsoft Purview account using enterprise data governance solutions.
Kubernetes cluster: You need to have an existing Linux-based Kubernetes cluster or to prepare one. The nodes can be identified by node selector, which follows the definition of Kubernetes node selector. Minimum configuration:
- Container type: Linux
- Kubernetes version: 1.24.9 or above
- Node OS: Linux based OS running on x86 architecture
- Node spec: minimal eight cores CPU, 32-GB memory, and at least 80 GB of available hard disk space
- Node count: >=1 (should be fixed, not enable cluster auto scaler)
- Pod number per Node: >= 20 (max Pod number – count of other Pods not belonging to Self-Hosted IR)
Note
The folder /var/irstorage/ of each Node is reserved for SHIR. It is readable and writable to SHIR. You can get logs being persisted from this folder or upload external drivers to this folder. It will be created by SHIR if it doesn't exist, and it will not be deleted after SHIR being deleted. The container images used by SHIR are managed by Kubernetes Garbage Collection, which won't be cleaned-up by SHIR. Configure the proper threshold for your Kubernetes cluster.
Kubernetes cluster network: The Kubernetes cluster you have should be able to connect to the endpoint listed in networking requirements.
Integration runtime command line tool: In order manage your Microsoft Purview Kubernetes SHIR locally, you need a command line tool named IRCTL. You can download this tool during the SHIR creation process. IRCTL is a command line tool to manage your Microsoft Purview SHIR. For more information, see the IRCTL documentation.
- Kubernetes context: Kubernetes context, which contains Kubernetes cluster information and user’s permissions and credential for this cluster, is needed to talk to your Kubernetes cluster. To ease the configuration for the user’s permissions for SHIR management, you can start with Kubernetes Admin role. This context is generated with the setup of your Kubernetes cluster and saved in a config file. Where and how you can get this file depends on your setting up the Kubernetes cluster.
- If you use
kubeadm initto set up the Kubernetes cluster, you can find the config file under/etc/Kubernetes/admin.conf. - If you use AKS, you can follow the guidance of AKS to use Az PowerShell module command to get credentials of this cluster to your local machine. The context can be merged to the config file under
$HOME/.kube/configdirectly. - If you're using other tools setting up a Kubernetes cluster, refer to the Kubernetes documentation.
- As you have the config file of the Kubernetes context, merge it to the config file, which is
$HOME/.kube/config, on the machine you would like to run IRCTL command. Or you can set the config file of the Kubernetes context in an environment variable named KUBECONFIG as well. For more information about the Kubernetes context, see Configure Access to Multiple Clusters.
- If you use
Create Kubernetes supported self-hosted integration runtime
To control and manage a Kubernetes SHIR, users can download a command line tool named IRCTL. The following are the steps to your Kubernetes supported self-hosted integration runtime.
The steps take you through downloading IRCTL, but for direct links, see the IRCTL documentation.
Set up a Kubernetes supported self-hosted integration runtime
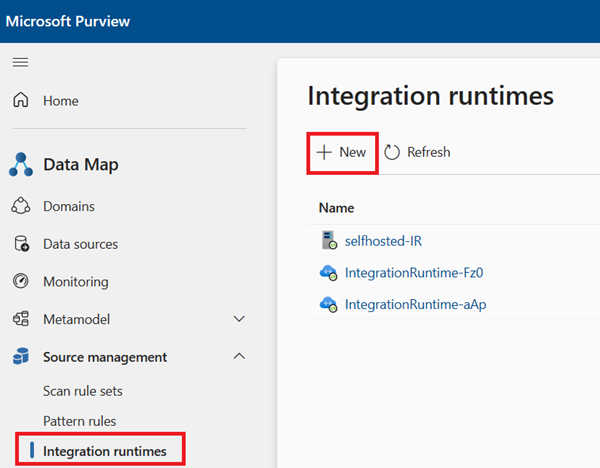
Open the Integration runtimes window in the Microsoft Purview Data Map
- If you're using the new Microsoft Purview portal:
- Open the Data Map
- Select Source management
- Select Integration runtimes
- If you're using the classic Microsoft Purview governance portal:
- Open the Data Map
- Select Integration runtimes
- If you're using the new Microsoft Purview portal:
Select the + New button
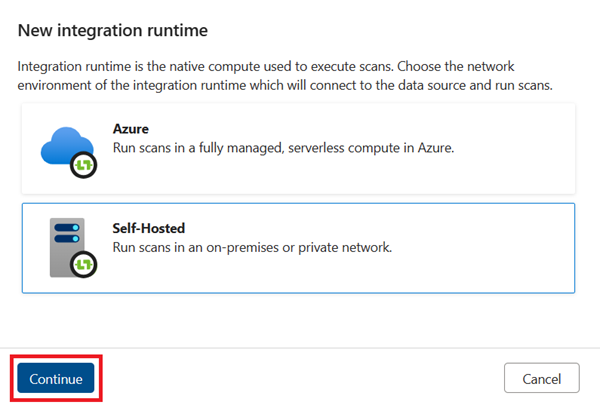
Select Self-hosted and then select Continue
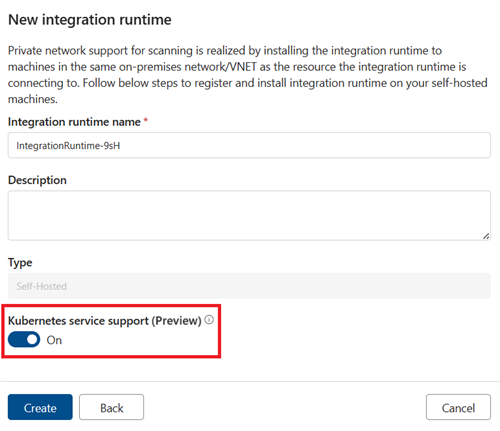
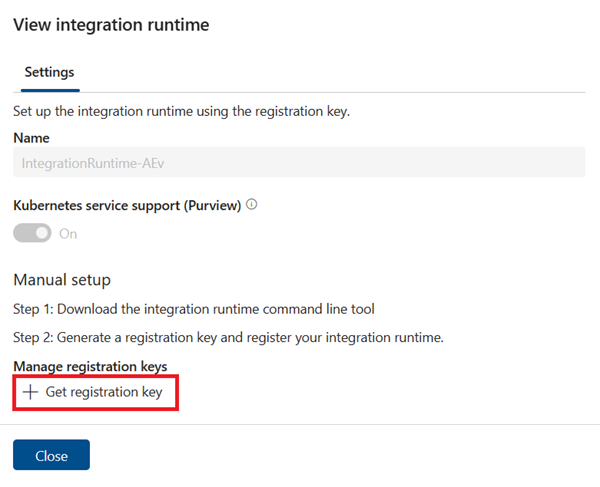
Give your runtime a name, then select the Kubernetes service support toggle to enable
Select Create
Select Get registration key
Copy the key value. You need it to run commands in IRCTL later.
Tip
If needed, you can regenerate a key or revoke a generated key.
Select the Download IRCTL and install integration runtime link to download the IRCTL tool. (You can also follow these steps to download IRCTL directly.)
On the machine where you want to run the IRCTL command line, install IRCTL from the download. IRCTL connects to your Kubernetes cluster by context of the Kube config. If context isn't specified, IRCTL uses the current context. You can set the context in one of two ways:
Run kubectl command line and execute this command to confirm the current context:
kubectl config get-contexts – List all contexts configured on the machinekubectl config current-context – Get the current context namekubectl config use-context <name of context>Run IRCTL and execute
--contextto specify the context in the Kube config
Run the IRCTL command line and execute this command with the registration key you copied.
./irctl create --registration-key <registration key copied from the portal>Note
If node selector isn't specified, will use all nodes of the Kubernetes cluster. For AKS, we suggest using the label of AKS node pool as the node selector or you can customize different labels to the SHIR nodes.
You see this printout:
[Info] Start to create SHIR with Kubernetes context [your-context]......
[Info] Environment validation passed!
[Info] Registering SHIR[example-k8s-shir] for Microsoft Purview Account [yourpurviewaccount]......
[Info] SHIR Registration done!
[Info] Provisioning SHIR, it may take about 5-30 minutes......done!
[Info] SHIR creation succeeded!
Tip
If the installation progress is broken by Ctrl-C or other reasons, the following command can be used to monitor the installation progress:
./irctl install statusOnce installation is complete, to check the current status of the SHIR, run this command:
./irctl describeYou can also check the status of your SHIR in the Microsoft Purview portal, on the Integration runtimes page.
Set up a scan with external drivers
When scanning some data sources, you need to install the corresponding driver on the machine where the SHIR is installed for Microsoft Purview to connect with the data source. Below is an example for Db2 scan. Refer to respective connector article for specific prerequisites.
Note
Data sources that need these external drivers have the information listed in their prerequisites.
In this example, we are installing the Db2 driver. Steps for other drivers are similar.
Download the driver (each source has their individual driver listed.).
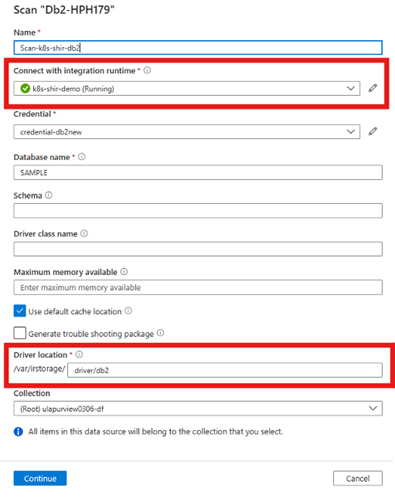
Upload the driver to each node for your integration runtime. You can use a command like this:
./irctl storage upload --source jdbc_sqlj/db2_driver --destination driver/db2A successful upload confirmation looks like this:
========== Context ==========
Kubernetes Context             : k8s-shir-test-cluster
Purview Account                : test-purview-1
Self-hosted Intrgration Runtime: k8s-shir-demo
========== Progress ==========
Processing 2/2 nodes...
aks-shirpool-27141791-vmss000000: SUCCEEDED
aks-shirpool-27141791-vmss000001: SUCCEEDED
========== Results ==========
jdbc_sqlj/db2_driver -> /var/irstorage/driver/db2
Note
If you replace nodes or scale out to new nodes, you need to upload the external driver again.
Verify the files uploaded with this command:
./irctl storage list driver/db2You should see a response like this:
========== Context ==========
Kubernetes Context             : k8s-shir-test-cluster
Purview Account                : test-purview-1
Self-hosted Intrgration Runtime: k8s-shir-demo
========== Progress ==========
Processing 2/2 nodes...
aks-shirpool-27141791-vmss000000: SUCCEEDED
aks-shirpool-27141791-vmss000001: SUCCEEDED
========== Results ==========
Node: aks-shirpool-27141791-vmss000000 - Succeeded
/var/irstorage/driver/db2
total 9364
drwxr-xr-x    2 root     root          4096 May 15 14:23 .
drwxr-xr-x    3 root     root          4096 May 15 14:23 ..
-rwxrwxr-x    1 root     root       6568346 May 15 14:23 db2jcc4.jar
Node: aks-shirpool-27141791-vmss000001 - Succeeded
/var/irstorage/driver/db2
total 9364
drwxr-xr-x    2 root     root          4096 May 15 14:23 .
drwxr-xr-x    3 root     root          4096 May 15 14:23 ..
-rwxrwxr-x    1 root     root       6568346 May 15 14:23 db2jcc4.jar
Create scan with the value for DriverLocation with the Destination value from step 3.
High availability and scalability
You can assign multiple nodes of the Kubernetes cluster to have high availability by using the node-selector during the Kubernetes supported self-hosted integration runtime installation. The benefits of having multiple nodes are:
- Higher availability of the self-hosted integration runtime so that it's no longer the single point of failure for scans.
- Run more concurrent scans. Each node can empower many scan runs at the same time. You can manually scale out nodes of the Kubernetes cluster if you need more concurrent scans.
- When scanning some sources like Azure Blob, Azure Data Lake Storage Gen2, and Azure Files, each scan run can use multiple nodes to boost the scan performance. For other sources, scans are executed on only one of the nodes.
The capability of Kubernetes supported self-hosted integration runtime can be updated by manually scaling out/in nodes of the Kubernetes cluster.
Note
You must upload all necessary drivers for scanning on each new node.
Networking requirements
| Domain name | Outbound ports | Description |
|---|---|---|
Public cloud: <tenantID>-api.purview-service.microsoft.comChina: <tenantID>-api.purview-service.microsoft.cn |
443 | Required to connect to Microsoft Purview service. If you use Microsoft Purview Private Endpoints, this endpoint is covered by account private endpoint. |
Public cloud: <purview_account>.purview.azure.comChina: <purview_account>.purview.azure.cn |
443 | Required to connect to Microsoft Purview service. If you use Microsoft Purview Private Endpoints, this endpoint is covered by account private endpoint. |
Public cloud: <managed_storage_account>.blob.core.chinacloudapi.cn or <ingestion_storage_account>.*.blob.storage.chinacloudapi.cnChina: <managed_storage_account>.blob.core.chinacloudapi.cnor <ingestion_storage_account>.blob.core.chinacloudapi.cn |
443 | Required to connect to the Microsoft Purview managed Azure Blob storage account. |
Public cloud: <managed_storage_account>.queue.core.chinacloudapi.cn or <ingestion_storage_account>.*.queue.storage.chinacloudapi.cnChina: <managed_storage_account>.queue.core.chinacloudapi.cnor <ingestion_storage_account>.queue.core.chinacloudapi.cn |
443 | Required to connect to the Microsoft Purview managed Azure Queue storage account. |
Public cloud: *.compute.governance.azure.comChina: *.compute.governance.azure.cn |
443 | Required to connect to the Microsoft Purview service. Currently wildcard is required as there's no dedicated resource. |
| mcr.microsoft.com | 443 | Required to download images. |
| *.data.mcr.microsoft.com | 443 | Required to download images. |
Note
Depending on the sources users want to scan, they also need to allow other domains and outbound ports for other Azure or external sources.
Version
Typically, we release one new minor version of self-hosted integration runtime every month, which includes features, enhancements, and bug fixes.
Each version of the self-hosted integration runtime expires in one year.
How to check the current version
You can check the version of your Kubernetes self-hosted integration runtime either on the portal, or with the IRCTL.
Portal
- In the Microsoft Purview portal, navigate to the Data Map.
- Select Integration runtimes
- The fourth column in your integration runtime's description line will be Version, and you can check the version there.
IRCTL (1.1.0 and above)
The describe command returns the integration runtime's version.
./irctl describe
Auto-update
Starting from version 1.1.0, the Kubernetes self-hosted integration runtime supports auto-update, which is enabled by default. This feature ensures your integration runtime is automatically upgraded to the latest Azure-managed version approximately once a month.
Opt-out
We recommend keeping auto-update enabled to benefit from the newest features and enhancements. However, you have the option to opt-out of auto-update using IRCTL. The auto-update configuration persists through reinstallation, so you don't need to disable it with each installation.
./irctl config set autoUpdate.enabled false
./irctl config view
Auto-update version vs latest version
To ensure stability, the auto-update is usually behind the latest version with a one-month delay. The auto-update version is managed by Microsoft.
If you would like to upgrade your integration runtime to newer versions, a manual upgrade should be performed with IRCTL of the specific version.
