Note
Access to this page requires authorization. You can try signing in or changing directories.
Access to this page requires authorization. You can try changing directories.
This article describes how to automate installation and updates for the Mobility Service agent in Azure Site Recovery.
When you deploy Site Recovery for disaster recovery of on-premises VMware VMs and physical servers to Azure, you install the Mobility Service agent on each machine you want to replicate. The Mobility Service captures data writes on the machine, and forwards them to the Site Recovery process server for replication. You can deploy the Mobility Service in a few ways:
- Push installation: Let Site Recovery install the Mobility service agent when you enable replication for a machine in the Azure portal.
- Manual installation: Install the Mobility service manually on each machine. Learn more about push and manual installation.
- Automated deployment: Automate installation with software deployment tools such as Microsoft Configuration Manager, or third-party tools such as JetPatch. Learn more
Automated installation and updating provides a solution if:
- Your organization doesn't allow for push installation on protected servers.
- Your company policy requires passwords to be changed periodically. You have to specify a password for the push installation.
- Your security policy doesn't permit adding firewall exceptions for specific machines.
- You're acting as a hosting service provider and don't want to provide customer machine credentials that are needed for push installation with Site Recovery.
- You need to scale agent installations to lots of servers simultaneously.
- You want to schedule installations and upgrades during planned maintenance windows.
Prerequisites
To automate the installation, you need the following items:
- A deployed software installation solution such as Configuration Manager or JetPatch.
- Deployment prerequisites in place in Azure and on-premises for VMware disaster recovery, or for physical server disaster recovery. Review the support requirements for disaster recovery.
Prepare for automated deployment
The following table summarizes tools and processes for automating Mobility Service deployment.
| Tool | Details | Instructions |
|---|---|---|
| Configuration Manager | 1. Verify that you have the prerequisites listed above in place. 2. Deploy disaster recovery by setting up the source environment, including downloading an OVA file to deploy the Site Recovery configuration server as a VMware VM using an OVF template. 3. You register the configuration server with the Site Recovery service, set up the target Azure environment, and configure a replication policy. 4. For automated Mobility Service deployment, you create a network share containing the configuration server passphrase and Mobility Service installation files. 5. You create a Configuration Manager package containing the installation or updates, and prepare for Mobility Service deployment. 6. You can then enable replication to Azure for the machines that have the Mobility Service installed. |
Automate with Configuration Manager |
| JetPatch | 1. Verify that you have the prerequisites listed above in place. 2. Deploy disaster recovery by setting up the source environment, including downloading and deploying JetPatch Agent Manager for Azure Site Recovery in your Site Recovery environment, using an OVF template. 3. You register the configuration server with Site Recovery, set up the target Azure environment, and configure a replication policy. 4. For automated deployment, initialize and complete the JetPatch Agent Manager configuration. 5. In JetPatch you can create a Site Recovery policy to automate deployment and upgrade of the Mobility Service agent. 6. You can then enable replication to Azure for the machines that have the Mobility Service installed. |
Automate with JetPatch Agent Manager Troubleshoot agent installation in JetPatch |
Automate with Configuration Manager
Prepare the installation files
Make sure you have the prerequisites in place.
Create a secure network file share (SMB share) that can be accessed by the machine running the configuration server.
In Configuration Manager, categorize the servers on which you want to install or update the Mobility Service. One collection should contain all Windows servers, the other all Linux servers.
On the network share, create a folder:
- For installation on Windows machines, create a folder named MobSvcWindows.
- For installation on Linux machines, create a folder named MobSvcLinux.
Sign in to the configuration server machine.
On the configuration server machine, open an administrative command prompt.
To generate the passphrase file, run this command:
cd %ProgramData%\ASR\home\svsystems\bin
genpassphrase.exe -v > MobSvc.passphrase
Copy the MobSvc.passphrase file to the Windows folder and the Linux folder.
To browse to the folder that contains the installation files, run this command:
cd %ProgramData%\ASR\home\svsystems\pushinstallsvc\repositoryCopy these installation files to the network share:
- For Windows, copy Microsoft-ASR_UA_version_Windows_GA_date_Release.exe to MobSvcWindows.
- For Linux, copy the following files to MobSvcLinux:
- Microsoft-ASR_UARHEL6-64release.tar.gz
- Microsoft-ASR_UARHEL7-64release.tar.gz
- Microsoft-ASR_UASLES11-SP3-64release.tar.gz
- Microsoft-ASR_UASLES11-SP4-64release.tar.gz
- Microsoft-ASR_UAOL6-64release.tar.gz
- Microsoft-ASR_UAUBUNTU-14.04-64release.tar.gz
As described in the following procedures, copy the code to the Windows or Linux folders. We're assuming that:
- The configuration server's IP address is
192.168.3.121. - The secure network file share is
\\ContosoSecureFS\MobilityServiceInstallers.
- The configuration server's IP address is
Copy code to the Windows folder
Copy the following code:
- Save the code in the MobSvcWindows folder as install.bat.
- Replace the
[CSIP]placeholders in this script with the actual values of the IP address of your configuration server. - The script supports new installations of the Mobility Service agent, and updates to agents that are already installed.
Time /t >> C:\Temp\logfile.log
REM ==================================================
REM ==== Clean up the folders ========================
RMDIR /S /q %temp%\MobSvc
MKDIR %Temp%\MobSvc
MKDIR C:\Temp
REM ==================================================

REM ==== Copy new files ==============================
COPY M*.* %Temp%\MobSvc
CD %Temp%\MobSvc
REN Micro*.exe MobSvcInstaller.exe
REM ==================================================

REM ==== Extract the installer =======================
MobSvcInstaller.exe /q /x:%Temp%\MobSvc\Extracted
REM ==== Wait 10s for extraction to complete =========
TIMEOUT /t 10
REM =================================================

REM ==== Perform installation =======================
REM =================================================

CD %Temp%\MobSvc\Extracted
whoami >> C:\Temp\logfile.log
SET PRODKEY=HKEY_LOCAL_MACHINE\SOFTWARE\Microsoft\Windows\CurrentVersion\Uninstall
REG QUERY %PRODKEY%\{275197FC-14FD-4560-A5EB-38217F80CBD1}
IF NOT %ERRORLEVEL% EQU 0 (
	echo "Product is not installed. Goto INSTALL." >> C:\Temp\logfile.log
	GOTO :INSTALL
) ELSE (
	echo "Product is installed." >> C:\Temp\logfile.log

	echo "Checking for Post-install action status." >> C:\Temp\logfile.log
	GOTO :POSTINSTALLCHECK
)

:POSTINSTALLCHECK
	REG QUERY "HKLM\SOFTWARE\Wow6432Node\InMage Systems\Installed Products\5" /v "PostInstallActions" | Find "Succeeded"
	If %ERRORLEVEL% EQU 0 (
		echo "Post-install actions succeeded. Checking for Configuration status." >> C:\Temp\logfile.log
		GOTO :CONFIGURATIONCHECK
	) ELSE (
		echo "Post-install actions didn't succeed. Goto INSTALL." >> C:\Temp\logfile.log
		GOTO :INSTALL
	)

:CONFIGURATIONCHECK
	REG QUERY "HKLM\SOFTWARE\Wow6432Node\InMage Systems\Installed Products\5" /v "AgentConfigurationStatus" | Find "Succeeded"
	If %ERRORLEVEL% EQU 0 (
		echo "Configuration has succeeded. Goto UPGRADE." >> C:\Temp\logfile.log
		GOTO :UPGRADE
	) ELSE (
		echo "Configuration didn't succeed. Goto CONFIGURE." >> C:\Temp\logfile.log
		GOTO :CONFIGURE
	)


:INSTALL
	echo "Perform installation." >> C:\Temp\logfile.log
    UnifiedAgent.exe /Role MS /InstallLocation "C:\Program Files (x86)\21Vianet Azure Site Recovery" /Platform "VmWare" /Silent
	IF %ERRORLEVEL% EQU 0 (
	    echo "Installation has succeeded." >> C:\Temp\logfile.log
		(GOTO :CONFIGURE)
    ) ELSE (
		echo "Installation has failed." >> C:\Temp\logfile.log
		GOTO :ENDSCRIPT
	)

:CONFIGURE
	echo "Perform configuration." >> C:\Temp\logfile.log
    cd "C:\Program Files (x86)\21Vianet Azure Site Recovery\agent"
	UnifiedAgentConfigurator.exe  /CSEndPoint "[CSIP]" /PassphraseFilePath %Temp%\MobSvc\MobSvc.passphrase
	IF %ERRORLEVEL% EQU 0 (
	    echo "Configuration has succeeded." >> C:\Temp\logfile.log
    ) ELSE (
		echo "Configuration has failed." >> C:\Temp\logfile.log
	)
	GOTO :ENDSCRIPT

:UPGRADE
	echo "Perform upgrade." >> C:\Temp\logfile.log
	UnifiedAgent.exe /Platform "VmWare" /Silent
	IF %ERRORLEVEL% EQU 0 (
	    echo "Upgrade has succeeded." >> C:\Temp\logfile.log
    ) ELSE (
		echo "Upgrade has failed." >> C:\Temp\logfile.log
	)
	GOTO :ENDSCRIPT

:ENDSCRIPT
	echo "End of script." >> C:\Temp\logfile.log
Copy code to the Linux folder
Copy the following code:
- Save the code in the MobSvcLinux folder as install_linux.sh.
- Replace the
[CSIP]placeholders in this script with the actual values of the IP address of your configuration server. - The script supports new installations of the Mobility Service agent, and updates to agents that are already installed.
#!/usr/bin/env bash

rm -rf /tmp/MobSvc
mkdir -p /tmp/MobSvc
INSTALL_DIR='/usr/local/ASR'
VX_VERSION_FILE='/usr/local/.vx_version'

echo "=============================" >> /tmp/MobSvc/sccm.log
echo `date` >> /tmp/MobSvc/sccm.log
echo "=============================" >> /tmp/MobSvc/sccm.log

if [ -f /etc/oracle-release ] && [ -f /etc/redhat-release ]; then
    if grep -q 'Oracle Linux Server release 6.*' /etc/oracle-release; then
        if uname -a | grep -q x86_64; then
            OS="OL6-64"
            echo $OS >> /tmp/MobSvc/sccm.log
            cp *OL6*.tar.gz /tmp/MobSvc
        fi
    fi
elif [ -f /etc/redhat-release ]; then
    if grep -q 'Red Hat Enterprise Linux Server release 6.* (Santiago)' /etc/redhat-release || \
        grep -q 'CentOS Linux release 6.* (Final)' /etc/redhat-release || \
        grep -q 'CentOS release 6.* (Final)' /etc/redhat-release; then
        if uname -a | grep -q x86_64; then
            OS="RHEL6-64"
            echo $OS >> /tmp/MobSvc/sccm.log
            cp *RHEL6*.tar.gz /tmp/MobSvc
        fi
    elif grep -q 'Red Hat Enterprise Linux Server release 7.* (Maipo)' /etc/redhat-release || \
        grep -q 'CentOS Linux release 7.* (Core)' /etc/redhat-release; then
        if uname -a | grep -q x86_64; then
            OS="RHEL7-64"
            echo $OS >> /tmp/MobSvc/sccm.log
            cp *RHEL7*.tar.gz /tmp/MobSvc
                fi
    elif grep -q 'Red Hat Enterprise Linux release 8.* (Ootpa)' /etc/redhat-release || \
        grep -q 'CentOS Linux release 8.* (Core)' /etc/redhat-release; then
        if uname -a | grep -q x86_64; then
            OS="RHEL8-64"
            echo $OS >> /tmp/MobSvc/sccm.log
            cp *RHEL8*.tar.gz /tmp/MobSvc
                fi
    fi
elif [ -f /etc/SuSE-release ] && grep -q 'VERSION = 11' /etc/SuSE-release; then
    if grep -q "SUSE Linux Enterprise Server 11" /etc/SuSE-release && grep -q 'PATCHLEVEL = 3' /etc/SuSE-release; then
        if uname -a | grep -q x86_64; then
            OS="SLES11-SP3-64"
            echo $OS >> /tmp/MobSvc/sccm.log
            cp *SLES11-SP3*.tar.gz /tmp/MobSvc
        fi
    elif grep -q "SUSE Linux Enterprise Server 11" /etc/SuSE-release && grep -q 'PATCHLEVEL = 4' /etc/SuSE-release; then
        if uname -a | grep -q x86_64; then
            OS="SLES11-SP4-64"
            echo $OS >> /tmp/MobSvc/sccm.log
            cp *SLES11-SP4*.tar.gz /tmp/MobSvc
        fi
    fi
elif [ -f /etc/lsb-release ] ; then
    if grep -q 'DISTRIB_RELEASE=14.04' /etc/lsb-release ; then
       if uname -a | grep -q x86_64; then
           OS="UBUNTU-14.04-64"
           echo $OS >> /tmp/MobSvc/sccm.log
           cp *UBUNTU-14*.tar.gz /tmp/MobSvc
       fi
    fi
else
    exit 1
fi

if [ -z "$OS" ]; then
    exit 1
fi

Install()
{
    echo "Perform Installation." >> /tmp/MobSvc/sccm.log
    ./install -q -d ${INSTALL_DIR} -r MS -v VmWare -c CSLegacy -a Install
    RET_VAL=$?
    echo "Installation Returncode: $RET_VAL" >> /tmp/MobSvc/sccm.log
    if [ $RET_VAL -eq 0 ]; then
        echo "Installation has succeeded. Proceed to configuration." >> /tmp/MobSvc/sccm.log
        Configure
    else
        echo "Installation has failed." >> /tmp/MobSvc/sccm.log
        exit $RET_VAL
    fi
}

Configure()
{
    echo "Perform configuration." >> /tmp/MobSvc/sccm.log
    ${INSTALL_DIR}/Vx/bin/UnifiedAgentConfigurator.sh -i [CSIP] -P MobSvc.passphrase
    RET_VAL=$?
    echo "Configuration Returncode: $RET_VAL" >> /tmp/MobSvc/sccm.log
    if [ $RET_VAL -eq 0 ]; then
        echo "Configuration has succeeded." >> /tmp/MobSvc/sccm.log
    else
        echo "Configuration has failed." >> /tmp/MobSvc/sccm.log
        exit $RET_VAL
    fi
}

Upgrade()
{
    echo "Perform Upgrade." >> /tmp/MobSvc/sccm.log
    ./install -q -v VmWare -r MS -v VmWare -c CSLegacy -a Upgrade
    RET_VAL=$?
    echo "Upgrade Returncode: $RET_VAL" >> /tmp/MobSvc/sccm.log
    if [ $RET_VAL -eq 0 ]; then
        echo "Upgrade has succeeded." >> /tmp/MobSvc/sccm.log
    else
        echo "Upgrade has failed." >> /tmp/MobSvc/sccm.log
        exit $RET_VAL
    fi
}

cp MobSvc.passphrase /tmp/MobSvc
cd /tmp/MobSvc

tar -zxvf *.tar.gz

if [ -e ${VX_VERSION_FILE} ]; then
    echo "${VX_VERSION_FILE} exists. Checking for configuration status." >> /tmp/MobSvc/sccm.log
    agent_configuration=$(grep ^AGENT_CONFIGURATION_STATUS "${VX_VERSION_FILE}" | cut -d"=" -f2 | tr -d " ")
    echo "agent_configuration=$agent_configuration" >> /tmp/MobSvc/sccm.log
     if [ "$agent_configuration" == "Succeeded" ]; then
        echo "Agent is already configured. Proceed to Upgrade." >> /tmp/MobSvc/sccm.log
        Upgrade
    else
        echo "Agent is not configured. Proceed to Configure." >> /tmp/MobSvc/sccm.log
        Configure
    fi
else
    Install
fi

cd /tmp
Create a package
Sign in to the Configuration Manager console and go to Software Library > Application Management > Packages.
Right-click Packages > Create Package.
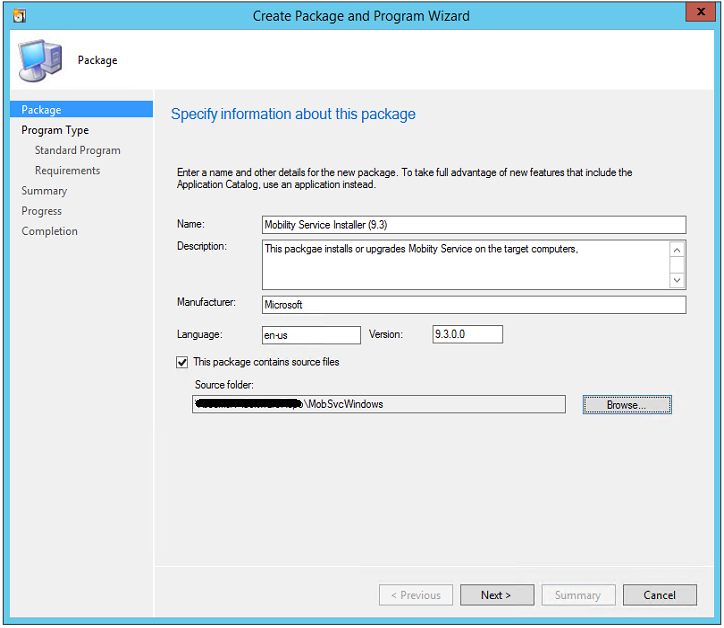
Provide package details including a name, description, manufacturer, language, and version.
Select This package contains source files.
Click Browse, and select the network share and folder that contains the relevant installer (MobSvcWindows or MobSvcLinux). Then, select Next.
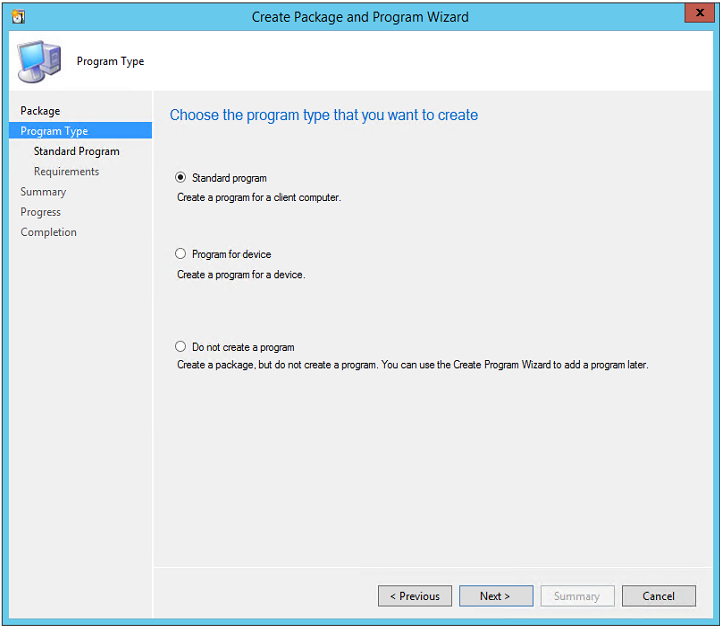
In Choose the program type that you want to create page, select Standard Program > Next.
In Specify information about this standard program page, specify the following values:
Parameter Windows value Linux value Name Install Azure Mobility Service (Windows) Install Azure Mobility Service (Linux). Command line install.bat ./install_linux.sh Program can run Whether or not a user is logged on Whether or not a user is logged on Other parameters Use default setting Use default setting 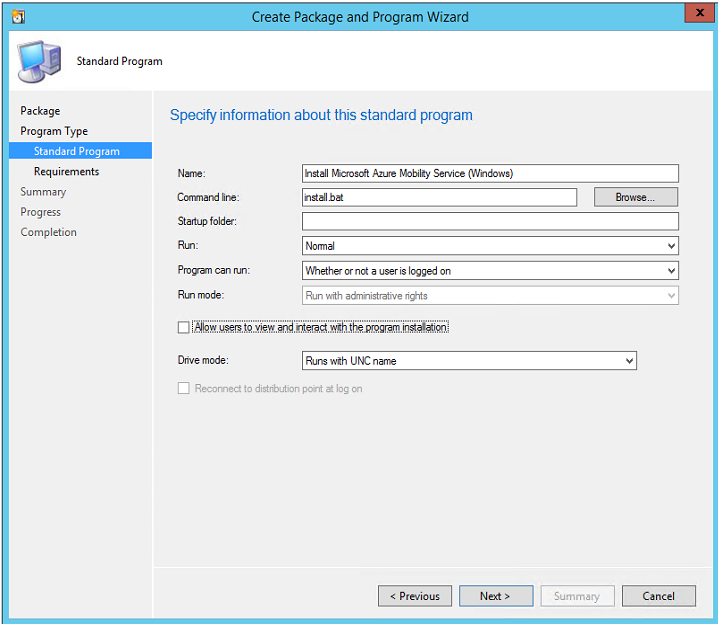
In Specify the requirements for this standard program, do the following tasks:
- For Windows machines, select This program can run only on specified platforms. Then, select the supported Windows operating systems and select Next.
- For Linux machines, select This program can run on any platform. Then select Next.
Finish the wizard.
Deploy the package
In the Configuration Manager console, right-click the package and select Distribute Content.
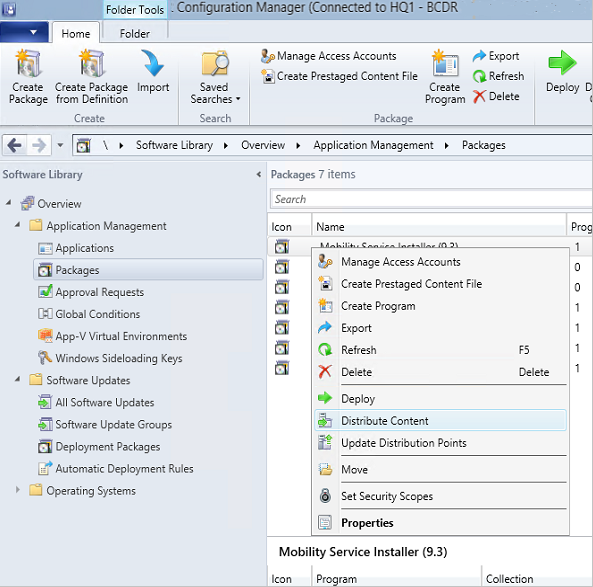
Select the distribution points on to which the packages should be copied. Learn more.
Complete the wizard. The package then starts replicating to the specified distribution points.
After the package distribution finishes, right-click the package > Deploy.
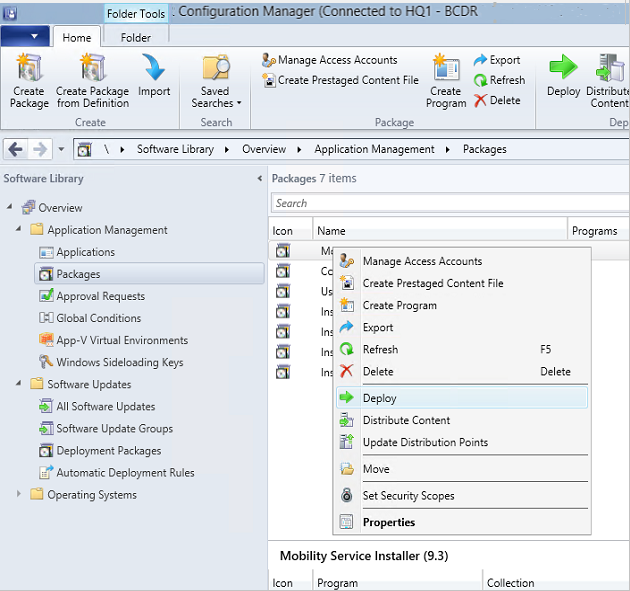
Select the Windows or Linux device collection you created previously.
On the Specify the content destination page, select Distribution Points.
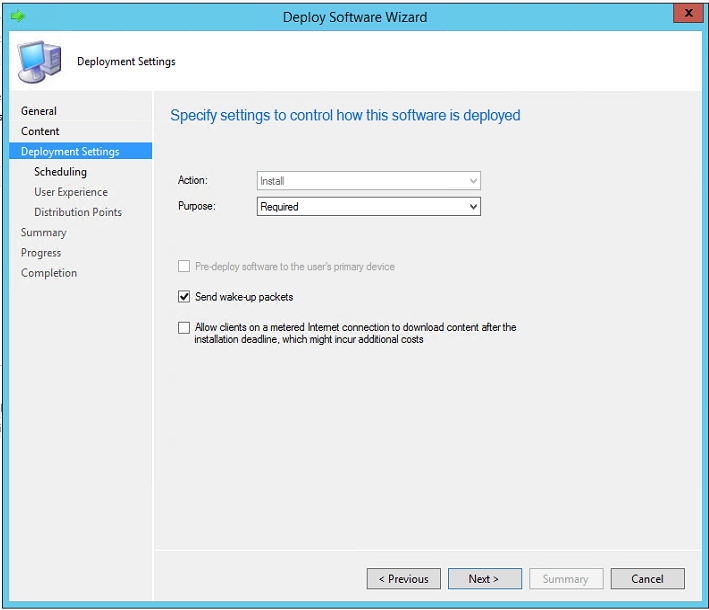
In Specify settings to control how this software is deployed page, set Purpose to Required.
In Specify the schedule for this deployment, set up a schedule. Learn more.
- The Mobility Service is installed in accordance with the schedule you specify.
- To avoid unnecessary reboots, schedule the package installation during your monthly maintenance window or software updates window.
On the Distribution Points page, configure settings and finish the wizard.
Monitor deployment progress in the Configuration Manager console. Go to Monitoring > Deployments > <your package name>.
Uninstall the Mobility Service
You can create Configuration Manager packages to uninstall the Mobility Service. For example, the following script uninstalls the Mobility Service:
Time /t >> C:\logfile.log
REM ==================================================
REM ==== Check if Mob Svc is already installed =======
REM ==== If not installed no operation required ========
REM ==== Else run uninstall command =====================
REM ==== {275197FC-14FD-4560-A5EB-38217F80CBD1} is ====
REM ==== guid for Mob Svc Installer ====================
whoami >> C:\logfile.log
NET START | FIND "InMage Scout Application Service"
IF  %ERRORLEVEL% EQU 1 (GOTO :INSTALL) ELSE GOTO :UNINSTALL
:NOOPERATION
                echo "No Operation Required." >> c:\logfile.log
                GOTO :ENDSCRIPT
:UNINSTALL
                echo "Uninstall" >> C:\logfile.log
                MsiExec.exe /qn /x {275197FC-14FD-4560-A5EB-38217F80CBD1} /L+*V "C:\ProgramData\ASRSetupLogs\UnifiedAgentMSIUninstall.log"
:ENDSCRIPT
Next steps
Enable replication for VMs.