Note
Access to this page requires authorization. You can try signing in or changing directories.
Access to this page requires authorization. You can try changing directories.
Note
The Basic and Standard plans entered a retirement period on March 17, 2025. For more information, see the Azure Spring Apps retirement announcement.
This article describes how to set up autoscale settings for your applications using the Azure portal or the Azure CLI.
Autoscale is a built-in feature of Azure Spring Apps that helps applications perform their best when demand changes. Azure Spring Apps supports scale-out and scale-in, which includes modifying the number of app instances and load balancing.
Prerequisites
- An Azure subscription. If you don't have an Azure subscription, create a Trial before you begin.
- A deployed Azure Spring Apps service instance. For more information, see Quickstart: Deploy your first application to Azure Spring Apps.
- At least one application already created in your service instance.
Navigate to the Autoscale page in the Azure portal
Use the following steps to access the autoscale settings:
- Sign in to the Azure portal.
- Go to the Azure Spring Apps Overview page.
- In the navigation pane, under Settings, select the Apps.
- Select the application for which you want to set up autoscale. If set up your Azure Spring Apps instance by following the directions in Quickstart: Deploy your first application to Azure Spring Apps, select the application named demo. You should then see the application's Overview page.
- In the navigation pane, under Settings, select Scale out.
Set up autoscale settings for your application in the Azure portal
Autoscale demand management provides the following options:
- Manual scale: Maintains a fixed instance count. In the Standard plan, you can scale out to a maximum of 500 instances. This value changes the number of separate running instances of the application.
- Custom autoscale: Scales on any schedule, based on any metrics.
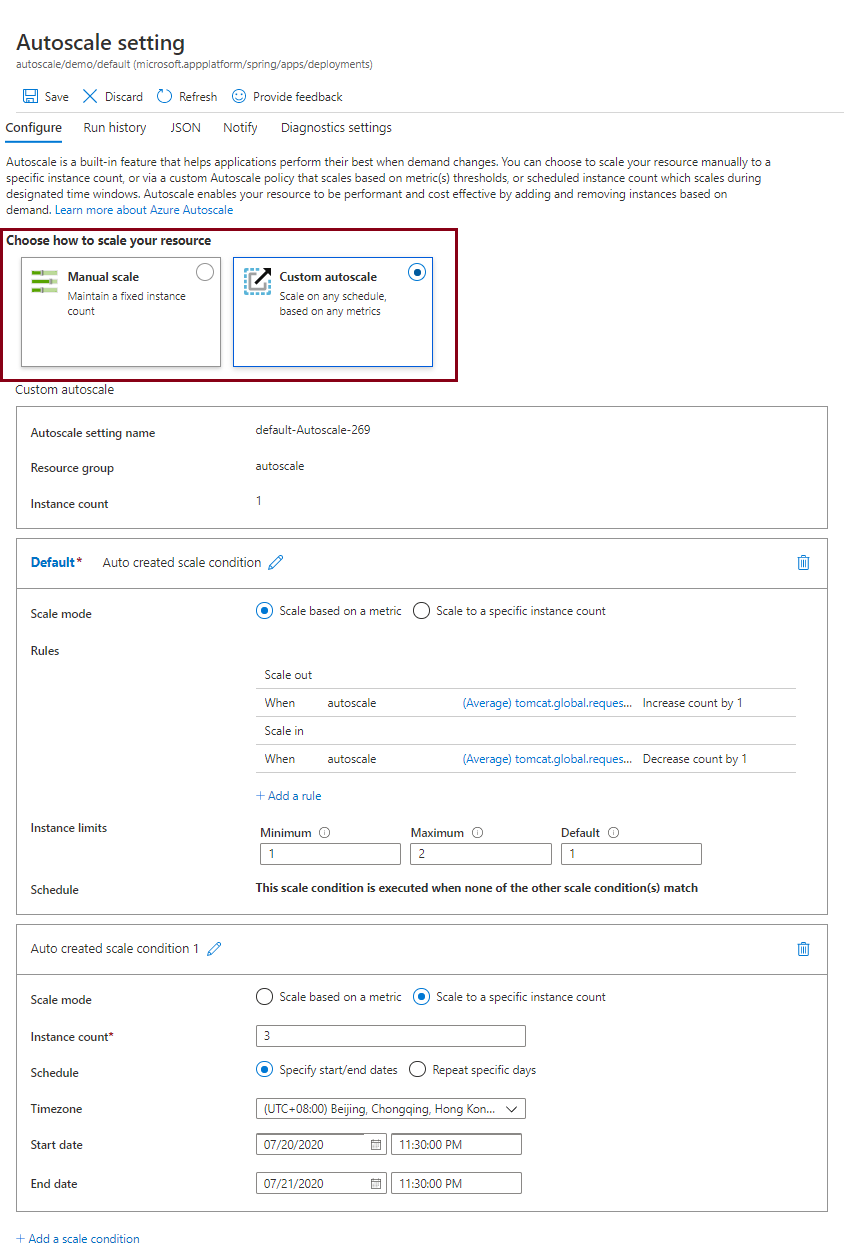
In the Azure portal, choose how you want to scale. The following figure shows the Custom autoscale option and mode settings.
Set up autoscale settings for your application in Azure CLI
You can also set autoscale modes using the Azure CLI. The following commands create an autoscale setting and an autoscale rule. Be sure to replace the <...> placeholders with your own values.
To create an autoscale setting, use the following command:
az monitor autoscale create \
     --resource-group <resource-group-name> \
     --name <autoscale-setting-name> \
     --resource /subscriptions/<subscription-id>/resourcegroups/<resource-group-name>/providers/Microsoft.AppPlatform/Spring/<service-instance-name>/apps/<app-name>/deployments/<deployment-name> \
     --min-count 1 \
     --max-count 5 \
     --count 1
To create an autoscale rule, use the following command:
az monitor autoscale rule create \
     --resource-group <resource-group-name> \
     --autoscale-name <autoscale-setting-name> \
     --scale out 1 \
     --cooldown 1 \
     --condition "tomcat.global.request.total.count > 100 avg 1m where AppName == <app-name> and Deployment == <deployment-name>"
For information on the available metrics, see the User metrics options section of Metrics for Azure Spring Apps.
Set up autoscale settings for blue-green deployments
Use the following steps to set up metrics-based autoscale settings for blue-green deployments:
Important
Create separate autoscale rules for each deployment. Set up one rule for the blue deployment, and a separate rule for the green deployment.
- In the Azure portal, navigate to the Autoscale setting page as described previously.
- Select Custom autoscale.
- Within a scale condition, select Add a rule.
- Choose values for the App dimension.
- For the Deployment dimension, set the value to either the blue or the green deployment name, not to All values.
- For the Instance dimension, set the value to All values. This ensures that the rule applies to all instances within the selected deployment.
This setup enables each deployment to scale based on its own metrics, avoiding conflicts or unexpected behavior during rollouts.
Upgrade to the Standard plan
If you're on the Basic plan and constrained by one or more of these limits, you can upgrade to the Standard plan. To upgrade, go to the Pricing plan menu by first selecting the Standard tier column and then selecting the Upgrade button.
