Note
Access to this page requires authorization. You can try signing in or changing directories.
Access to this page requires authorization. You can try changing directories.
In this quickstart, you learn how to use Azure Storage Explorer to create a container and a blob. Next, you learn how to download the blob to your local computer, and how to view all of the blobs in a container. You also learn how to create a snapshot of a blob, manage container access policies, and create a shared access signature.
Prerequisites
To access Azure Storage, you'll need an Azure subscription. If you don't already have a subscription, create a Trial Subscription before you begin.
All access to Azure Storage takes place through a storage account. For this quickstart, create a storage account using the Azure portal, Azure PowerShell, or Azure CLI. For help creating a storage account, see Create a storage account.
This quickstart requires that you install Azure Storage Explorer. To install Azure Storage Explorer for Windows, Macintosh, or Linux, see Azure Storage Explorer.
Log in to Storage Explorer
On first launch, the Microsoft Azure Storage Explorer - Connect to Azure Storage dialog is shown. Several resource options are displayed to which you can connect:
- Subscription
- Storage account
- Blob container
- Azure Data Lake Storage container or directory
- File share
- Queue
- Table
- Local storage emulator
In the Select Resource panel, select Subscription.

In the Select Azure Environment panel, select an Azure environment to sign in to. You can sign in to global Azure, a national cloud or an Azure Stack instance. Then select Next.

Storage Explorer will open a webpage for you to sign in.
After you successfully sign in with an Azure account, the account and the Azure subscriptions associated with that account appear under ACCOUNT MANAGEMENT. Select the Azure subscriptions that you want to work with, and then select Open Explorer.

After Storage Explorer finishes connecting, it displays the Explorer tab. This view gives you insight to all of your Azure storage accounts as well as local storage configured through the Azurite storage emulator or Azure Stack environments.

Create a container
To create a container, expand the storage account you created in the proceeding step. Select Blob Containers, right-click and select Create Blob Container. Enter the name for your blob container. See the Create a container section for a list of rules and restrictions on naming blob containers. When complete, press Enter to create the blob container. Once the blob container has been successfully created, it is displayed under the Blob Containers folder for the selected storage account.

Upload blobs to the container
Blob storage supports block blobs, append blobs, and page blobs. VHD files used to back IaaS VMs are page blobs. Append blobs are used for logging, such as when you want to write to a file and then keep adding more information. Most files stored in Blob storage are block blobs.
On the container ribbon, select Upload. This operation gives you the option to upload a folder or a file.
Choose the files or folder to upload. Select the blob type. Acceptable choices are Append, Page, or Block blob.
If uploading a .vhd or .vhdx file, choose Upload .vhd/.vhdx files as page blobs (recommended).
In the Upload to folder (optional) field either a folder name to store the files or folders in a folder under the container. If no folder is chosen, the files are uploaded directly under the container.

When you select Upload, the files selected are queued to upload, each file is uploaded. When the upload is complete, the results are shown in the Activities window.
View blobs in a container
In the Azure Storage Explorer application, select a container under a storage account. The main pane shows a list of the blobs in the selected container.

Download blobs
To download blobs using Azure Storage Explorer, with a blob selected, select Download from the ribbon. A file dialog opens and provides you the ability to enter a file name. Select Save to start the download of a blob to the local location.

Manage snapshots
Azure Storage Explorer provides the capability to take and manage snapshots of your blobs. To take a snapshot of a blob, right-click the blob and select Create Snapshot. To view snapshots for a blob, right-click the blob and select Manage history and Manage Snapshots. A list of the snapshots for the blob are shown in the current tab.

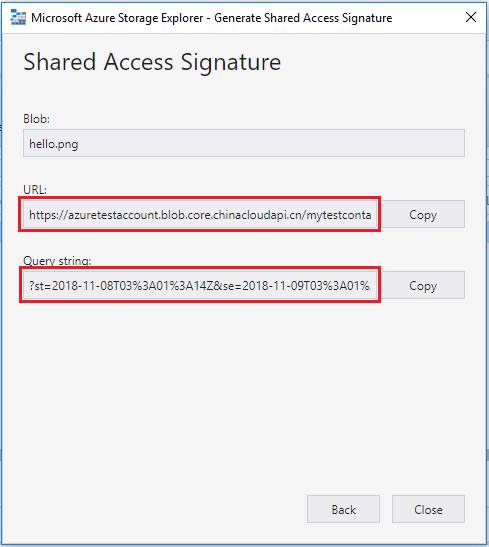
Generate a shared access signature
You can use Storage Explorer to generate a shared access signatures (SAS). Right-click a storage account, container, or blob and choose Get Shared Access Signature.... Choose the start and expiry time, and permissions for the SAS URL and select Create. Storage Explorer generates the SAS token with the parameters you specified and displays it for copying.
When you create a SAS for a storage account, Storage Explorer generates an account SAS. For more information about the account SAS, see Create an account SAS.
When you create a SAS for a container or blob, Storage Explorer generates a service SAS. For more information about the service SAS, see Create a service SAS.
Note
When you create a SAS with Storage Explorer, the SAS is always assigned with the storage account key. Storage Explorer does not currently support creating a user delegation SAS, which is a SAS that is signed with Microsoft Entra credentials.
Next steps
In this quickstart, you learned how to transfer files between a local disk and Azure Blob storage using Azure Storage Explorer. To learn more about working with Blob storage, continue to the Blob storage overview.