Applications often require secure connections between multiple Azure services simultaneously. For example, an enterprise Azure App Service instance might connect to several different storage accounts, an Azure SQL database instance, a Service Bus, and more.
Managed identities are the recommended authentication option for secure, passwordless connections between Azure resources. Developers don't have to manually track and manage many different secrets for managed identities, since most of these tasks are handled internally by Azure. This tutorial explores how to manage connections between multiple services using managed identities and the Azure Identity client library.
Compare the types of managed identities
Azure provides the following types of managed identities:
- System-assigned managed identities are directly tied to a single Azure resource. When you enable a system-assigned managed identity on a service, Azure will create a linked identity and handle administrative tasks for that identity internally. When the Azure resource is deleted, the identity is also deleted.
- User-assigned managed identities are independent identities that are created by an administrator and can be associated with one or more Azure resources. The lifecycle of the identity is independent of those resources.
You can read more about best practices and when to use system-assigned versus user-assigned managed identities in managed identity best practice recommendations.
Explore DefaultAzureCredential
Managed identities are most easily implemented in your application code via a class called DefaultAzureCredential from the Azure Identity client library. DefaultAzureCredential supports multiple authentication mechanisms and automatically determines which should be used at runtime. Learn more about DefaultAzureCredential for the following ecosystems:
Connect an Azure-hosted app to multiple Azure services
Imagine you're tasked with connecting an existing app to multiple Azure services and databases using passwordless connections. The application is an ASP.NET Core Web API hosted on Azure App Service, though the steps below apply to other Azure hosting environments as well, such as Azure Spring Apps, Virtual Machines, Container Apps, and AKS.
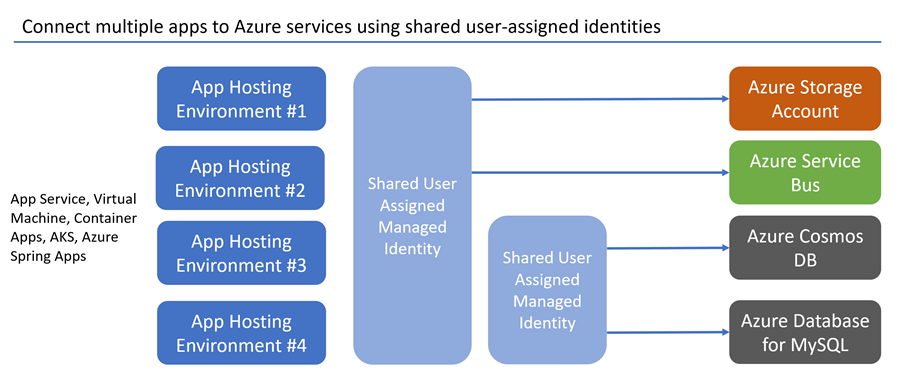
This tutorial applies to the following architectures, though it can be adapted to many other scenarios as well through minimal configuration changes.

The following steps demonstrate how to configure an app to use a system-assigned managed identity and your local development account to connect to multiple Azure Services.
Create a system-assigned managed identity
In the Azure portal, navigate to the hosted application that you would like to connect to other services.
On the service overview page, select Identity.
Toggle the Status setting to On to enable a system assigned managed identity for the service.

Assign roles to the managed identity for each connected service
Navigate to the overview page of the storage account you would like to grant access your identity access to.
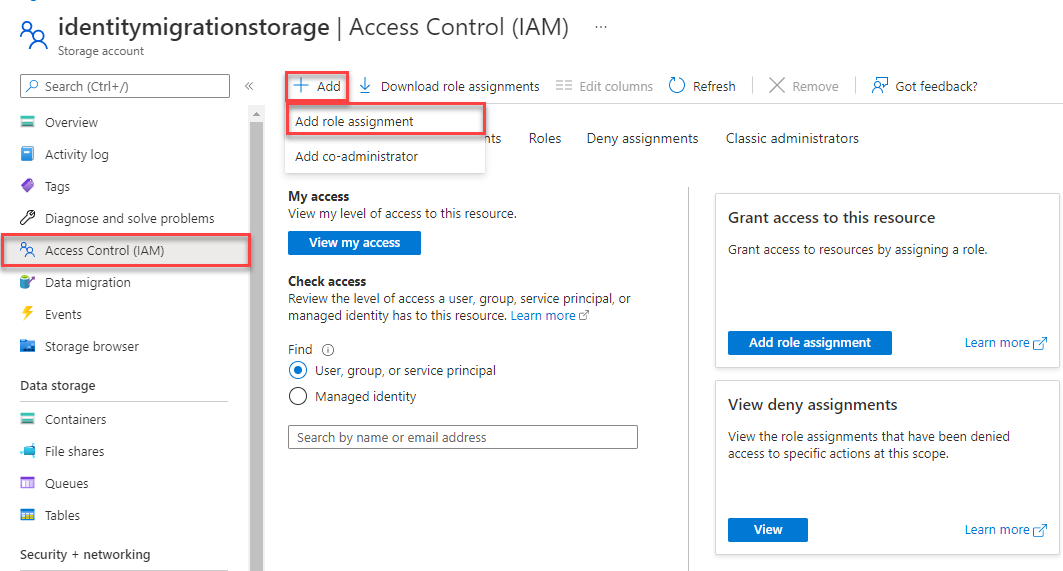
Select Access Control (IAM) from the storage account navigation.
Choose + Add and then Add role assignment.
In the Role search box, search for Storage Blob Data Contributor, which grants permissions to perform read and write operations on blob data. You can assign whatever role is appropriate for your use case. Select the Storage Blob Data Contributor from the list and choose Next.
On the Add role assignment screen, for the Assign access to option, select Managed identity. Then choose +Select members.
In the flyout, search for the managed identity you created by entering the name of your App Service. Select the system-assigned identity, and then choose Select to close the flyout menu.
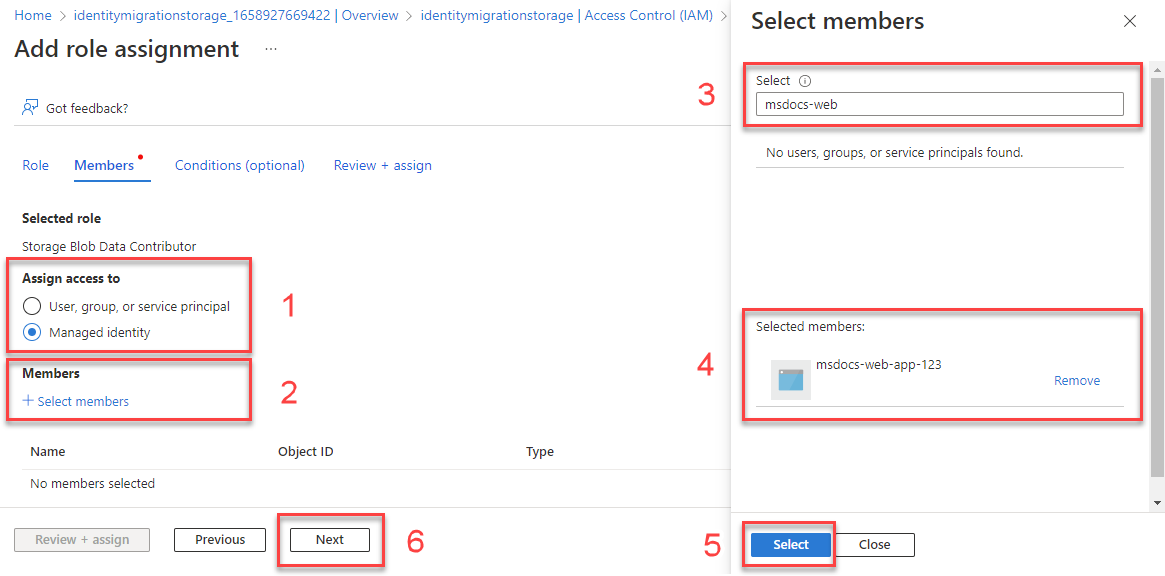
Select Next a couple times until you're able to select Review + assign to finish the role assignment.
Repeat this process for the other services you would like to connect to.
Local development considerations
You can also enable access to Azure resources for local development by assigning roles to a user account the same way you assigned roles to your managed identity.
After assigning the Storage Blob Data Contributor role to your managed identity, under Assign access to, this time select User, group or service principal. Choose + Select members to open the flyout menu again.
Search for the user@domain account or Microsoft Entra security group you would like to grant access to by email address or name, and then select it. This should be the same account you use to sign-in to your local development tooling with, such as Visual Studio or the Azure CLI.
Note
You can also assign these roles to a Microsoft Entra security group if you're working on a team with multiple developers. You can then place any developer inside that group who needs access to develop the app locally.
Implement the application code
In your project, install the Azure.Identity package. This library provides DefaultAzureCredential. You can also add any other Azure libraries that are relevant to your app. For this example, the Azure.Storage.Blobs and Azure.Messaging.ServiceBus packages are added to connect to Blob Storage and Service Bus, respectively.
dotnet add package Azure.Identity
dotnet add package Azure.Messaging.ServiceBus
dotnet add package Azure.Storage.Blobs
Instantiate service clients for the Azure services to which your app must connect. The following code sample interacts with Blob Storage and Service Bus using the corresponding service clients.
using Azure.Identity;
using Azure.Messaging.ServiceBus;
using Azure.Storage.Blobs;

// Create DefaultAzureCredential instance that uses system-assigned managed identity
// in the underlying ManagedIdentityCredential.
DefaultAzureCredential credential = new();

BlobServiceClient blobServiceClient = new(
    new Uri("https://<your-storage-account>.blob.core.chinacloudapi.cn"),
    credential);

ServiceBusClient serviceBusClient = new("<your-namespace>", credential);
ServiceBusSender sender = serviceBusClient.CreateSender("producttracking");
In your project, add the azure-identity dependency to your pom.xml file. This library provides DefaultAzureCredential. You can also add any other Azure dependencies that are relevant to your app. For this example, the azure-storage-blob and azure-messaging-servicebus dependencies are added to interact with Blob Storage and Service Bus.
<dependencyManagement>
  <dependencies>
    <dependency>
      <groupId>com.azure</groupId>
      <artifactId>azure-sdk-bom</artifactId>
      <version>1.2.5</version>
      <type>pom</type>
      <scope>import</scope>
    </dependency>
  </dependencies>
</dependencyManagement>
<dependencies>
  <dependency>
    <groupId>com.azure</groupId>
    <artifactId>azure-identity</artifactId>
  </dependency>
  <dependency>
    <groupId>com.azure</groupId>
    <artifactId>azure-storage-blob</artifactId>
  </dependency>
  <dependency>
    <groupId>com.azure</groupId>
    <artifactId>azure-messaging-servicebus</artifactId>
  </dependency>
</dependencies>
Instantiate service clients for the Azure services to which your app must connect. The following code sample interacts with Blob Storage and Service Bus using the corresponding service clients.
class Demo {
    public static void main(String[] args) {
        // Create DefaultAzureCredential instance that uses system-assigned managed identity
        // in the underlying ManagedIdentityCredential.
        DefaultAzureCredential credential = new DefaultAzureCredentialBuilder()
            .build();

        BlobServiceClient blobServiceClient = new BlobServiceClientBuilder()
            .endpoint("https://<your-storage-account>.blob.core.chinacloudapi.cn")
            .credential(credential)
            .buildClient();

        ServiceBusClientBuilder clientBuilder = new ServiceBusClientBuilder()
            .credential(credential);
        ServiceBusSenderClient serviceBusSenderClient = clientBuilder.sender()
            .queueName("producttracking")
            .buildClient();
    }
}
In your project, you only need to add service dependencies you use. For this example, the spring-cloud-azure-starter-storage-blob and spring-cloud-azure-starter-servicebus dependencies are added in order to connect to Blob Storage and Service Bus.
<dependencyManagement>
  <dependencies>
    <dependency>
      <groupId>com.azure.spring</groupId>
      <artifactId>spring-cloud-azure-dependencies</artifactId>
      <version>4.5.0</version>
      <type>pom</type>
      <scope>import</scope>
    </dependency>
  </dependencies>
</dependencyManagement>
<dependencies>
  <dependency>
    <groupId>com.azure.spring</groupId>
    <artifactId>spring-cloud-azure-starter-storage-blob</artifactId>
  </dependency>
  <dependency>
    <groupId>com.azure.spring</groupId>
    <artifactId>spring-cloud-azure-starter-servicebus</artifactId>
  </dependency>
</dependencies>
Instantiate service clients for the Azure services to which your app must connect. The following examples connect to Blob Storage and Service Bus using the corresponding service clients.
spring:
  cloud:
    azure:
      servicebus:
        namespace: <service-bus-name>
        entity-name: <service-bus-entity-name>
        entity-type: <service-bus-entity-type>
      storage:
        blob:
          account-name: <storage-account-name>
@Service
public class ExampleService {
    @Autowired
    private BlobServiceClient blobServiceClient;

    @Autowired
    private ServiceBusSenderClient serviceBusSenderClient;
}
In your project, install the @azure/identity package. This library provides DefaultAzureCredential. For this example, the @azure/storage-blob and @azure/service-bus packages are installed to interact with Blob Storage and Service Bus.
npm install --save @azure/identity @azure/storage-blob @azure/service-bus
Instantiate service clients for the Azure services to which your app must connect. The following code sample interacts with Blob Storage and Service Bus using the corresponding service clients.
import { DefaultAzureCredential } from "@azure/identity";
import { BlobServiceClient } from "@azure/storage-blob";
import { ServiceBusClient } from "@azure/service-bus";

// Azure resource names
const storageAccount = process.env.AZURE_STORAGE_ACCOUNT_NAME;
const serviceBusNamespace = process.env.AZURE_SERVICE_BUS_NAMESPACE;

// Create DefaultAzureCredential instance that uses system-assigned managed identity
// in the underlying ManagedIdentityCredential.
const credential = new DefaultAzureCredential();

// Create client for Blob Storage
const blobServiceClient = new BlobServiceClient(
  `https://${storageAccount}.blob.core.chinacloudapi.cn`,
  credential
);

// Create client for Service Bus
const serviceBusClient = new ServiceBusClient(
  `https://${serviceBusNamespace}.servicebus.chinacloudapi.cn`,
  credential
);
In your project, add a reference to the azure-identity package. This library provides DefaultAzureCredential. You can also add any other Azure libraries that are relevant to your app. For this example, the azure-storage-blob and azure-service-bus packages are added to connect to Blob Storage and Service Bus, respectively.
pip install azure-identity azure-servicebus azure-storage-blob
Instantiate service clients for the Azure services to which your app must connect. The following code sample interacts with Blob Storage and Service Bus using the corresponding service clients.
from azure.identity import DefaultAzureCredential
from azure.servicebus import ServiceBusClient, ServiceBusMessage
from azure.storage.blob import BlobServiceClient
import os

# Create DefaultAzureCredential instance that uses system-assigned managed identity
# in the underlying ManagedIdentityCredential.
credential = DefaultAzureCredential()

blob_service_client = BlobServiceClient(
    account_url="https://<my-storage-account-name>.blob.core.chinacloudapi.cn/",
    credential=credential
)

fully_qualified_namespace = os.environ['SERVICEBUS_FULLY_QUALIFIED_NAMESPACE']
queue_name = os.environ['SERVICE_BUS_QUEUE_NAME']

with ServiceBusClient(fully_qualified_namespace, credential) as service_bus_client:
    with service_bus_client.get_queue_sender(queue_name) as sender:
        # Sending a single message
        single_message = ServiceBusMessage("Single message")
        sender.send_messages(single_message)
When this code runs locally, DefaultAzureCredential searches its credential chain for the first available credentials. If the Managed_Identity_Client_ID environment variable is null locally, a credential corresponding to a locally installed developer tool is used. For example, Azure CLI or Visual Studio. To learn more about this process, see section Explore DefaultAzureCredential.
When the application is deployed to Azure, DefaultAzureCredential automatically retrieves the Managed_Identity_Client_ID variable from the App Service environment. That value becomes available when a managed identity is associated with your app.
This overall process ensures that your app can run securely locally and in Azure without the need for any code changes.
Connect multiple apps using multiple managed identities
Although the apps in the previous example shared the same service access requirements, real-world environments are often more nuanced. Consider a scenario where multiple apps connect to the same storage accounts, but two of the apps also access different services or databases.
To configure this setup in your code, ensure your application registers separate service clients to connect to each storage account or database. Reference the correct managed identity client IDs for each service when configuring DefaultAzureCredential. The following code samples configure these Azure service connections:
- Two connections to separate storage accounts using a shared user-assigned managed identity
- A connection to Azure Cosmos DB and Azure SQL services using a second user-assigned managed identity. This managed identity is shared when the Azure SQL client driver allows for it. For more information, see the code comments.
In your project, install the required packages. The Azure Identity library provides DefaultAzureCredential.
dotnet add package Azure.Identity
dotnet add package Azure.Storage.Blobs
dotnet add package Microsoft.Azure.Cosmos
dotnet add package Microsoft.Data.SqlClient
Add the following to your code:
using Azure.Core;
using Azure.Identity;
using Azure.Storage.Blobs;
using Microsoft.Azure.Cosmos;
using Microsoft.Data.SqlClient;

string clientIdStorage =
    Environment.GetEnvironmentVariable("Managed_Identity_Client_ID_Storage")!;

// Create a DefaultAzureCredential instance that configures the underlying
// ManagedIdentityCredential to use a user-assigned managed identity.
DefaultAzureCredential credentialStorage = new(
    new DefaultAzureCredentialOptions
    {
        ManagedIdentityClientId = clientIdStorage,
    });

// First Blob Storage client
BlobServiceClient blobServiceClient1 = new(
    new Uri("https://<receipt-storage-account>.blob.core.chinacloudapi.cn"),
    credentialStorage);

// Second Blob Storage client
BlobServiceClient blobServiceClient2 = new(
    new Uri("https://<contract-storage-account>.blob.core.chinacloudapi.cn"),
    credentialStorage);

string clientIdDatabases =
    Environment.GetEnvironmentVariable("Managed_Identity_Client_ID_Databases")!;

// Create a DefaultAzureCredential instance that configures the underlying
// ManagedIdentityCredential to use a user-assigned managed identity.
DefaultAzureCredential credentialDatabases = new(
    new DefaultAzureCredentialOptions
    {
        ManagedIdentityClientId = clientIdDatabases,
    });

// Create an Azure Cosmos DB client
CosmosClient cosmosClient = new(
    Environment.GetEnvironmentVariable("COSMOS_ENDPOINT", EnvironmentVariableTarget.Process),
    credentialDatabases);

// Open a connection to Azure SQL
string connectionString =
    $"Server=<azure-sql-hostname>.database.chinacloudapi.cn;User Id={clientIdDatabases};Authentication=Active Directory Default;Database=<database-name>";

using (SqlConnection connection = new(connectionString)
{
    AccessTokenCallback = async (authParams, cancellationToken) =>
    {
        const string defaultScopeSuffix = "/.default";
        string scope = authParams.Resource.EndsWith(defaultScopeSuffix)
            ? authParams.Resource
            : $"{authParams.Resource}{defaultScopeSuffix}";
        AccessToken token = await credentialDatabases.GetTokenAsync(
            new TokenRequestContext([scope]),
            cancellationToken);

        return new SqlAuthenticationToken(token.Token, token.ExpiresOn);
    }
})
{
    connection.Open();
}
Add the following to your pom.xml file:
<dependencyManagement>
  <dependencies>
    <dependency>
      <groupId>com.azure</groupId>
      <artifactId>azure-sdk-bom</artifactId>
      <version>1.2.5</version>
      <type>pom</type>
      <scope>import</scope>
    </dependency>
  </dependencies>
</dependencyManagement>
<dependencies>
  <dependency>
    <groupId>com.azure</groupId>
    <artifactId>azure-identity</artifactId>
  </dependency>
  <dependency>
    <groupId>com.azure</groupId>
    <artifactId>azure-storage-blob</artifactId>
  </dependency>
  <dependency>
    <groupId>com.azure</groupId>
    <artifactId>azure-cosmos</artifactId>
  </dependency>
  <dependency>
    <groupId>com.microsoft.sqlserver</groupId>
    <artifactId>mssql-jdbc</artifactId>
    <version>11.2.1.jre17</version>
  </dependency>
</dependencies>
Add the following to your code:
class Demo {
    public static void main(String[] args) {
        String clientIdStorage = System.getenv("Managed_Identity_Client_ID_Storage");

        // Create a DefaultAzureCredential instance that configures the underlying
        // ManagedIdentityCredential to use a user-assigned managed identity.
        DefaultAzureCredential credentialStorage = new DefaultAzureCredentialBuilder()
            .managedIdentityClientId(clientIdStorage)
            .build();

        // First Blob Storage client
        BlobServiceClient blobServiceClient1 = new BlobServiceClientBuilder()
            .endpoint("https://<receipt-storage-account>.blob.core.chinacloudapi.cn")
            .credential(credentialStorage)
            .buildClient();

        // Second Blob Storage client
        BlobServiceClient blobServiceClient2 = new BlobServiceClientBuilder()
            .endpoint("https://<contract-storage-account>.blob.core.chinacloudapi.cn")
            .credential(credentialStorage)
            .buildClient();

        String clientIdDatabases = System.getenv("Managed_Identity_Client_ID_Databases");

        // Create a DefaultAzureCredential instance that configures the underlying
        // ManagedIdentityCredential to use a user-assigned managed identity.
        DefaultAzureCredential credentialDatabases = new DefaultAzureCredentialBuilder()
            .managedIdentityClientId(clientIdDatabases)
            .build()

        // Create an Azure Cosmos DB client
        CosmosClient cosmosClient = new CosmosClientBuilder()
            .endpoint("https://<cosmos-db-account>.documents.azure.cn:443/")
            .credential(credentialDatabases)
            .buildClient();

        // Open a connection to Azure SQL using a managed identity.
        // The DefaultAzureCredential instance stored in the credentialDatabases variable can't be
        // used here, so sharing isn't possible between Cosmos DB and Azure SQL.
        String connectionUrl = "jdbc:sqlserver://<azure-sql-hostname>.database.chinacloudapi.cn:1433;"
            + "database=<database-name>;encrypt=true;trustServerCertificate=false;hostNameInCertificate=*.database"
            + ".chinacloudapi.cn;loginTimeout=30;Authentication=ActiveDirectoryMSI;";
        try {
            Connection connection = DriverManager.getConnection(connectionUrl);
            Statement statement = connection.createStatement();
        } catch (SQLException e) {
            e.printStackTrace();
        }
    }
}
Add the following to your pom.xml file:
<dependencyManagement>
  <dependencies>
    <dependency>
      <groupId>com.azure.spring</groupId>
      <artifactId>spring-cloud-azure-dependencies</artifactId>
      <version>4.5.0</version>
      <type>pom</type>
      <scope>import</scope>
    </dependency>
  </dependencies>
</dependencyManagement>
<dependencies>
  <dependency>
    <groupId>com.azure.spring</groupId>
    <artifactId>spring-cloud-azure-starter-storage-blob</artifactId>
  </dependency>
  <dependency>
    <groupId>com.azure.spring</groupId>
    <artifactId>spring-cloud-azure-starter-cosmos</artifactId>
  </dependency>
  <dependency>
    <groupId>com.microsoft.sqlserver</groupId>
    <artifactId>mssql-jdbc</artifactId>
  </dependency>
  <dependency>
    <groupId>org.springframework.boot</groupId>
    <artifactId>spring-boot-starter-jdbc</artifactId>
  </dependency>
</dependencies>
Add the following to your application.yml file:
spring:
  cloud:
    azure:
      cosmos:
        endpoint: https://<cosmos-db-account>.documents.azure.cn:443/
        credential:
          client-id: <Managed_Identity_Client_ID_Databases>
          managed-identity-enabled: true
      storage:
        blob:
          endpoint: https://<contract-storage-account>.blob.core.chinacloudapi.cn
          credential:
            client-id: <Managed_Identity_Client_ID_Storage>
            managed-identity-enabled: true
  datasource:
    url: jdbc:sqlserver://<azure-sql-hostname>.database.chinacloudapi.cn:1433;database=<database-name>;encrypt=true;trustServerCertificate=false;hostNameInCertificate=*.database.chinacloudapi.cn;loginTimeout=30;Authentication=ActiveDirectoryMSI;
Add the following to your code:
Note
Spring Cloud Azure doesn't support configure multiple clients of the same service, the following code samples create multiple beans for this situation.
@Configuration
public class AzureStorageConfiguration {
    @Bean("secondBlobServiceClient")
    public BlobServiceClient secondBlobServiceClient(BlobServiceClientBuilder builder) {
        return builder.endpoint("https://<receipt-storage-account>.blob.core.chinacloudapi.cn")
            .buildClient();
    }

    @Bean("firstBlobServiceClient")
    public BlobServiceClient firstBlobServiceClient(BlobServiceClientBuilder builder) {
        return builder.buildClient();
    }
}
@Service
public class ExampleService {
    @Autowired
    @Qualifier("firstBlobServiceClient")
    private BlobServiceClient blobServiceClient1;

    @Autowired
    @Qualifier("secondBlobServiceClient")
    private BlobServiceClient blobServiceClient2;

    @Autowired
    private CosmosClient cosmosClient;

    @Autowired
    private JdbcTemplate jdbcTemplate;
}
In your project, install the required packages. The Azure Identity library provides DefaultAzureCredential.
npm install --save @azure/identity @azure/storage-blob @azure/cosmos tedious
Add the following to your code:
import { DefaultAzureCredential } from "@azure/identity";
import { BlobServiceClient } from "@azure/storage-blob";
import { CosmosClient } from "@azure/cosmos";
import { Connection } from "tedious";

// Create a DefaultAzureCredential instance that configures the underlying
// ManagedIdentityCredential to use a user-assigned managed identity.
const credentialStorage = new DefaultAzureCredential({
  managedIdentityClientId: process.env.MANAGED_IDENTITY_CLIENT_ID_STORAGE
});

// First Blob Storage client
const blobServiceClient1 = new BlobServiceClient(
  `https://${process.env.AZURE_STORAGE_ACCOUNT_NAME_1}.blob.core.chinacloudapi.cn`,
  credentialStorage
);

// Second Blob Storage client
const blobServiceClient2 = new BlobServiceClient(
  `https://${process.env.AZURE_STORAGE_ACCOUNT_NAME_2}.blob.core.chinacloudapi.cn`,
  credentialStorage
);

// Create a DefaultAzureCredential instance that configures the underlying
// ManagedIdentityCredential to use a user-assigned managed identity.
const credentialDatabases = new DefaultAzureCredential({
  managedIdentityClientId: process.env.MANAGED_IDENTITY_CLIENT_ID_DATABASES
});

// Create an Azure Cosmos DB client
const cosmosClient = new CosmosClient({
  endpoint: process.env.COSMOS_ENDPOINT,
  credential: credentialDatabases
});

// Configure connection and connect to Azure SQL
const config = {
  server: process.env.AZURE_SQL_SERVER,
  authentication: {
    type: 'azure-active-directory-access-token',
    options: {
      token: credentialDatabases.getToken("https://database.chinacloudapi.cn//.default").token
    }
  },
  options: {
    database: process.env.AZURE_SQL_DATABASE,
    encrypt: true
  }
};

const connection = new Connection(config);
connection.connect();
In your project, install the required packages. The Azure Identity library provides DefaultAzureCredential.
pip install azure-identity azure-storage-blob azure-cosmos pyodbc
Add the following to your code:
from azure.cosmos import CosmosClient
from azure.identity import DefaultAzureCredential
from azure.storage.blob import BlobServiceClient
import os, pyodbc, struct

# Create a DefaultAzureCredential instance that configures the underlying
# ManagedIdentityCredential to use a user-assigned managed identity.
credential_storage = DefaultAzureCredential(
    managed_identity_client_id=os.environ['Managed_Identity_Client_ID_Storage']
)

# First Blob Storage client
blob_service_client_1 = BlobServiceClient(
    account_url="https://<receipt-storage-account>.blob.core.chinacloudapi.cn/",
    credential=credential_storage
)

# Second Blob Storage client
blob_service_client_2 = BlobServiceClient(
    account_url="https://<contract-storage-account>.blob.core.chinacloudapi.cn/",
    credential=credential_storage
)

# Create a DefaultAzureCredential instance that configures the underlying
# ManagedIdentityCredential to use a user-assigned managed identity.
credential_databases = DefaultAzureCredential(
    managed_identity_client_id=os.environ['Managed_Identity_Client_ID_Databases']
)

# Create an Azure Cosmos DB client
cosmos_client = CosmosClient(
    os.environ['COSMOS_ENDPOINT'],
    credential=credential_databases
)

# Connect to Azure SQL
token_bytes = credential_databases.get_token("https://database.chinacloudapi.cn/.default").token.encode("UTF-16-LE")
token_struct = struct.pack(f'<I{len(token_bytes)}s', len(token_bytes), token_bytes)
SQL_COPT_SS_ACCESS_TOKEN = 1256  # This connection option is defined by microsoft in msodbcsql.h
conn = pyodbc.connect(connection_string, attrs_before={SQL_COPT_SS_ACCESS_TOKEN: token_struct})
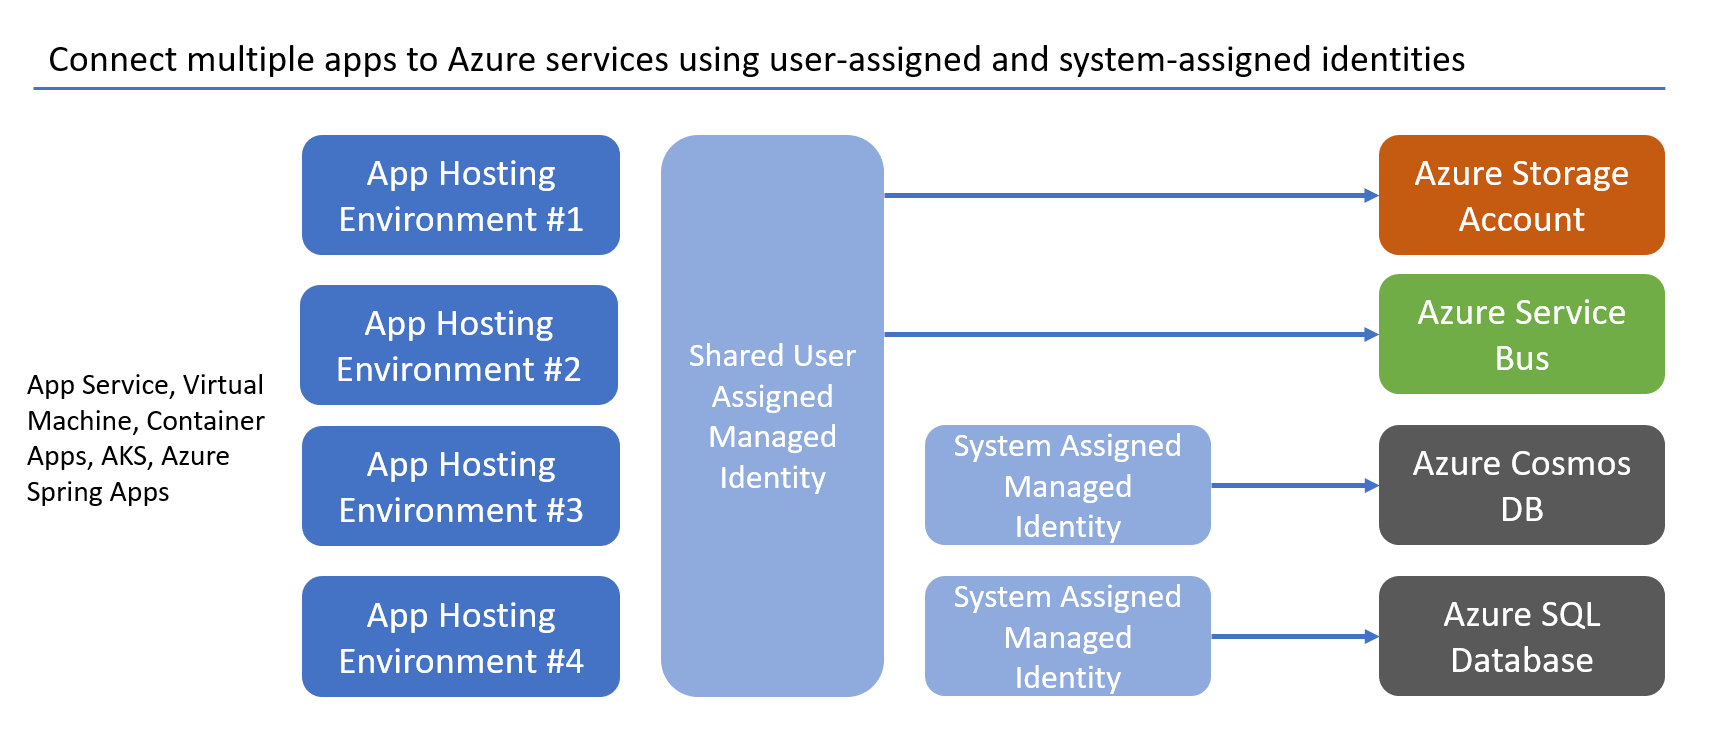
You can also associate a user-assigned managed identity and a system-assigned managed identity to a resource simultaneously. This can be useful in scenarios where all of the apps require access to the same shared services, but one of the apps also has a specific dependency on an additional service. Using a system-assigned managed identity also ensures that the identity tied to that specific app is deleted when the app is deleted, which can help keep your environment clean.
These types of scenarios are explored in more depth in the managed identity best practice recommendations.
In this tutorial, you learned how to migrate an application to passwordless connections. Read the following resources to explore the concepts discussed in this article in more depth:


