Note
Access to this page requires authorization. You can try signing in or changing directories.
Access to this page requires authorization. You can try changing directories.
In this article, you learn how to view, manage, and rotate storage account access keys. When you create a storage account, Azure generates two 512-bit storage account access keys for the account. These keys can be used to authorize access to data in your storage account via Shared Key authorization, or via SAS tokens that are signed with the shared key.
Azure recommends that you use Azure Key Vault to manage your access keys, and that you regularly rotate and regenerate your keys. Using Azure Key Vault makes it easy to rotate your keys without interruption to your applications. You can also manually rotate your keys.
Important
For optimal security, Azure recommends using Microsoft Entra ID with managed identities to authorize requests against blob, queue, and table data, whenever possible. Authorization with Microsoft Entra ID and managed identities provides superior security and ease of use over Shared Key authorization. To learn more about managed identities, see What are managed identities for Azure resources. For an example of how to enable and use a managed identity for a .NET application, see Authenticating Azure-hosted apps to Azure resources with .NET.
For resources hosted outside of Azure, such as on-premises applications, you can use managed identities through Azure Arc. For example, apps running on Azure Arc-enabled servers can use managed identities to connect to Azure services. To learn more, see Authenticate against Azure resources with Azure Arc-enabled servers.
For scenarios where shared access signatures (SAS) are used, Azure recommends using a user delegation SAS. A user delegation SAS is secured with Microsoft Entra credentials instead of the account key. To learn about shared access signatures, see Grant limited access to data with shared access signatures. For an example of how to create and use a user delegation SAS with .NET, see Create a user delegation SAS for a blob with .NET.
Protect your access keys
Storage account access keys provide full access to the storage account data and the ability to generate SAS tokens. Always be careful to protect your access keys. Use Azure Key Vault to manage and rotate your keys securely. Access to the shared key grants a user full access to a storage account's data. Access to shared keys should be carefully limited and monitored. Use user delegation SAS tokens with limited scope of access in scenarios where Microsoft Entra ID based authorization can't be used. Avoid hard-coding access keys or saving them anywhere in plain text that is accessible to others. Rotate your keys if you believe they might have been compromised.
Important
To prevent users from accessing data in your storage account with Shared Key, you can disallow Shared Key authorization for the storage account. Granular access to data with least privileges necessary is recommended as a security best practice. Microsoft Entra ID based authorization using managed identities should be used for scenarios that support OAuth. Kerberos should be used for Azure Files over SMB. For Azure Files over REST, SAS tokens can be used. Shared key access should be disabled if not required to prevent its inadvertent use. For more information, see Prevent Shared Key authorization for an Azure Storage account.
To protect an Azure Storage account with Microsoft Entra Conditional Access policies, you must disallow Shared Key authorization for the storage account.
If you have disabled shared key access and you are seeing Shared Key authorization reported in the diagnostic logs, this indicates that trusted access is being used to access storage. For more details, see Trusted access for resources registered in your Microsoft Entra tenant.
View account access keys
You can view and copy your account access keys with the Azure portal, PowerShell, or Azure CLI. The Azure portal also provides a connection string for your storage account that you can copy.
To view and copy your storage account access keys or connection string from the Azure portal:
In the Azure portal, go to your storage account.
From the resource menu under Security + networking, select Access keys. Your account access keys appear, as well as the complete connection string for each key.
Select Show keys to show your access keys and connection strings and to enable buttons to copy the values.
Under key1, find the Key value. Select the Copy button to copy the account key.
Alternately, you can copy the entire connection string. Under key1, find the Connection string value. Select the Copy button to copy the connection string.
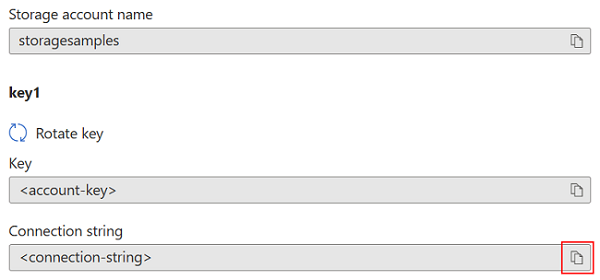
You can use either of the two keys to access Azure Storage, but in general it's a good practice to use the first key, and reserve the use of the second key for when you are rotating keys.
To view or read an account's access keys, the user must either be a Service Administrator, or must be assigned an Azure role that includes the Microsoft.Storage/storageAccounts/listkeys/action. Some Azure built-in roles that include this action are the Owner, Contributor, and Storage Account Key Operator Service Role roles. For more information about the Service Administrator role, see Azure roles, Microsoft Entra roles, and classic subscription administrator roles. For detailed information about built-in roles for Azure Storage, see the Storage section in Azure built-in roles for Azure RBAC.
Use Azure Key Vault to manage your access keys
Azure recommends using Azure Key Vault to manage and rotate your access keys. Your application can securely access your keys in Key Vault, so that you can avoid storing them with your application code. For more information about using Key Vault for key management, see the following articles:
- Manage storage account keys with Azure Key Vault and PowerShell
- Manage storage account keys with Azure Key Vault and the Azure CLI
Manually rotate access keys
Azure recommends that you rotate your access keys periodically to help keep your storage account secure. If possible, use Azure Key Vault to manage your access keys. If you are not using Key Vault, you will need to rotate your keys manually.
Two access keys are assigned so that you can rotate your keys. Having two keys ensures that your application maintains access to Azure Storage throughout the process.
Warning
Regenerating your access keys can affect any applications or Azure services that are dependent on the storage account key. Any clients that use the account key to access the storage account must be updated to use the new key, including media services, cloud, desktop and mobile applications, and graphical user interface applications for Azure Storage, such as Azure Storage Explorer.
Additionally, rotating or regenerating access keys revokes shared access signatures (SAS) that are generated based on that key. After access key rotation, you must regenerate account and service SAS tokens to avoid disruptions to applications. Note that user delegation SAS tokens are secured with Microsoft Entra credentials and aren't affected by key rotation.
If you plan to manually rotate access keys, Azure recommends that you set a key expiration policy. For more information, see Create a key expiration policy.
After you create the key expiration policy, you can use Azure Policy to monitor whether a storage account's keys have been rotated within the recommended interval. For details, see Check for key expiration policy violations.
To rotate your storage account access keys in the Azure portal:
- Update the connection strings in your application code to reference the secondary access key for the storage account.
- Navigate to your storage account in the Azure portal.
- Under Security + networking, select Access keys.
- To regenerate the primary access key for your storage account, select the Regenerate button next to the primary access key.
- Update the connection strings in your code to reference the new primary access key.
- Regenerate the secondary access key in the same manner.
Caution
Azure recommends using only one of the keys in all of your applications at the same time. If you use Key 1 in some places and Key 2 in others, you will not be able to rotate your keys without some application losing access.
To rotate an account's access keys, the user must either be a Service Administrator, or must be assigned an Azure role that includes the Microsoft.Storage/storageAccounts/regeneratekey/action. Some Azure built-in roles that include this action are the Owner, Contributor, and Storage Account Key Operator Service Role roles. For more information about the Service Administrator role, see Azure roles, Microsoft Entra roles, and classic subscription administrator roles. For detailed information about Azure built-in roles for Azure Storage, see the Storage section in Azure built-in roles for Azure RBAC.
Create a key expiration policy
A key expiration policy enables you to set a reminder for the rotation of the account access keys. The reminder is displayed if the specified interval has elapsed and the keys have not yet been rotated. After you create a key expiration policy, you can monitor your storage accounts for compliance to ensure that the account access keys are rotated regularly.
Note
Before you can create a key expiration policy, you may need to rotate each of your account access keys at least once.
To create a key expiration policy in the Azure portal:
- In the Azure portal, go to your storage account.
- Under Security + networking, select Access keys. Your account access keys appear, as well as the complete connection string for each key.
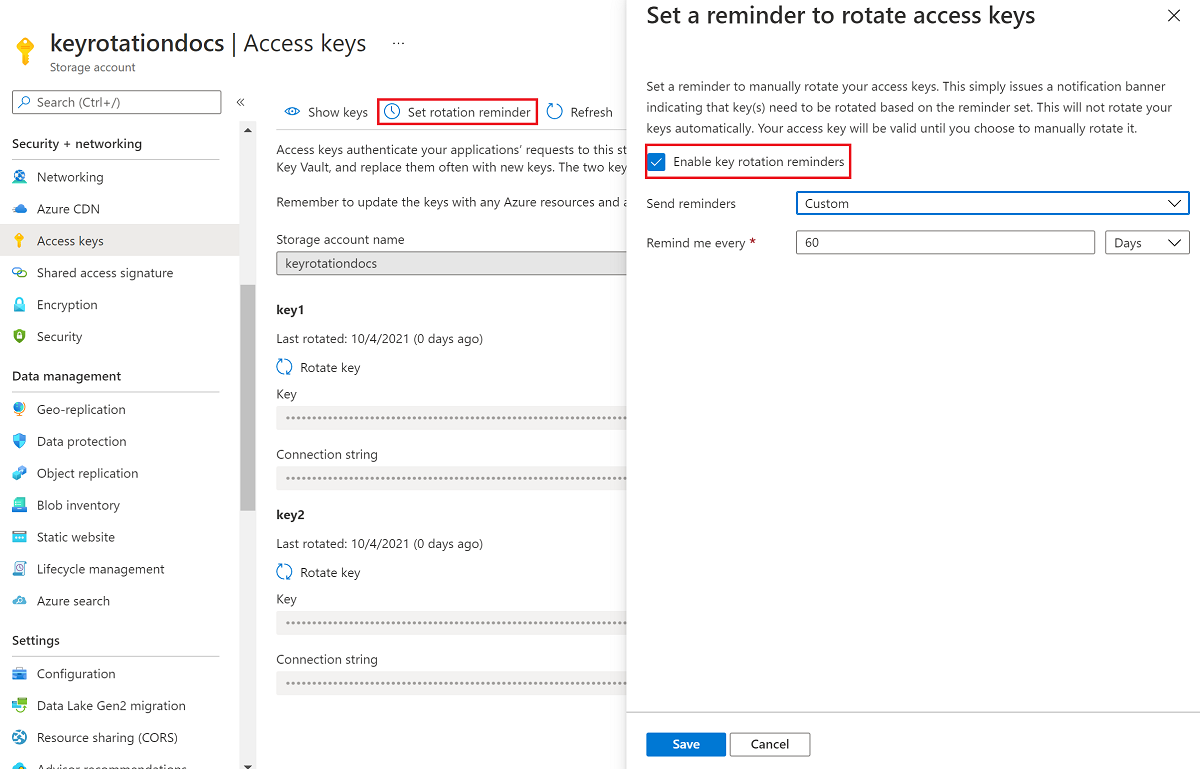
- Select the Set rotation reminder button. If the Set rotation reminder button is grayed out, you will need to rotate each of your keys. Follow the steps described in Manually rotate access keys to rotate the keys.
- In Set a reminder to rotate access keys, select the Enable key rotation reminders checkbox and set a frequency for the reminder.
- Select Save.
Check for key expiration policy violations
You can monitor your storage accounts with Azure Policy to ensure that account access keys have been rotated within the recommended period. Azure Storage provides a built-in policy for ensuring that storage account access keys are not expired. For more information about the built-in policy, see Storage account keys should not be expired in List of built-in policy definitions.
Assign the built-in policy for a resource scope
Follow these steps to assign the built-in policy to the appropriate scope in the Azure portal:
In the Azure portal, search for Policy to display the Azure Policy dashboard.
In the Authoring section, select Assignments.
Choose Assign policy.
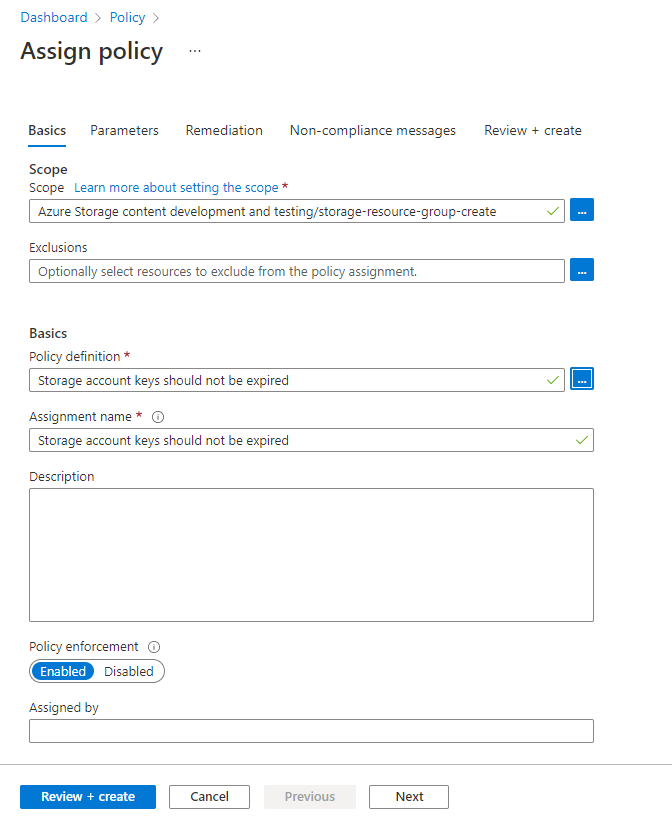
On the Basics tab of the Assign policy page, in the Scope section, specify the scope for the policy assignment. Select the More button to choose the subscription and optional resource group.
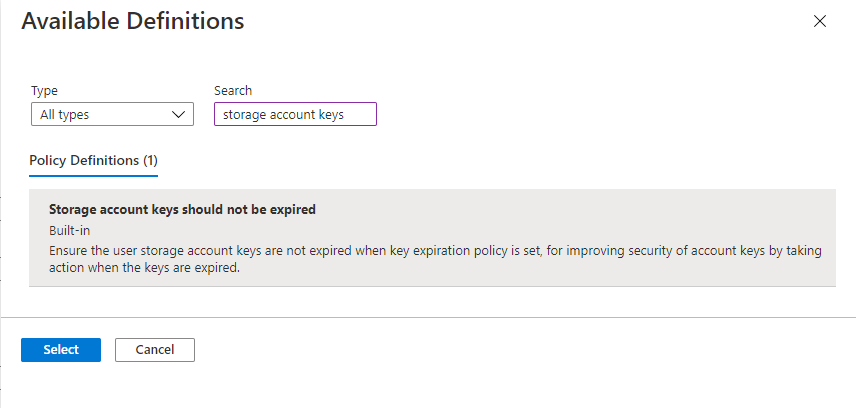
For the Policy definition field, select the More button, and enter storage account keys in the Search field. Select the policy definition named Storage account keys should not be expired.
Select Review + create to assign the policy definition to the specified scope.
Monitor compliance with the key expiration policy
To monitor your storage accounts for compliance with the key expiration policy, follow these steps:
On the Azure Policy dashboard, locate the built-in policy definition for the scope that you specified in the policy assignment. You can search for Storage account keys should not be expired in the Search box to filter for the built-in policy.
Select the policy name with the desired scope.
On the Policy assignment page for the built-in policy, select View compliance. Any storage accounts in the specified subscription and resource group that do not meet the policy requirements appear in the compliance report.
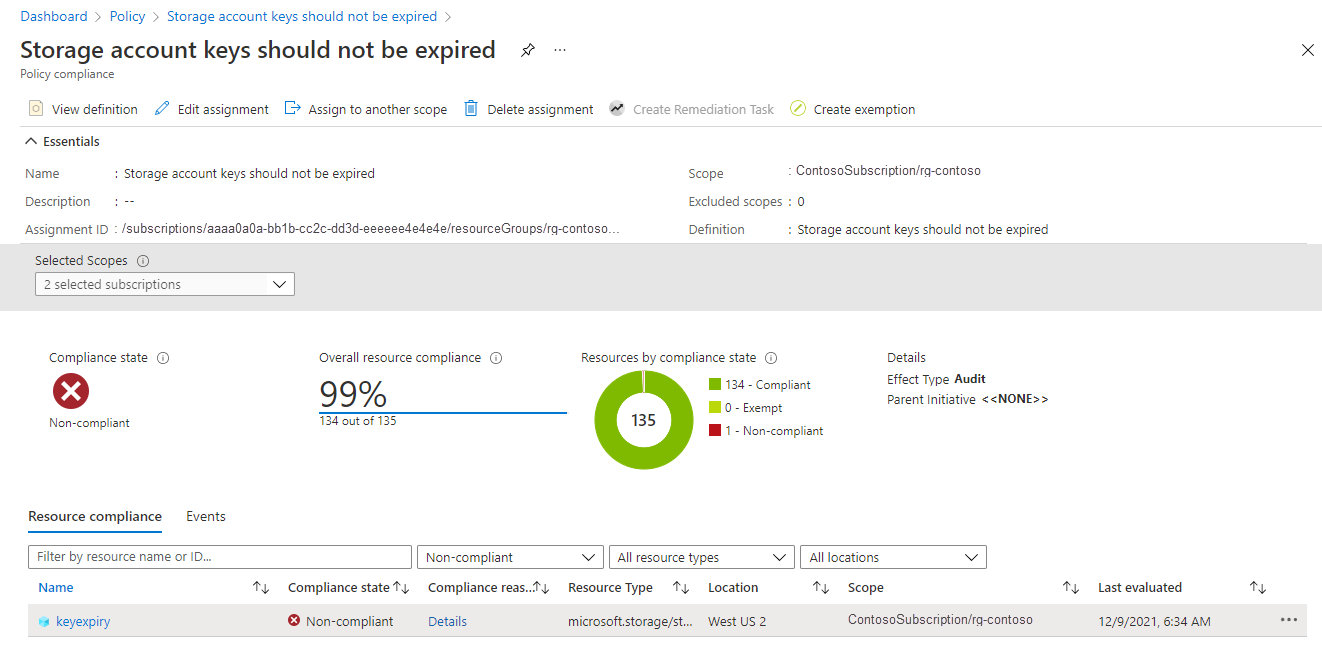
To bring a storage account into compliance, rotate the account access keys.