Note
Access to this page requires authorization. You can try signing in or changing directories.
Access to this page requires authorization. You can try changing directories.
This article shows you how to relocate an Azure Storage Account to a new region by creating a copy of your storage account into another region. You also learn how to relocate your data to that account by using AzCopy, or another tool of your choice.
Prerequisites
Ensure that the services and features that your account uses are supported in the target region.
For preview features, ensure that your subscription is allowlisted for the target region.
Depending on your Storage Account deployment, the following dependent resources may need to be deployed and configured in the target region prior to relocation:
Prepare
To prepare, you must export and then modify a Resource Manager template.
Export a template
A Resource Manager template contains settings that describe your storage account.
To export a template by using Azure portal:
Sign in to the Azure portal.
Select All resources and then select your storage account.
Select > Automation > Export template.
Choose Download in the Export template blade.
Locate the .zip file that you downloaded from the portal, and unzip that file to a folder of your choice.
This zip file contains the .json files that comprise the template and scripts to deploy the template.
Modify the template
Modify the template by changing the storage account name and region.
To deploy the template by using Azure portal:
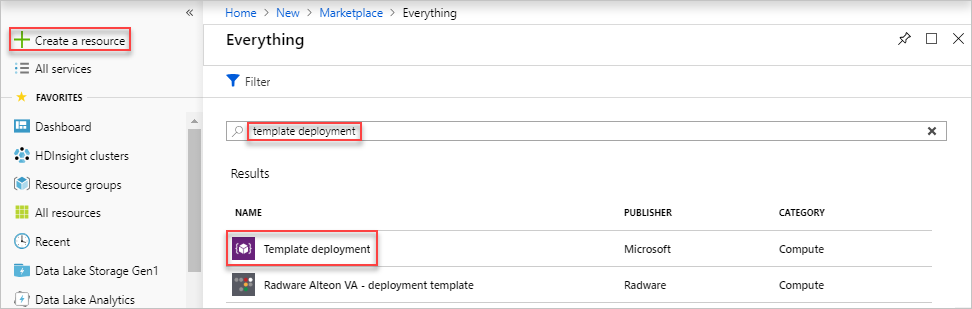
In the Azure portal, select Create a resource.
In Search the Marketplace, type template deployment, and then press ENTER.
Select Template deployment.
Select Create.
Select Build your own template in the editor.
Select Load file, and then follow the instructions to load the template.json file that you downloaded in the last section.
In the template.json file, name the target storage account by setting the default value of the storage account name. This example sets the default value of the storage account name to
mytargetaccount."$schema": "https://schema.management.azure.com/schemas/2015-01-01/deploymentTemplate.json#", "contentVersion": "1.0.0.0", "parameters": { "storageAccounts_mysourceaccount_name": { "defaultValue": "mytargetaccount", "type": "String" } },Edit the location property in the template.json file to the target region. This example sets the target region to
chinanorth3."resources": [ { "type": "Microsoft.Storage/storageAccounts", "apiVersion": "2019-04-01", "name": "[parameters('storageAccounts_mysourceaccount_name')]", "location": "chinanorth3" } ]To obtain region location codes, see Azure Locations. The code for a region is the region name with no spaces, China North3 = chinanorth3.
Redeploy
Deploy the template to create a new storage account in the target region.
Save the template.json file.
Enter or select the property values:
- Subscription: Select an Azure subscription.
- Resource group: Select Create new and give the resource group a name.
- Location: Select an Azure location.
Select I agree to the terms and conditions stated above, and then select Select Purchase.
Tip
If you receive an error which states that the XML specified is not syntactically valid, compare the JSON in your template with the schemas described in the Azure Resource Manager documentation.
Configure the new storage account
Some features won't export to a template, so you'll have to add them to the new storage account.
The following table lists these features along with guidance for adding them to your new storage account.
| Feature | Guidance |
|---|---|
| Lifecycle management policies | Manage the Azure Blob storage lifecycle |
| Static websites | Host a static website in Azure Storage |
| Event subscriptions | Reacting to Blob storage events |
| Alerts | Create, view, and manage activity log alerts by using Azure Monitor |
Note
If you set up a CDN for the source storage account, just change the origin of your existing CDN to the primary blob service endpoint (or the primary static website endpoint) of your new account.
Move data to the new storage account
AzCopy is the preferred tool to move your data over due to its performance optimization. With AzCopy, data is copied directly between storage servers, and so it doesn't use the network bandwidth of your computer. You can run AzCopy at the command line or as part of a custom script. For more information, see Copy blobs between Azure storage accounts by using AzCopy.
You can also use Azure Data Factory to move your data over. To learn how to use Data Factory to relocate your data see one of the following guides:
- Copy data to or from Azure Blob storage by using Azure Data Factory
- Copy data to or from Azure Data Lake Storage Gen2 using Azure Data Factory
- Copy data from or to Azure Files by using Azure Data Factory
- Copy data to and from Azure Table storage by using Azure Data Factory
Discard or clean up
After the deployment, if you want to start over, you can delete the target storage account, and repeat the steps described in the Prepare and Redeploy sections of this article.
To commit the changes and complete the move of a storage account, delete the source storage account.
To remove a storage account by using the Azure portal:
- In the Azure portal, expand the menu on the left side to open the menu of services, and choose Storage accounts to display the list of your storage accounts.
- Locate the target storage account to delete, and right-click the More button (...) on the right side of the listing.
- Select Delete, and confirm.
Next steps
To learn more about moving resources between regions and disaster recovery in Azure, refer to: