Note
Access to this page requires authorization. You can try signing in or changing directories.
Access to this page requires authorization. You can try changing directories.
The Azure PowerShell module is used to create and manage Azure resources using PowerShell cmdlets or scripts. This quickstart shows how to use the Azure PowerShell module to deploy and run an Azure Stream Analytics job.
The sample job reads streaming data from an IoT Hub device. The input data is generated by a Raspberry Pi online simulator. The Stream Analytics job transforms the data using the Stream Analytics query language to filter messages with a temperature greater than 27°. Then, it writes the resulting output events into a file in a blob storage.
Before you begin
- If you don't have an Azure subscription, create a Trial.
- This quickstart requires the Azure PowerShell module. Run
Get-Module -ListAvailable Azto find the version that is installed on your local machine. If you need to install or upgrade, see Install Azure PowerShell module. - Some IoT Hub actions aren't supported by Azure PowerShell and must be completed using Azure CLI version 2.0.70 or later and the IoT extension for Azure CLI. Install the Azure CLI and use
az extension add --name azure-iotto install the IoT extension.
Sign in to Azure
Sign in to your Azure subscription with the Connect-AzAccount -Environment AzureChinaCloud command, and enter your Azure credentials in the pop-up browser:
# Connect to your Azure account
Connect-AzAccount -Environment AzureChinaCloud
If you have more than one subscription, select the subscription you would like to use for this quickstart by running the following cmdlets. Make sure to replace <your subscription name> with the name of your subscription:
# List all available subscriptions.
Get-AzSubscription

# Select the Azure subscription you want to use to create the resource group and resources.
Get-AzSubscription -SubscriptionName "<your subscription name>" | Select-AzSubscription
Create a resource group
Create an Azure resource group with New-AzResourceGroup. A resource group is a logical container into which Azure resources are deployed and managed.
$resourceGroup = "StreamAnalyticsRG"
$location = "chinaeast2"
New-AzResourceGroup `
    -Name $resourceGroup `
    -Location $location
Prepare the input data
Before defining the Stream Analytics job, prepare the data that is configured as input to the job.
The following Azure CLI code block has many commands to prepare the input data required by the job. Review the following sections to understand the code.
In your PowerShell window, run the
az logincommand to sign in to your Azure account.When you successfully sign in, Azure CLI returns a list of your subscriptions. Copy the subscription you're using for this quickstart and run the
az account setcommand to select that subscription. Choose the same subscription you selected in the previous section with PowerShell. Make sure to replace<your subscription name>with the name of your subscription.az login az account set --subscription "<your subscription>"Create an IoT Hub using the
az iot hub createcommand. This example creates an IoT Hub called MyASAIoTHub. Because IoT Hub names are unique, you need to come up with your own IoT Hub name. Set the SKU to F1 to use the free tier if it's available with your subscription. If not, choose the next lowest tier.az iot hub create --name "MyASAIoTHub" --resource-group $resourceGroup --sku S1Once the IoT hub has been created, get the IoT Hub connection string using the az iot hub connection-string show command. Copy the entire connection string and save it. You need it when you add the IoT Hub as an input to your Stream Analytics job.
az iot hub connection-string show --resource-group $resourceGroup --hub-name "MyASAIoTHub"Add a device to IoT Hub using the
az iot hub device-identity createcommand. This example creates a device called MyASAIoTDevice.az iot hub device-identity create --resource-group $resourceGroup --hub-name "MyASAIoTHub" --device-id "MyASAIoTDevice"Get the device connection string using the
az iot hub device-identity connection-string showcommand. Copy the entire connection string and save it for when you create the Raspberry Pi simulator.az iot hub device-identity connection-string show --resource-group $resourceGroup --hub-name "MyASAIoTHub" --device-id "MyASAIoTDevice" --output tableOutput example:
HostName=MyASAIoTHub.azure-devices.net;DeviceId=MyASAIoTDevice;SharedAccessKey=a2mnUsg52+NIgYudxYYUNXI67r0JmNubmfVafojG8=
Create blob storage
The following Azure PowerShell code block uses commands to create blob storage that is used for job output. Review the sections to understand the code.
Create a standard general-purpose storage account using New-AzStorageAccount cmdlet. This example creates a storage account called myasaquickstartstorage with locally redundant storage(LRS) and blob encryption (enabled by default).
Retrieve the storage account context
$storageAccount.Contextthat defines the storage account to be used. When working with storage accounts, you reference the context instead of repeatedly providing the credentials.Create a storage container using New-AzStorageContainer.
Copy the storage key that is outputted by the code, and save that key to create the streaming job's output later on.
$storageAccountName = "myasaquickstartstorage"
$storageAccount = New-AzStorageAccount `
  -ResourceGroupName $resourceGroup `
  -Name $storageAccountName `
  -Location $location `
  -SkuName Standard_LRS `
  -Kind Storage

$ctx = $storageAccount.Context
$containerName = "container1"

New-AzStorageContainer `
  -Name $containerName `
  -Context $ctx

$storageAccountKey = (Get-AzStorageAccountKey `
  -ResourceGroupName $resourceGroup `
  -Name $storageAccountName).Value[0]

Write-Host "The <storage account key> placeholder needs to be replaced in your output json files with this key value:"
Write-Host $storageAccountKey -ForegroundColor Cyan
Create a Stream Analytics job
Create a Stream Analytics job with New-AzStreamAnalyticsJob cmdlet. This cmdlet takes the job name, resource group name, location, and sku name as parameters. The job name can be any friendly name that identifies your job. It can have alphanumeric characters, hyphens, and underscores only and it must be between 3 and 63 characters long.
Run the New-AzStreamAnalyticsJob cmdlet.
$jobName = "MyStreamingJob"
New-AzStreamAnalyticsJob `
  -ResourceGroupName $resourceGroup `
  -Name $jobName `
  -Location chinanorth3 `
  -SkuName Standard
Configure input to the job
Add an input to your job by using the New-AzStreamAnalyticsInput cmdlet. This cmdlet takes the job name, job input name, resource group name, and the job input definition as parameters. The job input definition is a JSON file that contains the properties required to configure the job’s input. In this example, you create a blob storage as an input.
On your local machine, create a file named JobInputDefinition.json and add the following JSON data to it.
Important
- Replace
accesspolicykeywith theSharedAccessKeyportion of the IoT Hub connection string you saved in a previous section. - If you used a different name for the IoT hub, update the value for
iotHubNamespace.
{
    "properties": {
        "type": "Stream",
        "datasource": {
            "type": "Microsoft.Devices/IotHubs",
            "properties": {
                "iotHubNamespace": "MyASAIoTHub",
                "sharedAccessPolicyName": "iothubowner",
                "sharedAccessPolicyKey": "accesspolicykey",
                "endpoint": "messages/events",
                "consumerGroupName": "$Default"
                }
        },
        "compression": {
            "type": "None"
        },
        "serialization": {
            "type": "Json",
            "properties": {
                "encoding": "UTF8"
            }
        }
    },
    "name": "IoTHubInput",
    "type": "Microsoft.StreamAnalytics/streamingjobs/inputs"
}
Set the $jobInputDefinitionFile PowerShell variable to the path where you've stored the job input definition JSON file.
$jobInputDefinitionFile = "C:\JobInputDefinition.json"
Next, run the New-AzStreamAnalyticsInput cmdlet to create an Azure IoT Hub input for the Stream Analytics job.
$jobInputName = "IoTHubInput"
New-AzStreamAnalyticsInput `
  -ResourceGroupName $resourceGroup `
  -JobName $jobName `
  -File $jobInputDefinitionFile `
  -Name $jobInputName
Configure output to the job
Add an output to your job by using the New-AzStreamAnalyticsOutput cmdlet. This cmdlet takes the job name, job output name, resource group name, and the job output definition as parameters. The job output definition is a JSON file that contains the properties required to configure job’s output. This example uses blob storage as output.
On your local machine, create a file named JobOutputDefinition.json, and add the following JSON data to it.
Important
Replace the value for accountKey with your storage account’s access key that is the value stored in $storageAccountKey value.
{
    "properties": {
        "datasource": {
            "type": "Microsoft.Storage/Blob",
            "properties": {
                "storageAccounts": [
                    {
                      "accountName": "asaquickstartstorage",
                      "accountKey": "<storage account key>"
                    }
                ],
                "container": "container1",
                "pathPattern": "output/",
                "dateFormat": "yyyy/MM/dd",
                "timeFormat": "HH"
            }
        },
        "serialization": {
            "type": "Json",
            "properties": {
                "encoding": "UTF8",
                "format": "LineSeparated"
            }
        }
    },
    "name": "BlobOutput",
    "type": "Microsoft.StreamAnalytics/streamingjobs/outputs"
}
Set the $jobOutputDefinitionFile PowerShell variable to the path where you've stored the job output definition JSON file.
$jobOutputDefinitionFile = "C:\JobOutputDefinition.json"
Next, run the New-AzStreamAnalyticsOutput cmdlet to create an Azure Blob Storage output for the Stream Analytics job.
$jobOutputName = "BlobOutput"

New-AzStreamAnalyticsOutput `
  -ResourceGroupName $resourceGroup `
  -JobName $jobName `
  -File $jobOutputDefinitionFile `
  -Name $jobOutputName
Define the transformation query
Add a transformation your job by using the New-AzStreamAnalyticsTransformation cmdlet. This cmdlet takes the job name, job transformation name, resource group name, and the job transformation definition as parameters. On your local machine, create a file named JobTransformationDefinition.json and add the following JSON data to it. The JSON file contains a query parameter that defines the transformation query:
{
    "name":"MyTransformation",
    "type":"Microsoft.StreamAnalytics/streamingjobs/transformations",
    "properties":{
        "streamingUnits":1,
        "script":null,
        "query":"SELECT * INTO BlobOutput FROM IoTHubInput WHERE Temperature > 27"
    }
}
Next run the New-AzStreamAnalyticsTransformation cmdlet.
$jobTransformationName = "MyJobTransformation"
$jobTransformationDefinitionFile = "C:\JobTransformationDefinition.json"
New-AzStreamAnalyticsTransformation `
    -ResourceGroupName $resourceGroup `
    -JobName $jobName `
    -Query "SELECT * INTO BlobOutput FROM IoTHubInput WHERE Temperature > 27" `
    -StreamingUnit 1 `
    -Name $jobTransformationName
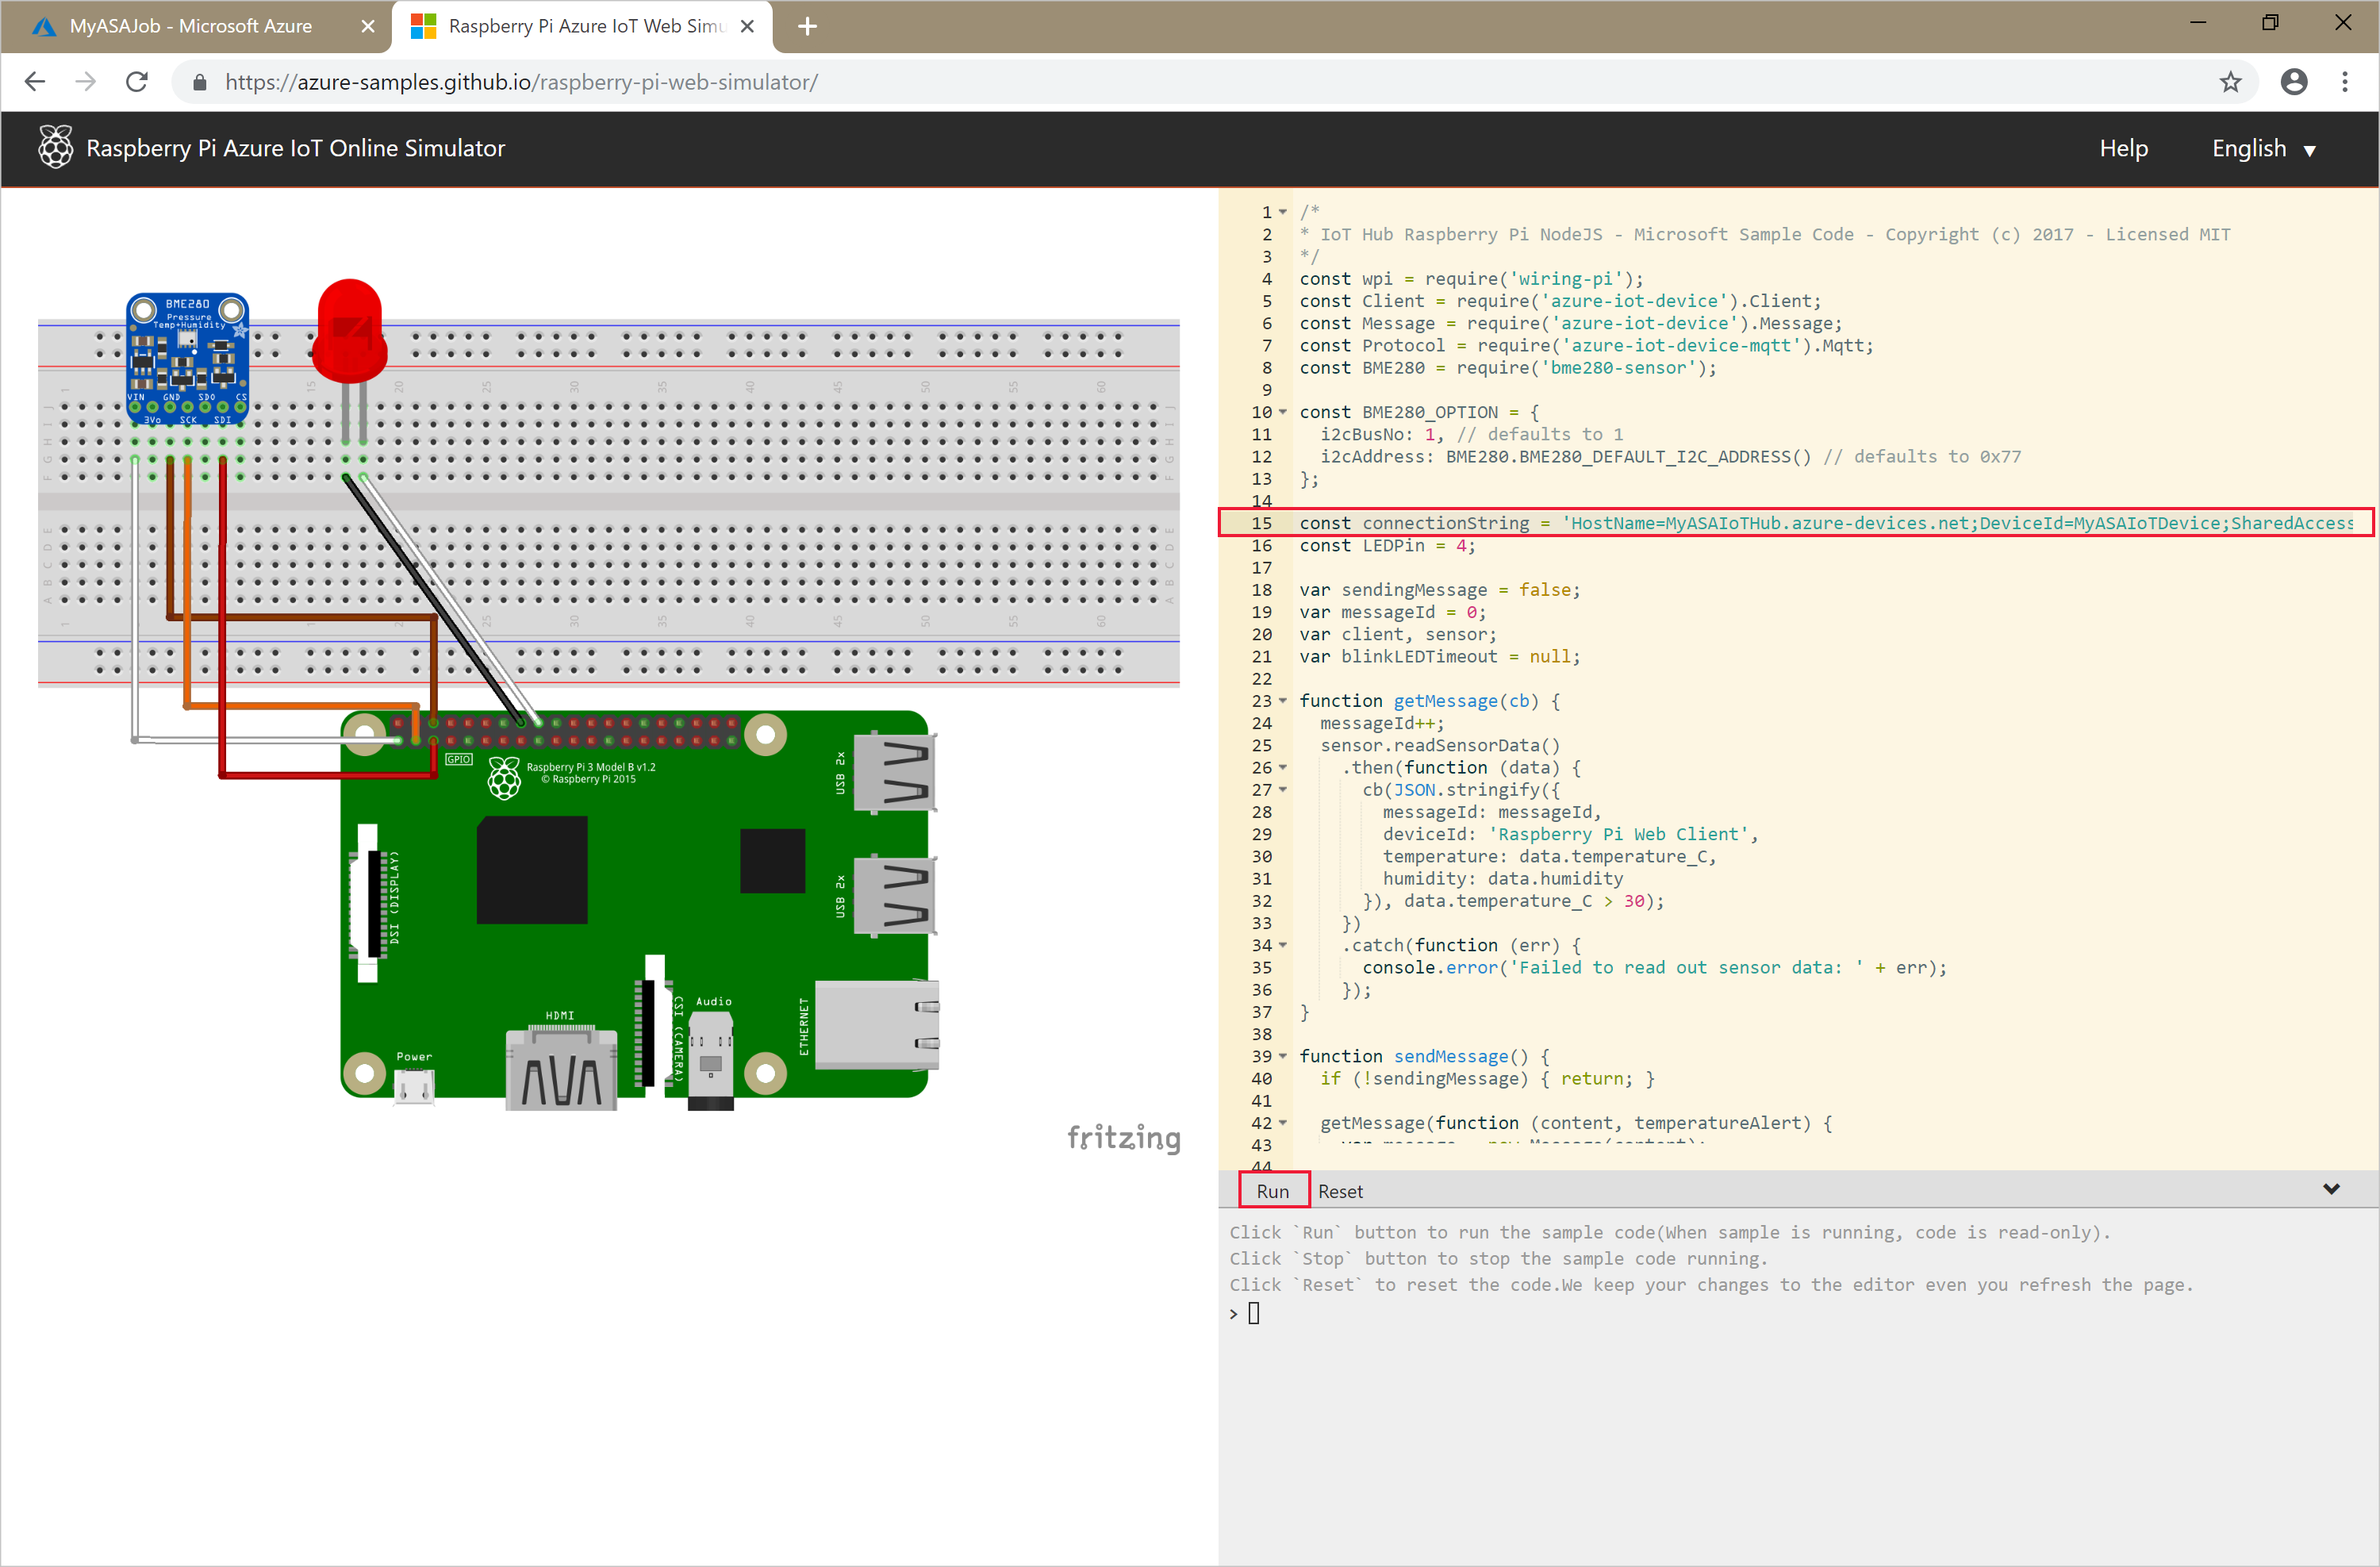
Run the IoT simulator
Open the Raspberry Pi Azure IoT Online Simulator.
Replace the placeholder in Line 15 with the entire Azure IoT Hub Device connection string you saved in a previous section.
Click Run. The output should show the sensor data and messages that are being sent to your IoT Hub.
Start the Stream Analytics job and check the output
Start the job by using the Start-AzStreamAnalyticsJob cmdlet. This cmdlet takes the job name, resource group name, output start mode, and start time as parameters. OutputStartMode accepts values of JobStartTime, CustomTime, or LastOutputEventTime. To learn more about what each of these values are referring to, see the parameters section in PowerShell documentation.
After you run the following cmdlet, it returns True as output if the job starts. In the storage container, an output folder is created with the transformed data.
Start-AzStreamAnalyticsJob `
  -ResourceGroupName $resourceGroup `
  -Name $jobName `
  -OutputStartMode 'JobStartTime'
Clean up resources
When no longer needed, delete the resource group, the streaming job, and all related resources. Deleting the job avoids billing the streaming units consumed by the job. If you're planning to use the job in future, you can skip deleting it, and stop the job for now. If you aren't going to continue to use this job, delete all resources created by this quickstart by running the following cmdlet:
Remove-AzResourceGroup `
  -Name $resourceGroup
Next steps
In this quickstart, you deployed a simple Stream Analytics job using PowerShell. You can also deploy Stream Analytics jobs using the Azure portal.
To learn about configuring other input sources and performing real-time detection, continue to the following article: