Note
Access to this page requires authorization. You can try signing in or changing directories.
Access to this page requires authorization. You can try changing directories.
Note
External Hive metastores will no longer be supported in subsequent versions after Azure Synapse Runtime for Apache Spark 3.4 in Synapse.
Azure Synapse Analytics allows Apache Spark pools in the same workspace to share a managed HMS (Hive Metastore) compatible metastore as their catalog. When customers want to persist the Hive catalog metadata outside of the workspace, and share catalog objects with other computational engines outside of the workspace, such as HDInsight and Azure Databricks, they can connect to an external Hive Metastore. In this article, you can learn how to connect Synapse Spark to an external Apache Hive Metastore.
Supported Hive Metastore versions
The feature works with Spark 3.3. The following table shows the supported Hive Metastore versions for each Spark version.
| Spark Version | HMS 2.3.x | HMS 3.1.X |
|---|---|---|
| 3.3(deprecated) | Yes | Yes |
| 3.4 | Yes | Yes |
Set up linked service to Hive Metastore
Note
Only Azure SQL Database and Azure Database for MySQL are supported as an external Hive Metastore. SQL(username-password) authentication is supported for both kinds of databases. Additionally, system-sssigned managed identity authentication is supported only for Azure SQL Database and Spark 3.4+. If the provided database is blank, please provision it via Hive Schema Tool to create database schema.
Follow below steps to set up a linked service to the external Hive Metastore in Synapse workspace.
Linked Service for Azure SQL Database
Open Synapse Studio, go to Manage > Linked services at left, click New to create a new linked service.

Choose Azure SQL Database, click Continue.
Provide Name of the linked service. Record the name of the linked service, this info will be used to configure Spark shortly.
Choose Legacy version and select Connection String.
Either select Azure SQL Database for the external Hive Metastore from Azure subscription list, or enter the info manually.
Set Authentication type as one of
SQL AuthenticationorSystem-assigned managed identity. ForSQL Authentication, provide User name and Password to set up the connection. ForSystem-assigned managed identity, the page will automatically populate the management identity associated with the current workspace.Test connection to verify the authentication.
Click Create to create the linked service.
Linked Service for Azure Database for MySQL
Open Synapse Studio, go to Manage > Linked services at left, click New to create a new linked service.
Choose Azure Database for MySQL, click Continue.
Provide Name of the linked service. Record the name of the linked service, this info will be used to configure Spark shortly.
Either select Azure Database for MySQL for the external Hive Metastore from Azure subscription list, or enter the info manually.
Provide User name and Password to set up the connection.
Test connection to verify the username and password.
Click Create to create the linked service.
(Optional)Test connection and get the metastore version in notebook
Note
The following testing code pieces only apply to user/password auth.
Some network security rule settings could block access from Spark pool to the external Hive Metastore DB. Before you configure the Spark pool, run below code in any Spark pool notebook to test connection to the external Hive Metastore DB.
You can also get your Hive Metastore version from the output results. The Hive Metastore version will be used in the Spark configuration.
Warning
Don't publish the test scripts in your notebook with your password hardcoded as this could cause a potential security risk for your Hive Metastore.
Connection testing code for Azure SQL
%%spark
import java.sql.DriverManager
/** this JDBC url could be copied from Azure portal > Azure SQL database > Connection strings > JDBC **/
val url = s"jdbc:sqlserver://{your_servername_here}.database.chinacloudapi.cn:1433;database={your_database_here};user={your_username_here};password={your_password_here};encrypt=true;trustServerCertificate=false;hostNameInCertificate=*.database.chinacloudapi.cn;loginTimeout=30;"
try {
    val connection = DriverManager.getConnection(url)
    val result = connection.createStatement().executeQuery("select t.SCHEMA_VERSION from VERSION t")
    result.next();
    println(s"Successful to test connection. Hive Metastore version is ${result.getString(1)}")
} catch {
    case ex: Throwable => println(s"Failed to establish connection:\n $ex")
}
Connection testing code for Azure Database for MySQL
%%spark
import java.sql.DriverManager
/** this JDBC url could be copied from Azure portal > Azure Database for MySQL > Connection strings > JDBC **/
val url = s"jdbc:mysql://{your_servername_here}.mysql.database.chinacloudapi.cn:3306/{your_database_here}?useSSL=true"
try {
    val connection = DriverManager.getConnection(url, "{your_username_here}", "{your_password_here}");
    val result = connection.createStatement().executeQuery("select t.SCHEMA_VERSION from VERSION t")
    result.next();
    println(s"Successful to test connection. Hive Metastore version is ${result.getString(1)}")
} catch {
    case ex: Throwable => println(s"Failed to establish connection:\n $ex")
}
Configure Spark to use the external Hive Metastore
After creating the linked service to the external Hive Metastore successfully, you need to set up a few Spark configurations to use the external Hive Metastore. You can both set up the configuration at Spark pool level, or at Spark session level.
Here are the configurations and descriptions:
Note
Synapse aims to work smoothly with computes from HDI. However HMS 3.1 in HDI 4.0 is not fully compatible with the OSS HMS 3.1. For OSS HMS 3.1, please check here.
| Spark config | Description |
|---|---|
spark.sql.hive.metastore.version |
Supported versions:
|
spark.sql.hive.metastore.jars |
|
spark.hadoop.hive.synapse.externalmetastore.linkedservice.name |
Name of your linked service |
spark.sql.hive.metastore.sharedPrefixes |
com.mysql.jdbc,com.microsoft.vegas |
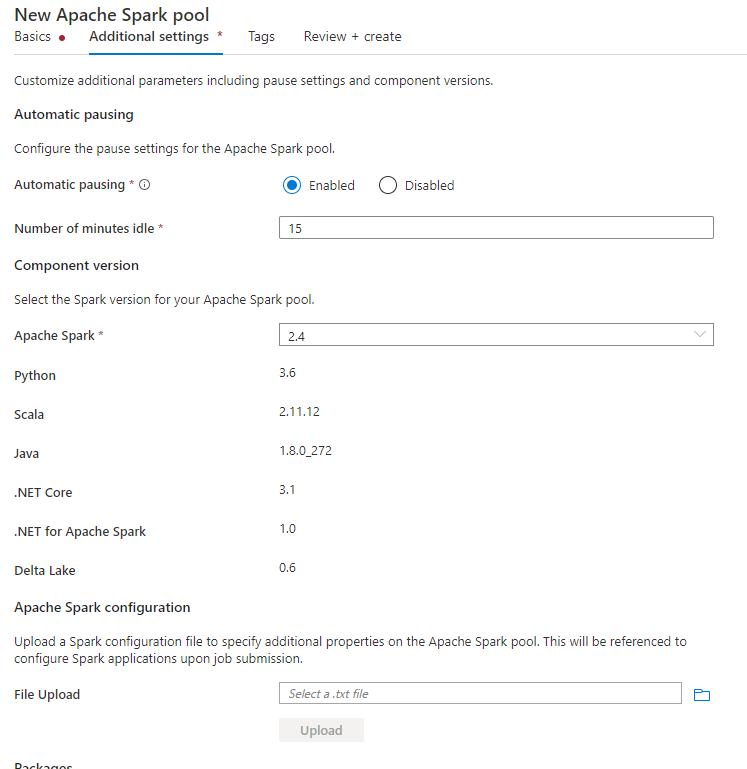
Configure at Spark pool level
When creating the Spark pool, under Additional Settings tab, put below configurations in a text file and upload it in Apache Spark configuration section. You can also use the context menu for an existing Spark pool, choose Apache Spark configuration to add these configurations.
Update metastore version and linked service name, and save below configs in a text file for Spark pool configuration:
spark.sql.hive.metastore.version <your hms version, Make sure you use the first 2 parts without the 3rd part>
spark.hadoop.hive.synapse.externalmetastore.linkedservice.name <your linked service name>
spark.sql.hive.metastore.jars /opt/hive-metastore/lib-<your hms version, 2 parts>/*:/usr/hdp/current/hadoop-client/lib/*
spark.sql.hive.metastore.sharedPrefixes com.mysql.jdbc,com.microsoft.vegas
Here's an example for metastore version 2.3 with linked service named as HiveCatalog21:
spark.sql.hive.metastore.version 2.3
spark.hadoop.hive.synapse.externalmetastore.linkedservice.name HiveCatalog21
spark.sql.hive.metastore.jars /opt/hive-metastore/lib-2.3/*:/usr/hdp/current/hadoop-client/lib/*
spark.sql.hive.metastore.sharedPrefixes com.mysql.jdbc,com.microsoft.vegas
Configure at Spark session level
For notebook session, you can also configure the Spark session in notebook using %%configure magic command. Here's the code.
%%configure -f
{
    "conf":{
        "spark.sql.hive.metastore.version":"<your hms version, 2 parts>",
        "spark.hadoop.hive.synapse.externalmetastore.linkedservice.name":"<your linked service name>",
        "spark.sql.hive.metastore.jars":"/opt/hive-metastore/lib-<your hms version, 2 parts>/*:/usr/hdp/current/hadoop-client/lib/*",
        "spark.sql.hive.metastore.sharedPrefixes":"com.mysql.jdbc,com.microsoft.vegas"
    }
}
For batch job, same configuration can also be applied via SparkConf.
Run queries to verify the connection
After all these settings, try listing catalog objects by running below query in Spark notebook to check the connectivity to the external Hive Metastore.
spark.sql("show databases").show()
Set up storage connection
The linked service to Hive Metastore database just provides access to Hive catalog metadata. To query the existing tables, you need to set up connection to the storage account that stores the underlying data for your Hive tables as well.
Set up connection to Azure Data Lake Storage Gen 2
Workspace primary storage account
If the underlying data of your Hive tables is stored in the workspace primary storage account, you don't need to do extra settings. It will just work as long as you followed storage setting up instructions during workspace creation.
Other ADLS Gen 2 account
If the underlying data of your Hive catalogs is stored in another ADLS Gen 2 account, you need to make sure the users who run Spark queries have Storage Blob Data Contributor role on the ADLS Gen2 storage account.
Set up connection to Blob Storage
If the underlying data of your Hive tables are stored in Azure Blob storage account, set up the connection follow below steps:
Open Synapse Studio, go to Data > Linked tab > Add button > Connect to external data.
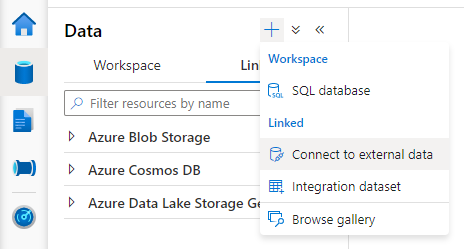
Choose Azure Blob Storage and select Continue.
Provide Name of the linked service. Record the name of the linked service, this info will be used in Spark configuration shortly.
Select the Azure Blob Storage account. Make sure Authentication method is Account key. Currently Spark pool can only access Blob Storage account via account key.
Test connection and select Create.
After creating the linked service to Blob Storage account, when you run Spark queries, make sure you run below Spark code in the notebook to get access to the Blob Storage account for the Spark session. Learn more about why you need to do this here.
%%pyspark
blob_account_name = "<your blob storage account name>"
blob_container_name = "<your container name>"
from pyspark.sql import SparkSession
sc = SparkSession.builder.getOrCreate()
token_library = sc._jvm.com.microsoft.azure.synapse.tokenlibrary.TokenLibrary
blob_sas_token = token_library.getConnectionString("<blob storage linked service name>")
spark.conf.set('fs.azure.sas.%s.%s.blob.core.chinacloudapi.cn' % (blob_container_name, blob_account_name), blob_sas_token)
After setting up storage connections, you can query the existing tables in the Hive Metastore.
Known limitations
- Synapse Studio object explorer will continue to show objects in managed Synapse metastore instead of the external HMS.
- SQL <-> Spark synchronization doesn't work when using external HMS.
- Only Azure SQL Database and Azure Database for MySQL are supported as external Hive Metastore database. Only SQL authorization is supported.
- Currently Spark only works on external Hive tables and non-transactional/non-ACID managed Hive tables. It doesn't support Hive ACID/transactional tables.
- Apache Ranger integration isn't supported.
Troubleshooting
See below error when querying a Hive table with data stored in Blob Storage
No credentials found for account xxxxx.blob.core.chinacloudapi.cn in the configuration, and its container xxxxx is not accessible using anonymous credentials. Please check if the container exists first. If it is not publicly available, you have to provide account credentials.
When using key authentication to your storage account via linked service, you need to take an extra step to get the token for Spark session. Run below code to configure your Spark session before running the query. Learn more about why you need to do this here.
%%pyspark
blob_account_name = "<your blob storage account name>"
blob_container_name = "<your container name>"
from pyspark.sql import SparkSession
sc = SparkSession.builder.getOrCreate()
token_library = sc._jvm.com.microsoft.azure.synapse.tokenlibrary.TokenLibrary
blob_sas_token = token_library.getConnectionString("<blob storage linked service name>")
spark.conf.set('fs.azure.sas.%s.%s.blob.core.chinacloudapi.cn' % (blob_container_name, blob_account_name), blob_sas_token)
See below error when query a table stored in ADLS Gen2 account
Operation failed: "This request is not authorized to perform this operation using this permission.", 403, HEAD
This could happen because the user who runs Spark query doesn't have enough access to the underlying storage account. Make sure the user who runs Spark queries has Storage Blob Data Contributor role on the ADLS Gen2 storage account. This step can be done after creating the linked service.
HMS schema related settings
To avoid changing HMS backend schema/version, following hive configs are set by system by default:
spark.hadoop.hive.metastore.schema.verification true
spark.hadoop.hive.metastore.schema.verification.record.version false
spark.hadoop.datanucleus.fixedDatastore true
spark.hadoop.datanucleus.schema.autoCreateAll false
If your HMS version is 1.2.1 or 1.2.2, there's an issue in Hive that claims requiring only 1.2.0 if you turn spark.hadoop.hive.metastore.schema.verification to true. Our suggestion is either you can modify your HMS version to 1.2.0, or overwrite below two configurations to work around:
spark.hadoop.hive.metastore.schema.verification false
spark.hadoop.hive.synapse.externalmetastore.schema.usedefault false
If you need to migrate your HMS version, we recommend using hive schema tool. And if the HMS has been used by HDInsight clusters, we suggest using HDI provided version.
HMS schema change for OSS HMS 3.1
Synapse aims to work smoothly with computes from HDI. However HMS 3.1 in HDI 4.0 isn't fully compatible with the OSS HMS 3.1. Apply the following manually to your HMS 3.1 if it's not provisioned by HDI.
-- HIVE-19416
ALTER TABLE TBLS ADD WRITE_ID bigint NOT NULL DEFAULT(0);
ALTER TABLE PARTITIONS ADD WRITE_ID bigint NOT NULL DEFAULT(0);
When sharing the metastore with HDInsight 4.0 Spark cluster, I can't see the tables
If you want to share the Hive catalog with a spark cluster in HDInsight 4.0, ensure your property spark.hadoop.metastore.catalog.default in Synapse spark aligns with the value in HDInsight spark. The default value for HDI spark is spark and the default value for Synapse spark is hive.
When sharing the Hive Metastore with HDInsight 4.0 Hive cluster, I can list the tables successfully, but only get empty result when I query the table
As mentioned in the limitations, Synapse Spark pool only supports external hive tables and non-transactional/ACID managed tables, it doesn't support Hive ACID/transactional tables currently. In HDInsight 4.0 Hive clusters, all managed tables are created as ACID/transactional tables by default, that's why you get empty results when querying those tables.
See below error when an external metastore is used while Intelligent cache is enabled
java.lang.ClassNotFoundException: Class com.microsoft.vegas.vfs.SecureVegasFileSystem not found
You can easily fix this issue by appending /usr/hdp/current/hadoop-client/* to your spark.sql.hive.metastore.jars.
Eg:
spark.sql.hive.metastore.jars":"/opt/hive-metastore/lib-2.3/*:/usr/hdp/current/hadoop-client/lib/*:/usr/hdp/current/hadoop-client/*