Note
Access to this page requires authorization. You can try signing in or changing directories.
Access to this page requires authorization. You can try changing directories.
This article is a step-by-step guide for getting started with Azure Synapse Link for SQL Server 2022. For an overview, see Azure Synapse Link for SQL Server 2022.
Prerequisites
Before you begin, see Create a new Azure Synapse workspace to get Azure Synapse Link for SQL. The current tutorial is to create Azure Synapse Link for SQL in a public network. This article assumes that you selected Disable Managed virtual network and Allow connections from all IP addresses when you created an Azure Synapse workspace. If you want to configure Azure Synapse Link for SQL Server 2022 with network security, also see Configure Azure Synapse Link for SQL Server 2022 with network security.
Create an Azure Data Lake Storage Gen2 account, which is different from the account you create with the Azure Synapse Analytics workspace. You'll use this account as the landing zone to stage the data submitted by SQL Server 2022. For more information, see Create an Azure Data Lake Storage Gen2 account.
Make sure that your SQL Server 2022 database has a master key created.
CREATE MASTER KEY ENCRYPTION BY PASSWORD = '<a new password>'
Create your target Azure Synapse SQL dedicated pool
Open Synapse Studio.
Open the Manage hub, go to SQL pools, and then select New.
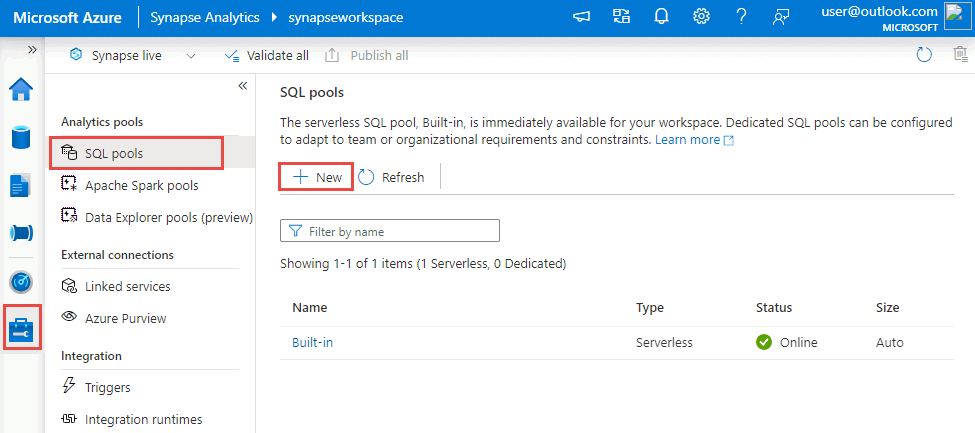
Enter a unique pool name, use the default settings, and create the dedicated pool.
From the Data hub, under Workspace, your new Azure Synapse SQL database should be listed under Databases. From your new Azure Synapse SQL database, select New SQL script, and then select Empty script.
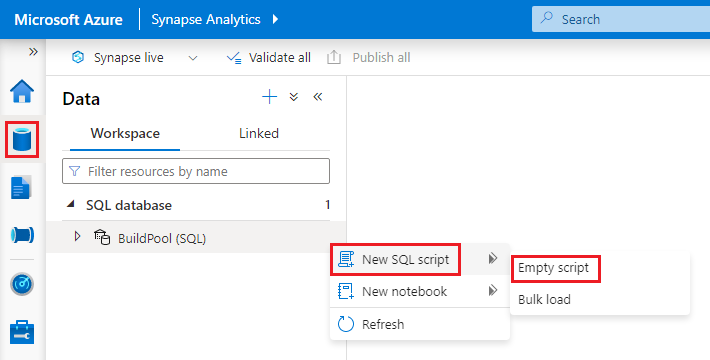
To create the master key for your target Azure Synapse SQL database, paste the following script, and then select Run.
CREATE MASTER KEY
Create a linked service for your source SQL Server 2022 database
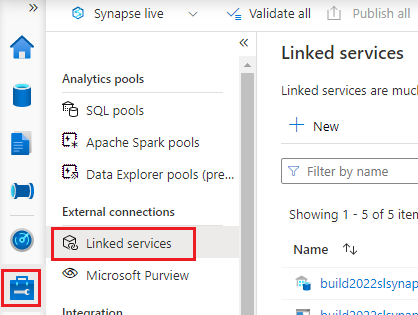
Select the Manage hub button, and then select Linked services.
Press New, select SQL Server and select Continue.
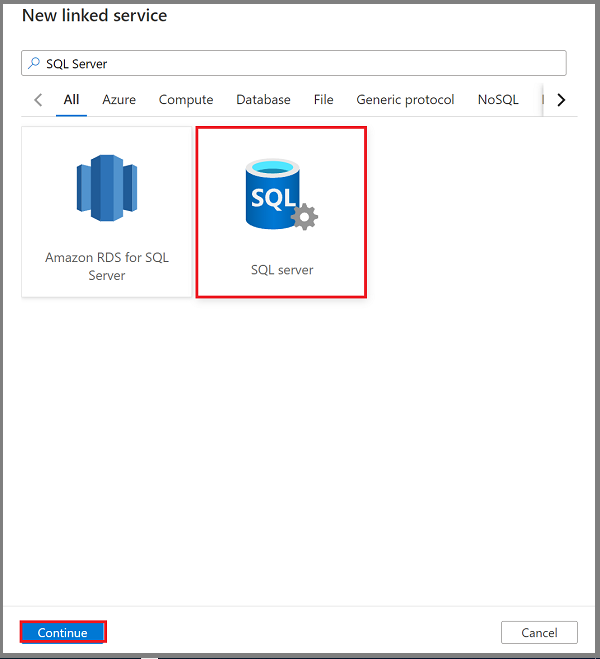
In the Name box, enter the name of the linked service of SQL Server 2022.
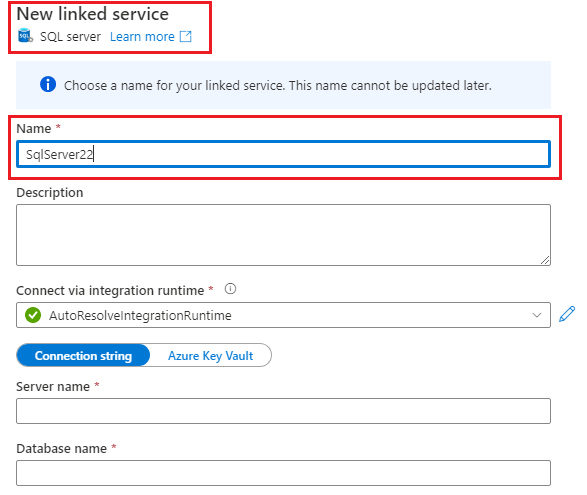
Note
Only the Linked Service in Legacy version is supported.
When you're choosing the integration runtime, select your self-hosted integration runtime. If your Azure Synapse workspace doesn't have an available self-hosted integration runtime, create one.
(Optional) To create a self-hosted integration runtime to connect to your source SQL Server 2022, do the following:
a. Select New.
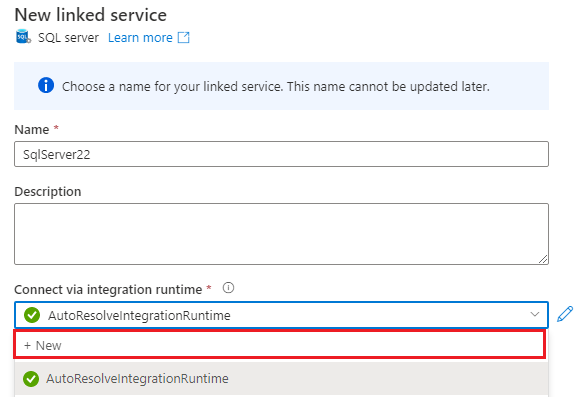
b. Select Self-hosted, and then select Continue.
c. In the Name box, enter the name of the self-hosted integration runtime, and then select Create.
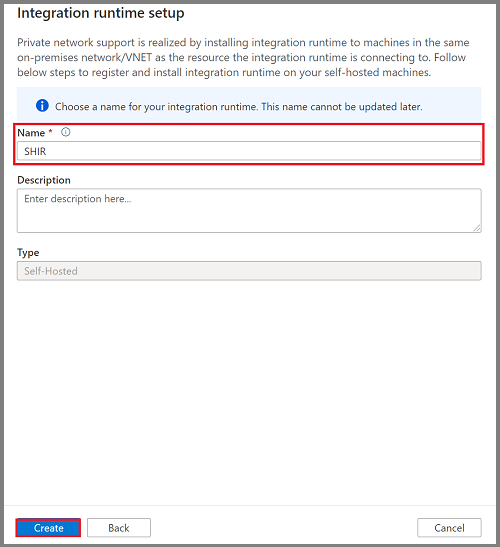
A self-hosted integration runtime is now available in your Azure Synapse workspace.
d. Follow the prompts to download, install, and use the key to register your integration runtime agent on your Windows machine, which has direct access to your SQL Server 2022 instance. For more information, see Create a self-hosted integration runtime - Azure Data Factory and Azure Synapse.
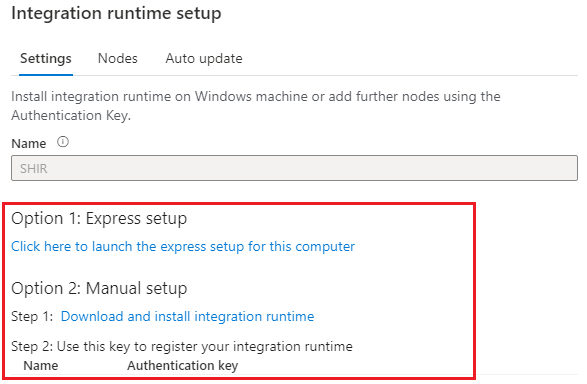
e. Select Close.
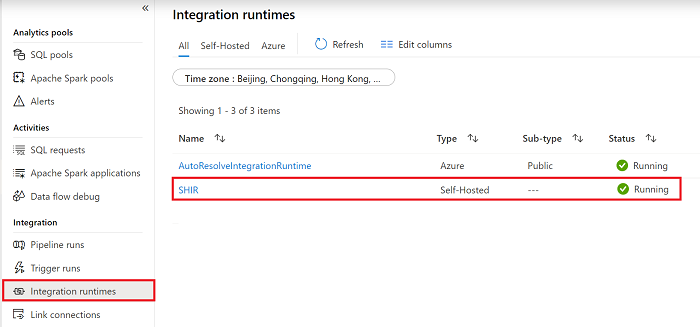
f. Go to the monitoring page, and then ensure that your self-hosted integration runtime is running by selecting Refresh to get the latest status of integration runtime.
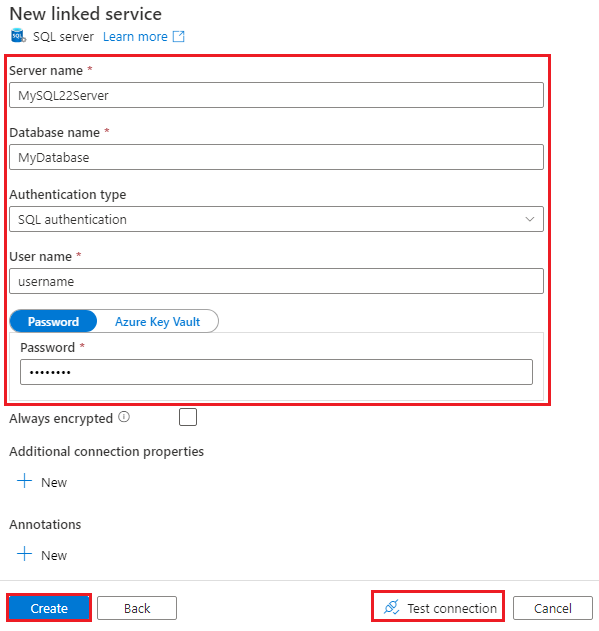
Continue to enter the remaining information for your linked service, including SQL Server name, Database name, Authentication type, User name, and Password to connect to your SQL Server 2022 instance.
Note
We recommend that you enable encryption on this connection. To do so, add the
Encryptproperty with a value oftrueas an additional connection property. Also set theTrust Server Certificateproperty to eithertrueorfalse, depending on your server configuration. For more information, see Enable encrypted connections to the database engine.Select Test Connection to ensure that your self-hosted integration runtime can access your SQL Server instance.
Select Create.
Your new linked service will be connected to the SQL Server 2022 instance that's available in your workspace.
Note
The linked service that you create here isn't dedicated to Azure Synapse Link for SQL. It can be used by any workspace user who has the appropriate permissions. Take time to understand the scope of users who might have access to this linked service and its credentials. For more information about permissions in Azure Synapse workspaces, see Azure Synapse workspace access control overview - Azure Synapse Analytics.
Create a linked service to connect to your landing zone on Azure Data Lake Storage Gen2
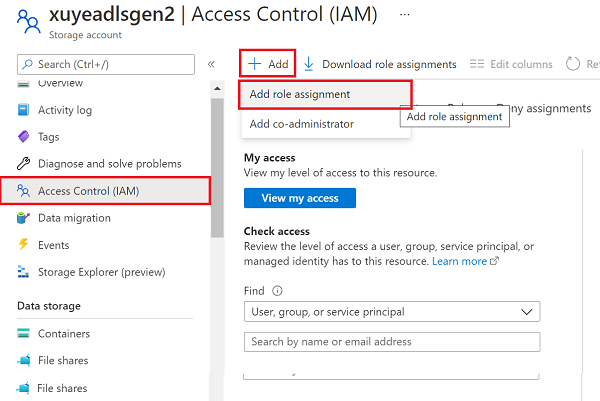
Go to your newly created Azure Data Lake Storage Gen2 account, select Access Control (IAM), select Add, and then select Add role assignment.
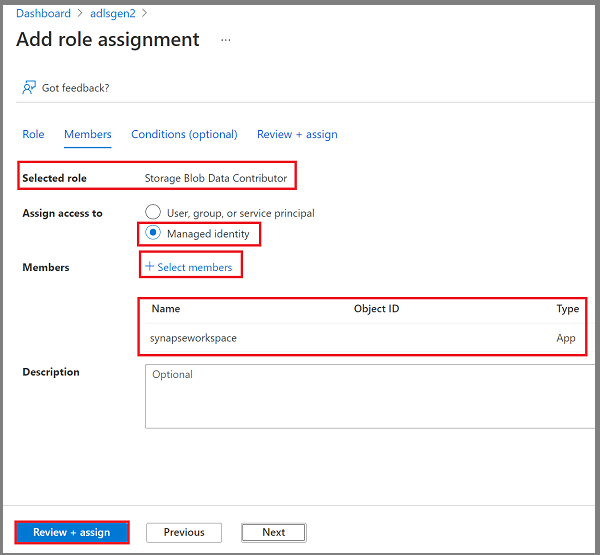
Select Storage Blob Data Contributor for the chosen role, select Managed identity and then, under Members, select your Azure Synapse workspace. Adding this role assignment might take a few minutes.
Note
Make sure that you've granted your Azure Synapse workspace managed identity permissions to the Azure Data Lake Storage Gen2 storage account that's used as the landing zone. For more information, see Grant permissions to a managed identity in an Azure Synapse workspace - Azure Synapse Analytics.
Open the Manage hub in your Azure Synapse workspace, and go to Linked services.

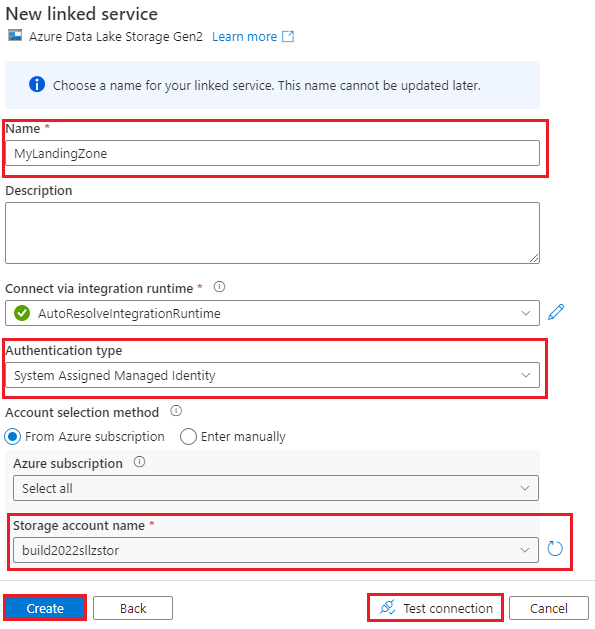
Select New, and then select Azure Data Lake Storage Gen2.
Do the following:
a. In the Name box, enter the name of the linked service for your landing zone.
b. For Authentication method, enter Managed Identity.
c. Select the Storage account name, which has already been created.
Select Test Connection to ensure that you can access your Azure Data Lake Storage Gen2 account.
Select Create.
Your new linked service will be connected to the Azure Data Lake Storage Gen2 account.
Note
The linked service that you create here isn't dedicated to Azure Synapse Link for SQL. It can be used by any workspace user who has the appropriate permissions. Take time to understand the scope of users who might have access to this linked service and its credentials. For more information about permissions in Azure Synapse workspaces, see Azure Synapse workspace access control overview - Azure Synapse Analytics.
Create the Azure Synapse Link connection
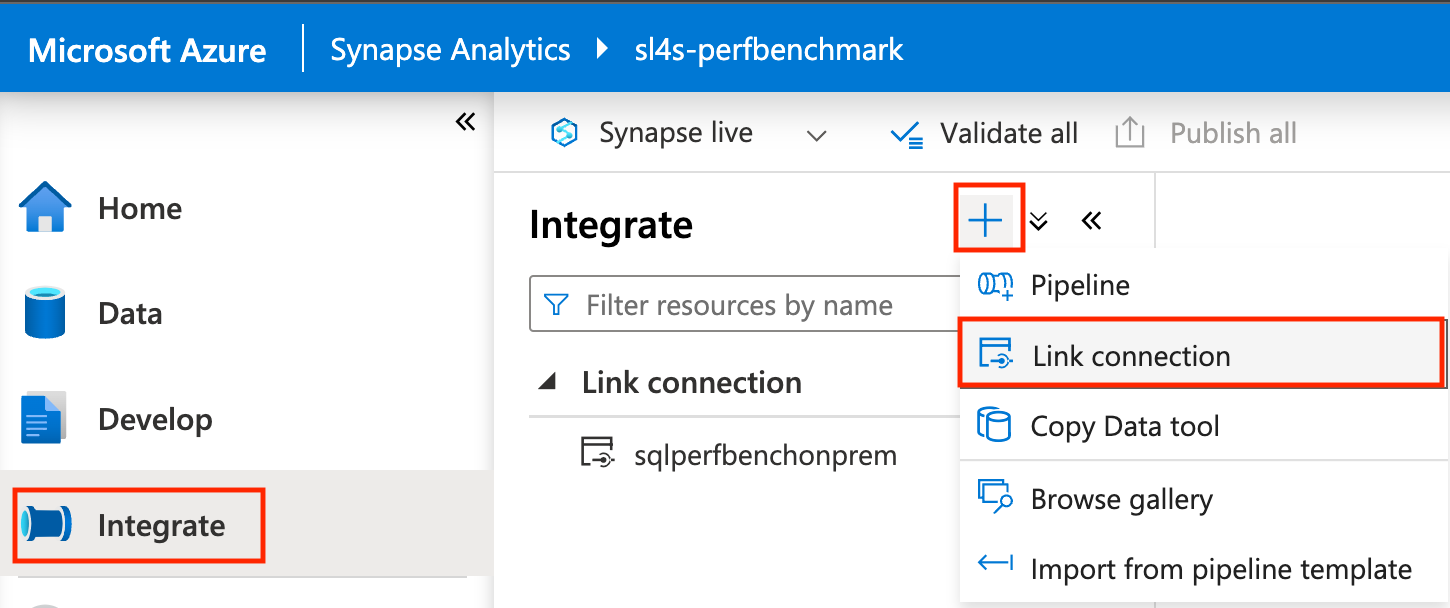
From Synapse Studio, open the Integrate hub.
On the Integrate pane, select the plus sign (+), and then select Link connection.
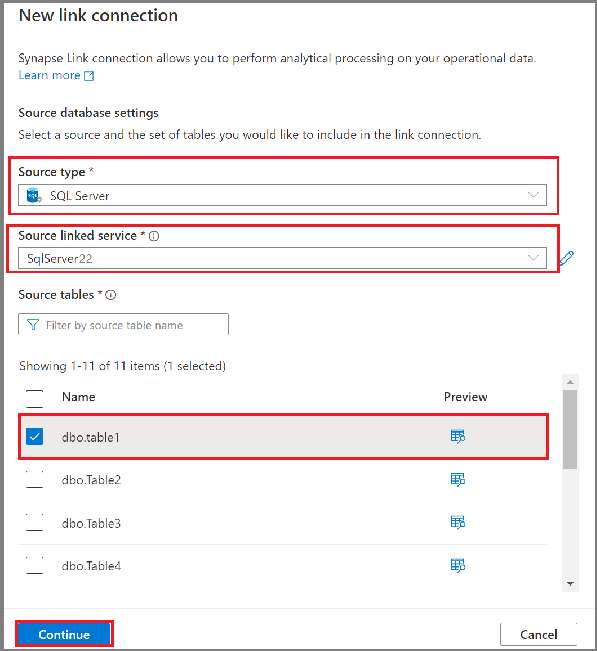
Enter your source database:
a. For Source type, select SQL Server.
b, For your source Linked service, select the service that connects to your SQL Server 2022 instance.
c. For Table names, select names from your SQL Server instance to be replicated to your Azure Synapse SQL pool.
d. Select Continue.
From Synapse SQL Dedicated Pools, select a target database name.
Select Continue.
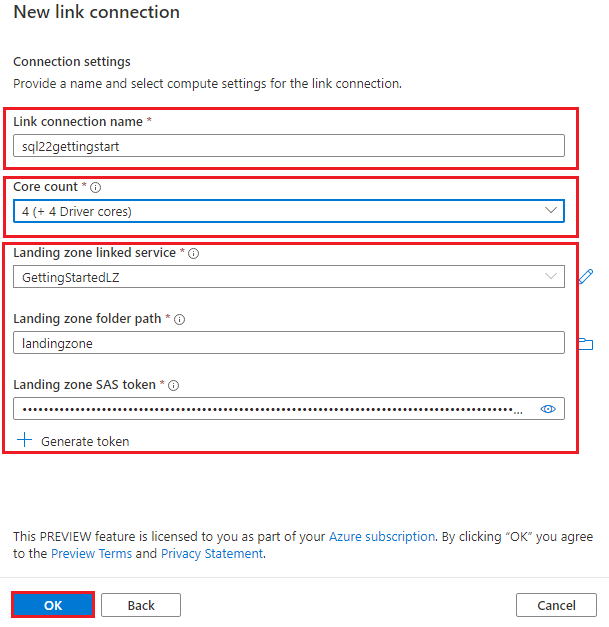
Enter your link connection settings:
a. For Link connection name, enter the name.
b. For Core count for the link connection compute, enter the number of cores. These cores will be used for the movement of data from the source to the target. We recommend that you start with a small number and increase the count as needed.
c. For Linked service, select the service that will connect to your landing zone.
d. Enter your Azure Data Lake Storage Gen2 container name or container/folder name as a landing zone folder path for staging the data. The container must be created first.
e. Enter your Azure Data Lake Storage Gen2 shared access signature token. The token is required for the SQL change feed to access the landing zone. If your Azure Data Lake Storage Gen2 account doesn't have a shared access signature token, you can create one by selecting Generate token.
f. Select OK.
Note
The number of cores you select here are allocated to the ingestion service for processing data loading and changes. They don't affect the target dedicated SQL pool configuration. If you can't connect to landing zone using generated SAS token due to limitation from your storage, you can try to use delegation SAS token to connect to landing zone as well.
With the new Azure Synapse Link connection open, you can now update the target table name, distribution type, and structure type.
Note
- Consider using heap table for the structure type when your data contains varchar(max), nvarchar(max), and varbinary(max).
- Make sure that the schema in your Azure Synapse SQL dedicated pool has already been created before you start the link connection. Azure Synapse Link for SQL will create tables automatically under your schema in the Azure Synapse SQL pool.
In the Action on existing target table dropdown list, choose the option most appropriate for your scenario if the table already exists in the destination.
- Drop and recreate table: The existing target table will be dropped and recreated.
- Fail on non-empty table: If target table contains data, link connection for the given table will fail.
- Merge with existing data: Data will be merged into the existing table.
Note
If you want to merge multiple sources into the same destination by choosing "Merge with existing data", make sure the sources contain different data to avoid conflict and unexpected result.
Specify whether to enable transaction consistency across tables.
- When this option is enabled, a transaction spanning across multiple tables on the source database is always replicated to the destination database in a single transaction. This, however, will create overhead on the overall replication throughput.
- When the option is disabled, each table will replicate changes in its own transaction boundary to the destination in parallel connections, thus improving overall replication throughput.
Note
When you want to enable transaction consistency across tables, please also make sure the transaction isolation levels in your Synapse dedicated SQL pool is READ COMMITTED SNAPSHOT ISOLATION.
Select Publish all to save the new link connection to the service.
Start the Azure Synapse Link connection
Select Start, and then wait a few minutes for the data to be replicated.
Note
A link connection will start from a full initial load from your source database, followed by incremental change feeds via the change feed feature in SQL Server 2022. For more information, see Azure Synapse Link for SQL change feed.
Monitor Azure Synapse Link for SQL Server 2022
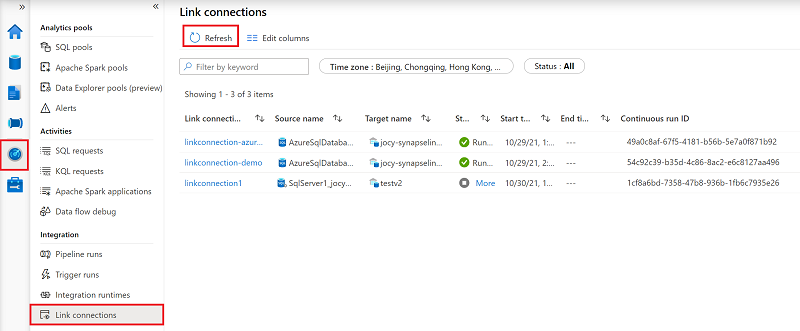
You can monitor the status of your Azure Synapse Link connection, see which tables are being initially copied over (snapshotting), and see which tables are in continuous replication mode (replicating).
Go to the Monitor hub of your Azure Synapse workspace, and then select Link connections.
Open the link connection you started, and view the status of each table.
Select Refresh on the monitoring view for your connection to observe any updates to the status.
Query the replicated data
Wait for a few minutes, and then check to ensure that the target database has the expected table and data. See the data available in your Azure Synapse SQL dedicated pool destination store. You can also now explore the replicated tables in your target Azure Synapse SQL dedicated pool.
In the Data hub, under Workspace, open your target database.
Under Tables, right-click one of your target tables.
Select New SQL script, and then select Top 100 rows.
Run this query to view the replicated data in your target Azure Synapse SQL dedicated pool.
You can also query the target database by using Microsoft SQL Server Management Studio (SSMS) or other tools. Use the SQL dedicated endpoint for your workspace as the server name. This name is usually
<workspacename>.sql.azuresynapse.azure.cn. AddDatabase=databasename@poolnameas an extra connection string parameter when connecting via SSMS or other tools.
Add or remove a table in an existing Azure Synapse Link connection
To add or remove tables in Synapse Studio, do the following:
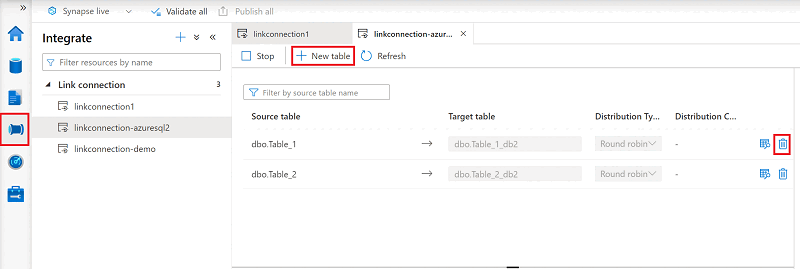
In your Azure Synapse workspace, open the Integrate hub.
Select the link connection that you want to edit, and then open it.
Do either of the following:
- To add a table, select New table.
- To remove a table, select the trash can icon next to it.
Note
You can directly add or remove tables when a link connection is running.
Stop the Azure Synapse Link connection
To stop the Azure Synapse Link connection in Synapse Studio, do the following:
In your Azure Synapse workspace, open the Integrate hub.
Select the link connection that you want to edit, and then open it.
Select Stop to stop the link connection, and it will stop replicating your data.

Note
- If you restart a link connection after stopping it, it will start from a full initial load from your source database, and incremental change feeds will follow.
- If you choose "Merge with existing data" as the action on existing target table, when you stop the link connection and restart it, the record deletions in source during that period won't be deleted in the destination. In such case, to ensure data consistency, consider to use pause/resume instead of stop/start, or to clean up the destination tables before you restart the link connection.
Rotate the shared access signature token for the landing zone
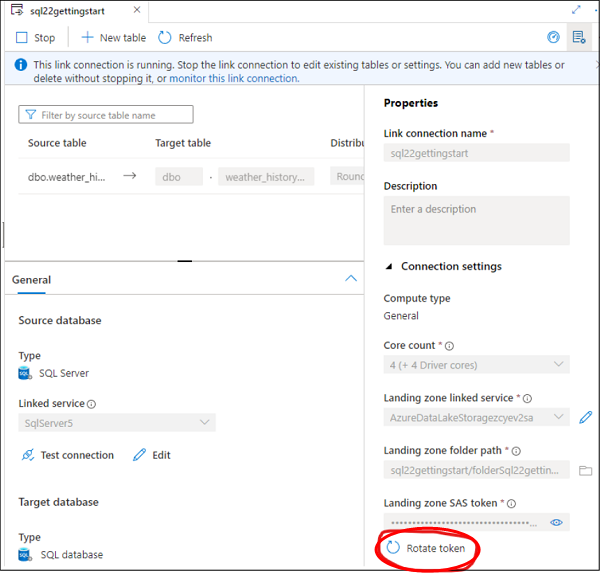
A shared access signature token is required for the SQL change feed to get access to the landing zone and push data there. It has an expiration date, so you need to rotate the token before that date. Otherwise, Azure Synapse Link will fail to replicate the data from the SQL Server instance to the Azure Synapse SQL dedicated pool.
In your Azure Synapse workspace, open the Integrate hub.
Select the link connection that you want to edit, and then open it.
Select Rotate token.
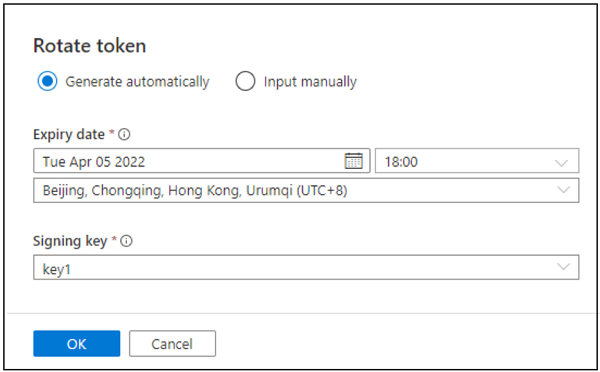
To get the new shared access signature token, select Generate automatically or Input manually, and then select OK.
Note
If you can't connect to landing zone using generated SAS token due to limitation from your storage, you can try to use delegation SAS token to connect to landing zone as well.
Next steps
If you're using a database other than SQL Server 2022, see: