Virtual network peering enables you to connect Azure virtual networks across different subscriptions and Microsoft Entra tenants. In this tutorial, you learn to create virtual network peering between virtual networks created through Resource Manager that exist in different subscriptions. Peering two virtual networks enables resources in different virtual networks to communicate with each other with the same bandwidth and latency as though the resources were in the same virtual network. Learn more about Virtual network peering.
Depending on whether, the virtual networks are in the same, or different subscriptions the steps to create a virtual network peering are different. Steps to peer networks created with the classic deployment model are different. For more information about deployment models, see Azure deployment model.
Learn how to create a virtual network peering in other scenarios by selecting the scenario from the following table:
A virtual network peering can't be created between two virtual networks deployed through the classic deployment model. If you need to connect virtual networks that were both created through the classic deployment model, you can use an Azure VPN Gateway to connect the virtual networks.
This tutorial peers virtual networks in the same region. You can also peer virtual networks in different supported regions. Familiarize yourself with the peering requirements and constraints before peering virtual networks.
Prerequisites
An Azure account or accounts with two active subscriptions. Create an account.
An Azure account with permissions in both subscriptions or an account in each subscription with the proper permissions to create a virtual network peering. For a list of permissions, see Virtual network peering permissions.
To separate the duty of managing the network belonging to each tenant, add the user from each tenant as a guest in the opposite tenant and assign them the Network Contributor role to the virtual network. This procedure applies if the virtual networks are in different subscriptions and Active Directory tenants.
To establish a network peering when you don't intend to separate the duty of managing the network belonging to each tenant, add the user from tenant A as a guest in the opposite tenant. Then, assign them the Network Contributor role to initiate and connect the network peering from each subscription. With these permissions, the user is able to establish the network peering from each subscription.
For more information about guest users, see Add Microsoft Entra B2B collaboration users in the Azure portal.
Each user must accept the guest user invitation from the opposite Microsoft Entra tenant.
Sign-in to the Azure portal.
An Azure account or accounts with two active subscriptions. Create an account.
An Azure account with permissions in both subscriptions or an account in each subscription with the proper permissions to create a virtual network peering. For a list of permissions, see Virtual network peering permissions.
To separate the duty of managing the network belonging to each tenant, add the user from each tenant as a guest in the opposite tenant and assign them the Network Contributor role to the virtual network. This procedure applies if the virtual networks are in different subscriptions and Active Directory tenants.
To establish a network peering when you don't intend to separate the duty of managing the network belonging to each tenant, add the user from tenant A as a guest in the opposite tenant. Then, assign them the Network Contributor role to initiate and connect the network peering from each subscription. With these permissions, the user is able to establish the network peering from each subscription.
For more information about guest users, see Add Microsoft Entra B2B collaboration users in the Azure portal.
Each user must accept the guest user invitation from the opposite Microsoft Entra tenant.
Azure PowerShell installed locally.
Sign in to Azure PowerShell and select the subscription with which you want to use this feature. For more information, see Sign in with Azure PowerShell.
Ensure your Az.Network module is 4.3.0 or later. To verify the installed module, use the command Get-InstalledModule -Name "Az.Network". If the module requires an update, use the command Update-Module -Name Az.Network if necessary.
If you choose to install and use PowerShell locally, this article requires the Azure PowerShell module version 5.4.1 or later. Run Get-Module -ListAvailable Az to find the installed version. If you need to upgrade, see Install Azure PowerShell module. If you're running PowerShell locally, you also need to run Connect-AzAccount -Environment AzureChinaCloud to create a connection with Azure.
An Azure account or accounts with two active subscriptions. Create an account.
An Azure account with permissions in both subscriptions or an account in each subscription with the proper permissions to create a virtual network peering. For a list of permissions, see Virtual network peering permissions.
To separate the duty of managing the network belonging to each tenant, add the user from each tenant as a guest in the opposite tenant and assign them the Network Contributor role to the virtual network. This procedure applies if the virtual networks are in different subscriptions and Active Directory tenants.
To establish a network peering when you don't intend to separate the duty of managing the network belonging to each tenant, add the user from tenant A as a guest in the opposite tenant. Then, assign them the Network Contributor role to initiate and connect the network peering from each subscription. With these permissions, the user is able to establish the network peering from each subscription.
For more information about guest users, see Add Microsoft Entra B2B collaboration users in the Azure portal.
Each user must accept the guest user invitation from the opposite Microsoft Entra tenant.
If you prefer to run CLI reference commands locally, install the Azure CLI. If you're running on Windows or macOS, consider running Azure CLI in a Docker container. For more information, see How to run the Azure CLI in a Docker container.
If you're using a local installation, sign in to the Azure CLI by using the az login command. To finish the authentication process, follow the steps displayed in your terminal. For other sign-in options, see Sign in with the Azure CLI.
When you're prompted, install the Azure CLI extension on first use. For more information about extensions, see Use extensions with the Azure CLI.
Run az version to find the version and dependent libraries that are installed. To upgrade to the latest version, run az upgrade.
This how-to article requires version 2.31.0 or later of the Azure CLI.
In the following steps, learn how to peer virtual networks in different subscriptions and Microsoft Entra tenants.
You can use the same account that has permissions in both subscriptions or you can use separate accounts for each subscription to set up the peering. An account with permissions in both subscriptions can complete all of the steps without signing out and signing in to portal and assigning permissions.
The following resources and account examples are used in the steps in this article:
| User account |
Resource group |
Subscription |
Virtual network |
| user-1 |
test-rg |
subscription-1 |
vnet-1 |
| user-2 |
test-rg-2 |
subscription-2 |
vnet-2 |
Create virtual network - vnet-1
Note
If you're using a single account to complete the steps, you can skip the steps for logging out of the portal and assigning another user permissions to the virtual networks.
The following procedure creates a virtual network with a resource subnet.
In the portal, search for and select Virtual networks.
On the Virtual networks page, select + Create.
On the Basics tab of Create virtual network, enter or select the following information:
| Setting |
Value |
| Project details |
|
| Subscription |
Select your subscription. |
| Resource group |
Select Create new.
Enter test-rg in Name.
Select OK. |
| Instance details |
|
| Name |
Enter vnet-1. |
| Region |
Select East US 2. |

Select Next to proceed to the Security tab.
Select Next to proceed to the IP Addresses tab.
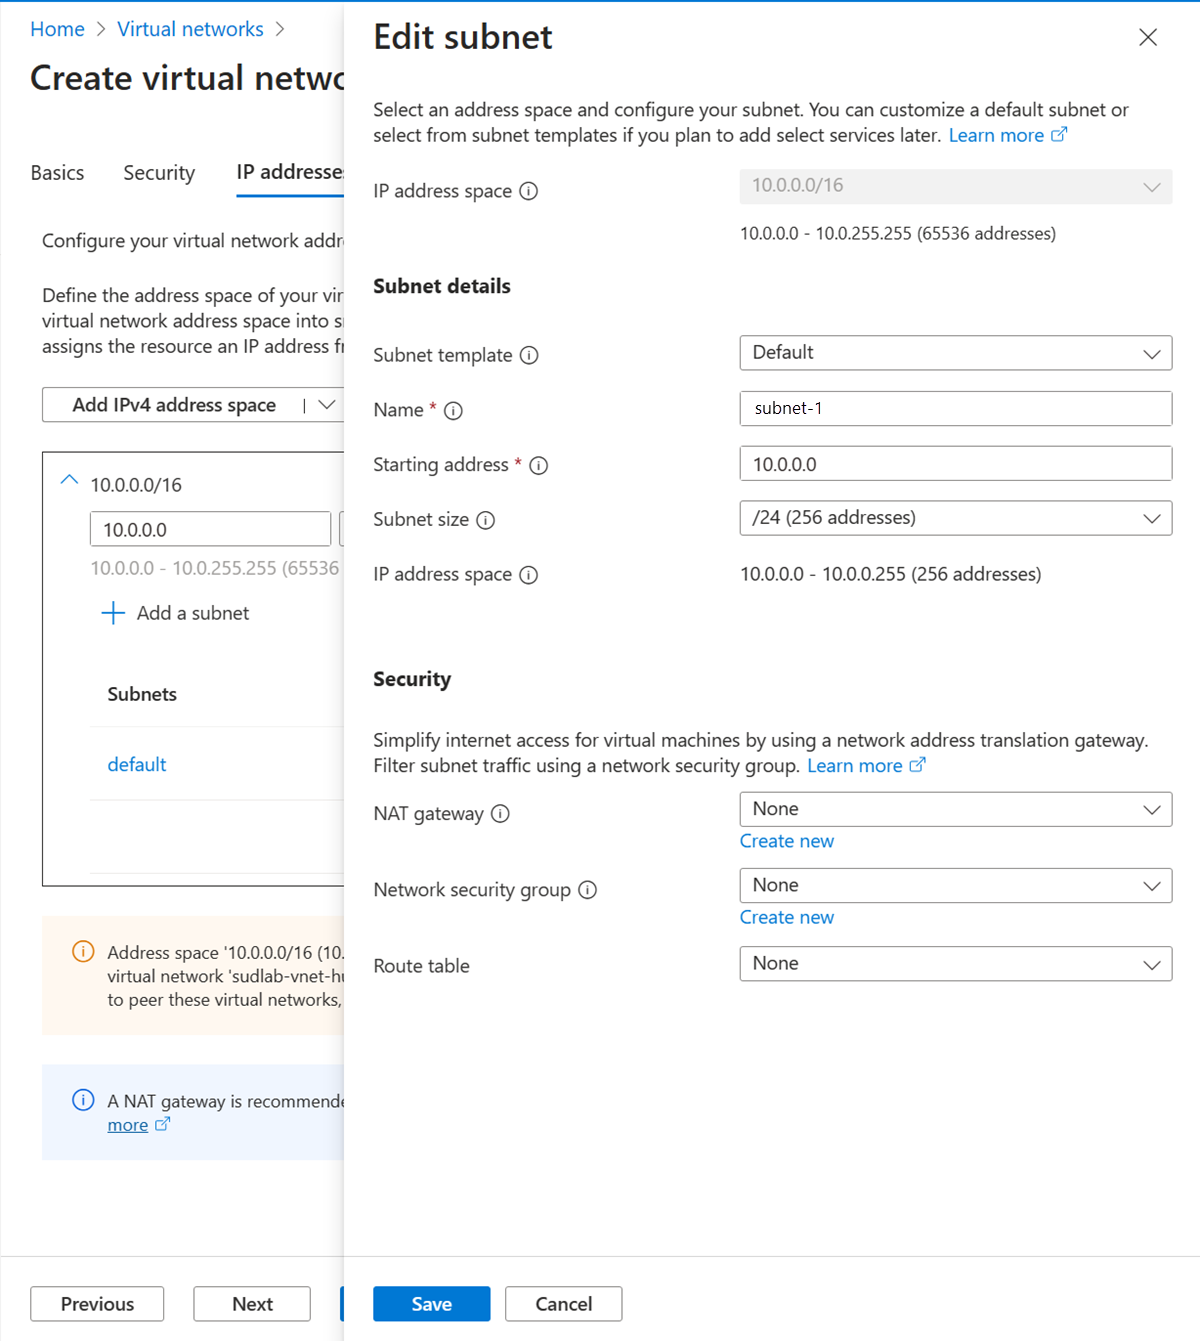
In the address space box in Subnets, select the default subnet.
In Edit subnet, enter or select the following information:
| Setting |
Value |
| Subnet purpose |
Leave the default Default. |
| Name |
Enter subnet-1. |
Leave the rest of the settings as their defaults. Select Save.
Select Save.
Select Review + create at the bottom of the screen, and when validation passes, select Create.
Sign in to subscription-1
Use Connect-AzAccount -Environment AzureChinaCloud to sign in to subscription-1.
Connect-AzAccount -Environment AzureChinaCloud
If you're using one account for both subscriptions, sign in to that account and change the subscription context to subscription-1 with Set-AzContext.
Set-AzContext -Subscription subscription-1
Create a resource group - test-rg
An Azure resource group is a logical container where Azure resources are deployed and managed.
Create a resource group with New-AzResourceGroup:
$rsg = @{
    Name = 'test-rg'
    Location = 'eastus2'
}
New-AzResourceGroup @rsg
Create the virtual network
Create a virtual network with New-AzVirtualNetwork. This example creates a subnet-1 virtual network named vnet-1 in the West US 3 location:
$vnet = @{
    Name = 'vnet-1'
    ResourceGroupName = 'test-rg'
    Location = 'eastus2'
    AddressPrefix = '10.0.0.0/16'
}
$virtualNetwork = New-AzVirtualNetwork @vnet
Add a subnet
Azure deploys resources to a subnet within a virtual network, so you need to create a subnet. Create a subnet configuration named subnet-1 with Add-AzVirtualNetworkSubnetConfig:
$subnet = @{
    Name = 'subnet-1'
    VirtualNetwork = $virtualNetwork
    AddressPrefix = '10.0.0.0/24'
}
$subnetConfig = Add-AzVirtualNetworkSubnetConfig @subnet
Associate the subnet to the virtual network
You can write the subnet configuration to the virtual network with Set-AzVirtualNetwork. This command creates the subnet:
$virtualNetwork | Set-AzVirtualNetwork
Sign in to subscription-1
Use az sign-in to sign in to subscription-1.
az login
If you're using one account for both subscriptions, sign in to that account and change the subscription context to subscription-1 with az account set.
az account set --subscription "subscription-1"
Create a resource group - test-rg
An Azure resource group is a logical container where Azure resources are deployed and managed.
Create a resource group with az group create:
az group create \
    --name test-rg \
    --location eastus2
Create the virtual network
Create a virtual network and subnet with az network vnet create. This example creates a subnet-1 virtual network named vnet-1 in the West US 3 location.
az network vnet create \
    --resource-group test-rg\
    --location eastus2 \
    --name vnet-1 \
    --address-prefixes 10.0.0.0/16 \
    --subnet-name subnet-1 \
    --subnet-prefixes 10.0.0.0/24
Assign permissions for user-2
A user account in the other subscription that you want to peer with must be added to the network you previously created. If you're using a single account for both subscriptions, you can skip this section.
Remain signed in to the portal as user-1.
In the search box a the top of the portal, enter Virtual network. Select Virtual networks in the search results.
Select vnet-1.
Select Access control (IAM).
Select + Add -> Add role assignment.
In Add role assignment in the Role tab, select Network Contributor.
Select Next.
In the Members tab, select + Select members.
In Select members in the search box, enter user-2.
Select Select.
Select Review + assign.
Select Review + assign.
Use Get-AzVirtualNetwork to obtain the resource ID for vnet-1. Assign user-2 from subscription-2 to vnet-1 with New-AzRoleAssignment.
Use Get-AzADUser to obtain the object ID for user-2.
user-2 is used in this example for the user account. Replace this value with the display name for the user from subscription-2 that you wish to assign permissions to vnet-1. You can skip this step if you're using the same account for both subscriptions.
$id = @{
    Name = 'vnet-1'
    ResourceGroupName = 'test-rg'
}
$vnet = Get-AzVirtualNetwork @id

$obj = Get-AzADUser -DisplayName 'user-2'

$role = @{
    ObjectId = $obj.id
    RoleDefinitionName = 'Network Contributor'
    Scope = $vnet.id
}
New-AzRoleAssignment @role
Use az network vnet show to obtain the resource ID for vnet-1. Assign user-2 from subscription-2 to vnet-1 with az role assignment create.
Use az ad user list to obtain the object ID for user-2.
user-2 is used in this example for the user account. Replace this value with the display name for the user from subscription-2 that you wish to assign permissions to vnet-1. You can skip this step if you're using the same account for both subscriptions.
az ad user list --display-name user-2
[
  {
    "businessPhones": [],
    "displayName": "user-2",
    "givenName": null,
    "id": "aaaaaaaa-0000-1111-2222-bbbbbbbbbbbb",
    "jobTitle": null,
    "mail": "user-2@fabrikam.com",
    "mobilePhone": null,
    "officeLocation": null,
    "preferredLanguage": null,
    "surname": null,
    "userPrincipalName": "user-2_fabrikam.com#EXT#@contoso.partner.onmschina.cn"
  }
]
Make note of the object ID of user-2 in field id. In this example, its aaaaaaaa-0000-1111-2222-bbbbbbbbbbbb.
vnetid=$(az network vnet show \
    --name vnet-1 \
    --resource-group test-rg \
    --query id \
    --output tsv)

az role assignment create \
      --assignee aaaaaaaa-0000-1111-2222-bbbbbbbbbbbb \
      --role "Network Contributor" \
      --scope $vnetid
Replace the example guid in --assignee with the real object ID for user-2.
Obtain resource ID of vnet-1
Remain signed in to the portal as user-1.
In the search box a the top of the portal, enter Virtual network. Select Virtual networks in the search results.
Select vnet-1.
In Settings, select Properties.
Copy the information in the Resource ID field and save for the later steps. The resource ID is similar to the following example: /subscriptions/<Subscription Id>/resourceGroups/test-rg/providers/Microsoft.Network/virtualNetworks/vnet-1.
Sign out of the portal as user-1.
The resource ID of vnet-1 is required to set up the peering connection from vnet-2 to vnet-1. Use Get-AzVirtualNetwork to obtain the resource ID for vnet-1.
$id = @{
    Name = 'vnet-1'
    ResourceGroupName = 'test-rg'
}
$vnetA = Get-AzVirtualNetwork @id

$vnetA.id
The resource ID of vnet-1 is required to set up the peering connection from vnet-2 to vnet-1. Use az network vnet show to obtain the resource ID for vnet-1.
vnetidA=$(az network vnet show \
    --name vnet-1 \
    --resource-group test-rg \
    --query id \
    --output tsv)

echo $vnetidA
Create virtual network - vnet-2
In this section, you sign in as user-2 and create a virtual network for the peering connection to vnet-1.
Create a second virtual network with the following values by repeating the steps in the previous section.
| Setting |
Value |
| Subscription |
subscription-2 |
| Resource group |
test-rg-2 |
| Name |
vnet-2 |
| Address space |
10.1.0.0/16 |
| Subnet name |
subnet-1 |
| Subnet address range |
10.1.0.0/24 |
Sign in to subscription-2
Use Connect-AzAccount to sign in to subscription-2.
Connect-AzAccount -Environment AzureChinaCloud
If you're using one account for both subscriptions, sign in to that account and change the subscription context to subscription-2 with Set-AzContext.
Set-AzContext -Subscription subscription-2
Create a resource group - test-rg-2
An Azure resource group is a logical container where Azure resources are deployed and managed.
Create a resource group with New-AzResourceGroup:
$rsg = @{
    Name = 'test-rg-2'
    Location = 'eastus2'
}
New-AzResourceGroup @rsg
Create the virtual network
Create a virtual network with New-AzVirtualNetwork. This example creates a subnet-1 virtual network named vnet-2 in the West US 3 location:
$vnet = @{
    Name = 'vnet-2'
    ResourceGroupName = 'test-rg-2'
    Location = 'chinaeast2'
    AddressPrefix = '10.1.0.0/16'
}
$virtualNetwork = New-AzVirtualNetwork @vnet
Add a subnet
Azure deploys resources to a subnet within a virtual network, so you need to create a subnet. Create a subnet configuration named subnet-1 with Add-AzVirtualNetworkSubnetConfig:
$subnet = @{
    Name = 'subnet-1'
    VirtualNetwork = $virtualNetwork
    AddressPrefix = '10.1.0.0/24'
}
$subnetConfig = Add-AzVirtualNetworkSubnetConfig @subnet
Associate the subnet to the virtual network
You can write the subnet configuration to the virtual network with Set-AzVirtualNetwork. This command creates the subnet:
$virtualNetwork | Set-AzVirtualNetwork
Sign in to subscription-2
Use az sign-in to sign in to subscription-1.
az login
If you're using one account for both subscriptions, sign in to that account and change the subscription context to subscription-2 with az account set.
az account set --subscription "subscription-2"
Create a resource group - test-rg-2
An Azure resource group is a logical container where Azure resources are deployed and managed.
Create a resource group with az group create:
az group create \
    --name test-rg-2 \
    --location chinaeast2
Create the virtual network
Create a virtual network and subnet with az network vnet create. This example creates a subnet-1 virtual network named vnet-2 in the China East 2 location.
az network vnet create \
    --resource-group test-rg-2\
    --location chinaeast2 \
    --name vnet-2 \
    --address-prefixes 10.1.0.0/16 \
    --subnet-name subnet-1 \
    --subnet-prefixes 10.1.0.0/24
Assign permissions for user-1
A user account in the other subscription that you want to peer with must be added to the network you previously created. If you're using a single account for both subscriptions, you can skip this section.
Remain signed in to the portal as user-2.
In the search box a the top of the portal, enter Virtual network. Select Virtual networks in the search results.
Select vnet-2.
Select Access control (IAM).
Select + Add -> Add role assignment.
In Add role assignment in the Role tab, select Network Contributor.
Select Next.
In the Members tab, select + Select members.
In Select members in the search box, enter user-1.
Select Select.
Select Review + assign.
Select Review + assign.
Use Get-AzVirtualNetwork to obtain the resource ID for vnet-1. Assign user-1 from subscription-1 to vnet-2 with New-AzRoleAssignment.
Use Get-AzADUser to obtain the object ID for user-1.
user-1 is used in this example for the user account. Replace this value with the display name for the user from subscription-1 that you wish to assign permissions to vnet-2. You can skip this step if you're using the same account for both subscriptions.
$id = @{
    Name = 'vnet-2'
    ResourceGroupName = 'test-rg-2'
}
$vnet = Get-AzVirtualNetwork @id

$obj = Get-AzADUser -DisplayName 'user-1'

$role = @{
    ObjectId = $obj.id
    RoleDefinitionName = 'Network Contributor'
    Scope = $vnet.id
}
New-AzRoleAssignment @role
Use az network vnet show to obtain the resource ID for vnet-2. Assign user-1 from subscription-1 to vnet-2 with az role assignment create.
Use az ad user list to obtain the object ID for user-1.
user-1 is used in this example for the user account. Replace this value with the display name for the user from subscription-1 that you wish to assign permissions to vnet-2. You can skip this step if you're using the same account for both subscriptions.
az ad user list --display-name user-1
[
  {
    "businessPhones": [],
    "displayName": "user-1",
    "givenName": null,
    "id": "bbbbbbbb-1111-2222-3333-cccccccccccc",
    "jobTitle": null,
    "mail": "user-1@contoso.com",
    "mobilePhone": null,
    "officeLocation": null,
    "preferredLanguage": null,
    "surname": null,
    "userPrincipalName": "user-1_contoso.com#EXT#@fabrikam.partner.onmschina.cn"
  }
]
Make note of the object ID of user-1 in field id. In this example, it's bbbbbbbb-1111-2222-3333-cccccccccccc.
vnetid=$(az network vnet show \
    --name vnet-2 \
    --resource-group test-rg-2 \
    --query id \
    --output tsv)

az role assignment create \
      --assignee bbbbbbbb-1111-2222-3333-cccccccccccc \
      --role "Network Contributor" \
      --scope $vnetid
Obtain resource ID of vnet-2
The resource ID of vnet-2 is required to set up the peering connection from vnet-1 to vnet-2. Use the following steps to obtain the resource ID of vnet-2.
Remain signed in to the portal as user-2.
In the search box a the top of the portal, enter Virtual network. Select Virtual networks in the search results.
Select vnet-2.
In Settings, select Properties.
Copy the information in the Resource ID field and save for the later steps. The resource ID is similar to the following example: /subscriptions/<Subscription Id>/resourceGroups/test-rg-2/providers/Microsoft.Network/virtualNetworks/vnet-2.
Sign out of the portal as user-2.
The resource ID of vnet-2 is required to set up the peering connection from vnet-1 to vnet-2. Use Get-AzVirtualNetwork to obtain the resource ID for vnet-2.
$id = @{
    Name = 'vnet-2'
    ResourceGroupName = 'test-rg-2'
}
$vnetB = Get-AzVirtualNetwork @id

$vnetB.id
The resource ID of vnet-2 is required to set up the peering connection from vnet-1 to vnet-2. Use az network vnet show to obtain the resource ID for vnet-2.
vnetidB=$(az network vnet show \
    --name vnet-2 \
    --resource-group test-rg-2 \
    --query id \
    --output tsv)

echo $vnetidB
Create peering connection - vnet-1 to vnet-2
You need the Resource ID for vnet-2 from the previous steps to set up the peering connection.
Sign in to the Azure portal as user-1. If you're using one account for both subscriptions, change to subscription-1 in the portal.
In the search box a the top of the portal, enter Virtual network. Select Virtual networks in the search results.
Select vnet-1.
Select Peerings.
Select + Add.
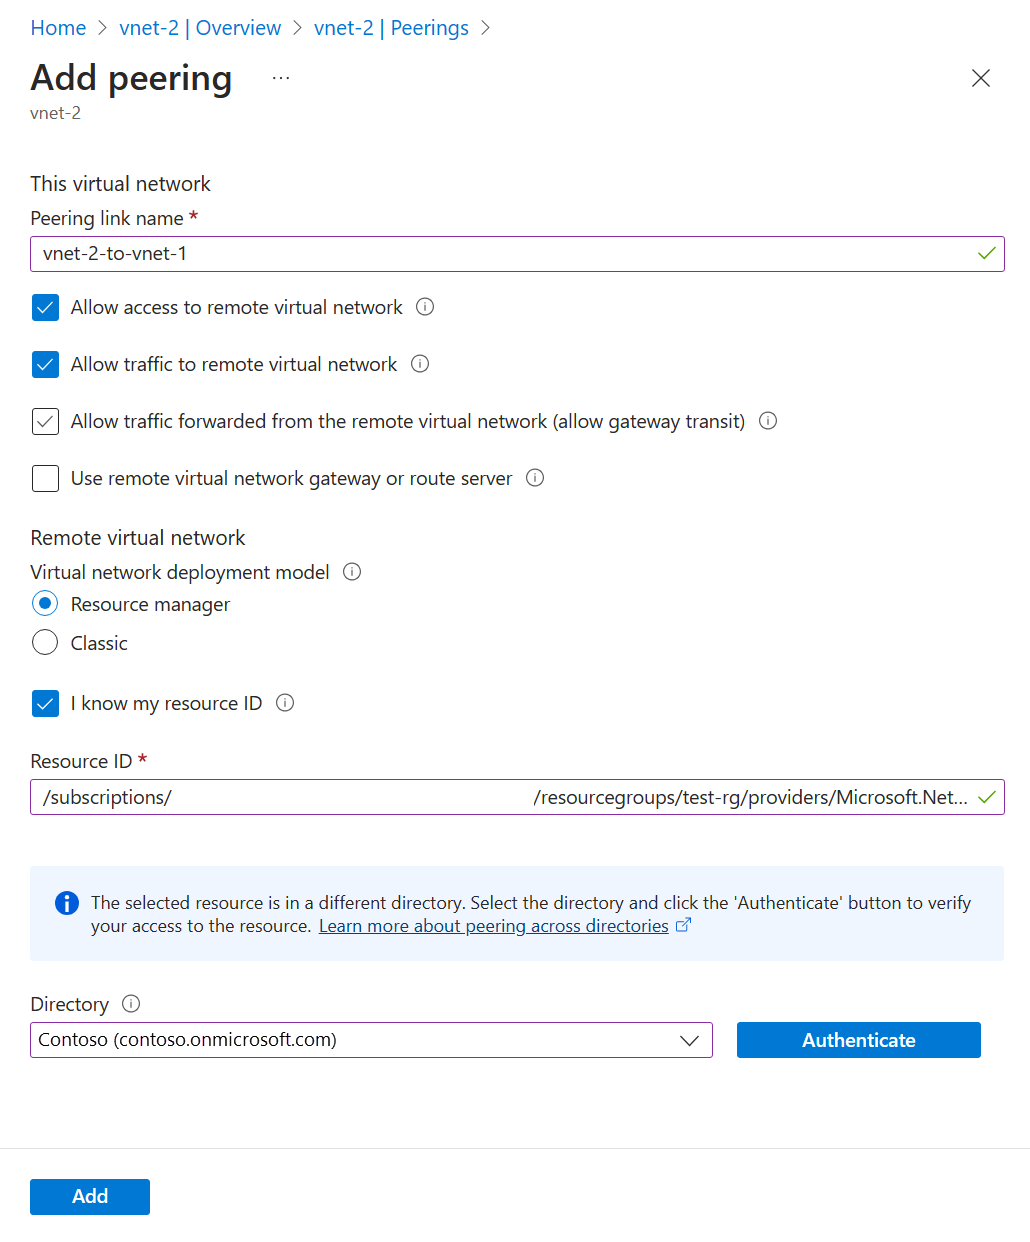
Enter or select the following information in Add peering:
| Setting |
Value |
| Remote virtual network summary |
|
| Peering link name |
vnet-2-to-vnet-1 |
| Virtual network deployment model |
Resource Manager |
| I know my resource ID |
Select the box |
| Resource ID |
Enter the Resource ID for vnet-2 |
| Directory |
Select the Microsoft Entra ID directory that corresponds with vnet-2 and user-2, but authenticate using user-1 |
| Remote virtual network peering settings |
|
| Allow 'the peered virtual network' to access 'vnet-1' |
Leave the default of Enabled |
| Allow 'the peered virtual network' to receive forwarded traffic from 'vnet-1' |
Select the box |
| Local virtual network summary |
|
| Peering link name |
vnet-1-to-vnet-2 |
| Local virtual network peering settings |
|
| Allow 'vnet-1' to access 'the peered virtual network' |
Leave the default of Enabled |
| Allow 'vnet-1' to receive forwarded traffic from 'the peered virtual network' |
Select the box |
Select Add.

Sign out of the portal as user-1.
Sign in to subscription-1
Use Connect-AzAccount to sign in to subscription-1.
Connect-AzAccount -Environment AzureChinaCloud
If you're using one account for both subscriptions, sign in to that account and change the subscription context to subscription-1 with Set-AzContext.
Set-AzContext -Subscription subscription-1
Sign in to subscription-2
Authenticate to subscription-2 so that the peering can be set up.
Use Connect-AzAccount to sign in to subscription-2.
Connect-AzAccount -Environment AzureChinaCloud
Change to subscription-1 (optional)
You might have to switch back to subscription-1 to continue with the actions in subscription-1.
Change context to subscription-1.
Set-AzContext -Subscription subscription-1
Create peering connection
Use Add-AzVirtualNetworkPeering to create a peering connection between vnet-1 and vnet-2.
$netA = @{
    Name = 'vnet-1'
    ResourceGroupName = 'test-rg'
}
$vnetA = Get-AzVirtualNetwork @netA

$peer = @{
    Name = 'vnet-1-to-vnet-2'
    VirtualNetwork = $vnetA
    RemoteVirtualNetworkId = '/subscriptions/<subscription-2-Id>/resourceGroups/test-rg-2/providers/Microsoft.Network/virtualNetworks/vnet-2'
}
Add-AzVirtualNetworkPeering @peer
Use Get-AzVirtualNetworkPeering to obtain the status of the peering connections from vnet-1 to vnet-2.
$status = @{
    ResourceGroupName =  'test-rg'
    VirtualNetworkName = 'vnet-1'
}
Get-AzVirtualNetworkPeering @status | Format-Table VirtualNetworkName, PeeringState
PS /home/azureuser> Get-AzVirtualNetworkPeering @status | Format-Table VirtualNetworkName, PeeringState

VirtualNetworkName PeeringState
------------------ ------------
vnet-1            Initiated
Sign in to subscription-1
Use az sign-in to sign in to subscription-1.
az login
If you're using one account for both subscriptions, sign in to that account and change the subscription context to subscription-1 with az account set.
az account set --subscription "subscription-1"
Sign in to subscription-2
Authenticate to subscription-2 so that the peering can be set up.
Use az sign-in to sign in to subscription-2.
az login
Change to subscription-1 (optional)
You might have to switch back to subscription-1 to continue with the actions in subscription-1.
Change context to subscription-1.
az account set --subscription "subscription-1"
Create peering connection
Use az network vnet peering create to create a peering connection between vnet-1 and vnet-2.
az network vnet peering create \
    --name vnet-1-to-vnet-2 \
    --resource-group test-rg \
    --vnet-name vnet-1 \
    --remote-vnet /subscriptions/<subscription-2-Id>/resourceGroups/test-rg-2/providers/Microsoft.Network/VirtualNetworks/vnet-2 \
    --allow-vnet-access
Use az network vnet peering list to obtain the status of the peering connections from vnet-1 to vnet-2.
az network vnet peering list \
    --resource-group test-rg \
    --vnet-name vnet-1 \
    --output table
The peering connection shows in Peerings in a Initiated state. To complete the peer, a corresponding connection must be set up in vnet-2.
Create peering connection - vnet-2 to vnet-1
You need the Resource IDs for vnet-1 from the previous steps to set up the peering connection.
Sign in to the Azure portal as user-2. If you're using one account for both subscriptions, change to subscription-2 in the portal.
In the search box a the top of the portal, enter Virtual network. Select Virtual networks in the search results.
Select vnet-2.
Select Peerings.
Select + Add.
Enter or select the following information in Add peering:
| Setting |
Value |
| Remote virtual network summary |
|
| Peering link name |
vnet-1-to-vnet-2 |
| Virtual network deployment model |
Resource Manager |
| I know my resource ID |
Select the box |
| Resource ID |
Enter the Resource ID for vnet-1 |
| Directory |
Select the Microsoft Entra ID directory that corresponds with vnet-1 and user-1, but authenticate using user-2 |
| Remote virtual network peering settings |
|
| Allow 'the peered virtual network' to access 'vnet-1' |
Leave the default of Enabled |
| Allow 'the peered virtual network' to receive forwarded traffic from 'vnet-1' |
Select the box |
| Local virtual network summary |
|
| Peering link name |
vnet-1-to-vnet-2 |
| Local virtual network peering settings |
|
| Allow 'vnet-1' to access 'the peered virtual network' |
Leave the default of Enabled |
| Allow 'vnet-1' to receive forwarded traffic from 'the peered virtual network' |
Select the box |
Select Add.
In the pull-down box, select the Directory that corresponds with vnet-1 and user-1.
Select Authenticate.
Select Add.
Sign in to subscription-2
Use Connect-AzAccount to sign in to subscription-2.
Connect-AzAccount -Environment AzureChinaCloud
If you're using one account for both subscriptions, sign in to that account and change the subscription context to subscription-2 with Set-AzContext.
Set-AzContext -Subscription subscription-2
Sign in to subscription-1
Authenticate to subscription-1 so that the peering can be set up.
Use Connect-AzAccount to sign in to subscription-1.
Connect-AzAccount -Environment AzureChinaCloud
Change to subscription-2 (optional)
You might have to switch back to subscription-2 to continue with the actions in subscription-2.
Change context to subscription-2.
Set-AzContext -Subscription subscription-2
Create peering connection
Use Add-AzVirtualNetworkPeering to create a peering connection between vnet-2 and vnet-1.
$netB = @{
    Name = 'vnet-2'
    ResourceGroupName = 'test-rg-2'
}
$vnetB = Get-AzVirtualNetwork @netB

$peer = @{
    Name = 'vnet-2-to-vnet-1'
    VirtualNetwork = $vnetB
    RemoteVirtualNetworkId = '/subscriptions/<subscription-1-Id>/resourceGroups/test-rg/providers/Microsoft.Network/virtualNetworks/vnet-1'
}
Add-AzVirtualNetworkPeering @peer
User Get-AzVirtualNetworkPeering to obtain the status of the peering connections from vnet-2 to vnet-1.
$status = @{
    ResourceGroupName =  'test-rg-2'
    VirtualNetworkName = 'vnet-2'
}
Get-AzVirtualNetworkPeering @status | Format-Table VirtualNetworkName, PeeringState
PS /home/azureuser> Get-AzVirtualNetworkPeering @status | Format-Table VirtualNetworkName, PeeringState

VirtualNetworkName PeeringState
------------------ ------------
vnet-2            Connected
Sign in to subscription-2
Use az sign-in to sign in to subscription-2.
az login
If you're using one account for both subscriptions, sign in to that account and change the subscription context to subscription-2 with az account set.
az account set --subscription "subscription-2"
Sign in to subscription-1
Authenticate to subscription-1 so that the peering can be set up.
Use az sign-in to sign in to subscription-1.
az login
Change to subscription-2 (optional)
You might have to switch back to subscription-2 to continue with the actions in subscription-2.
Change context to subscription-2.
az account set --subscription "subscription-2"
Create peering connection
Use az network vnet peering create to create a peering connection between vnet-2 and vnet-1.
az network vnet peering create \
    --name vnet-2-to-vnet-1 \
    --resource-group test-rg-2 \
    --vnet-name vnet-2 \
    --remote-vnet /subscriptions/<subscription-1-Id>/resourceGroups/test-rg/providers/Microsoft.Network/VirtualNetworks/vnet-1 \
    --allow-vnet-access
Use az network vnet peering list to obtain the status of the peering connections from vnet-2 to vnet-1.
az network vnet peering list \
    --resource-group test-rg-2 \
    --vnet-name vnet-2 \
    --output table
The peering is successfully established after you see Connected in the Peering status column for both virtual networks in the peering. Any Azure resources you create in either virtual network are now able to communicate with each other through their IP addresses. If you're using Azure name resolution for the virtual networks, the resources in the virtual networks aren't able to resolve names across the virtual networks. If you want to resolve names across virtual networks in a peering, you must create your own DNS (Domain Name System) server or use Azure DNS.
For more information about using your own DNS for name resolution, see, Name resolution using your own DNS server.
For more information about Azure DNS, see What is Azure DNS?
Next steps
