Note
Access to this page requires authorization. You can try signing in or changing directories.
Access to this page requires authorization. You can try changing directories.
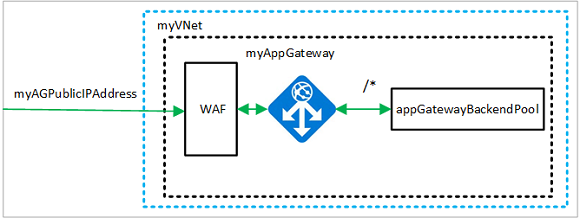
You can restrict traffic on an application gateway with a Web Application Firewall (WAF). The WAF uses OWASP rules to protect your application. These rules include protection against attacks such as SQL injection, cross-site scripting attacks, and session hijacks.
In this article, you learn how to:
- Set up the network
- Create an application gateway with WAF enabled
- Create a virtual machine scale set
- Create a storage account and configure diagnostics
If you prefer, you can complete this procedure using Azure PowerShell.
If you don't have an Azure subscription, create a trial account before you begin.
Prerequisites
If you prefer to run CLI reference commands locally, install the Azure CLI. If you're running on Windows or macOS, consider running Azure CLI in a Docker container. For more information, see How to run the Azure CLI in a Docker container.
If you're using a local installation, sign in to the Azure CLI by using the az login command. To finish the authentication process, follow the steps displayed in your terminal. For other sign-in options, see Sign in with the Azure CLI.
When you're prompted, install the Azure CLI extension on first use. For more information about extensions, see Use extensions with the Azure CLI.
Run az version to find the version and dependent libraries that are installed. To upgrade to the latest version, run az upgrade.
- This article requires version 2.0.4 or later of the Azure CLI.
Create a resource group
A resource group is a logical container into which Azure resources are deployed and managed. Create an Azure resource group named myResourceGroupAG with az group create.
az group create --name myResourceGroupAG --location chinanorth2
Create network resources
The virtual network and subnets are used to provide network connectivity to the application gateway and its associated resources. Create a virtual network named myVNet and a subnet named myAGSubnet. then create a public IP address named myAGPublicIPAddress.
az network vnet create \
  --name myVNet \
  --resource-group myResourceGroupAG \
  --location chinanorth2 \
  --address-prefix 10.0.0.0/16 \
  --subnet-name myBackendSubnet \
  --subnet-prefix 10.0.1.0/24

az network vnet subnet create \
  --name myAGSubnet \
  --resource-group myResourceGroupAG \
  --vnet-name myVNet \
  --address-prefix 10.0.2.0/24

az network public-ip create \
  --resource-group myResourceGroupAG \
  --name myAGPublicIPAddress \
  --allocation-method Static \
  --sku Standard
Create an application gateway with a WAF policy
You can use az network application-gateway create to create the application gateway named myAppGateway. When you create an application gateway using the Azure CLI, you specify configuration information, such as capacity, sku, and HTTP settings. The application gateway is assigned to myAGSubnet and myAGPublicIPAddress.
az network application-gateway waf-policy create \
  --name waf-pol \
  --resource-group myResourceGroupAG \
  --type OWASP \
  --version 3.2

az network application-gateway create \
  --name myAppGateway \
  --location chinanorth2 \
  --resource-group myResourceGroupAG \
  --vnet-name myVNet \
  --subnet myAGSubnet \
  --capacity 2 \
  --sku WAF_v2 \
  --http-settings-cookie-based-affinity Disabled \
  --frontend-port 80 \
  --http-settings-port 80 \
  --http-settings-protocol Http \
  --public-ip-address myAGPublicIPAddress \
  --waf-policy waf-pol \
  --priority 1
It may take several minutes for the application gateway to be created. After the application gateway is created, you can see these new features of it:
- appGatewayBackendPool - An application gateway must have at least one backend address pool.
- appGatewayBackendHttpSettings - Specifies that port 80 and an HTTP protocol is used for communication.
- appGatewayHttpListener - The default listener associated with appGatewayBackendPool.
- appGatewayFrontendIP - Assigns myAGPublicIPAddress to appGatewayHttpListener.
- rule1 - The default routing rule that is associated with appGatewayHttpListener.
Create a virtual machine scale set
In this example, you create a virtual machine scale set that provides two servers for the backend pool in the application gateway. The virtual machines in the scale set are associated with the myBackendSubnet subnet. To create the scale set, you can use az vmss create.
Replace <username> and <password> with your values before you run this.
az vmss create \
  --name myvmss \
  --resource-group myResourceGroupAG \
  --image Ubuntu2204 \
  --admin-username <username> \
  --admin-password <password> \
  --instance-count 2 \
  --vnet-name myVNet \
  --subnet myBackendSubnet \
  --vm-sku Standard_DS2 \
  --upgrade-policy-mode Automatic \
  --app-gateway myAppGateway \
  --backend-pool-name appGatewayBackendPool
Install NGINX
az vmss extension set \
  --publisher Microsoft.Azure.Extensions \
  --version 2.0 \
  --name CustomScript \
  --resource-group myResourceGroupAG \
  --vmss-name myvmss \
  --settings '{ "fileUris": ["https://raw.githubusercontent.com/Azure/azure-docs-powershell-samples/master/application-gateway/iis/install_nginx.sh"],"commandToExecute": "./install_nginx.sh" }'
Create a storage account and configure diagnostics
In this article, the application gateway uses a storage account to store data for detection and prevention purposes. You could also use Azure Monitor logs or Event Hub to record data.
Create a storage account
Create a storage account named myagstore1 with az storage account create.
az storage account create \
  --name myagstore1 \
  --resource-group myResourceGroupAG \
  --location chinanorth2 \
  --sku Standard_LRS \
  --encryption-services blob
Configure diagnostics
Configure diagnostics to record data into the ApplicationGatewayAccessLog, ApplicationGatewayPerformanceLog, and ApplicationGatewayFirewallLog logs. Replace <subscriptionId> with your subscription identifier and then configure diagnostics with az monitor diagnostic-settings create.
appgwid=$(az network application-gateway show --name myAppGateway --resource-group myResourceGroupAG --query id -o tsv)

storeid=$(az storage account show --name myagstore1 --resource-group myResourceGroupAG --query id -o tsv)

az monitor diagnostic-settings create --name appgwdiag --resource $appgwid \
  --logs '[ { "category": "ApplicationGatewayAccessLog", "enabled": true, "retentionPolicy": { "days": 30, "enabled": true } }, { "category": "ApplicationGatewayPerformanceLog", "enabled": true, "retentionPolicy": { "days": 30, "enabled": true } }, { "category": "ApplicationGatewayFirewallLog", "enabled": true, "retentionPolicy": { "days": 30, "enabled": true } } ]' \
  --storage-account $storeid
Test the application gateway
To get the public IP address of the application gateway, use az network public-ip show. Copy the public IP address, and then paste it into the address bar of your browser.
az network public-ip show \
  --resource-group myResourceGroupAG \
  --name myAGPublicIPAddress \
  --query [ipAddress] \
  --output tsv

Clean up resources
When no longer needed, remove the resource group, application gateway, and all related resources.
az group delete --name myResourceGroupAG
