Nota:
El acceso a esta página requiere autorización. Puede intentar iniciar sesión o cambiar directorios.
El acceso a esta página requiere autorización. Puede intentar cambiar los directorios.
在本快速入门中,你将在 Azure 应用程序配置中创建一个功能标志,并使用它动态控制 Python 应用来创建功能管理的端到端实现。
功能管理支持扩展了应用程序配置中的动态配置功能。 快速入门中的这些示例基于动态配置教程中介绍的 Python 应用。 在继续之前,请完成该快速入门和教程,首先使用动态配置创建 python 应用。
此库不依赖于任何 Azure 库。 它们可以通过其 Python 配置提供程序无缝集成到应用程序配置。
先决条件
- 具有活动订阅的 Azure 帐户。 创建试用版订阅。
- 应用配置存储区,如 创建存储区的教程所示。
- Python 3.8 或更高版本 - 有关在 Windows 上设置 Python 的信息,请参阅 Windows 上的 Python 文档,或者 python 下载。
- azure-appconfiguration-provider 库 1.2.0 或更高版本。
添加功能标志
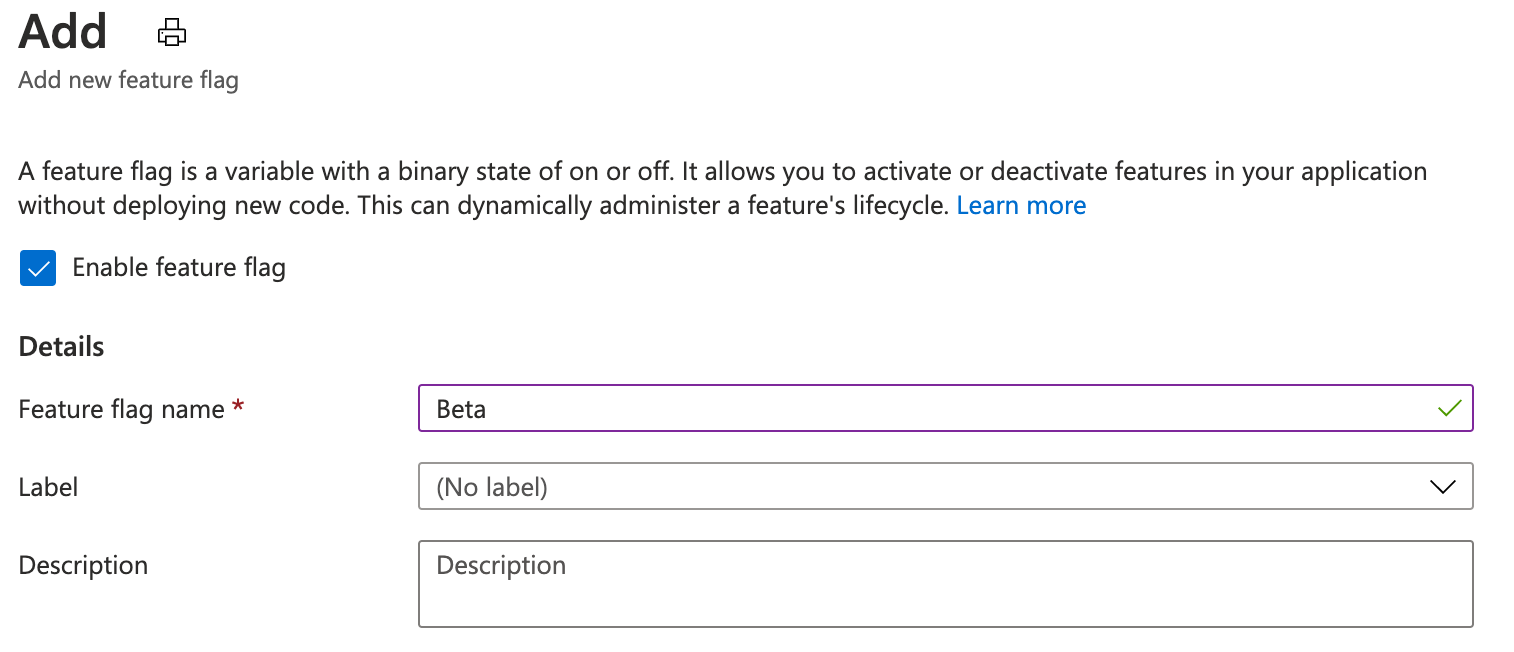
将名为“Beta”的功能标志添加到应用程序配置存储区,并将“标签”和“描述”保留为其默认值。 有关如何使用 Azure 门户或 CLI 将功能标志添加到存储区的详细信息,请转到创建功能标志。 在此阶段,应取消选中“启用功能标志”复选框。

控制台应用程序
使用
pip install命令安装功能管理。pip install featuremanagement创建一个名为
app.py的新 Python 文件并添加以下代码:from featuremanagement import FeatureManager from azure.identity import InteractiveBrowserCredential from azure.appconfiguration.provider import load import os from time import sleep endpoint = os.environ["APP_CONFIGURATION_ENDPOINT"] # Connecting to Azure App Configuration using an endpoint # credential is used to authenticate the client, the InteractiveBrowserCredential is used for this sample. It will open a browser window to authenticate the user. For all credential options see [credential classes](https://github.com/Azure/azure-sdk-for-python/tree/main/sdk/identity/azure-identity#credential-classes). # feature_flag_enabled makes it so that the provider will load feature flags from Azure App Configuration # feature_flag_refresh_enabled makes it so that the provider will refresh feature flags from Azure App Configuration, when the refresh operation is triggered config = load(endpoint=endpoint, credential=InteractiveBrowserCredential(), feature_flag_enabled=True, feature_flag_refresh_enabled=True) feature_manager = FeatureManager(config) # Is always false print("Beta is ", feature_manager.is_enabled("Beta")) while not feature_manager.is_enabled("Beta"): sleep(5) config.refresh() print("Beta is ", feature_manager.is_enabled("Beta"))
启动应用程序时,将打开浏览器窗口以对用户进行身份验证。 用户必须至少具有 App Configuration Data Reader 角色才能访问应用程序配置存储,有关详细信息,请参阅应用程序配置角色。
设置名为 APP_CONFIGURATION_ENDPOINT 的环境变量,并将其设置为你的应用程序配置存储的终结点。 在命令行中,运行以下命令并重启命令提示符,以使更改生效:
若要使用 Windows 命令提示符在本地生成和运行应用,请运行以下命令:
setx APP_CONFIGURATION_ENDPOINT "<endpoint-of-your-app-configuration-store>"重启命令提示符以使更改生效。 输出环境变量的值以验证它的设置是否正确。
运行 Python 应用程序。
python app.py在应用程序配置门户中,选择“功能管理器”,使用“已启用”列中的开关将“Beta”功能标志的状态更改为“开”。
密钥 状态 Beta 开 大约 30 秒后(即提供程序的刷新间隔),应用程序将输出以下内容:
Beta is True
Web 应用程序
以下示例演示如何使用 Azure 应用程序配置和动态刷新来更新现有的 Web 应用程序,同时使用功能标志。 有关如何对配置值使用动态刷新的更详细示例,请参阅 Python 动态配置。 在继续之前,请确保在应用程序配置存储中启用了 Beta 功能标志。
在 app.py 中,设置 Azure 应用程序配置的加载方法以额外加载功能标志,同时启用功能标志的刷新。
from featuremanagement import FeatureManager

...

global azure_app_config, feature_manager
# Connecting to Azure App Configuration using an endpoint
# credential is used to authenticate the client, the InteractiveBrowserCredential is used for this sample. It will open a browser window to authenticate the user. For all credential options see [credential classes](https://github.com/Azure/azure-sdk-for-python/tree/main/sdk/identity/azure-identity#credential-classes).
# feature_flag_enabled makes it so that the provider will load feature flags from Azure App Configuration
# feature_flag_refresh_enabled makes it so that the provider will refresh feature flags from Azure App Configuration, when the refresh operation is triggered
azure_app_config = load(endpoint=endpoint, credential=InteractiveBrowserCredential(),
                        refresh_on=[WatchKey("sentinel")],
                        on_refresh_success=on_refresh_success,
                        refresh_interval=10, # Default value is 30 seconds, shortened for this sample
                        feature_flag_enabled=True,
                        feature_flag_refresh_enabled=True,
                    )
feature_manager = FeatureManager(config)
此外,更新路由以检查更新后的功能标志。
@app.route("/")
def index():
    ...
    context["message"] = azure_app_config.get("message")
    context["beta"] = feature_manager.is_enabled("Beta")
    ...
更新模板 index.html 以使用新的功能标志。
...

<body>
  <main>
    <div>
      <h1>{{message}}</h1>
      {% if beta %}
      <h2>Beta is enabled</h2>
      {% endif %}
    </div>
  </main>
</body>
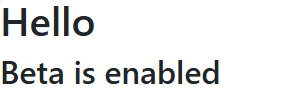
更新并运行应用程序后,可以看到工作中的功能标志,其中 Beta is enabled 消息将显示在页面上,但前提是功能标志在应用程序配置存储中启用。

可以在此处找到完整的示例项目。
每当触发这些终结点时,都可以执行刷新检查以确保使用最新的配置值。 如果刷新间隔尚未传递或刷新正在进行,则检查可以立即返回。
刷新完成后,将同时更新所有值,因此配置始终在对象中保持一致。
清理资源
如果不想继续使用本文中创建的资源,请删除此处创建的资源组以避免产生费用。
重要
删除资源组的操作不可逆。 将永久删除资源组以及其中的所有资源。 请确保不要意外删除错误的资源组或资源。 如果在包含要保留的其他资源的资源组中创建了本文的资源,请从相应的窗格中单独删除每个资源,而不是删除该资源组。
- 登录到 Azure 门户,然后选择“资源组”。
- 在“按名称筛选”框中,输入资源组的名称。
- 在结果列表中,选择资源组名称以查看概述。
- 选择“删除资源组”。
- 系统会要求确认是否删除资源组。 重新键入资源组的名称进行确认,然后选择“删除”。
片刻之后,将会删除该资源组及其所有资源。
后续步骤
在本快速入门中,你已创建一个新的应用程序配置存储,并已使用它来通过功能管理库管理 Python 应用中的功能。