Nota:
El acceso a esta página requiere autorización. Puede intentar iniciar sesión o cambiar directorios.
El acceso a esta página requiere autorización. Puede intentar cambiar los directorios.
适用于:![]() IoT Edge 1.5
IoT Edge 1.5
重要
IoT Edge 1.5 LTS 是受支持的版本。 IoT Edge 1.4 LTS 于 2024 年 11 月 12 日终止。 如果使用的是早期版本,请参阅 Update IoT Edge。
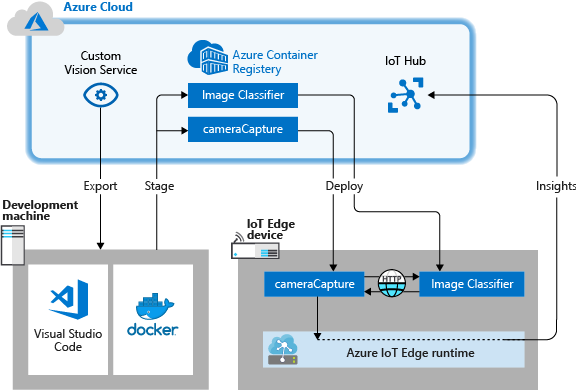
Azure IoT Edge 通过将工作负载从云移动到边缘,使 IoT 解决方案更高效。 此功能非常适用于处理大量数据的服务,例如计算机视觉模型。 使用 Azure AI 自定义视觉 可以生成自定义映像分类器并将其作为容器部署到设备。 这两个服务一起让用户从图像或视频流中查找见解,而无需先传输所有数据。 自定义视觉提供一个分类器,用于将图像与训练的模型进行比较以生成见解。
例如,IoT Edge 设备上的自定义视觉可以确定高速公路的交通流量是否高于或低于正常水平,或者停车场是否有连续的空位。 这些见解可以与其他服务共享,方便采取行动。
在本教程中,你将了解如何执行以下操作:
- 使用自定义视觉生成图像分类器。
- 开发一个 IoT Edge 模块,用于查询设备上的自定义视觉 Web 服务器。
- 将图像分类器结果发送到 IoT 中心。
如果没有 Azure 帐户,请在开始前创建一个试用帐户。
先决条件
提示
本教程是 Raspberry Pi 3 上的自定义视觉和 Azure IoT Edge 示例项目的简化版本。 它在云 VM 上运行,并使用静态映像来训练和测试映像分类器,这有助于 IoT Edge 上的自定义视觉新手。 示例项目使用物理硬件并设置实时相机源来训练和测试图像分类器,这对探索更详细、更真实的场景很有帮助。
通过使用首选的 Azure IoT Edge 开发工具 命令行 (CLI) 开发工具,完成 教程:使用 Visual Studio Code 开发 IoT Edge 模块 来为 Linux 容器开发设置环境。 完成本教程后,请确保开发环境中提供了以下先决条件:
- Azure 中的免费版或标准版 IoT 中心
- 运行 Azure IoT Edge (支持 Linux 容器)的设备。 按照快速入门设置 Linux 设备或 Windows 设备。
- 容器注册表,例如 Azure 容器注册表。
- 已安装带有 Azure IoT 中心扩展的 Visual Studio Code。
- 在开发计算机上下载并安装 与 Docker 兼容的容器管理系统 。 将其设置为运行 Linux 容器。
若要使用自定义视觉服务开发 IoT Edge 模块,请确保在开发计算机上安装以下附加先决条件:
使用自定义视觉生成图像分类器
若要生成图像分类器,请创建自定义视觉项目并提供训练图像。 有关本部分中执行的步骤的详细信息,请参阅 如何使用自定义视觉生成分类器。
生成并训练映像分类器后,将其导出为 Docker 容器并将其部署到 IoT Edge 设备。
创建新项目
在 Web 浏览器中,导航到自定义影像服务网页。
选择“登录”,使用访问 Azure 资源时所用的帐户进行登录。
选择“新建项目”。
使用以下值来创建项目:
字段 值 名称 为项目提供一个名称,例如 EdgeTreeClassifier。 说明 可选项目说明。 资源 选择一个包含自定义视觉服务资源的 Azure 资源组,或者如果尚未添加 Azure 资源组,则选择“新建” 。 项目类型 分类 分类类型 多类(每个图像一个标签) 域名 常规(精简) 导出功能 基本平台(TensorFlow、CoreML、ONNX 等) 选择“创建项目”。
上传图像并训练分类器
创建图像分类器需要一组训练图像和测试图像。
将示例图像从 Cognitive-CustomVision-Windows 存储库克隆或下载到本地开发计算机。
git clone https://github.com/Microsoft/Cognitive-CustomVision-Windows.git返回到自定义视觉项目,选择“添加图像”。
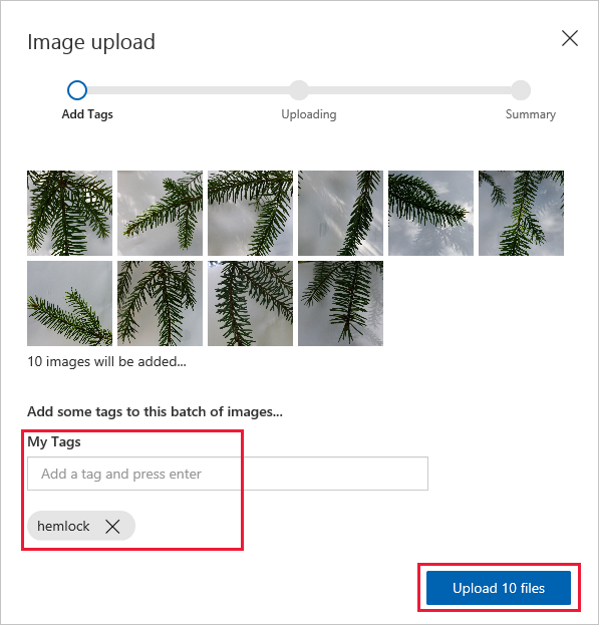
浏览到已克隆到本地的 git 存储库,导航到第一个图像文件夹 Cognitive-CustomVision-Windows / Samples / Images / Hemlock。 选择文件夹中的所有 10 个图像,然后选择“ 打开”。
将标记 hemlock 添加到此组图像,然后按 Enter 应用标记。
选择“上传 10 个文件”。
成功上传图像以后,选择“完成”。
再次选择“添加图像”。
浏览到第二个图像文件夹 Cognitive-CustomVision-Windows / Samples / Images / Japanese Cherry。 选择文件夹中的所有 10 个图像,然后单击“打开”。
将标记“日本樱花” 添加到此组图像,然后按 Enter 应用该标记。
选择“上传 10 个文件”。 成功上传图像以后,选择“完成”。
标记并上传这两组图像后,选择“ 训练 ”以训练分类器。
导出分类器
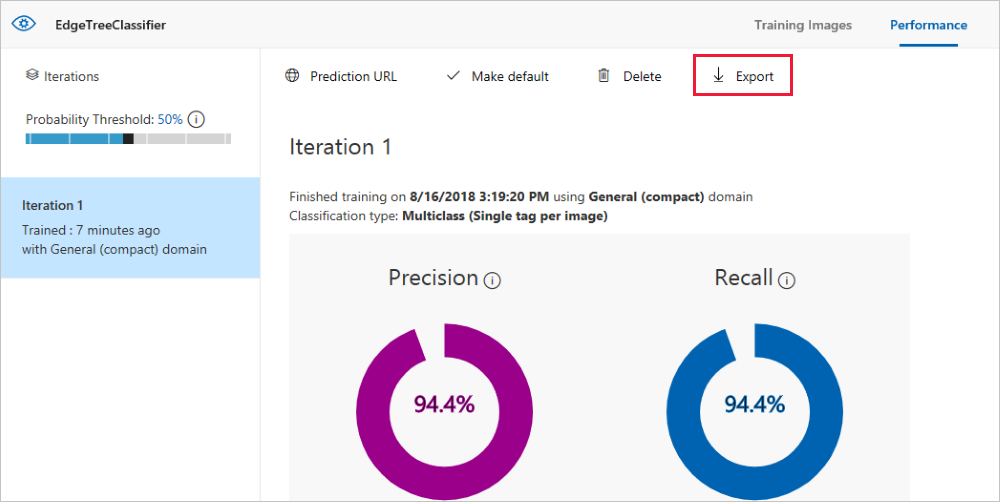
训练分类器以后,请在分类器的“性能”页上选择“导出”。
选择“DockerFile” 作为平台。
选择“Linux” 作为版本。
选择“导出”。
导出完成后,选择“ 下载 ”并将 .zip 包保存在计算机上的本地。 从包中提取所有文件。 使用这些文件创建包含图像分类服务器的 IoT Edge 模块。
此时,你已完成自定义视觉项目的创建和训练。 将在下一部分使用导出的文件,但现在已完成对 Custom Vision 网页的操作。
创建 IoT Edge 解决方案
现在,开发计算机上有了适用于容器版图像分类器的文件。 在本部分中,将设置映像分类器容器以作为 IoT Edge 模块运行。 还可以创建第二个模块,该模块将请求发布到分类器,并将结果作为消息发送到 IoT 中心。
创建新的解决方案
解决方案是为单个 IoT Edge 部署以逻辑方式开发和组织多个模块的方式。 解决方案包含适用于一个或多个模块的代码,以及部署清单,声明如何在 IoT Edge 设备上配置模块。 使用 Azure IoT Edge 开发工具 命令行 (CLI) 开发工具创建解决方案。 使用该工具的最简单方法是 使用 Docker 运行 IoT Edge 开发容器。
创建一个名为classifier的目录,并切换到该目录。
mkdir CustomVisionSolution
cd CustomVisionSolution
运行 iotedgedev 工具 init 命令 以创建新的 IoT Edge 解决方案。 在 IoT Edge 开发 Docker 容器中,输入以下命令:
iotedgedev solution init --template python --module classifieriotedgedev solution init 脚本会提示你完成以下几个步骤:
- 向 Azure 进行身份验证
- 选择 Azure 订阅
- 选择或创建资源组
- 选择或创建 Azure IoT 中心
- 选择或创建 Azure IoT Edge 设备
该命令使用当前工作目录中名为 分类器的 模块创建新的 IoT Edge 解决方案。
在 Visual Studio Code 中打开解决方案。
添加图像分类器
Visual Studio Code 中的 Python 模块模板包含一些可以在运行后对 IoT Edge 进行测试的示例代码。 在本方案中不需使用该代码。 请按照以下步骤,将示例代码替换为之前导出的图像分类器容器。
在文件资源管理器中,浏览到已下载并提取的自定义视觉包。 复制已提取包中的所有内容。 其中应该有两个文件夹(app 和 azureml)和两个文件(Dockerfile 和 README)。
在文件资源管理器中,浏览到曾经要求 Visual Studio Code 在其中创建 IoT Edge 解决方案的目录。
打开 classifier 模块文件夹。 如果在上一部分使用了建议的名称,则文件夹结构将类似于 CustomVisionSolution / modules / classifier。
将文件粘贴到 classifier 文件夹中。
返回到 Visual Studio Code 窗口。 解决方案工作区现在会显示模块文件夹中的图像分类器文件。
将原始 Dockerfile.amd64 文件替换为自定义视觉包中的 Dockerfile,方法是删除原始 Dockerfile.amd64 并将 Dockerfile 重命名为 Dockerfile.amd64。
保存所做更改。
创建模拟摄像头模块
在实际的自定义视觉部署中,相机提供实时图像或视频流。 在本方案中,请生成一个可以向图像分类器发送测试图像的模块来模拟摄像头。
在此部分,请将新模块添加到同一 CustomVisionSolution 并提供创建模拟摄像头所需的代码。
使用 iotedgedev 工具向解决方案添加新模块。 该命令在解决方案的 modules 文件夹中创建名为 cameracapture 的新文件夹。
iotedgedev solution add --template python cameracapture在 modules / 文件夹中打开 main.py 文件。
将整个文件替换为以下代码。 此示例代码将 POST 请求发送到在 classifier 模块中运行的图像处理服务。 我们提供的此模块容器包含可在请求中使用的示例图像。 此示例代码随后将响应打包为 IoT 中心消息并发送到输出队列。
# Copyright (c) Microsoft. All rights reserved.
# Licensed under the MIT license. See LICENSE file in the project root for
# full license information.

import time
import sys
import os
import requests
import json
from azure.iot.device import IoTHubModuleClient, Message

# global counters
SENT_IMAGES = 0

# global client
CLIENT = None

# Send a message to IoT Hub
# Route output1 to $upstream in deployment.template.json
def send_to_hub(strMessage):
    message = Message(bytearray(strMessage, 'utf8'))
    CLIENT.send_message_to_output(message, "output1")
    global SENT_IMAGES
    SENT_IMAGES += 1
    print( "Total images sent: {}".format(SENT_IMAGES) )

# Send an image to the image classifying server
# Return the JSON response from the server with the prediction result
def sendFrameForProcessing(imagePath, imageProcessingEndpoint):
    headers = {'Content-Type': 'application/octet-stream'}

    with open(imagePath, mode="rb") as test_image:
        try:
            response = requests.post(imageProcessingEndpoint, headers = headers, data = test_image)
            print("Response from classification service: (" + str(response.status_code) + ") " + json.dumps(response.json()) + "\n")
        except Exception as e:
            print(e)
            print("No response from classification service")
            return None

    return json.dumps(response.json())

def main(imagePath, imageProcessingEndpoint):
    try:
        print ( "Simulated camera module for Azure IoT Edge. Press Ctrl-C to exit." )

        try:
            global CLIENT
            CLIENT = IoTHubModuleClient.create_from_edge_environment()
        except Exception as iothub_error:
            print ( "Unexpected error {} from IoTHub".format(iothub_error) )
            return

        print ( "The sample is now sending images for processing and will indefinitely.")

        while True:
            classification = sendFrameForProcessing(imagePath, imageProcessingEndpoint)
            if classification:
                send_to_hub(classification)
            time.sleep(10)

    except KeyboardInterrupt:
        print ( "IoT Edge module sample stopped" )

if __name__ == '__main__':
    try:
        # Retrieve the image location and image classifying server endpoint from container environment
        IMAGE_PATH = os.getenv('IMAGE_PATH', "")
        IMAGE_PROCESSING_ENDPOINT = os.getenv('IMAGE_PROCESSING_ENDPOINT', "")
    except ValueError as error:
        print ( error )
        sys.exit(1)

    if ((IMAGE_PATH and IMAGE_PROCESSING_ENDPOINT) != ""):
        main(IMAGE_PATH, IMAGE_PROCESSING_ENDPOINT)
    else:
        print ( "Error: Image path or image-processing endpoint missing" )
保存 main.py 文件。
打开 requirements.txt 文件。
为将要包括在容器中的库添加新的一行。
requests保存 requirements.txt 文件。
向容器添加测试图像
我们将使用单个测试图像来替代实际摄像头提供图像源的方式。 测试图像已包含在您早先在本教程中下载用于训练图像的 GitHub 存储库中。
导航到 Cognitive-CustomVision-Windows / Samples / Images / Test 中的测试图像。
复制 test_image.jpg
浏览到 IoT Edge 解决方案目录,并将测试图像粘贴到 模块 / 相机捕获 文件夹中。 该图像应该置于你在上一部分编辑的 main.py 文件所在的文件夹中。
在 Visual Studio Code 中,打开 cameracapture 模块的 Dockerfile.amd64 文件。
在建立工作目录
WORKDIR /app的行后面,添加以下代码行:ADD ./test_image.jpg .保存 Dockerfile。
准备部署清单
在本教程中,你已训练自定义视觉模型,以将树的图像分类,并将该模型打包为 IoT Edge 模块。 然后,你创建了第二个模块,用于查询图像分类服务器并将其结果报告给 IoT 中心。 现在,你已准备好创建部署清单,告知 IoT Edge 设备如何一起启动和运行这两个模块。
适用于 Visual Studio Code 的 IoT Edge 扩展在每个 IoT Edge 解决方案中提供了一个模板,用于创建部署清单。
在解决方案文件夹中打开 deployment.template.json 文件。
为部署清单中的模块设置注册表凭据。
"registryCredentials": {
    "<registryName>": {
        "username": "<AcrUsername>",
        "password": "<AcrPassword>",
        "address": "<registryName>.azurecr.cn"
    }
}
将 registryName< 替换为> Azure 容器注册表的名称,并将 AcrUsername< 和 AcrPassword 替换为>注册表的用户名和密码。<> 可以在 Azure 门户的 Azure 容器注册表的 “访问密钥 ”部分找到这些值。
查找模块部分,其中包含三个模块:你创建的两个模块、分类器和相机捕获,以及默认包含的第三个模块 tempSensor。
删除 tempSensor 模块及其所有参数。 此模块提供测试方案的示例数据,但此部署中不需要该示例数据。
如果为图像分类模块提供了 classifier 之外的名称,现在请检查该名称,确保其采用全小写形式。 摄像头模块使用一个请求库来调用分类器模块,该库将所有请求格式化为小写,而 IoT Edge 对大小写敏感。
对于每个系统模块 edgeAgent 和 edgeHub,请将 createOptions 值更改为字符串化版本。 例如:
"createOptions": "{\"HostConfig\":{\"PortBindings\":{\"5671/tcp\":[{\"HostPort\":\"5671\"}],\"8883/tcp\":[{\"HostPort\":\"8883\"}],\"443/tcp\":[{\"HostPort\":\"443\"}]}}}"对于每个系统模块 edgeAgent 和 edgeHub,请将映像版本更改为最新版本 1.5。 例如:
"image": "mcr.microsoft.com/azureiotedge-agent:1.5", "image": "mcr.microsoft.com/azureiotedge-hub:1.5",将分类器模块的 createOptions 参数更新为字符串化版本。 例如:
"createOptions": "{\"HostConfig\":{\"PortBindings\":{\"5671/tcp\":[{\"HostPort\":\"5671\"}],\"8883/tcp\":[{\"HostPort\":\"8883\"}],\"443/tcp\":[{\"HostPort\":\"443\"}]}}}"使用以下 JSON 更新 cameracapture 模块的 createOptions 参数。 此信息在模块容器中创建环境变量,这些环境变量会在 main.py 进程中被检索。 在部署清单中包含此信息后,无需重新生成模块映像即可更改映像或终结点。
"createOptions": "{\"Env\":[\"IMAGE_PATH=test_image.jpg\",\"IMAGE_PROCESSING_ENDPOINT=http://classifier/image\"]}"如果为自定义视觉模块提供了 classifier 之外的名称,请更新图像处理终结点值,使之匹配。
例如,分类器和相机捕获配置应类似于:
"modules": {
    "classifier": {
        "version": "1.0",
        "type": "docker",
        "status": "running",
        "restartPolicy": "always",
        "settings": {
            "image": "${MODULES.classifier}",
            "createOptions": "{\"HostConfig\":{\"PortBindings\":{\"5671/tcp\":[{\"HostPort\":\"5671\"}],\"8883/tcp\":[{\"HostPort\":\"8883\"}],\"443/tcp\":[{\"HostPort\":\"443\"}]}}}"
        }
    },
    "cameracapture": {
        "version": "1.0",
        "type": "docker",
        "status": "running",
        "restartPolicy": "always",
        "settings": {
            "image": "${MODULES.cameracapture}",
            "createOptions": "{\"Env\":[\"IMAGE_PATH=test_image.jpg\",\"IMAGE_PROCESSING_ENDPOINT=http://classifier/image\"]}"
        }
    }
}
保存 deployment.template.json 文件。
生成并推送 IoT Edge 解决方案
创建模块并配置部署清单模板后,生成容器映像并将其推送到容器注册表。
映像位于注册表中以后,即可将解决方案部署到 IoT Edge 设备。 可以通过 IoT 中心在设备上设置模块。 在本部分中,你将设置对 IoT 中心的访问权限,然后使用 Azure CLI 将解决方案部署到 IoT Edge 设备。
首先,生成解决方案并将其推送到容器注册表。
选择查看>终端 来打开 Visual Studio Code 集成终端。
使用 Azure 容器注册表中的用户名、密码和登录服务器在终端中输入以下命令登录到 Docker。 可以在 Azure 门户中从注册表的“访问密钥”部分检索这些值。
docker login -u <AcrUsername> -p <AcrPassword> <AcrLoginServer>可能会收到一条安全警告,推荐使用
--password-stdin。 这条最佳做法是针对生产方案建议的,这超出了本教程的范畴。 有关详细信息,请参阅 docker login 参考。使用模块的 Dockerfile 生成并标记模块 Docker 映像。
docker build --rm -f "<DockerFilePath>" -t <ImageNameAndTag> "<ContextPath>"例如,若要为本地注册表或 Azure 容器注册表生成映像,请使用以下命令:
# Build and tag the image for an Azure Container Registry. Replace <AcrRegistryName> with your own registry name.

docker build --rm -f "./modules/classifier/Dockerfile.amd64" -t <AcrRegistryName>.azurecr.cn/classifier:0.0.1-amd64 "./modules/classifier"
docker build --rm -f "./modules/cameracapture/Dockerfile.amd64" -t <AcrRegistryName>.azurecr.cn/cameracapture:0.0.1-amd64 "./modules/cameracapture"
推送模块 Docker 映像
向 Docker 提供容器注册表凭据,以便它可以将容器映像推送到注册表中的存储。
使用 Azure 容器注册表 (ACR) 凭据登录到 Docker。
docker login -u <AcrUsername> -p <AcrPassword> <AcrLoginServer>可能会收到一条安全警告,推荐使用
--password-stdin。 虽然它是为生产方案推荐的最佳做法,但它超出了本教程的范畴。 有关详细信息,请参阅 docker login azure --cloud-name AzureChinaCloud 参考。登录到 Azure 容器注册表。 可能需要安装 Azure CLI 才能使用
az命令。 此命令要求提供在“设置”>“访问密钥”中的容器注册表中的用户名和密码。az acr login -n <AcrRegistryName>提示
如果你在学习本教程过程中的任何时候退出登录,请重复 Docker 和 Azure 容器注册表登录步骤以继续。
将 模块映像推送到本地注册表或容器注册表。
docker push <ImageName>例如:
# Push the Docker image to an Azure Container Registry. Replace <AcrRegistryName> with your Azure Container Registry name.

az acr login --name <AcrRegistryName>
docker push <AcrRegistryName>.azurecr.cn/classifier:0.0.1-amd64
docker push <AcrRegistryName>.azurecr.cn/cameracapture:0.0.1-amd64
更新部署模板
使用容器注册表图像位置更新 deployment.template.json 文件。 将 image 值更改为推送到注册表的图像。 例如,将分类器和相机捕获模块的 image 值中的 AcrRegistryName 替换为注册表名称<>:
"classifier": {
    "version": "1.0",
    "type": "docker",
    "status": "running",
    "restartPolicy": "always",
    "settings": {
        "image": "<AcrRegistryName>.azurecr.cn/classifier:0.0.1-amd64",
        "createOptions": "{\"HostConfig\":{\"PortBindings\":{\"5671/tcp\":[{\"HostPort\":\"5671\"}],\"8883/tcp\":[{\"HostPort\":\"8883\"}],\"443/tcp\":[{\"HostPort\":\"443\"}]}}}"
    },
    "cameracapture": {
        "version": "1.0",
        "type": "docker",
        "status": "running",
        "restartPolicy": "always",
        "settings": {
            "image": "<AcrRegistryName>.azurecr.cn/cameracapture:0.0.1-amd64",
            "createOptions": "{\"Env\":[\"IMAGE_PATH=test_image.jpg\",\"IMAGE_PROCESSING_ENDPOINT=http://classifier/image\"]}"
        }
    }
}
最终部署清单如下所示:
{
  "$schema-template": "4.0.0",
  "modulesContent": {
    "$edgeAgent": {
      "properties.desired": {
        "schemaVersion": "1.1",
        "runtime": {
          "type": "docker",
          "settings": {
            "minDockerVersion": "v1.25",
            "loggingOptions": "",
            "registryCredentials": {
              "<AcrRegistryName>": {
                "username": "<AcrUserName>",
                "password": "<AcrPassword>",
                "address": "<AcrRegistryName>.azurecr.cn"
              }
            }
          }
        },
        "systemModules": {
          "edgeAgent": {
            "type": "docker",
            "settings": {
              "image": "mcr.microsoft.com/azureiotedge-agent:1.5",
              "createOptions": "{\"HostConfig\":{\"PortBindings\":{\"5671/tcp\":[{\"HostPort\":\"5671\"}],\"8883/tcp\":[{\"HostPort\":\"8883\"}],\"443/tcp\":[{\"HostPort\":\"443\"}]}}}"
            }
          },
          "edgeHub": {
            "type": "docker",
            "status": "running",
            "restartPolicy": "always",
            "settings": {
              "image": "mcr.microsoft.com/azureiotedge-hub:1.5",
              "createOptions": "{\"HostConfig\":{\"PortBindings\":{\"5671/tcp\":[{\"HostPort\":\"5671\"}],\"8883/tcp\":[{\"HostPort\":\"8883\"}],\"443/tcp\":[{\"HostPort\":\"443\"}]}}}"
            }
          }
        },
        "modules": {
          "classifier": {
            "version": "1.0",
            "type": "docker",
            "status": "running",
            "restartPolicy": "always",
            "settings": {
              "image": "<AcrRegistryName>.azurecr.cn/classifier:0.0.1-amd64",
              "createOptions": "{\"HostConfig\":{\"PortBindings\":{\"5671/tcp\":[{\"HostPort\":\"5671\"}],\"8883/tcp\":[{\"HostPort\":\"8883\"}],\"443/tcp\":[{\"HostPort\":\"443\"}]}}}"
            }
          },
          "cameracapture": {
            "version": "1.0",
            "type": "docker",
            "status": "running",
            "restartPolicy": "always",
            "settings": {
              "image": "<AcrRegistryName>.azurecr.cn/cameracapture:0.0.1-amd64",
              "createOptions": "{\"Env\":[\"IMAGE_PATH=test_image.jpg\",\"IMAGE_PROCESSING_ENDPOINT=http://classifier/image\"]}"
            }
          }
        }
      }
    },
    "$edgeHub": {
      "properties.desired": {
        "schemaVersion": "1.2",
        "routes": {
          "sensorToclassifier": "FROM /messages/modules/tempSensor/outputs/temperatureOutput INTO BrokeredEndpoint(\"/modules/classifier/inputs/input1\")",
          "classifierToIoTHub": "FROM /messages/modules/classifier/outputs/* INTO $upstream",
          "cameracaptureToIoTHub": "FROM /messages/modules/cameracapture/outputs/* INTO $upstream"
        },
        "storeAndForwardConfiguration": {
          "timeToLiveSecs": 7200
        }
      }
    }
  }
}
将模块部署到设备
验证生成的容器映像是否存储在容器注册表中。 然后,使用为方案准备的部署清单 deployment.template.json 将它们部署到设备。
使用 IoT Edge Azure CLI set-modules 命令将模块部署到 Azure IoT 中心。 例如,若要将 deployment.template.json 文件中定义的模块部署到 IoT Edge 设备 <DeviceName> 的 IoT 中心 <IotHubName>,请使用以下命令。 将 hub-name、device-id 和 login IoT 中心连接字符串的值替换为自己的值。
az iot edge set-modules --hub-name <IotHubName> --device-id <DeviceName> --content ./deployment.template.json --login "HostName=my-iot-hub.azure-devices.cn;SharedAccessKeyName=iothubowner;SharedAccessKey=<SharedAccessKey>"
提示
可以在 Azure 门户中找到包含共享访问密钥的 IoT 中心连接字符串。 转到 IoT 中心 >“安全设置”“共享访问策略”>“iothubowner”。>
确保 IoT Edge 设备正在运行。
在设备下,展开“模块”可查看已部署的正在运行的模块的列表。 选择“刷新”按钮。 可以看到新的分类器和相机捕获模块与$edgeAgent和$edgeHub一起运行。
也可查看设备本身上的所有模块是否都已启动并运行。 在 IoT Edge 设备上运行以下命令,以便查看模块的状态。
iotedge list
启动模块可能需要数分钟时间。 IoT Edge 运行时需要接收其新的部署清单,从容器运行时下拉模块映像,然后启动每个新模块。
查看分类结果
在设备上,查看相机捕获模块的日志,查看发送的消息并确认 IoT 中心收到消息。
iotedge logs cameracapture
例如,你应该会看到如下输出:
admin@vm:~$ iotedge logs cameracapture
Simulated camera module for Azure IoT Edge. Press Ctrl-C to exit.
The sample is now sending images for processing and will indefinitely.
Response from classification service: (200) {"created": "2023-07-13T17:38:42.940878", "id": "", "iteration": "", "predictions": [{"boundingBox": null, "probability": 1.0, "tagId": "", "tagName": "hemlock"}], "project": ""}

Total images sent: 1
Response from classification service: (200) {"created": "2023-07-13T17:38:53.444884", "id": "", "iteration": "", "predictions": [{"boundingBox": null, "probability": 1.0, "tagId": "", "tagName": "hemlock"}], "project": ""}
注意
最初,由于部署和启动模块之间的延迟,你可能会在相机捕获模块的输出中看到连接错误。
相机捕获模块会自动重新尝试连接,直到连接成功。 成功连接后,会看到预期的图像分类消息。
自定义视觉模块中的结果是从 cameracapture 模块作为消息发送的,其中包括图像为铁杉树或樱花树的概率。 由于图像是铁杉,因此你会看到概率为 1.0。
清理资源
如果打算继续阅读下一篇建议的文章,请保留创建的资源和配置并重复使用它们。 还可以继续使用相同的 IoT Edge 设备作为测试设备。
否则,请删除本文中使用的本地配置和 Azure 资源以避免费用。
删除 Azure 资源
无法撤消删除Azure资源和资源组。 请确保不要意外删除错误的资源组或资源。 如果在具有要保留的资源的现有资源组中创建IoT 中心,请仅删除IoT 中心资源本身,而不是资源组。
若要删除资源,请执行以下操作:
- 登录到 Azure 门户,然后选择“资源组”。
- 选择包含 IoT Edge 测试资源的资源组的名称。
- 查看资源组包含的资源列表。 若要删除这一切,可以选择“删除资源组”。 如果只想删除其中一些资源,请选择每个资源以单独删除它们。