Nota:
El acceso a esta página requiere autorización. Puede intentar iniciar sesión o cambiar directorios.
El acceso a esta página requiere autorización. Puede intentar cambiar los directorios.
本文介绍如何创建:
simulated-device:具有直接方法的模拟设备应用,用于重新启动设备并报告上次重新启动时间。 从云调用直接方法。
trigger-reboot:一个 Java 应用,它通过 IoT 中心调用模拟设备应用中的直接方法。 它显示响应和更新的报告属性。
注释
有关可用于生成要在设备和解决方案后端上运行的应用程序的 SDK 的信息,请参阅 Azure IoT SDK。
先决条件
已注册的设备。 在 Azure 门户中注册一个。
Java SE 开发工具包 8。 请确保在长期支持下选择 Java 8,以获取 JDK 8 的下载。
确保已在防火墙中打开端口 8883。 本文中的设备示例使用通过端口 8883 进行通信的 MQTT 协议。 某些企业和教育网络环境中可能会阻止此端口。 有关解决此问题的详细信息和方法,请参阅“连接到 IoT 中心”(MQTT)。
使用直接方法创建设备应用
在本部分中,你将创建一个模拟设备的 Java 控制台应用。 应用程序监听来自 IoT 中心的重启直接方法调用,并立即对该调用作出响应。 然后,应用会休眠一段时间来模拟重新启动过程,然后它使用报告的属性通知 触发器重新启动 后端应用重新启动已完成。
在 dm-get-started 文件夹中,在命令提示符处使用以下命令创建名为 simulated-device 的 Maven 项目:
mvn archetype:generate -DgroupId=com.mycompany.app -DartifactId=simulated-device -DarchetypeArtifactId=maven-archetype-quickstart -DinteractiveMode=false在命令提示符下,导航到 simulated-device 文件夹。
使用文本编辑器打开 simulated-device 文件夹中的pom.xml 文件,并将以下依赖项添加到依赖项节点。 通过此依赖项,可以使用应用中的 iot-service-client 包与 IoT 中心通信:
<dependency>
  <groupId>com.microsoft.azure.sdk.iot</groupId>
  <artifactId>iot-device-client</artifactId>
  <version>1.17.5</version>
</dependency>
注释
可以使用 Maven 搜索检查最新版本的 iot-device-client。
将以下依赖项添加到 依赖项 节点。 此依赖项将 Apache SLF4J 日志记录外观配置为 NOP,设备客户端 SDK 使用它来进行日志记录。 此配置是可选的,但如果省略该配置,则运行应用时可能会在控制台中看到警告。 有关设备客户端 SDK 中日志记录的详细信息,请参阅适用于 Java 自述文件的 Azure IoT 设备 SDK 示例中的日志记录。
<dependency> <groupId>org.slf4j</groupId> <artifactId>slf4j-nop</artifactId> <version>1.7.28</version> </dependency>在依赖项节点之后添加以下构建节点。 此配置指示 Maven 使用 Java 1.8 生成应用:
<build>
  <plugins>
    <plugin>
      <groupId>org.apache.maven.plugins</groupId>
      <artifactId>maven-compiler-plugin</artifactId>
      <version>3.3</version>
      <configuration>
        <source>1.8</source>
        <target>1.8</target>
      </configuration>
    </plugin>
  </plugins>
</build>
保存并关闭 pom.xml 文件。
使用文本编辑器打开 simulated-device\src\main\java\com\mycompany\app\App.java 源文件。
将以下 import 语句添加到该文件:
import com.microsoft.azure.sdk.iot.device.*;
import com.microsoft.azure.sdk.iot.device.DeviceTwin.*;

import java.io.IOException;
import java.net.URISyntaxException;
import java.time.LocalDateTime;
import java.util.Scanner;
import java.util.Set;
import java.util.HashSet;
将以下类级变量添加到 App 类。 替换为
{yourdeviceconnectionstring}在 IoT 中心注册设备时看到的设备连接字符串:private static final int METHOD_SUCCESS = 200; private static final int METHOD_NOT_DEFINED = 404; private static IotHubClientProtocol protocol = IotHubClientProtocol.MQTT; private static String connString = "{yourdeviceconnectionstring}"; private static DeviceClient client;若要为直接方法状态事件实现回调处理程序,请将以下嵌套类添加到 App 类:
protected static class DirectMethodStatusCallback implements IotHubEventCallback
{
  public void execute(IotHubStatusCode status, Object context)
  {
    System.out.println("IoT Hub responded to device method operation with status " + status.name());
  }
}
若要为设备孪生状态事件实现回调处理程序,请将以下嵌套类添加到 App 类:
protected static class DeviceTwinStatusCallback implements IotHubEventCallback
{
    public void execute(IotHubStatusCode status, Object context)
    {
        System.out.println("IoT Hub responded to device twin operation with status " + status.name());
    }
}
若要为属性事件实现回调处理程序,请将以下嵌套类添加到 App 类:
protected static class PropertyCallback implements PropertyCallBack<String, String>
{
  public void PropertyCall(String propertyKey, String propertyValue, Object context)
  {
    System.out.println("PropertyKey:     " + propertyKey);
    System.out.println("PropertyKvalue:  " + propertyKey);
  }
}
若要实现用于模拟设备重启的线程,请将以下嵌套类添加到 App 类。 线程休眠 5 秒,然后设置 lastReboot 报告属性:
protected static class RebootDeviceThread implements Runnable {
  public void run() {
    try {
      System.out.println("Rebooting...");
      Thread.sleep(5000);
      Property property = new Property("lastReboot", LocalDateTime.now());
      Set<Property> properties = new HashSet<Property>();
      properties.add(property);
      client.sendReportedProperties(properties);
      System.out.println("Rebooted");
    }
    catch (Exception ex) {
      System.out.println("Exception in reboot thread: " + ex.getMessage());
    }
  }
}
若要在设备上实现直接方法,请将以下嵌套类添加到 App 类。 当模拟应用收到对 重新启动 直接方法的调用时,它会向调用方返回确认,然后启动线程来处理重新启动:
protected static class DirectMethodCallback implements com.microsoft.azure.sdk.iot.device.DeviceTwin.DeviceMethodCallback
{
  @Override
  public DeviceMethodData call(String methodName, Object methodData, Object context)
  {
    DeviceMethodData deviceMethodData;
    switch (methodName)
    {
      case "reboot" :
      {
        int status = METHOD_SUCCESS;
        System.out.println("Received reboot request");
        deviceMethodData = new DeviceMethodData(status, "Started reboot");
        RebootDeviceThread rebootThread = new RebootDeviceThread();
        Thread t = new Thread(rebootThread);
        t.start();
        break;
      }
      default:
      {
        int status = METHOD_NOT_DEFINED;
        deviceMethodData = new DeviceMethodData(status, "Not defined direct method " + methodName);
      }
    }
    return deviceMethodData;
  }
}
修改 main 方法的签名以引发以下异常:
public static void main(String[] args) throws IOException, URISyntaxException若要实例化 DeviceClient,请将 main 方法中的代码替换为以下代码:
System.out.println("Starting device client sample...");
client = new DeviceClient(connString, protocol);
若要开始侦听直接方法调用,请将以下代码添加到 main 方法:
try
{
  client.open();
  client.subscribeToDeviceMethod(new DirectMethodCallback(), null, new DirectMethodStatusCallback(), null);
  client.startDeviceTwin(new DeviceTwinStatusCallback(), null, new PropertyCallback(), null);
  System.out.println("Subscribed to direct methods and polling for reported properties. Waiting...");
}
catch (Exception e)
{
  System.out.println("On exception, shutting down \n" + " Cause: " + e.getCause() + " \n" +  e.getMessage());
  client.close();
  System.out.println("Shutting down...");
}
若要关闭设备模拟器,请将以下代码添加到 main 方法:
System.out.println("Press any key to exit...");
Scanner scanner = new Scanner(System.in);
scanner.nextLine();
scanner.close();
client.close();
System.out.println("Shutting down...");
保存并关闭 simulated-device\src\main\java\com\mycompany\app\App.java 文件。
生成 模拟设备 应用并更正任何错误。 在命令提示符下,导航到 simulated-device 文件夹并运行以下命令:
mvn clean package -DskipTests
获取 IoT 中心连接字符串
在本文中,你将创建一个在设备上调用直接方法的后端服务。 若要通过 IoT 中心在设备上调用直接方法,服务需要 服务连接 权限。 默认情况下,每个 IoT 中心都使用名为“服务”的共享访问策略创建,该策略会授予此权限。
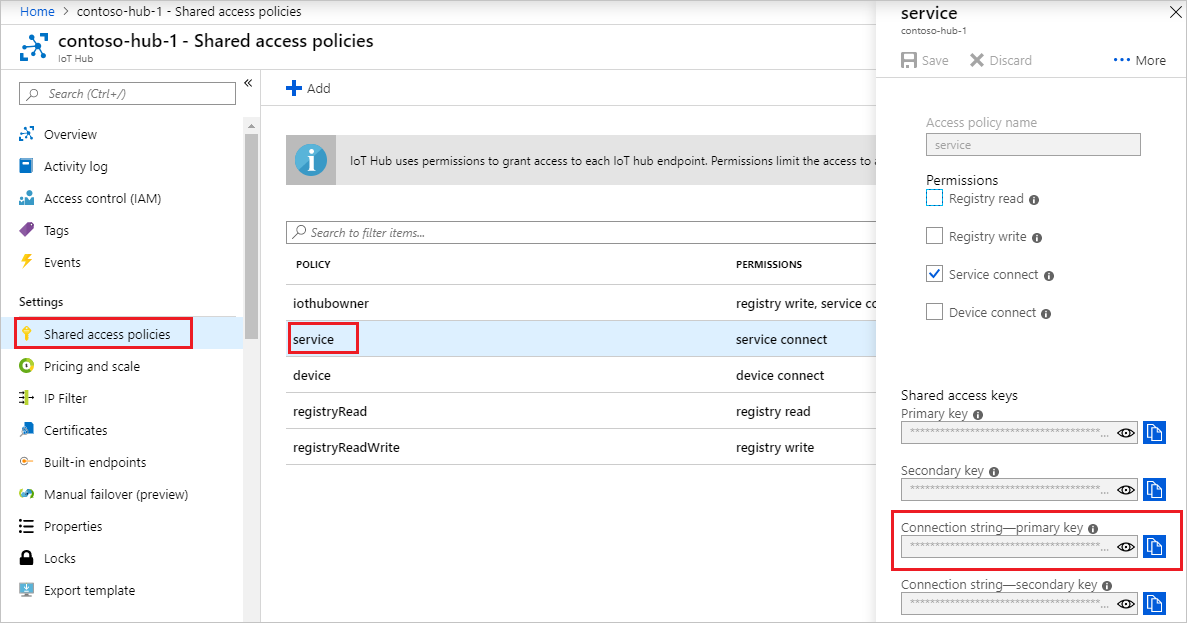
若要获取 service策略的 IoT 中心连接字符串,请执行以下步骤:
在 Azure 门户中,选择 资源组。 选择中心所在的资源组,然后从资源列表中选择中心。
在 IoT 中心的左侧窗格中,选择 “共享访问策略”。
在策略列表中,选择“service”策略。
复制“主连接字符串”并保存该值。
有关 IoT 中心共享访问策略和权限的详细信息,请参阅 访问控制和权限。
创建服务应用以触发重新启动
在本部分中,将创建一个 Java 控制台应用,该应用:
在模拟设备应用中调用重新启动直接方法。
显示响应。
轮询设备发送的报告属性,以判断重启是否完成。
此控制台应用连接到 IoT 中心以调用直接方法并读取报告的属性。
创建名为 dm-get-started 的空文件夹。
在 dm-get-started 文件夹中,使用命令提示符处的以下命令创建名为 trigger-reboot 的 Maven 项目:
mvn archetype:generate -DgroupId=com.mycompany.app -DartifactId=trigger-reboot -DarchetypeArtifactId=maven-archetype-quickstart -DinteractiveMode=false在命令提示符下,导航到 触发器重新启动 文件夹。
使用文本编辑器打开触发器重启文件夹中的pom.xml 文件,并将以下依赖项添加到依赖项节点。 通过此依赖项,可以使用应用中的 iot-service-client 包与 IoT 中心通信:
<dependency>
  <groupId>com.microsoft.azure.sdk.iot</groupId>
  <artifactId>iot-service-client</artifactId>
  <version>1.17.1</version>
  <type>jar</type>
</dependency>
注释
可以使用 Maven 搜索检查最新版本的 iot-service-client。
在依赖项节点之后添加以下构建节点。 此配置指示 Maven 使用 Java 1.8 生成应用:
<build>
  <plugins>
    <plugin>
      <groupId>org.apache.maven.plugins</groupId>
      <artifactId>maven-compiler-plugin</artifactId>
      <version>3.3</version>
      <configuration>
        <source>1.8</source>
        <target>1.8</target>
      </configuration>
    </plugin>
  </plugins>
</build>
保存并关闭 pom.xml 文件。
使用文本编辑器打开 trigger-reboot\src\main\java\com\mycompany\app\App.java 源文件。
将以下 import 语句添加到该文件:
import com.microsoft.azure.sdk.iot.service.devicetwin.DeviceMethod;
import com.microsoft.azure.sdk.iot.service.devicetwin.MethodResult;
import com.microsoft.azure.sdk.iot.service.exceptions.IotHubException;
import com.microsoft.azure.sdk.iot.service.devicetwin.DeviceTwin;
import com.microsoft.azure.sdk.iot.service.devicetwin.DeviceTwinDevice;

import java.io.IOException;
import java.util.concurrent.TimeUnit;
import java.util.concurrent.Executors;
import java.util.concurrent.ExecutorService;
将以下类级变量添加到 App 类。 将
{youriothubconnectionstring}替换为先前在 获取 IoT 中心连接字符串 中复制的 IoT 中心连接字符串:public static final String iotHubConnectionString = "{youriothubconnectionstring}"; public static final String deviceId = "myDeviceId"; private static final String methodName = "reboot"; private static final Long responseTimeout = TimeUnit.SECONDS.toSeconds(30); private static final Long connectTimeout = TimeUnit.SECONDS.toSeconds(5);若要实现每 10 秒从设备孪生读取报告属性的线程,请将以下嵌套类添加到 App 类:
private static class ShowReportedProperties implements Runnable {
  public void run() {
    try {
      DeviceTwin deviceTwins = DeviceTwin.createFromConnectionString(iotHubConnectionString);
      DeviceTwinDevice twinDevice = new DeviceTwinDevice(deviceId);
      while (true) {
        System.out.println("Get reported properties from device twin");
        deviceTwins.getTwin(twinDevice);
        System.out.println(twinDevice.reportedPropertiesToString());
        Thread.sleep(10000);
      }
    } catch (Exception ex) {
      System.out.println("Exception reading reported properties: " + ex.getMessage());
    }
  }
}
修改 main 方法的签名以引发以下异常:
public static void main(String[] args) throws IOException若要在模拟设备上调用重新启动直接方法,请将 main 方法中的代码替换为以下代码:
System.out.println("Starting sample...");
DeviceMethod methodClient = DeviceMethod.createFromConnectionString(iotHubConnectionString);

try
{
  System.out.println("Invoke reboot direct method");
  MethodResult result = methodClient.invoke(deviceId, methodName, responseTimeout, connectTimeout, null);

  if(result == null)
  {
    throw new IOException("Invoke direct method reboot returns null");
  }
  System.out.println("Invoked reboot on device");
  System.out.println("Status for device:   " + result.getStatus());
  System.out.println("Message from device: " + result.getPayload());
}
catch (IotHubException e)
{
    System.out.println(e.getMessage());
}
若要启动线程来轮询模拟设备报告的属性,请将以下代码添加到 main 方法中:
ShowReportedProperties showReportedProperties = new ShowReportedProperties();
ExecutorService executor = Executors.newFixedThreadPool(1);
executor.execute(showReportedProperties);
若要使你能够停止应用,请将以下代码添加到 main 方法:
System.out.println("Press ENTER to exit.");
System.in.read();
executor.shutdownNow();
System.out.println("Shutting down sample...");
保存并关闭 trigger-reboot\src\main\java\com\mycompany\app\App.java 文件。
生成 触发器重启 后端应用并更正任何错误。 在命令提示符下,导航到 触发器重启 文件夹并运行以下命令:
mvn clean package -DskipTests
运行应用
现在,你已准备好运行应用。
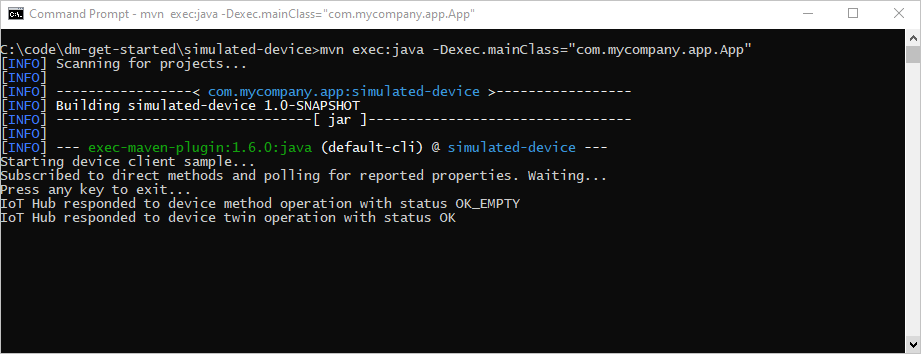
在 simulated-device 文件夹中的命令提示符处运行以下命令,开始侦听来自 IoT 中心的重新启动方法调用:
mvn exec:java -Dexec.mainClass="com.mycompany.app.App"
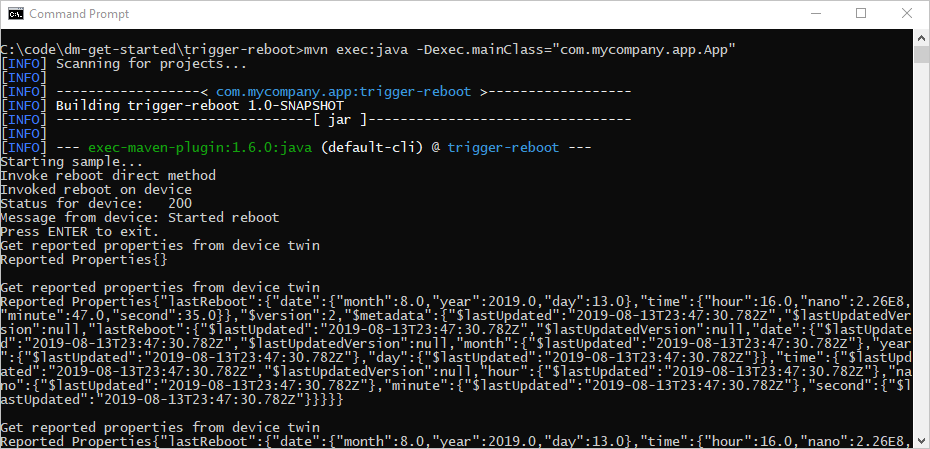
在 触发器重启 文件夹中的命令提示符处,运行以下命令,从 IoT 中心调用模拟设备上的重新启动方法:
mvn exec:java -Dexec.mainClass="com.mycompany.app.App"
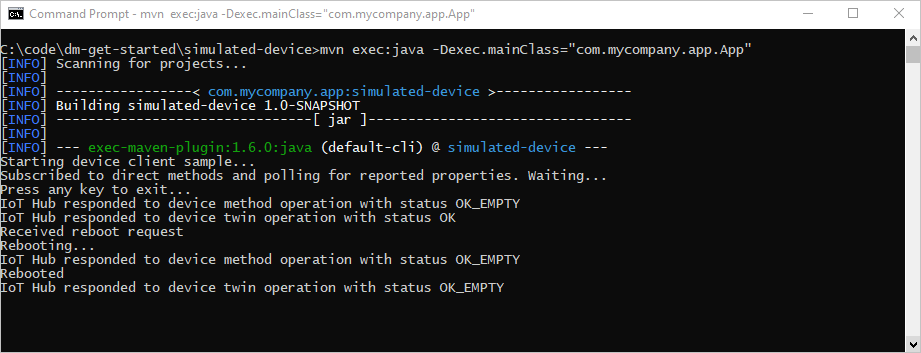
模拟设备响应重启直接方法调用。

自定义和扩展设备管理操作
IoT 解决方案可以扩展定义的设备管理模式集,或使用设备孪生和云到设备方法基元启用自定义模式。 设备管理作的其他示例包括出厂重置、固件更新、软件更新、电源管理、网络和连接管理以及数据加密。
设备维护窗口
通常,将设备配置为在某个时间执行操作,以最大程度地减少中断和停机时间。 设备维护时段是一种常用的模式,用于定义设备应更新其配置的时间。 后端解决方案可以使用设备孪生的所需属性来定义和激活设备上启用维护时段的策略。 当设备收到维护时段策略时,它可以使用设备孪生的报告属性来报告策略的状态。 然后,后端应用可以使用设备孪生查询来证明设备和每个策略的符合性。
后续步骤
本文使用直接方法在设备上触发远程重启。 你利用报告的属性报告设备的上次重启时间,并查询设备孪生以便从云端发现设备的上次重启时间。
若要了解如何在多个设备上扩展 IoT 解决方案和计划方法调用,请参阅 计划和广播作业。
