使用 Visual Studio Code 进行交互式调试
了解如何使用 Visual Studio Code (VS Code) 和 debugpy 以交互方式调试 Azure 机器学习试验、管道和部署。
在本地运行和调试试验
将机器学习试验提交到云之前,使用 Azure 机器学习扩展来验证、运行和调试它们。
先决条件
Azure 机器学习 VS Code 扩展(预览版)。 有关详细信息,请参阅设置 Azure 机器学习 VS Code 扩展。
重要
Azure 机器学习 VS Code 扩展默认使用 CLI (v2)。 本指南中的说明使用 1.0 CLI。 若要切换到 1.0 CLI,请将 Visual Studio Code 中的
azureML.CLI Compatibility Mode设置指定为1.0。 有关在 Visual Studio Code 中修改设置的详细信息,请参阅用户和工作区设置文档。-
适用于 Mac 和 Windows 的 Docker Desktop
适用于 Linux 的 Docker 引擎。
注意
在 Windows 上,确保将 Docker 配置为使用 Linux 容器。
提示
对于 Windows,虽然不是必需的,但强烈建议将 Docker 与适用于 Linux 的 Windows 子系统 (WSL) 2 配合使用。
在本地调试试验
重要
在本地运行试验之前,请确保:
- Docker 正在运行。
- Visual Studio Code 中的
azureML.CLI Compatibility Mode设置设为1.0,如先决条件中所指定
在 VS Code 中打开 Azure 机器学习扩展视图。
展开包含你的工作区的订阅节点。 如果还没有工作区,可使用该扩展创建一个 Azure 机器学习工作区。
展开你的工作区节点。
右键单击“试验”节点,然后选择“创建试验”。 出现提示时,为你的试验提供一个名称。
展开“试验”节点,右键单击要运行的试验,然后选择“运行试验”。
从选项列表中,选择“本地”。
仅在 Windows 上首次使用。 提示你是否允许文件共享时,选择“是”。 启用文件共享时,它允许 Docker 将包含脚本的目录装载到容器。 此外,它还允许 Docker 将运行中的日志和输出存储在系统上的临时目录中。
选择“是”调试试验。 否则请选择“否” 。 选择“否”将在本地运行试验,而不会附加到调试器。
选择“新建运行配置”以创建运行配置。 运行配置定义要运行的脚本、依赖项和使用的数据集。 或者,如果你已有一个运行配置,请从下拉列表中选择它。
- 选择环境。 可从任何 Azure 机器学习策展中选择,也可自行创建。
- 提供要运行的脚本名。 该路径相对于在 VS Code 中打开的目录。
- 选择是否要使用 Azure 机器学习数据集。 可使用扩展创建 Azure 机器学习数据集。
- 为了将调试器附加到运行试验的容器,需要使用 Debugpy。 若要将 debugpy 添加为依赖项,请选择“添加 Debugpy”。 否则,请选择“跳过”。 如果不将 debugpy 添加为依赖项,则可在不附加到调试器的情况下运行试验。
- 此时会在编辑器中打开一个包含运行配置设置的配置文件。 如果对设置感到满意,请选择“提交试验”。 或者,可从菜单栏打开命令面板(“查看”>“命令面板”),然后在文本框中输入
Azure ML: Submit experiment命令。
提交试验后,会创建一个包含脚本和运行配置中指定的配置的 Docker 映像。
当 Docker 映像生成过程开始时,
60_control_log.txt文件的内容将流式传输到 VS Code 中的输出控制台。注意
第一次创建 Docker 映像时,可能需要几分钟时间。
映像生成后,会出现一个启动调试器的提示。 在脚本中设置断点,并在准备开始调试时选择“启动调试器”。 这样做可将 VS Code 调试器附加到运行试验的容器。 或者,在 Azure 机器学习扩展中,将鼠标悬停在当前运行的节点上,然后选择“播放”图标来启动调试器。
重要
单个试验不能有多个调试会话。 但可使用多个 VS Code 实例来调试多个试验。
此时,你应该能使用 VS Code 来逐步执行和调试代码。
如果要取消运行,请右键单击运行节点,然后选择“取消运行”。
与远程试验运行类似,你可展开运行节点来检查日志和输出。
提示
使用环境中定义的相同依赖项的 Docker 映像将在运行之间重复使用。 但是,如果使用新的或不同的环境运行试验,则会创建一个新映像。 由于这些映像会保存到本地存储,因此建议删除旧的或未使用的 Docker 映像。 若要从系统中删除映像,请使用 Docker CLI 或 VS Code Docker 扩展。
对机器学习管道进行调试和故障排除
在某些情况下,可能需要以交互方式调试 ML 管道中使用的 Python 代码。 通过使用 VS Code 和 debugpy,可以在代码在训练环境中运行时附加到该代码。
先决条件
一个配置为使用 Azure 虚拟网络的 Azure 机器学习工作区。
一个使用 Python 脚本作为管道步骤的一部分的 Azure 机器学习管道。 例如 PythonScriptStep。
一个位于虚拟网络中并供管道用来训练的 Azure 机器学习计算群集。
一个位于虚拟网络中的开发环境。 该开发环境可以是下列其中一项:
- 虚拟网络中的 Azure 虚拟机
- 虚拟网络中笔记本 VM 的计算实例
- 通过 VPN 或 ExpressRoute 与虚拟网络建立了专用网络连接的客户端计算机。
有关将 Azure 虚拟网络与 Azure 机器学习配合使用的详细信息,请参阅虚拟网络隔离和隐私概述。
提示
虽然可以使用不在虚拟网络后面的 Azure 机器学习资源,但仍建议使用虚拟网络。
工作原理
ML 管道步骤运行 Python 脚本。 可修改这些脚本来执行以下操作:
记录运行这些脚本的主机的 IP 地址。 使用 IP 地址将调试器连接到脚本。
启动 debugpy 调试组件,并等待调试程序建立连接。
在开发环境中,监视训练过程创建的日志,以查找运行脚本的 IP 地址。
使用
launch.json文件告知 VS Code 要将调试器连接到哪个 IP 地址。附加调试器并以交互方式逐步运行脚本。
配置 Python 脚本
若要启用调试,请对 ML 管道中的步骤使用的 Python 脚本进行以下更改:
添加以下 import 语句:
import argparse
import os
import debugpy
import socket
from azureml.core import Run
添加以下参数。 这些参数使你能够按需启用调试器,并设置附加调试器的超时:
parser.add_argument('--remote_debug', action='store_true')
parser.add_argument('--remote_debug_connection_timeout', type=int,
                    default=300,
                    help=f'Defines how much time the AzureML compute target '
                    f'will await a connection from a debugger client (VSCODE).')
parser.add_argument('--remote_debug_client_ip', type=str,
                    help=f'Defines IP Address of VS Code client')
parser.add_argument('--remote_debug_port', type=int,
                    default=5678,
                    help=f'Defines Port of VS Code client')
添加以下语句。 这些语句加载当前运行上下文,使你能够记录运行代码的节点的 IP 地址:
global run
run = Run.get_context()
添加一个
if语句,用于启动 debugpy 并等待调试程序附加完成。 如果在超时之前未附加任何调试器,脚本将继续正常运行。 确保用自己的值替换listen函数的HOST和PORT值。if args.remote_debug: print(f'Timeout for debug connection: {args.remote_debug_connection_timeout}') # Log the IP and port try: ip = args.remote_debug_client_ip except: print("Need to supply IP address for VS Code client") print(f'ip_address: {ip}') debugpy.listen(address=(ip, args.remote_debug_port)) # Wait for the timeout for debugger to attach debugpy.wait_for_client() print(f'Debugger attached = {debugpy.is_client_connected()}')
以下 Python 示例演示了用于启用调试的简单 train.py 文件:
# Copyright (c) Microsoft. All rights reserved.
# Licensed under the MIT license.

import argparse
import os
import debugpy
import socket
from azureml.core import Run

print("In train.py")
print("As a data scientist, this is where I use my training code.")

parser = argparse.ArgumentParser("train")

parser.add_argument("--input_data", type=str, help="input data")
parser.add_argument("--output_train", type=str, help="output_train directory")

# Argument check for remote debugging
parser.add_argument('--remote_debug', action='store_true')
parser.add_argument('--remote_debug_connection_timeout', type=int,
                    default=300,
                    help=f'Defines how much time the AzureML compute target '
                    f'will await a connection from a debugger client (VSCODE).')
parser.add_argument('--remote_debug_client_ip', type=str,
                    help=f'Defines IP Address of VS Code client')
parser.add_argument('--remote_debug_port', type=int,
                    default=5678,
                    help=f'Defines Port of VS Code client')

# Get run object, so we can find and log the IP of the host instance
global run
run = Run.get_context()

args = parser.parse_args()

# Start debugger if remote_debug is enabled
if args.remote_debug:
    print(f'Timeout for debug connection: {args.remote_debug_connection_timeout}')
    # Log the IP and port
    ip = socket.gethostbyname(socket.gethostname())
    # try:
    #     ip = args.remote_debug_client_ip
    # except:
    #     print("Need to supply IP address for VS Code client")
    print(f'ip_address: {ip}')
    debugpy.listen(address=(ip, args.remote_debug_port))
    # Wait for the timeout for debugger to attach
    debugpy.wait_for_client()
    print(f'Debugger attached = {debugpy.is_client_connected()}')

print("Argument 1: %s" % args.input_data)
print("Argument 2: %s" % args.output_train)

if not (args.output_train is None):
    os.makedirs(args.output_train, exist_ok=True)
    print("%s created" % args.output_train)
配置 ML 管道
若要提供所需的 Python 包来启动 debugpy 并获取运行上下文,请创建一个环境并设置 pip_packages=['debugpy', 'azureml-sdk==<SDK-VERSION>']。 更改 SDK 版本,使之与当前使用的版本匹配。 以下代码片段演示如何创建环境:
# Use a RunConfiguration to specify some additional requirements for this step.
from azureml.core.runconfig import RunConfiguration
from azureml.core.conda_dependencies import CondaDependencies
from azureml.core.runconfig import DEFAULT_CPU_IMAGE

# create a new runconfig object
run_config = RunConfiguration()

# enable Docker
run_config.environment.docker.enabled = True

# set Docker base image to the default CPU-based image
run_config.environment.docker.base_image = DEFAULT_CPU_IMAGE

# use conda_dependencies.yml to create a conda environment in the Docker image for execution
run_config.environment.python.user_managed_dependencies = False

# specify CondaDependencies obj
run_config.environment.python.conda_dependencies = CondaDependencies.create(conda_packages=['scikit-learn'],
                                                                           pip_packages=['debugpy', 'azureml-sdk==<SDK-VERSION>'])
在配置 Python 脚本部分,已将新参数添加到 ML 管道步骤使用的脚本。 以下代码片段演示如何使用这些参数来为组件启用调试并设置超时。 此外,演示如何使用前面通过设置 runconfig=run_config 创建的环境:
# Use RunConfig from a pipeline step
step1 = PythonScriptStep(name="train_step",
                         script_name="train.py",
                         arguments=['--remote_debug', '--remote_debug_connection_timeout', 300,'--remote_debug_client_ip','<VS-CODE-CLIENT-IP>','--remote_debug_port',5678],
                         compute_target=aml_compute,
                         source_directory=source_directory,
                         runconfig=run_config,
                         allow_reuse=False)
当管道运行时,每个步骤将创建一个子运行。 如果启用了调试,则修改后的脚本将在子运行的 70_driver_log.txt 中记录类似于以下文本的信息:
Timeout for debug connection: 300
ip_address: 10.3.0.5
保存 ip_address 值。 在下一部分中使用。
提示
还可以在此管道步骤的子运行的运行日志中找到 IP 地址。 有关如何查看此信息的详细信息,请参阅监视 Azure ML 试验运行和指标。
配置开发环境
若要在 VS Code 部署环境中安装 debugpy,请使用以下命令:
python -m pip install --upgrade debugpy有关结合使用 VS Code 和 debugpy 的详细信息,请参阅远程调试。
若要配置 VS Code 以便与运行调试器的 Azure 机器学习计算进行通信,请创建新的调试配置:
在 VS Code 中,选择“调试”菜单,然后选择“打开配置” 。 打开一个名为 launch.json 的文件。
在 launch.json 文件中,找到包含
"configurations": [的行,然后在其后插入以下文本: 将"host": "<IP-ADDRESS>"项更改为在上一部分所述的、在日志中返回的 IP 地址。 将"localRoot": "${workspaceFolder}/code/step"项更改为包含所调试脚本的副本的本地目录:{ "name": "Azure Machine Learning Compute: remote debug", "type": "python", "request": "attach", "port": 5678, "host": "<IP-ADDRESS>", "redirectOutput": true, "pathMappings": [ { "localRoot": "${workspaceFolder}/code/step1", "remoteRoot": "." } ] }重要
如果“配置”部分已存在其他项,请在插入的代码后添加一个逗号 (,)。
提示
最佳做法(尤其是对于管道)是将脚本的资源保留在不同的目录中,以便代码仅与每个步骤相关。 在此示例中,
localRoot示例值引用/code/step1。如果你正在调试多个脚本,请在不同的目录中为每个脚本创建一个单独的配置节。
保存 launch.json 文件。
连接调试器
打开 VS Code,然后打开脚本的本地副本。
设置断点,在附加调试器后,脚本将在这些断点处停止。
当子进程正在运行脚本,并且
Timeout for debug connection已显示在日志中时,请按 F5 键或选择“调试”。 出现提示时,选择“Azure 机器学习计算: 远程调试”配置。 还可以从侧栏中选择“调试”图标,从“调试”下拉菜单中选择“Azure 机器学习: 远程调试”项,然后使用绿色箭头附加调试器。此时,VS Code 将连接到计算节点上的 debugpy,并在前面设置的断点处停止。 现在可以在代码运行时逐句调试代码、查看变量等。
注意
如果日志中显示的某个项指出
Debugger attached = False,则表示超时期限已过,而脚本在没有调试器的情况下继续运行。 再次提交管道,并在显示Timeout for debug connection消息之后、超时期限已过之前连接调试器。
对部署进行调试和故障排除
某些情况下,可能需要以交互方式调试包含在模型部署中的 Python 代码。 例如,输入脚本失败,并且无法通过额外记录确定原因的情况。 通过使用 VS Code 和 debugpy,可以附加到在 Docker 容器中运行的代码。
提示
通过在本地调试托管联机终结点和部署,可以节省时间并及早捕获 bug。 有关详细信息,请参阅在 Visual Studio Code(预览版)中以本地方式调试托管联机终结点。
重要
使用 Model.deploy() 和 LocalWebservice.deploy_configuration 在本地部署模型时,此调试方法不起作用。 相反,你必须使用 Model.package() 方法创建一个映像。
若要在本地部署 Web 服务,需要在本地系统上安装能够正常工作的 Docker。 有关使用 Docker 的详细信息,请参阅 Docker 文档。 在使用计算实例时,已安装 Docker。
配置开发环境
若要在本地 VS Code 部署环境中安装 debugpy,请使用以下命令:
python -m pip install --upgrade debugpy有关结合使用 VS Code 和 debugpy 的详细信息,请参阅远程调试。
若要配置 VS Code,使其与 Docker 映像进行通信,请创建新的调试配置:
在 VS Code 的“运行”扩展中,选择“调试”菜单,然后选择“打开配置” 。 打开一个名为 launch.json 的文件。
在 launch.json 文件中,找到“configurations”项(包含
"configurations": [的行),并且在其后插入以下文本。{ "name": "Azure Machine Learning Deployment: Docker Debug", "type": "python", "request": "attach", "connect": { "port": 5678, "host": "0.0.0.0", }, "pathMappings": [ { "localRoot": "${workspaceFolder}", "remoteRoot": "/var/azureml-app" } ] }插入后,launch.json 文件应如下所示:
{
// Use IntelliSense to learn about possible attributes.
// Hover to view descriptions of existing attributes.
// For more information, visit: https://go.microsoft.com/fwlink/linkid=830387
"version": "0.2.0",
"configurations": [
    {
        "name": "Python: Current File",
        "type": "python",
        "request": "launch",
        "program": "${file}",
        "console": "integratedTerminal"
    },
    {
        "name": "Azure Machine Learning Deployment: Docker Debug",
        "type": "python",
        "request": "attach",
        "connect": {
            "port": 5678,
            "host": "0.0.0.0"
            },
        "pathMappings": [
            {
                "localRoot": "${workspaceFolder}",
                "remoteRoot": "/var/azureml-app"
            }
        ]
    }
    ]
}
重要
如果 configurations 部分已存在其他条目,请在插入的代码后添加一个逗号 (,)。
本部分使用端口 5678 附加到 Docker 容器。
保存 launch.json 文件。
创建包括 debugpy 的映像
修改部署的 Conda 环境,使其包括 debugpy。 以下示例演示使用
pip_packages参数添加它的过程:from azureml.core.conda_dependencies import CondaDependencies # Usually a good idea to choose specific version numbers # so training is made on same packages as scoring myenv = CondaDependencies.create(conda_packages=['numpy==1.15.4', 'scikit-learn==0.19.1', 'pandas==0.23.4'], pip_packages = ['azureml-defaults==1.0.83', 'debugpy']) with open("myenv.yml","w") as f: f.write(myenv.serialize_to_string())若要在服务启动时启动 debugpy 并等待连接,请将以下内容添加到
score.py文件的顶部:import debugpy # Allows other computers to attach to debugpy on this IP address and port. debugpy.listen(('0.0.0.0', 5678)) # Wait 30 seconds for a debugger to attach. If none attaches, the script continues as normal. debugpy.wait_for_client() print("Debugger attached...")基于环境定义创建一个映像,并将该映像提取到本地注册表。
注意
此示例假定
ws指向 Azure 机器学习工作区,且model是要部署的模型。myenv.yml文件包含步骤 1 中创建的 Conda 依赖项。from azureml.core.conda_dependencies import CondaDependencies from azureml.core.model import InferenceConfig from azureml.core.environment import Environment myenv = Environment.from_conda_specification(name="env", file_path="myenv.yml") myenv.docker.base_image = None myenv.docker.base_dockerfile = "FROM mcr.microsoft.com/azureml/openmpi3.1.2-ubuntu18.04:20210615.v1" inference_config = InferenceConfig(entry_script="score.py", environment=myenv) package = Model.package(ws, [model], inference_config) package.wait_for_creation(show_output=True) # Or show_output=False to hide the Docker build logs. package.pull()创建并下载映像(此过程花费的时间可能超过 10 分钟)后,映像路径(包括存储库、名称和标记,在此示例中也是摘要)会显示在类似于以下内容的消息中:
Status: Downloaded newer image for myregistry.azurecr.io/package@sha256:<image-digest>若要使得在本地使用映像更加容易,可使用以下命令为此映像添加标记。 将以下命令中的
myimagepath替换为前面步骤中的位置值。docker tag myimagepath debug:1对于其余步骤,可以将本地映像作为
debug:1而不是完整的映像路径值来进行引用。
调试服务
提示
如果在 score.py 文件中为 debugpy 连接设置超时,则必须在超时到达之前将 VS Code 连接到调试会话。 启动 VS Code,打开 score.py 的本地副本,设置一个断点,使其准备就绪,然后再使用本部分中的步骤进行操作。
有关调试和设置断点的详细信息,请参阅调试。
若要使用映像启动 Docker 容器,请使用以下命令:
docker run -it --name debug -p 8000:5001 -p 5678:5678 -v <my_local_path_to_score.py>:/var/azureml-app/score.py debug:1 /bin/bash此命令会在本地将
score.py附加到容器中的对应项。 因此,在编辑器中所做的任何更改都将自动反映到容器中为了获得更好的体验,可以使用新的 VS Code 界面进入容器。 从 VS Code 侧栏中选择
Docker扩展,找到已创建的本地容器(在本文档中为debug:1)。 右键单击此容器并选择"Attach Visual Studio Code",这时将自动打开一个新的 VS Code 界面,该界面将显示已创建的容器内部。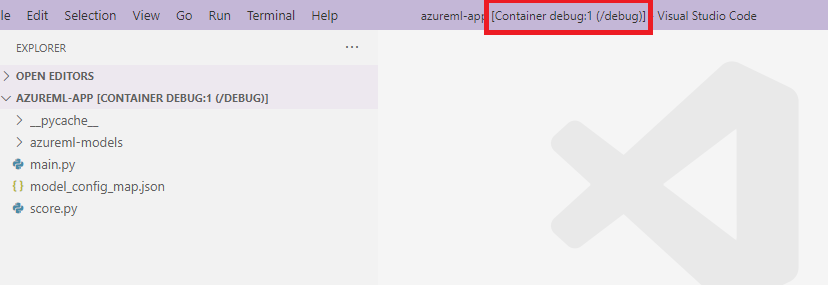
在容器内,在 shell 中运行以下命令
runsvdir /var/runit然后,可以在容器内的 shell 查看以下输出:
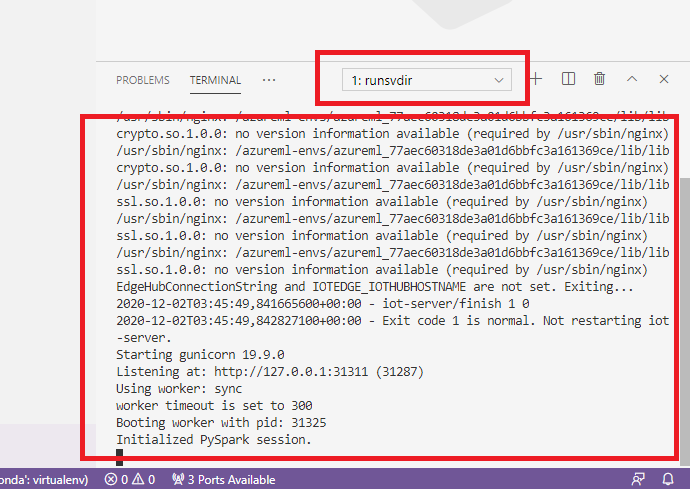
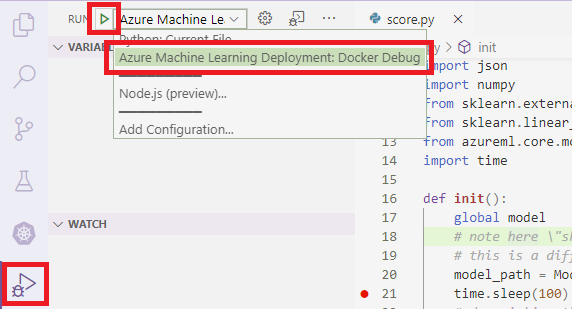
若要将 VS Code 附加到容器中的 debugpy,请打开 VS Code 并按 F5 或选择“调试”。 出现提示时,请选择“Azure 机器学习部署: Docker 调试”配置。 还可以从侧栏中选择“运行”扩展图标,即“Azure 机器学习部署: Docker 调试”项(位于“调试”下拉菜单),然后使用绿色箭头附加调试器。
选择绿色箭头并附加调试器后,可以在容器 VS Code 界面中查看一些新信息:
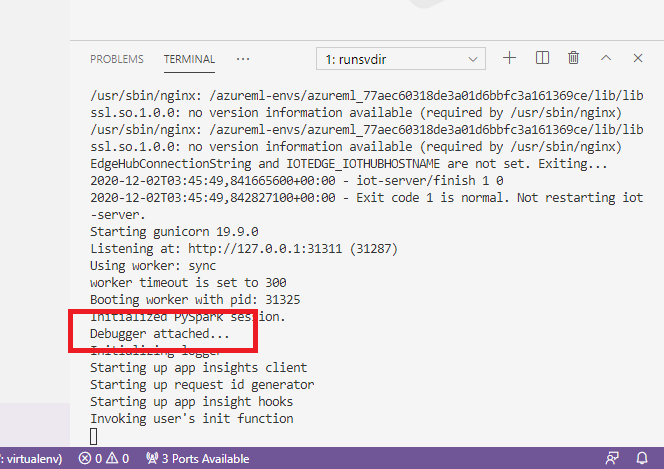
此外,在主 VS Code 界面中,可以看到以下内容:
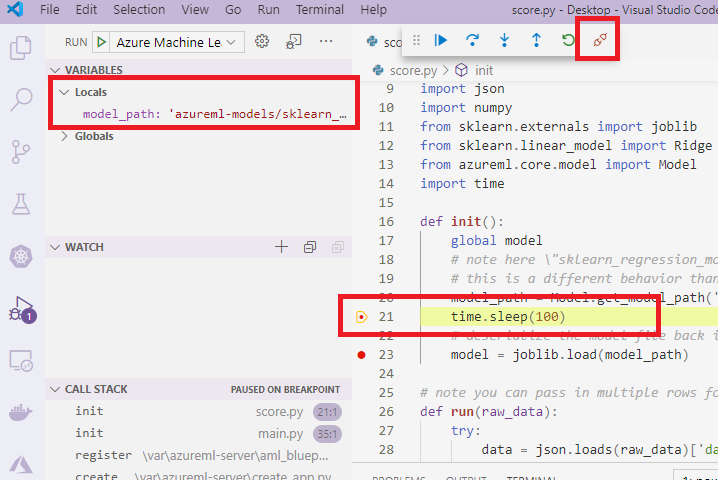
现在,附加到容器的本地 score.py 已在你设置的断点处停止。 此时,VS Code 会连接到 Docker 容器内的 debugpy,并在之前设置的断点处停止 Docker 容器。 现在可以在代码运行时逐句调试代码、查看变量等。
有关使用 VS Code 调试 Python 的详细信息,请参阅调试 Python 代码。
停止容器
若要停止容器,请使用以下命令:
docker stop debug
后续步骤
现在,你已设置 VS Code Remote,可以将计算实例用作 VS Code 中的远程计算,从而对代码进行交互式调试。
详细了解故障排除:
