다음을 통해 공유

自动跟踪

添加一行代码, mlflow.<library>.autolog() 以自动跟踪生成 AI 应用。 自动跟踪适用于 现时支持的 20 多个库和框架

先决条件

Databricks 建议使用 MLflow 3 获取最新的 GenAI 跟踪功能。

在 Databricks 笔记本中运行以下命令,以安装 mlflow 要使用的包和集成包。 此示例使用 OpenAI:

MLflow 3

  • mlflow[databricks]>=3.1:具有 GenAI 功能和 Databricks 连接的核心 MLflow 功能。
  • openai>=1.0.0:仅需要在此页上运行 基本自动跟踪示例 (如果使用其他 LLM 提供程序,请改为安装各自的 SDK)。
  • 其他库:为要使用的集成安装特定库。

安装基本要求:

%pip install --upgrade "mlflow[databricks]>=3.1" openai>=1.0.0
# Also install libraries you want to trace (langchain, anthropic, etc.)

dbutils.library.restartPython()

MLflow 2.x

  • mlflow[databricks]>=2.15.0,3.0.0<:具有 Databricks 连接的核心 MLflow 功能。
  • openai>=1.0.0:仅需要在此页上运行 基本自动跟踪示例 (如果使用其他 LLM 提供程序,请改为安装各自的 SDK)。
  • 其他库:为要使用的集成安装特定库。

安装基本要求:

%pip install --upgrade "mlflow[databricks]>=2.15.0,<3.0.0" openai>=1.0.0
# Also install libraries you want to trace (langchain, anthropic, etc.)

dbutils.library.restartPython()

配置凭据

Databricks 笔记本

在 Databricks 笔记本中,设置任何必要的 LLM API 密钥:

import os
os.environ["OPENAI_API_KEY"] = "your-api-key"

# Add other provider keys as needed
# os.environ["ANTHROPIC_API_KEY"] = "your-api-key"
# os.environ["MISTRAL_API_KEY"] = "your-api-key"

外部环境

如果位于外部环境中,请设置 Databricks 凭据和 LLM API 密钥:

export DATABRICKS_HOST="https://your-workspace.cloud.databricks.com"
export DATABRICKS_TOKEN="your-databricks-token"

# Add other provider keys as needed
#export OPENAI_API_KEY="your-openai-api-key"
# export ANTHROPIC_API_KEY="your-anthropic-api-key"
# export MISTRAL_API_KEY="your-mistral-api-key"

自动跟踪示例

下面介绍如何为连接到 Databricks Foundation 模型 API 的 OpenAI 代理启用自动跟踪。

import mlflow
import os
from openai import OpenAI

# Databricks Foundation Model APIs use Databricks authentication.

mlflow.set_tracking_uri("databricks")
mlflow.set_experiment("/Shared/databricks-sdk-autolog-example")

# Enable auto-tracing for OpenAI (which will trace Databricks Foundation Model API calls)
mlflow.openai.autolog()

# Create OpenAI client configured for Databricks
client = OpenAI(
    api_key=os.environ.get("DATABRICKS_TOKEN"),
    base_url=f"{os.environ.get('DATABRICKS_HOST')}/serving-endpoints"
)

# Query Llama 4 Maverick using OpenAI client
response = client.chat.completions.create(
    model="databricks-llama-4-maverick",
    messages=[
        {"role": "system", "content": "You are a helpful assistant."},
        {"role": "user", "content": "What are the key features of MLflow Tracing?"}
    ],
    max_tokens=150,
    temperature=0.7
)

print(response.choices[0].message.content)
# Your calls to Databricks Foundation Model APIs are automatically traced!

完整 Databricks 集成指南

MLflow 自动跟踪 20 多个受支持的框架。 以下是最受欢迎的:

OpenAI

下面介绍如何为 OpenAI 启用自动跟踪:

import mlflow
from openai import OpenAI

# Enable automatic tracing
mlflow.openai.autolog()

# Set up tracking
mlflow.set_tracking_uri("databricks")
mlflow.set_experiment("/Shared/tracing-demo")

# Use OpenAI as normal - traces happen automatically
client = OpenAI()
response = client.chat.completions.create(
    model="gpt-4o-mini",
    messages=[{"role": "user", "content": "What is MLflow Tracing?"}],
    max_tokens=100
)

print(response.choices[0].message.content)
# All OpenAI calls are now traced.

请参阅 完整的 OpenAI 集成指南

LangChain

import mlflow
import os

from langchain.prompts import PromptTemplate
from langchain_core.output_parsers import StrOutputParser
from langchain_openai import ChatOpenAI

# Enabling autolog for LangChain will enable trace logging.
mlflow.langchain.autolog()

# Set up MLflow tracking on Databricks
mlflow.set_tracking_uri("databricks")
mlflow.set_experiment("/Shared/langchain-tracing-demo")

llm = ChatOpenAI(model="gpt-4o-mini", temperature=0.7, max_tokens=1000)

prompt_template = PromptTemplate.from_template(
    "Answer the question as if you are {person}, fully embodying their style, wit, personality, and habits of speech. "
    "Emulate their quirks and mannerisms to the best of your ability, embracing their traits—even if they aren't entirely "
    "constructive or inoffensive. The question is: {question}"
)

chain = prompt_template | llm | StrOutputParser()

# Let's test another call
chain.invoke(
    {
        "person": "Linus Torvalds",
        "question": "Can I just set everyone's access to sudo to make things easier?",
    }
)

完整 LangChain 集成指南

LangGraph

from typing import Literal

import mlflow

from langchain_core.messages import AIMessage, ToolCall
from langchain_core.outputs import ChatGeneration, ChatResult
from langchain_core.tools import tool
from langchain_openai import ChatOpenAI
from langgraph.prebuilt import create_react_agent

# Enabling tracing for LangGraph (LangChain)
mlflow.langchain.autolog()

# Set up MLflow tracking on Databricks
mlflow.set_tracking_uri("databricks")
mlflow.set_experiment("/Shared/langgraph-tracing-demo")

@tool
def get_weather(city: Literal["nyc", "sf"]):
    """Use this to get weather information."""
    if city == "nyc":
        return "It might be cloudy in nyc"
    elif city == "sf":
        return "It's always sunny in sf"

llm = ChatOpenAI(model="gpt-4o-mini")
tools = [get_weather]
graph = create_react_agent(llm, tools)

# Invoke the graph
result = graph.invoke(
    {"messages": [{"role": "user", "content": "what is the weather in sf?"}]}
)

完整 LangGraph 集成指南

Anthropic

import anthropic
import mlflow
import os

# Enable auto-tracing for Anthropic
mlflow.anthropic.autolog()

# Set up MLflow tracking on Databricks
mlflow.set_tracking_uri("databricks")
mlflow.set_experiment("/Shared/anthropic-tracing-demo")

# Configure your API key.
client = anthropic.Anthropic(api_key=os.environ["ANTHROPIC_API_KEY"])

# Use the create method to create new message.
message = client.messages.create(
    model="claude-3-5-sonnet-20241022",
    max_tokens=1024,
    messages=[
        {"role": "user", "content": "Hello, Claude"},
    ],
)

完整人类集成指南

DSPy

import dspy
import mlflow

# Enabling tracing for DSPy
mlflow.dspy.autolog()

# Set up MLflow tracking on Databricks
mlflow.set_tracking_uri("databricks")
mlflow.set_experiment("/Shared/dspy-tracing-demo")

# Define a simple ChainOfThought model and run it
lm = dspy.LM("openai/gpt-4o-mini")
dspy.configure(lm=lm)

# Define a simple summarizer model and run it
class SummarizeSignature(dspy.Signature):
    """Given a passage, generate a summary."""

    passage: str = dspy.InputField(desc="a passage to summarize")
    summary: str = dspy.OutputField(desc="a one-line summary of the passage")

class Summarize(dspy.Module):
    def __init__(self):
        self.summarize = dspy.ChainOfThought(SummarizeSignature)

    def forward(self, passage: str):
        return self.summarize(passage=passage)

summarizer = Summarize()
summarizer(
    passage=(
        "MLflow Tracing is a feature that enhances LLM observability in your Generative AI (GenAI) applications "
        "by capturing detailed information about the execution of your application's services. Tracing provides "
        "a way to record the inputs, outputs, and metadata associated with each intermediate step of a request, "
        "enabling you to easily pinpoint the source of bugs and unexpected behaviors."
    )
)

完整 DSPy 集成指南

Bedrock

import boto3
import mlflow

# Enable auto-tracing for Amazon Bedrock
mlflow.bedrock.autolog()

# Set up MLflow tracking on Databricks
mlflow.set_tracking_uri("databricks")
mlflow.set_experiment("/Shared/bedrock-tracing-demo")

# Create a boto3 client for invoking the Bedrock API
bedrock = boto3.client(
    service_name="bedrock-runtime",
    region_name="<REPLACE_WITH_YOUR_AWS_REGION>",
)

# MLflow will log a trace for Bedrock API call
response = bedrock.converse(
    modelId="anthropic.claude-3-5-sonnet-20241022-v2:0",
    messages=[
        {
            "role": "user",
            "content": "Describe the purpose of a 'hello world' program in one line.",
        }
    ],
    inferenceConfig={
        "maxTokens": 512,
        "temperature": 0.1,
        "topP": 0.9,
    },
)

完整基岩集成指南

AutoGen

import os
from typing import Annotated, Literal

from autogen import ConversableAgent

import mlflow

# Turn on auto tracing for AutoGen
mlflow.autogen.autolog()

# Set up MLflow tracking on Databricks
mlflow.set_tracking_uri("databricks")
mlflow.set_experiment("/Shared/autogen-tracing-demo")

# Define a simple multi-agent workflow using AutoGen
config_list = [
    {
        "model": "gpt-4o-mini",
        # Please set your OpenAI API Key to the OPENAI_API_KEY env var before running this example
        "api_key": os.environ.get("OPENAI_API_KEY"),
    }
]

Operator = Literal["+", "-", "*", "/"]

def calculator(a: int, b: int, operator: Annotated[Operator, "operator"]) -> int:
    if operator == "+":
        return a + b
    elif operator == "-":
        return a - b
    elif operator == "*":
        return a * b
    elif operator == "/":
        return int(a / b)
    else:
        raise ValueError("Invalid operator")

# First define the assistant agent that suggests tool calls.
assistant = ConversableAgent(
    name="Assistant",
    system_message="You are a helpful AI assistant. "
    "You can help with simple calculations. "
    "Return 'TERMINATE' when the task is done.",
    llm_config={"config_list": config_list},
)

# The user proxy agent is used for interacting with the assistant agent
# and executes tool calls.
user_proxy = ConversableAgent(
    name="Tool Agent",
    llm_config=False,
    is_termination_msg=lambda msg: msg.get("content") is not None
    and "TERMINATE" in msg["content"],
    human_input_mode="NEVER",
)

# Register the tool signature with the assistant agent.
assistant.register_for_llm(name="calculator", description="A simple calculator")(
    calculator
)
user_proxy.register_for_execution(name="calculator")(calculator)
response = user_proxy.initiate_chat(
    assistant, message="What is (44231 + 13312 / (230 - 20)) * 4?"
)

完整 AutoGen 集成指南

自动跟踪多个框架

可以对同一代理中的多个框架使用自动跟踪。

以下代码将直接 OpenAI API 调用、LangChain 链和自定义逻辑组合在一个跟踪中,以便于调试和监视。

%pip install --upgrade langchain langchain-openai
import mlflow
import openai
from mlflow.entities import SpanType
from langchain_openai import ChatOpenAI
from langchain_core.prompts import ChatPromptTemplate

# Enable auto-tracing for both OpenAI and LangChain
mlflow.openai.autolog()
mlflow.langchain.autolog()

# Create OpenAI client
client = openai.OpenAI()

@mlflow.trace(span_type=SpanType.CHAIN)
def multi_provider_workflow(query: str):
    # First, use OpenAI directly for initial processing
    analysis = client.chat.completions.create(
        model="gpt-4o-mini",
        messages=[
            {"role": "system", "content": "Analyze the query and extract key topics."},
            {"role": "user", "content": query}
        ]
    )
    topics = analysis.choices[0].message.content

    # Then use LangChain for structured processing
    llm = ChatOpenAI(model="gpt-4o-mini")
    prompt = ChatPromptTemplate.from_template(
        "Based on these topics: {topics}\nGenerate a detailed response to: {query}"
    )
    chain = prompt | llm
    response = chain.invoke({"topics": topics, "query": query})

    return response

# Run the function
result = multi_provider_workflow("Explain quantum computing")

合并手动跟踪和自动跟踪

@mlflow.trace 自动跟踪一起使用,为以下方案创建统一跟踪:

  • 一个工作流中的多个 LLM 调用
  • 具有不同提供程序的多代理系统
  • LLM 调用之间的自定义逻辑
import mlflow
import openai
from mlflow.entities import SpanType

mlflow.openai.autolog()

# Create OpenAI client
client = openai.OpenAI()

@mlflow.trace(span_type=SpanType.CHAIN)
def run(question):
    messages = build_messages(question)
    # MLflow automatically generates a span for OpenAI invocation
    response = client.chat.completions.create(
        model="gpt-4o-mini",
        max_tokens=100,
        messages=messages,
    )
    return parse_response(response)

@mlflow.trace
def build_messages(question):
    return [
        {"role": "system", "content": "You are a helpful chatbot."},
        {"role": "user", "content": question},
    ]

@mlflow.trace
def parse_response(response):
    return response.choices[0].message.content

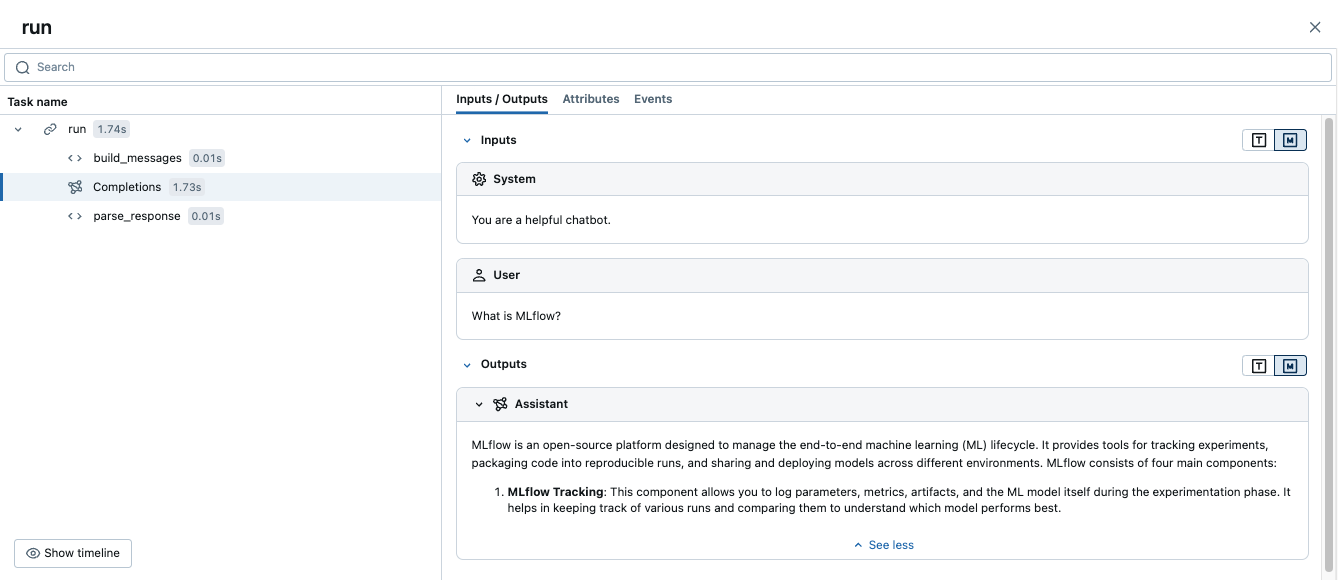
run("What is MLflow?")

运行此代码将生成一个跟踪,该跟踪将手动范围与自动 OpenAI 跟踪相结合:

自动跟踪和手动跟踪的组合

高级示例:多个 LLM 调用

import mlflow
import openai
from mlflow.entities import SpanType

# Enable auto-tracing for OpenAI
mlflow.openai.autolog()

# Create OpenAI client
client = openai.OpenAI()

@mlflow.trace(span_type=SpanType.CHAIN)
def process_user_query(query: str):
    # First LLM call: Analyze the query
    analysis = client.chat.completions.create(
        model="gpt-4o-mini",
        messages=[
            {"role": "system", "content": "Analyze the user's query and determine if it requires factual information or creative writing."},
            {"role": "user", "content": query}
        ]
    )
    analysis_result = analysis.choices[0].message.content

    # Second LLM call: Generate response based on analysis
    if "factual" in analysis_result.lower():
        # Use a different model for factual queries
        response = client.chat.completions.create(
            model="gpt-4o-mini",
            messages=[
                {"role": "system", "content": "Provide a factual, well-researched response."},
                {"role": "user", "content": query}
            ]
        )
    else:
        # Use a different model for creative queries
        response = client.chat.completions.create(
            model="gpt-4o-mini",
            messages=[
                {"role": "system", "content": "Provide a creative, engaging response."},
                {"role": "user", "content": query}
            ]
        )

    return response.choices[0].message.content

# Run the function
result = process_user_query("Tell me about the history of artificial intelligence")

这将创建一个跟踪,其中包含:

  • 父范围 process_user_query
  • OpenAI 调用的两个子范围

后续步骤

请参阅以下页面:

参考指南

有关本指南中提到的概念和功能的详细文档,请参阅以下内容: