在本快速入门中,你将使用 Python 连接到 Azure Database for PostgreSQL 灵活服务器实例。 然后使用 SQL 语句在 macOS、Ubuntu Linux 和 Windows 平台的数据库中查询、插入、更新和删除数据。
本文中的这些步骤介绍两种身份验证方法:Microsoft Entra 身份验证和 PostgreSQL 身份验证。 “无密码”选项卡可显示 Microsoft Entra 身份验证,“密码”选项卡则显示 PostgreSQL 身份验证。
Microsoft Entra 身份验证是一种使用 Microsoft Entra ID 中定义的标识连接到 Azure Database for PostgreSQL 的机制。 通过 Microsoft Entra 身份验证,可以在一个中心位置集中管理数据库用户标识和其他 Microsoft 服务,从而简化权限管理。 若要了解详细信息,请参阅 使用 Azure Database for PostgreSQL Microsoft Entra 身份验证。
PostgreSQL 身份验证使用存储在 PostgreSQL 中的帐户。 如果选择将密码用作帐户的凭据,这些凭据将存储在 user 表中。 由于这些密码存储在 PostgreSQL 中,因此你需要自行管理密码的轮换。
本文假设你熟悉如何使用 Python 进行开发,但不熟悉如何使用 Azure Database for PostgreSQL。
先决条件
- 具有活动订阅的 Azure 帐户。 创建试用帐户。
- Azure Database for PostgreSQL 灵活服务器实例。 若要创建 Azure Database for PostgreSQL 灵活服务器实例,请参阅 创建 Azure Database for PostgreSQL。
- Python 3.8+。
- 最新 pip 包安装程序。
为客户端工作站添加防火墙规则
- 如果使用 专用访问(虚拟网络集成)创建了 Azure Database for PostgreSQL 灵活服务器实例,则需要从服务器所在的同一虚拟网络中的资源连接到服务器。 可以创建虚拟机并将其添加到使用 Azure Database for PostgreSQL 灵活服务器实例创建的虚拟网络。 请参阅 网络。
- 如果使用“公共访问(允许的 IP 地址)”创建了 Azure Database for PostgreSQL 灵活服务器实例,可以将本地 IP 地址添加到服务器上的防火墙规则列表中。 请参阅 网络。
在服务器上配置 Microsoft Entra 集成(仅限无密码)
如果按照无密码身份验证的步骤操作,则必须为你的服务器实例配置 Microsoft Entra 身份验证,并且你必须被指定为服务器实例上的 Microsoft Entra 管理员。 按照配置 Microsoft Entra 集成中的步骤操作,确保已配置 Microsoft Entra 身份验证,并且你已被指定为服务器实例上的 Microsoft Entra 管理员。
准备开发环境
更改为要运行代码并创建和激活虚拟环境的文件夹。 虚拟环境是一个独立的目录,专用于特定版本的 Python 和该应用程序所需的其他软件包。
运行以下命令来创建并激活一个虚拟环境:
py -3 -m venv .venv
.venv\Scripts\activate
安装 Python 库
安装运行代码示例所需的 Python 库。
安装 azure-identity 标识库,它会跨 Azure SDK 提供 Microsoft Entra 令牌身份验证支持。
# Use the interpreter-bound pip to ensure installs go into the active venv/interpreter
python -m pip install --upgrade pip
python -m pip install azure-identity azure-keyvault-secrets
添加身份验证代码
在本部分中,将身份验证代码添加到工作目录,并使用服务器实例执行身份验证和授权所需的任何其他步骤。
在添加身份验证代码之前,请确保已安装每个示例所需的包。
必需的包(本文中的示例):
- 无密码示例:
azure-identity(azure-keyvault-secrets如果使用 Key Vault) - 密码示例:
psycopg(建议:python -m pip install "psycopg[binary]")
可选:使用这些条目创建一个 requirements.txt ,并随这些 python -m pip install -r requirements.txt 条目一起安装,以便进行可重现的安装。
将以下代码复制到编辑器中,并将其保存在名为 get_conn.py 的文件中。
import urllib.parse
import os

from azure.identity import DefaultAzureCredential

# IMPORTANT! This code is for demonstration purposes only. It's not suitable for use in production.
# For example, tokens issued by Microsoft Entra ID have a limited lifetime (24 hours by default).
# In production code, you need to implement a token refresh policy.

def get_connection_uri():

    # Read URI parameters from the environment
    dbhost = os.environ['DBHOST']
    dbname = os.environ['DBNAME']
    dbuser = urllib.parse.quote(os.environ['DBUSER'])
    sslmode = os.environ['SSLMODE']

    # Use passwordless authentication via DefaultAzureCredential.
    # IMPORTANT! This code is for demonstration purposes only. DefaultAzureCredential() is invoked on every call.
    # In practice, it's better to persist the credential across calls and reuse it so you can take advantage of token
    # caching and minimize round trips to the identity provider. To learn more, see:
    # https://github.com/Azure/azure-sdk-for-python/blob/main/sdk/identity/azure-identity/TOKEN_CACHING.md
    credential = DefaultAzureCredential()

    # Call get_token() to get a token from Microsft Entra ID and add it as the password in the URI.
    # Note the requested scope parameter in the call to get_token, "https://ossrdbms-aad.database.chinacloudapi.cn/.default".
    password = credential.get_token("https://ossrdbms-aad.database.chinacloudapi.cn/.default").token

    db_uri = f"postgresql://{dbuser}:{password}@{dbhost}/{dbname}?sslmode={sslmode}"
    return db_uri
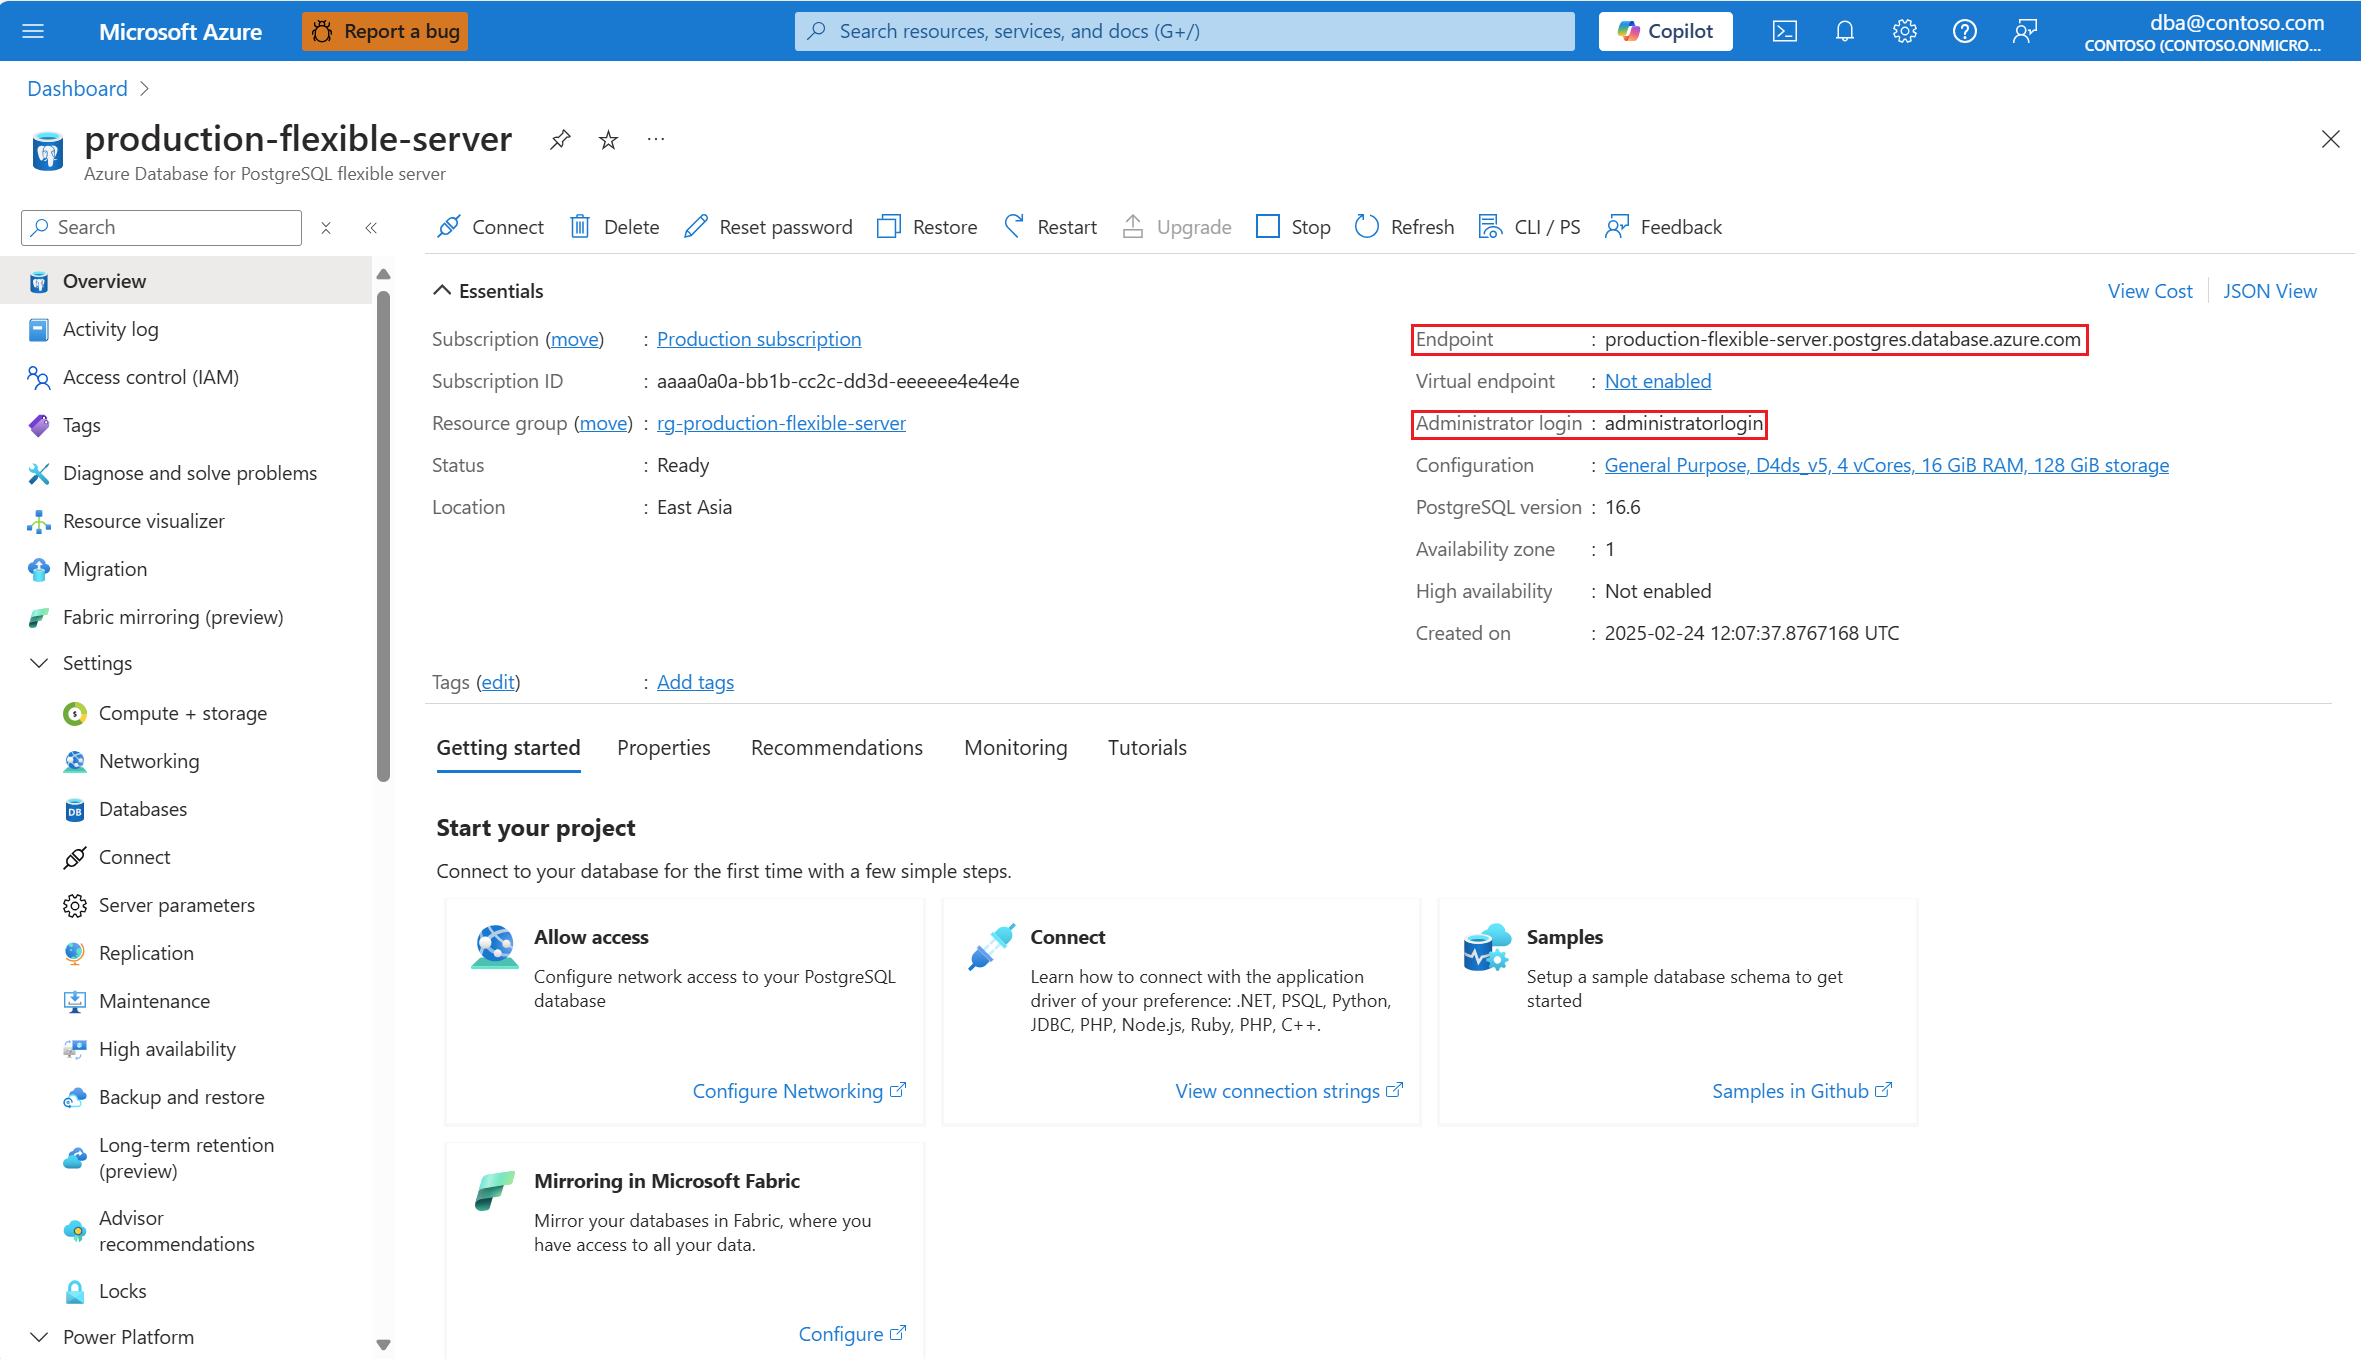
获取数据库连接信息。
- 在 Azure 门户中,搜索并选择 Azure Database for PostgreSQL 灵活服务器实例名称。
- 在服务器的“概览”页上,复制完全限定的服务器名称。 完全限定的“服务器名称”始终为“my-server-name<.postgres.database.chinacloudapi.cn”的格式。
- 在左侧菜单的“安全”下,选择“身份验证”。 请确保您的帐户已列在Microsoft Entra Admins下。 如果未列出,请完成在服务器上配置 Microsoft Entra 集成(仅限无密码)中的步骤。
为连接 URI 元素设置环境变量:
set DBHOST=<server-name> set DBNAME=<database-name> set DBUSER=<username> set SSLMODE=require在工作站上登录到 Azure。 可以使用 Azure CLI 或 Azure PowerShell 登录。
身份验证代码使用
DefaultAzureCredential向 Microsoft Entra ID 进行身份验证,并获取授权你在服务器实例上执行操作的令牌。DefaultAzureCredential支持一系列身份验证凭据类型。 支持的凭据包括用来登录开发人员工具(例如 Azure CLI 或 Azure PowerShell)的凭据。
如何运行 Python 示例
对于本文中的每个代码示例:
在文本编辑器中创建新的文件。
将代码示例添加到文件。
将文件保存在具有 .py 扩展名的项目文件夹(如 postgres-insert.py)中 。 对于 Windows,确保在保存文件时选择 UTF-8 编码。
在项目文件夹中键入
python后接文件名,例如python postgres-insert.py。
创建表并插入数据
下面的代码示例使用函数 psycopg.connect 连接到 Azure Database for PostgreSQL 灵活服务器数据库,并使用 SQL INSERT 语句加载数据。
cursor.execute 函数对数据库执行 SQL 查询。
import psycopg
from get_conn import get_connection_uri

conn_string = get_connection_uri()

conn = psycopg.connect(conn_string)
print("Connection established")
cursor = conn.cursor()

# Drop previous table of same name if one exists
cursor.execute("DROP TABLE IF EXISTS inventory;")
print("Finished dropping table (if existed)")

# Create a table
cursor.execute("CREATE TABLE inventory (id serial PRIMARY KEY, name VARCHAR(50), quantity INTEGER);")
print("Finished creating table")

# Insert some data into the table
cursor.execute("INSERT INTO inventory (name, quantity) VALUES (%s, %s);", ("banana", 150))
cursor.execute("INSERT INTO inventory (name, quantity) VALUES (%s, %s);", ("orange", 154))
cursor.execute("INSERT INTO inventory (name, quantity) VALUES (%s, %s);", ("apple", 100))
print("Inserted 3 rows of data")

# Clean up
conn.commit()
cursor.close()
conn.close()
如果代码成功运行,则会生成以下输出:
Connection established
Finished dropping table (if existed)
Finished creating table
Inserted 3 rows of data
读取数据
下面的代码示例连接到 Azure Database for PostgreSQL 灵活服务器数据库,并使用 cursor.execute 和 SQL SELECT 语句读取数据。 此函数可接受查询,并返回可使用 cursor.fetchall() 循环访问的结果集。
import psycopg
from get_conn import get_connection_uri

conn_string = get_connection_uri()

conn = psycopg.connect(conn_string)
print("Connection established")
cursor = conn.cursor()

# Fetch all rows from table
cursor.execute("SELECT * FROM inventory;")
rows = cursor.fetchall()

# Print all rows
for row in rows:
    print("Data row = (%s, %s, %s)" %(str(row[0]), str(row[1]), str(row[2])))

# Cleanup
conn.commit()
cursor.close()
conn.close()
如果代码成功运行,则会生成以下输出:
Connection established
Data row = (1, banana, 150)
Data row = (2, orange, 154)
Data row = (3, apple, 100)
更新数据
下面的代码示例连接到 Azure Database for PostgreSQL 灵活服务器数据库,并使用 cursor.execute 和 SQL UPDATE 语句来更新数据。
import psycopg
from get_conn import get_connection_uri

conn_string = get_connection_uri()

conn = psycopg.connect(conn_string)
print("Connection established")
cursor = conn.cursor()

# Update a data row in the table
cursor.execute("UPDATE inventory SET quantity = %s WHERE name = %s;", (200, "banana"))
print("Updated 1 row of data")

# Cleanup
conn.commit()
cursor.close()
conn.close()
删除数据
下面的代码示例连接到 Azure Database for PostgreSQL 灵活服务器数据库,并使用 cursor.execute 和 SQL DELETE 语句删除之前插入的清单项。
import psycopg
from get_conn import get_connection_uri

conn_string = get_connection_uri()

conn = psycopg.connect(conn_string)
print("Connection established")
cursor = conn.cursor()

# Delete data row from table
cursor.execute("DELETE FROM inventory WHERE name = %s;", ("orange",))
print("Deleted 1 row of data")

# Cleanup
conn.commit()
cursor.close()
conn.close()
相关内容
- 快速入门:将 Java 和 JDBC 与 Azure Database for PostgreSQL 配合使用
- 快速入门:使用 .NET (C#) 连接和查询 Azure Database for PostgreSQL 中的数据
- 快速入门:使用 Go 语言在 Azure Database for PostgreSQL 中连接和查询数据
- 快速入门:使用 PHP 连接和查询 Azure Database for PostgreSQL 中的数据
- 快速入门:使用 Azure Database for PostgreSQL 通过 Azure CLI 连接和查询
- 快速入门:在 Power BI 中从 Azure Database for PostgreSQL 导入数据


