适用于: Azure 数据工厂 Azure Synapse Analytics
本教程使用 Azure PowerShell 创建一个数据工厂管道,用于将数据从 SQL Server 数据库复制到 Azure Blob 存储。 同时创建一个自承载 Integration Runtime,用其在本地数据存储和云数据存储之间移动数据。
注意
本文不提供数据工厂服务的详细介绍。 有关详细信息,请参阅 Azure 数据工厂简介。
将在本教程中执行以下步骤:
- 创建数据工厂。
- 创建自我托管的集成运行时。
- 创建 SQL Server 和 Azure 存储链接服务。
- 创建 SQL Server 和 Azure Blob 数据集。
- 创建包含复制活动的管道,用于移动数据。
- 启动管道运行。
- 监视管道运行。
先决条件
Azure 订阅
如果还没有 Azure 订阅,请在开始前创建一个试用帐户。
Azure 角色
若要创建数据工厂实例,用于登录到 Azure 的用户帐户必须分配有“参与者”或“所有者”角色,或者必须是 Azure 订阅的管理员。
若要查看你在订阅中拥有的权限,请转到 Azure 门户,选择右上角的用户名,然后选择“权限”。 如果可以访问多个订阅,请选择相应的订阅。 有关将用户添加到角色的示例说明,请参阅使用 Azure 门户分配 Azure 角色一文。
SQL Server 2014、2016 和 2017
在本教程中,需将 SQL Server 数据库用作源数据存储。 在本教程中创建的数据工厂中的管道将数据从这个 SQL Server 数据库(源)复制到 Azure Blob 存储(接收器)。 然后,你可以在 SQL Server 数据库中创建名为 emp 的表,并向表中插入几个示例条目。
启动 SQL Server Management Studio。 如果此软件尚未安装在计算机上,请访问下载 SQL Server Management Studio。
使用凭据连接到 SQL Server 实例。
创建示例数据库。 在树状视图中右键单击“数据库”,然后选择“新建数据库”。
在“新建数据库”窗口中输入数据库的名称,然后选择“确定”。
若要创建 emp 表并将一些示例数据插入到其中,请对数据库运行以下查询脚本。 在树状视图中右键单击所创建的数据库,然后选择“新建查询”。
CREATE TABLE dbo.emp
(
    ID int IDENTITY(1,1) NOT NULL,
    FirstName varchar(50),
    LastName varchar(50)
)
GO

INSERT INTO emp (FirstName, LastName) VALUES ('John', 'Doe')
INSERT INTO emp (FirstName, LastName) VALUES ('Jane', 'Doe')
GO
Azure 存储帐户
在本教程中,请使用常规用途的 Azure 存储帐户(具体说来就是 Azure Blob 存储)作为目标/接收器数据存储。 如果没有常规用途的 Azure 存储帐户,请参阅创建存储帐户。 在本教程中创建的数据工厂中的管道将数据从 SQL Server 数据库(源)复制到此 Azure Blob 存储(接收器)。
获取存储帐户名称和帐户密钥
在本教程中,请使用 Azure 存储帐户的名称和密钥。 通过以下步骤获取存储帐户的名称和密钥:
使用 Azure 用户名和密码登录到 Azure 门户。
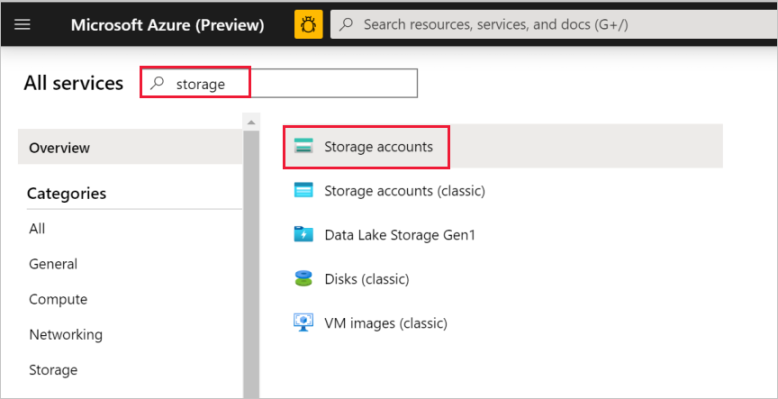
在左窗格中选择“更多服务”,使用“存储”关键字进行筛选,然后选择“存储帐户”。
在存储帐户列表中,通过筛选找出你的存储帐户(如果需要),然后选择你的存储帐户。
在“存储帐户”窗口中选择“访问密钥” 。
复制“存储帐户名称”和“key1”框中的值,然后将其粘贴到记事本或其他编辑器中,在教程的后面部分使用。
创建 adftutorial 容器
此部分在 Azure Blob 存储中创建名为 adftutorial 的 Blob 容器。
在“存储帐户”窗口中切换到“概览”,然后选择“Blob”。
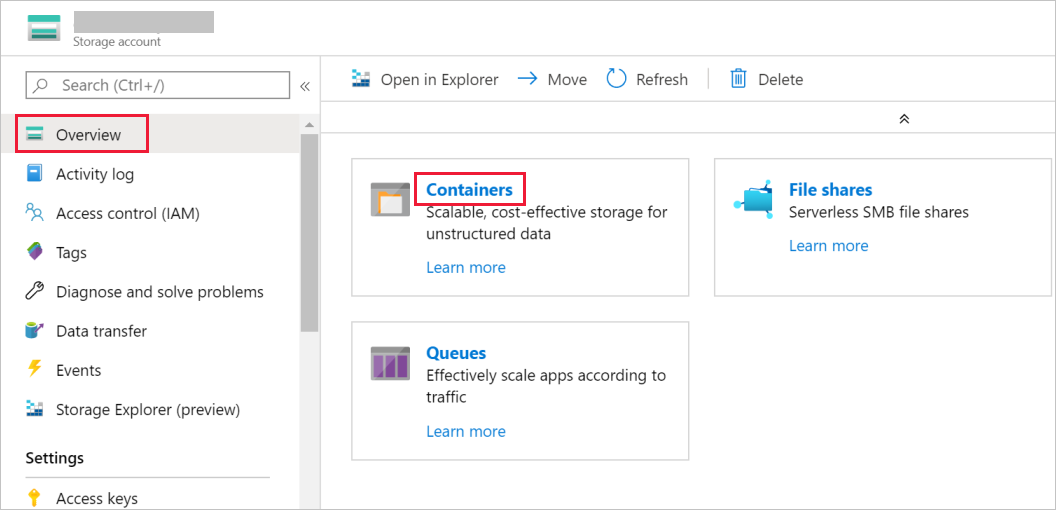
在“Blob 服务”窗口中,选择“容器”。
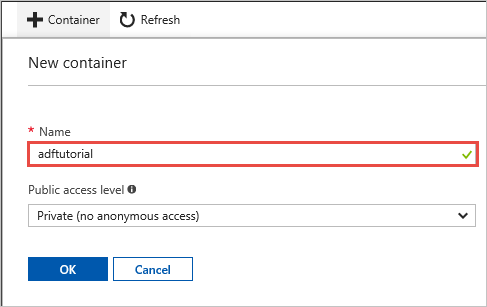
在“新建容器”窗口的“名称”框中输入“adftutorial”,然后选择“确定”。
在容器列表中选择“adftutorial”。
让 adftutorial 的“容器”窗口保持打开状态。 在教程结束时可以使用它来验证输出。 数据工厂自动在该容器中创建输出文件夹,因此不需要你来创建。
Windows PowerShell
安装 Azure PowerShell
注意
建议使用 Azure Az PowerShell 模块与 Azure 交互。 请参阅安装 Azure PowerShell 以开始使用。 若要了解如何迁移到 Az PowerShell 模块,请参阅 将 Azure PowerShell 从 AzureRM 迁移到 Az。
安装最新版的 Azure PowerShell(如果尚未在计算机上安装)。 有关详细信息,请参阅如何安装和配置 Azure PowerShell。
登录到 PowerShell
在计算机上启动 PowerShell,让其保持打开状态,直至本快速入门教程完成。 如果将它关闭再重新打开,则需再次运行这些命令。
运行以下命令,然后输入用于登录 Azure 门户的 Azure 用户名和密码:
Connect-AzAccount -Environment AzureChinaCloud如果有多个 Azure 订阅,请运行以下命令,选择要使用的订阅。 请将 SubscriptionId 替换为自己的 Azure 订阅的 ID:
Select-AzSubscription -SubscriptionId "<SubscriptionId>"
创建数据工厂
为资源组名称定义一个变量,稍后会在 PowerShell 命令中使用该变量。 将以下命令复制到 PowerShell,指定 Azure 资源组的名称(包括在双引号中,例如
"adfrg"),然后运行命令。$resourceGroupName = "ADFTutorialResourceGroup"若要创建 Azure 资源组,请运行以下命令:
New-AzResourceGroup $resourceGroupName -location 'China East 2'如果该资源组已存在,请勿覆盖它。 为
$resourceGroupName变量分配另一个值,然后再次运行命令。为数据工厂名称定义一个变量,稍后可在 PowerShell 命令中使用该变量。 名称必须以字母或数字开头,并且只能包含字母、数字和短划线 (-) 字符。
重要
使用全局唯一的名称更新数据工厂名称。 例如 ADFTutorialFactorySP1127。
$dataFactoryName = "ADFTutorialFactory"定义一个用于数据工厂位置的变量:
$location = "China East 2"若要创建数据工厂,请运行以下
Set-AzDataFactoryV2cmdlet:Set-AzDataFactoryV2 -ResourceGroupName $resourceGroupName -Location $location -Name $dataFactoryName
注意
- 数据工厂的名称必须全局唯一。 如果收到以下错误,请更改名称并重试。
The specified data factory name 'ADFv2TutorialDataFactory' is already in use. Data factory names must be globally unique. - 若要创建数据工厂实例,用于登录到 Azure 的用户帐户必须具有参与者或所有者角色,或者是 Azure 订阅的管理员。
- 若要查看目前提供数据工厂的 Azure 区域的列表,请在以下页面上选择感兴趣的区域,然后展开“分析”以找到“数据工厂”:可用产品(按区域)。 数据工厂使用的数据存储(Azure 存储、Azure SQL 数据库等)和计算资源(Azure HDInsight 等)可以位于其他区域。
创建自承载 Integration Runtime
在本部分,请创建一个自承载 Integration Runtime,然后将其与安装了 SQL Server 数据库的本地计算机相关联。 自承载 Integration Runtime 是一个组件,用于将数据从计算机上的 SQL Server 数据库复制到 Azure Blob 存储。
创建一个适用于 Integration Runtime 名称的变量。 使用唯一名称,并记下该名称。 本教程后面部分需要使用它。
$integrationRuntimeName = "ADFTutorialIR"创建自我托管的集成运行时。
Set-AzDataFactoryV2IntegrationRuntime -ResourceGroupName $resourceGroupName -DataFactoryName $dataFactoryName -Name $integrationRuntimeName -Type SelfHosted -Description "selfhosted IR description"下面是示例输出:
Name              : ADFTutorialIR
Type              : SelfHosted
ResourceGroupName : <resourceGroupName>
DataFactoryName   : <dataFactoryName>
Description       : selfhosted IR description
Id                : /subscriptions/<subscription ID>/resourceGroups/<resourceGroupName>/providers/Microsoft.DataFactory/factories/<dataFactoryName>/integrationruntimes/<integrationRuntimeName>
若要检索所创建的 Integration Runtime 的状态,请运行以下命令:
Get-AzDataFactoryV2IntegrationRuntime -name $integrationRuntimeName -ResourceGroupName $resourceGroupName -DataFactoryName $dataFactoryName -Status下面是示例输出:
State                     : NeedRegistration
Version                   :
CreateTime                : 9/10/2019 3:24:09 AM
AutoUpdate                : On
ScheduledUpdateDate       :
UpdateDelayOffset         :
LocalTimeZoneOffset       :
InternalChannelEncryption :
Capabilities              : {}
ServiceUrls               : {chinae2.frontend.datamovement.azure.cn}
Nodes                     : {}
Links                     : {}
Name                      : <Integration Runtime name>
Type                      : SelfHosted
ResourceGroupName         : <resourceGroup name>
DataFactoryName           : <dataFactory name>
Description               : selfhosted IR description
Id                        : /subscriptions/<subscription ID>/resourceGroups/<resourceGroupName>/providers/Microsoft.DataFactory/factories/<dataFactoryName>/integrationruntimes/<integrationRuntimeName>
若要检索可将自承载 Integration Runtime 注册到云中数据工厂服务的身份验证密钥,请运行以下命令。 复制其中一个密钥(去除引号),以便注册将在下一步安装到计算机上的自承载 Integration Runtime。
Get-AzDataFactoryV2IntegrationRuntimeKey -Name $integrationRuntimeName -DataFactoryName $dataFactoryName -ResourceGroupName $resourceGroupName | ConvertTo-Json下面是示例输出:
{
    "AuthKey1":  "IR@0000000000-0000-0000-0000-000000000000@xy0@xy@xxxxxxxxxxxxxxxxxxxxxxxxxxxxxxxxxxxxxxxx=",
    "AuthKey2":  "IR@0000000000-0000-0000-0000-000000000000@xy0@xy@yyyyyyyyyyyyyyyyyyyyyyyyyyyyyyyyyyyyyyyy="
}
安装 Integration Runtime
将 Azure 数据工厂 Integration Runtime 下载到本地 Windows 计算机上,然后进行安装。
在“欢迎使用 Microsoft Integration Runtime 安装向导”页上,选择“下一步”。
在“最终用户许可协议”窗口中接受许可协议的条款,然后选择“下一步” 。
在“目标文件夹”窗口中,选择“下一步”。
在“准备安装 Microsoft Integration Runtime”窗口中选择“安装”。
在“完成 Microsoft Integration Runtime 安装向导”页中选择“完成”。
在“注册 Integration Runtime (自承载)”窗口中粘贴在上一部分保存的密钥,然后选择“注册”。

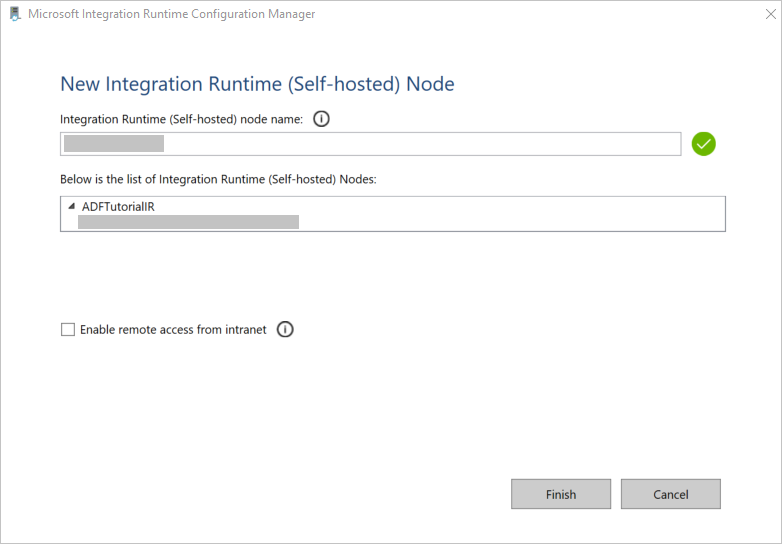
在“新建 Integration Runtime (自承载)节点”窗口中,选择“完成”。
成功注册自承载 Integration Runtime 后,会显示以下消息:
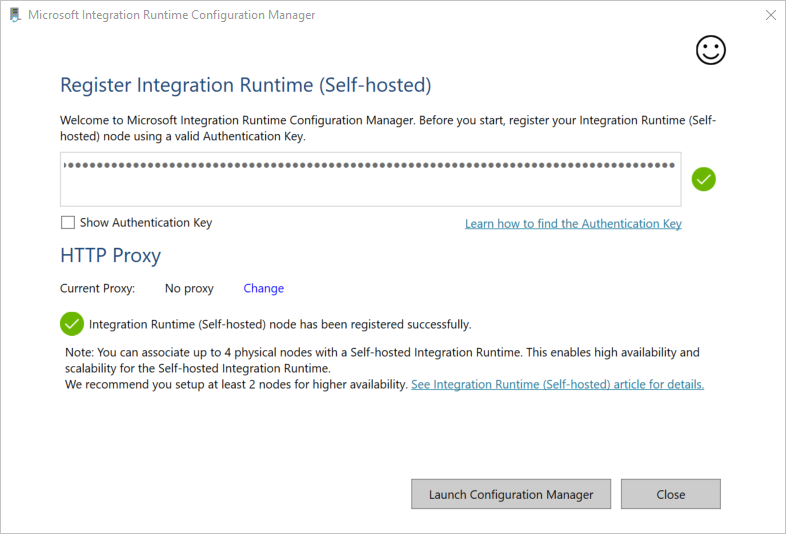
在“注册 Integration Runtime (自承载)”窗口中,选择“启动配置管理器”。
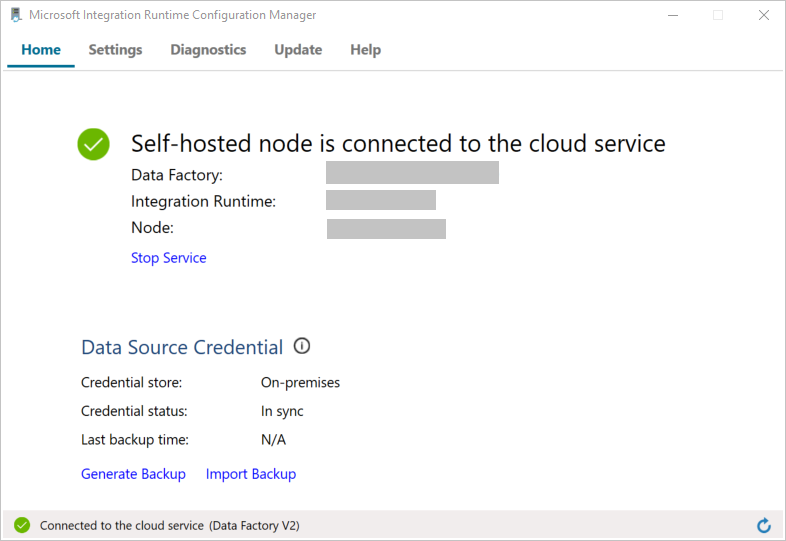
将节点连接到云服务后,会显示以下消息:
执行以下操作,测试到 SQL Server 数据库的连接:
a. 在“配置管理器”窗口中,切换到“诊断”选项卡。
b. 在“数据源类型”框中,选择“SqlServer”。
c. 输入服务器名称。
d. 输入数据库名称。
e. 选择身份验证模式。
f. 输入用户名。
g. 输入与用户名关联的密码。
h. 若要确认 Integration Runtime 能否连接到 SQL Server,请选择“测试”。
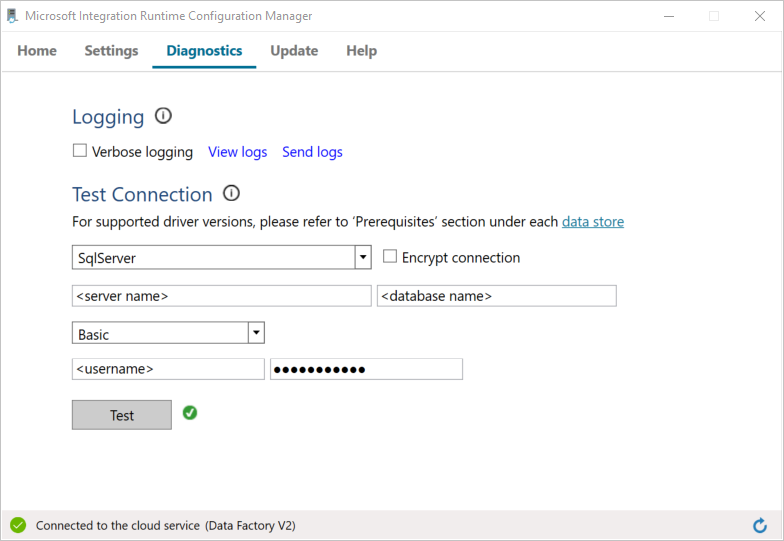
如果连接成功,则会显示绿色复选图标。 否则,会收到与故障相关的错误消息。 请解决问题,确保 Integration Runtime 可以连接到 SQL Server 实例。
记下所有上述值,在本教程的后面部分使用。
创建链接服务
若要将数据存储和计算服务链接到数据工厂,请在数据工厂中创建链接服务。 在本教程中,请将 Azure 存储帐户和 SQL Server 实例链接到数据存储。 链接服务包含的连接信息可供数据工厂服务用来在运行时连接到它们。
创建 Azure 存储链接服务(目标/接收器)
在此步骤中,请将 Azure 存储帐户链接到数据工厂。
在 C:\ADFv2Tutorial 文件夹中,创建包含以下代码的名为 AzureStorageLinkedService.json 的 JSON 文件。 如果 ADFv2Tutorial 文件夹不存在,请创建。
重要
在保存文件之前,请将 <accountName> 和 <accountKey> 分别替换为 Azure 存储帐户的名称和密钥。 已在先决条件部分记下它们。
{
    "name": "AzureStorageLinkedService",
    "properties": {
        "annotations": [],
        "type": "AzureBlobStorage",
        "typeProperties": {
            "connectionString": "DefaultEndpointsProtocol=https;AccountName=<accountName>;AccountKey=<accountKey>;EndpointSuffix=core.chinacloudapi.cn"
        }
    }
}
在 PowerShell 中切换到 C:\ADFv2Tutorial 文件夹。
Set-Location 'C:\ADFv2Tutorial'若要创建链接服务 AzureStorageLinkedService,请运行以下
Set-AzDataFactoryV2LinkedServicecmdlet:Set-AzDataFactoryV2LinkedService -DataFactoryName $dataFactoryName -ResourceGroupName $ResourceGroupName -Name "AzureStorageLinkedService" -File ".\AzureStorageLinkedService.json"下面是示例输出:
LinkedServiceName : AzureStorageLinkedService
ResourceGroupName : <resourceGroup name>
DataFactoryName   : <dataFactory name>
Properties        : Microsoft.Azure.Management.DataFactory.Models.AzureBlobStorageLinkedService
如果收到“找不到文件”错误,请运行
dir命令,确认该文件是否存在。 如果文件名的扩展为 .txt(例如 AzureStorageLinkedService.json.txt),请将其删除,然后再次运行 PowerShell 命令。
创建并加密 SQL Server 链接服务(源)
在此步骤中,请将 SQL Server 实例链接到数据工厂。
使用以下代码,在 C:\ADFv2Tutorial 文件夹中创建名为 SqlServerLinkedService.json 的 JSON 文件:
重要
根据连接到 SQL Server 时所使用的身份验证选择节。
使用 SQL 身份验证 (sa):
{
    "name":"SqlServerLinkedService",
    "type":"Microsoft.DataFactory/factories/linkedservices",
    "properties":{
        "annotations":[

        ],
        "type":"SqlServer",
        "typeProperties":{
            "connectionString":"integrated security=False;data source=<serverName>;initial catalog=<databaseName>;user id=<userName>;password=<password>"
        },
        "connectVia":{
            "referenceName":"<integration runtime name> ",
            "type":"IntegrationRuntimeReference"
        }
    }
}
使用 Windows 身份验证:
{
    "name":"SqlServerLinkedService",
    "type":"Microsoft.DataFactory/factories/linkedservices",
    "properties":{
        "annotations":[

        ],
        "type":"SqlServer",
        "typeProperties":{
            "connectionString":"integrated security=True;data source=<serverName>;initial catalog=<databaseName>",
            "userName":"<username> or <domain>\\<username>",
            "password":{
                "type":"SecureString",
                "value":"<password>"
            }
        },
        "connectVia":{
            "referenceName":"<integration runtime name>",
            "type":"IntegrationRuntimeReference"
        }
    }
}
重要
- 根据连接到 SQL Server 实例时所使用的身份验证选择节。
- 将 <integration runtime name> 替换为 Integration Runtime 的名称。
- 保存文件之前,请将 <servername>、databasename<、>username 和 <password> 替换为 SQL Server 实例的值。
- 如需在用户帐户或服务器名称中使用反斜杠 (\),请在其前面加上转义字符 (\)。 例如,使用 mydomain\\myuser。
若要加密敏感数据(用户名、密码等),请运行
New-AzDataFactoryV2LinkedServiceEncryptedCredentialcmdlet。
这种加密可确保使用数据保护应用程序编程接口 (DPAPI) 加密凭据。 加密的凭据存储在自承载 Integration Runtime 节点本地(本地计算机)。 可将输出的有效负载重定向到包含已加密凭据的另一个 JSON 文件(在本例中为 encryptedLinkedService.json)。New-AzDataFactoryV2LinkedServiceEncryptedCredential -DataFactoryName $dataFactoryName -ResourceGroupName $ResourceGroupName -IntegrationRuntimeName $integrationRuntimeName -File ".\SQLServerLinkedService.json" > encryptedSQLServerLinkedService.json运行以下命令,创建 EncryptedSqlServerLinkedService:
Set-AzDataFactoryV2LinkedService -DataFactoryName $dataFactoryName -ResourceGroupName $ResourceGroupName -Name "EncryptedSqlServerLinkedService" -File ".\encryptedSqlServerLinkedService.json"
创建数据集
在此步骤中,请创建输入和输出数据集。 这些数据集代表复制操作的输入和输出数据,该复制操作可将数据从 SQL Server 数据库复制到 Azure Blob 存储。
为源 SQL Server 数据库创建数据集
在此步骤中,请定义一个数据集,代表 SQL Server 数据库实例中的数据。 数据集为 SqlServerTable 类型。 它引用在上一步创建的 SQL Server 链接服务。 链接服务包含的连接信息可供数据工厂服务用来在运行时连接到 SQL Server 实例。 此数据集指定数据库中包含相应数据的 SQL 表。 在本教程中,emp 表包含源数据。
在 C:\ADFv2Tutorial 文件夹中,创建包含以下代码的名为 SqlServerDataset.json 的 JSON 文件:
{
    "name":"SqlServerDataset",
    "properties":{
        "linkedServiceName":{
            "referenceName":"EncryptedSqlServerLinkedService",
            "type":"LinkedServiceReference"
        },
        "annotations":[

        ],
        "type":"SqlServerTable",
        "schema":[

        ],
        "typeProperties":{
            "schema":"dbo",
            "table":"emp"
        }
    }
}
若要创建数据集 SqlServerDataset,请运行
Set-AzDataFactoryV2Datasetcmdlet。Set-AzDataFactoryV2Dataset -DataFactoryName $dataFactoryName -ResourceGroupName $resourceGroupName -Name "SqlServerDataset" -File ".\SqlServerDataset.json"下面是示例输出:
DatasetName       : SqlServerDataset
ResourceGroupName : <resourceGroupName>
DataFactoryName   : <dataFactoryName>
Structure         :
Properties        : Microsoft.Azure.Management.DataFactory.Models.SqlServerTableDataset
为 Azure Blob 存储(接收器)创建数据集
在此步骤中,请定义一个数据集,表示要复制到 Azure Blob 存储的数据。 数据集为 AzureBlob 类型。 它引用此前在本教程中创建的 Azure 存储链接服务。
链接服务包含的连接信息可供数据工厂用来在运行时连接到 Azure 存储帐户。 此数据集在 Azure 存储中指定从 SQL Server 数据库向其复制数据的文件夹。 在本教程中,该文件夹为 adftutorial/fromonprem,其中 adftutorial 是 Blob 容器,fromonprem 是文件夹。
在 C:\ADFv2Tutorial 文件夹中,创建包含以下代码的名为 AzureBlobDataset.json 的 JSON 文件:
{
    "name":"AzureBlobDataset",
    "properties":{
        "linkedServiceName":{
            "referenceName":"AzureStorageLinkedService",
            "type":"LinkedServiceReference"
        },
        "annotations":[

        ],
        "type":"DelimitedText",
        "typeProperties":{
            "location":{
                "type":"AzureBlobStorageLocation",
                "folderPath":"fromonprem",
                "container":"adftutorial"
            },
            "columnDelimiter":",",
            "escapeChar":"\\",
            "quoteChar":"\""
        },
        "schema":[

        ]
    },
    "type":"Microsoft.DataFactory/factories/datasets"
}
若要创建数据集 AzureBlobDataset,请运行
Set-AzDataFactoryV2Datasetcmdlet。Set-AzDataFactoryV2Dataset -DataFactoryName $dataFactoryName -ResourceGroupName $resourceGroupName -Name "AzureBlobDataset" -File ".\AzureBlobDataset.json"下面是示例输出:
DatasetName       : AzureBlobDataset
ResourceGroupName : <resourceGroupName>
DataFactoryName   : <dataFactoryName>
Structure         :
Properties        : Microsoft.Azure.Management.DataFactory.Models.DelimitedTextDataset
创建管道
本教程创建包含复制活动的管道。 该复制活动使用 SqlServerDataset 作为输入数据集,AzureBlobDataset 作为输出数据集。 源类型设置为 SqlSource,接收器类型设置为 BlobSink。
在 C:\ADFv2Tutorial 文件夹中,创建包含以下代码的名为 SqlServerToBlobPipeline.json 的 JSON 文件:
{
    "name":"SqlServerToBlobPipeline",
    "properties":{
        "activities":[
            {
                "name":"CopySqlServerToAzureBlobActivity",
                "type":"Copy",
                "dependsOn":[

                ],
                "policy":{
                    "timeout":"7.00:00:00",
                    "retry":0,
                    "retryIntervalInSeconds":30,
                    "secureOutput":false,
                    "secureInput":false
                },
                "userProperties":[

                ],
                "typeProperties":{
                    "source":{
                        "type":"SqlServerSource"
                    },
                    "sink":{
                        "type":"DelimitedTextSink",
                        "storeSettings":{
                            "type":"AzureBlobStorageWriteSettings"
                        },
                        "formatSettings":{
                            "type":"DelimitedTextWriteSettings",
                            "quoteAllText":true,
                            "fileExtension":".txt"
                        }
                    },
                    "enableStaging":false
                },
                "inputs":[
                    {
                        "referenceName":"SqlServerDataset",
                        "type":"DatasetReference"
                    }
                ],
                "outputs":[
                    {
                        "referenceName":"AzureBlobDataset",
                        "type":"DatasetReference"
                    }
                ]
            }
        ],
        "annotations":[

        ]
    }
}
若要创建管道 SQLServerToBlobPipeline,请运行
Set-AzDataFactoryV2Pipelinecmdlet。Set-AzDataFactoryV2Pipeline -DataFactoryName $dataFactoryName -ResourceGroupName $resourceGroupName -Name "SQLServerToBlobPipeline" -File ".\SQLServerToBlobPipeline.json"下面是示例输出:
PipelineName      : SQLServerToBlobPipeline
ResourceGroupName : <resourceGroupName>
DataFactoryName   : <dataFactoryName>
Activities        : {CopySqlServerToAzureBlobActivity}
Parameters        :
创建管道运行
针对 SQLServerToBlobPipeline 管道启动管道运行,并捕获管道运行 ID,以便将来进行监视。
$runId = Invoke-AzDataFactoryV2Pipeline -DataFactoryName $dataFactoryName -ResourceGroupName $resourceGroupName -PipelineName 'SQLServerToBlobPipeline'
监视管道运行
若要持续检查管道 SQLServerToBlobPipeline 的运行状态,请在 PowerShell 中运行以下脚本,列显最终结果:
while ($True) {
    $result = Get-AzDataFactoryV2ActivityRun -DataFactoryName $dataFactoryName -ResourceGroupName $resourceGroupName -PipelineRunId $runId -RunStartedAfter (Get-Date).AddMinutes(-30) -RunStartedBefore (Get-Date).AddMinutes(30)

    if (($result | Where-Object { $_.Status -eq "InProgress" } | Measure-Object).count -ne 0) {
        Write-Host "Pipeline run status: In Progress" -foregroundcolor "Yellow"
        Start-Sleep -Seconds 30
    }
    else {
        Write-Host "Pipeline 'SQLServerToBlobPipeline' run finished. Result:" -foregroundcolor "Yellow"
        $result
        break
    }
}
下面是示例运行的输出:
ResourceGroupName    : <resourceGroupName>
DataFactoryName      : <dataFactoryName>
ActivityRunId        : 24af7cf6-efca-4a95-931d-067c5c921c25
ActivityName         : CopySqlServerToAzureBlobActivity
ActivityType         : Copy
PipelineRunId        : 7b538846-fd4e-409c-99ef-2475329f5729
PipelineName         : SQLServerToBlobPipeline
Input                : {source, sink, enableStaging}
Output               : {dataRead, dataWritten, filesWritten, sourcePeakConnections...}
LinkedServiceName    :
ActivityRunStart     : 9/11/2019 7:10:37 AM
ActivityRunEnd       : 9/11/2019 7:10:58 AM
DurationInMs         : 21094
Status               : Succeeded
Error                : {errorCode, message, failureType, target}
AdditionalProperties : {[retryAttempt, ], [iterationHash, ], [userProperties, {}], [recoveryStatus, None]...}
可以运行以下命令,获取管道 SQLServerToBlobPipeline 的运行 ID,并查看详细的活动运行结果:
Write-Host "Pipeline 'SQLServerToBlobPipeline' run result:" -foregroundcolor "Yellow"
($result | Where-Object {$_.ActivityName -eq "CopySqlServerToAzureBlobActivity"}).Output.ToString()
下面是示例运行的输出:
{
    "dataRead":36,
    "dataWritten":32,
    "filesWritten":1,
    "sourcePeakConnections":1,
    "sinkPeakConnections":1,
    "rowsRead":2,
    "rowsCopied":2,
    "copyDuration":18,
    "throughput":0.01,
    "errors":[

    ],
    "effectiveIntegrationRuntime":"ADFTutorialIR",
    "usedParallelCopies":1,
    "executionDetails":[
        {
            "source":{
                "type":"SqlServer"
            },
            "sink":{
                "type":"AzureBlobStorage",
                "region":"ChinaEast2"
            },
            "status":"Succeeded",
            "start":"2019-09-11T07:10:38.2342905Z",
            "duration":18,
            "usedParallelCopies":1,
            "detailedDurations":{
                "queuingDuration":6,
                "timeToFirstByte":0,
                "transferDuration":5
            }
        }
    ]
}
验证输出
该管道自动在 Blob 容器中创建名为 adftutorial 的输出文件夹。 确认在输出文件夹中看到 dbo.emp.txt 文件。
在 Azure 门户的“adftutorial”容器窗口中选择“刷新”,查看输出文件夹。
选择文件夹列表中的
fromonprem。确认可以看到名为
dbo.emp.txt的文件。
相关内容
此示例中的管道将数据从 Azure Blob 存储中的一个位置复制到另一个位置。 你已了解如何执行以下操作:
- 创建数据工厂。
- 创建自我托管的集成运行时。
- 创建 SQL Server 和 Azure 存储链接服务。
- 创建 SQL Server 和 Azure Blob 数据集。
- 创建包含复制活动的管道,用于移动数据。
- 启动管道运行。
- 监视管道运行。
有关数据工厂支持的数据存储的列表,请参阅支持的数据存储。
若要了解如何将数据从源批量复制到目标,请继续学习以下教程: