重要
自 2025 年 5 月 1 日起,Azure AD B2C 将不再可供新客户购买。 在我们的常见问题解答中了解详细信息。
使用 Azure Active Directory B2C (Azure AD B2C) 自定义策略,不仅可以强制要求用户输入,还可以对其进行验证。 可以将用户输入标记为“必需”,例如 <DisplayClaim ClaimTypeReferenceId="givenName" Required="true"/>,但这并不意味着用户将输入有效的数据。 Azure AD B2C 提供了各种方法来验证用户输入。 本文介绍如何编写自定义策略,以使用以下方法收集用户输入并对其进行验证:
通过提供要从中选取的选项列表来限制用户输入的数据。 此方法使用你在发布声明时添加的枚举值。
定义用户输入必须匹配的模式。 此方法使用你在发布声明时添加的正则表达式。
定义一组规则,并要求用户输入遵循一个或多个规则。 此方法使用你在发布声明时添加的谓词。
使用特殊声明类型 reenterPassword 来验证用户在收集用户输入期间是否已正确地重新输入其密码。
配置验证技术配置文件,以定义无法在声明发布级别定义的复杂业务规则。 例如,你收集用户输入,而该输入需要根据另一个声明中的值或设置值进行验证。
先决条件
如果没有租户,请创建链接到 Azure 订阅的 Azure AD B2C 租户。
必须已在计算机上安装 Visual Studio Code (VS Code)。
完成《使用 Azure AD B2C 自定义策略收集和操作用户输入》中的步骤。 本文是《创建和运行自己的自定义策略操作指南系列教程》的一部分。
注意
本文是《在 Azure Active Directory B2C 中创建和运行自己的自定义策略操作指南系列教程》的一部分。 建议从第一篇文章开始本系列教程。
步骤 1 - 通过限制用户输入选项来验证用户输入
如果知道用户可以为给定输入而输入的所有可能值,则可以提供一组用户必须从中选择的有限的值。 为此,可以使用 DropdownSingleSelect、CheckboxMultiSelect 和 RadioSingleSelect UserInputType 来实现此目的。 在本文中,你将使用 RadioSingleSelect 输入类型:
在 VS Code 中,打开
ContosoCustomPolicy.XML文件。在
ClaimsSchema文件的ContosoCustomPolicy.XML元素中,声明以下声明类型:<ClaimType Id="accountType"> <DisplayName>Account Type</DisplayName> <DataType>string</DataType> <UserHelpText>The type of account used by the user</UserHelpText> <UserInputType>RadioSingleSelect</UserInputType> <Restriction> <Enumeration Text="Contoso Employee Account" Value="work" SelectByDefault="true"/> <Enumeration Text="Personal Account" Value="personal" SelectByDefault="false"/> </Restriction> </ClaimType>我们已声明 accountType 声明。 从用户收集声明的值时,用户必须为值“工作”选择“Contoso 员工帐户”,或为值“个人”选择“个人帐户”。
借助 Azure AD B2C,可以让策略适应不同的语言,并提供多种语言的帐户类型限制。 有关详细信息,请查看《添加用户属性》一文的本地化 UI。
使用
Id="UserInformationCollector"找到技术配置文件,并使用以下代码将 accountType 声明添加为显示声明:<DisplayClaim ClaimTypeReferenceId="accountType" Required="true"/>在包含
Id="UserInformationCollector"的技术配置文件中,使用以下代码将 accountType 声明添加为输出声明:<OutputClaim ClaimTypeReferenceId="accountType"/>要在访问令牌中包含帐户类型声明,请找到
RelyingParty元素,并使用以下代码将 accountType 声明添加为令牌声明:<OutputClaim ClaimTypeReferenceId="accountType" />
步骤 2 - 使用正则表达式验证用户输入
如果无法提前知道所有可能的用户输入值,则允许用户自行输入数据。 在这种情况下,可以使用正则表达式 (regex) 或模式来指示需要如何设置用户输入的格式。 例如,电子邮件文本中某处必须具有 at (@) 符号和 句点 (.)。
在发布声明时,自定义策略允许定义用户输入必须匹配的正则表达式。 可以选择提供一条消息,如果用户输入与表达式不匹配,则会向用户显示该消息。
找到
ClaimsSchema元素,并使用以下代码声明电子邮件声明:<ClaimType Id="email"> <DisplayName>Email Address</DisplayName> <DataType>string</DataType> <DefaultPartnerClaimTypes> <Protocol Name="OpenIdConnect" PartnerClaimType="email"/> </DefaultPartnerClaimTypes> <UserHelpText>Your email address. </UserHelpText> <UserInputType>TextBox</UserInputType> <Restriction> <Pattern RegularExpression="^[a-zA-Z0-9.!#$%&'^_`{}~-]+@[a-zA-Z0-9-]+(?:\.[a-zA-Z0-9-]+)*$" HelpText="Please enter a valid email address something like maurice@contoso.com"/> </Restriction> </ClaimType>使用
Id="UserInformationCollector"找到技术配置文件,并使用以下代码将电子邮件声明添加为显示声明:<DisplayClaim ClaimTypeReferenceId="email" Required="true"/>在包含
Id="UserInformationCollector"的技术配置文件中,使用以下代码将电子邮件声明添加为输出声明:<OutputClaim ClaimTypeReferenceId="email"/>找到
RelyingParty元素,并使用以下代码将电子邮件添加为令牌声明:<OutputClaim ClaimTypeReferenceId="email" />
步骤 3 - 使用谓词验证用户输入
你已使用正则表达式来验证用户输入。 但正则表达式有一个弱点,即在你更正输入之前将一直显示错误消息,而不会向你显示输入未能满足的特定要求。
使用谓词验证,可以通过定义一组规则(谓词),并为每项规则定义独立的错误消息来解决此问题。 在自定义策略中,谓词具有一个内置方法,可以定义你要进行的检查。 例如,可以使用 IsLengthRange 谓词方法来检查用户密码是否在(值)指定的最小和最大参数范围内。
虽然谓词定义了根据声明类型进行检查的验证,但 PredicateValidations 会对一组谓词进行分组,以构成可应用于声明类型的用户输入验证。 例如,可创建验证谓词组,用于验证可用于密码的不同类型的允许字符。
谓词和 PredicateValidations 元素都是策略文件 BuildingBlocks 部分的子元素。
找到
ClaimsSchema元素,并使用以下代码声明密码声明:<ClaimType Id="password"> <DisplayName>Password</DisplayName> <DataType>string</DataType> <AdminHelpText>Enter password</AdminHelpText> <UserHelpText>Enter password</UserHelpText> <UserInputType>Password</UserInputType> </ClaimType>使用以下代码将
Predicates元素添加为BuildingBlocks节的子元素。 在Predicates元素下方添加ClaimsSchema元素:<Predicates> </Predicates>在
Predicates元素中,使用以下代码定义谓词:<Predicate Id="IsLengthBetween8And64" Method="IsLengthRange" HelpText="The password must be between 8 and 64 characters."> <Parameters> <Parameter Id="Minimum">8</Parameter> <Parameter Id="Maximum">64</Parameter> </Parameters> </Predicate> <Predicate Id="Lowercase" Method="IncludesCharacters" HelpText="a lowercase letter"> <Parameters> <Parameter Id="CharacterSet">a-z</Parameter> </Parameters> </Predicate> <Predicate Id="Uppercase" Method="IncludesCharacters" HelpText="an uppercase letter"> <Parameters> <Parameter Id="CharacterSet">A-Z</Parameter> </Parameters> </Predicate> <Predicate Id="Number" Method="IncludesCharacters" HelpText="a digit"> <Parameters> <Parameter Id="CharacterSet">0-9</Parameter> </Parameters> </Predicate> <Predicate Id="Symbol" Method="IncludesCharacters" HelpText="a symbol"> <Parameters> <Parameter Id="CharacterSet">@#$%^&*\-_+=[]{}|\\:',.?/`~"();!</Parameter> </Parameters> </Predicate> <Predicate Id="PIN" Method="MatchesRegex" HelpText="The password must be numbers only."> <Parameters> <Parameter Id="RegularExpression">^[0-9]+$</Parameter> </Parameters> </Predicate> <Predicate Id="AllowedCharacters" Method="MatchesRegex" HelpText="An invalid character was provided."> <Parameters> <Parameter Id="RegularExpression">(^([0-9A-Za-z\d@#$%^&*\-_+=[\]{}|\\:',?/`~"();! ]|(\.(?!@)))+$)|(^$)</Parameter> </Parameters> </Predicate> <Predicate Id="DisallowedWhitespace" Method="MatchesRegex" HelpText="The password must not begin or end with a whitespace character."> <Parameters> <Parameter Id="RegularExpression">(^\S.*\S$)|(^\S+$)|(^$)</Parameter> </Parameters> </Predicate>我们定义了几个规则,这些规则在组合起来后描述了可接受的密码。 接下来,可以对谓词进行分组,以形成一组可在策略中使用的密码策略。
使用以下代码将
PredicateValidations元素添加为BuildingBlocks节的子元素。 将PredicateValidations元素添加为BuildingBlocks节的子元素(但它位于Predicates元素下方):<PredicateValidations> </PredicateValidations>在
PredicateValidations元素中,使用以下代码定义 PredicateValidations:<PredicateValidation Id="SimplePassword"> <PredicateGroups> <PredicateGroup Id="DisallowedWhitespaceGroup"> <PredicateReferences> <PredicateReference Id="DisallowedWhitespace"/> </PredicateReferences> </PredicateGroup> <PredicateGroup Id="AllowedCharactersGroup"> <PredicateReferences> <PredicateReference Id="AllowedCharacters"/> </PredicateReferences> </PredicateGroup> <PredicateGroup Id="LengthGroup"> <PredicateReferences> <PredicateReference Id="IsLengthBetween8And64"/> </PredicateReferences> </PredicateGroup> </PredicateGroups> </PredicateValidation> <PredicateValidation Id="StrongPassword"> <PredicateGroups> <PredicateGroup Id="DisallowedWhitespaceGroup"> <PredicateReferences> <PredicateReference Id="DisallowedWhitespace"/> </PredicateReferences> </PredicateGroup> <PredicateGroup Id="AllowedCharactersGroup"> <PredicateReferences> <PredicateReference Id="AllowedCharacters"/> </PredicateReferences> </PredicateGroup> <PredicateGroup Id="LengthGroup"> <PredicateReferences> <PredicateReference Id="IsLengthBetween8And64"/> </PredicateReferences> </PredicateGroup> <PredicateGroup Id="CharacterClasses"> <UserHelpText>The password must have at least 3 of the following:</UserHelpText> <PredicateReferences MatchAtLeast="3"> <PredicateReference Id="Lowercase"/> <PredicateReference Id="Uppercase"/> <PredicateReference Id="Number"/> <PredicateReference Id="Symbol"/> </PredicateReferences> </PredicateGroup> </PredicateGroups> </PredicateValidation> <PredicateValidation Id="CustomPassword"> <PredicateGroups> <PredicateGroup Id="DisallowedWhitespaceGroup"> <PredicateReferences> <PredicateReference Id="DisallowedWhitespace"/> </PredicateReferences> </PredicateGroup> <PredicateGroup Id="AllowedCharactersGroup"> <PredicateReferences> <PredicateReference Id="AllowedCharacters"/> </PredicateReferences> </PredicateGroup> </PredicateGroups> </PredicateValidation>我们有三个已定义的谓词验证,分别是 StrongPassword、CustomPassword 和 SimplePassword。 根据希望用户输入的密码的特征,可以在谓词验证上使用其中任何一项。 在本文中,我们将使用强密码。
找到 密码 声明类型声明,并使用以下代码将 StrongPassword 谓词验证添加到它包含的 UserInputType 元素后面:
<PredicateValidationReference Id="StrongPassword" />使用
Id="UserInformationCollector"找到技术配置文件,并使用以下代码将密码声明添加为显示声明:<DisplayClaim ClaimTypeReferenceId="password" Required="true"/>在包含
Id="UserInformationCollector"的技术配置文件中,使用以下代码将密码声明添加为输出声明:<OutputClaim ClaimTypeReferenceId="password"/>
注意
出于安全原因,我们不会在策略生成的令牌中添加用户密码作为声明。 因此,我们不会将密码声明添加到信赖方元素。
步骤 4 - 验证密码并确认密码
你可以要求用户输入密码两次,以此确认用户是否记得他们输入的密码。 在这种情况下,必须检查两个条目的值是否匹配。 自定义策略提供了一种简单的方法来实现此要求。 声明类型 password 和 reenterPassword 被视为特殊类型,因此当它们用于收集用户输入时,UI 会验证用户是否正确地重新输入了其密码。
在自定义策略中使用以下步骤验证密码重新输入:
在
ClaimsSchema文件的ContosoCustomPolicy.XML部分中,使用以下代码在密码声明后立即声明 reenterPassword 声明:<ClaimType Id="reenterPassword"> <DisplayName>Confirm new password</DisplayName> <DataType>string</DataType> <AdminHelpText>Confirm new password</AdminHelpText> <UserHelpText>Reenter password</UserHelpText> <UserInputType>Password</UserInputType> </ClaimType>要收集用户的密码确认输入,请找到
UserInformationCollector自断言技术配置文件,并使用以下代码将 reenterPassword 声明添加为显示声明:<DisplayClaim ClaimTypeReferenceId="reenterPassword" Required="true"/>在
ContosoCustomPolicy.XML文件中,找到UserInformationCollector自断言技术配置文件,然后使用以下代码添加 reenterPassword 声明作为输出声明:<OutputClaim ClaimTypeReferenceId="reenterPassword"/>
步骤 5 - 上传自定义策略文件
此时,你已构建了策略来处理前三种用户输入验证方法。
按照上传自定义策略文件中的步骤进行操作。 如果要上传与门户中已有文件同名的文件,请确保选择“覆盖自定义策略(如果已存在)”。
步骤 6 - 测试自定义策略
在“自定义策略”下,选择“B2C_1A_CONTOSOCUSTOMPOLICY”。
对于自定义策略概述页面上的“选择应用程序”,选择 Web 应用程序,例如之前注册的 webapp1。 确保将“选择回复 URL”的值设置为“
https://jwt.ms”。选择“立即运行”按钮。
输入 名字 和 姓氏。
选择“帐户类型”。
对于“电子邮件地址”,请输入格式不正确的电子邮件值,例如 maurice@contoso。
对于“密码”,请输入未遵循所设置强密码全部特征的密码值。
选择“继续”按钮。 你会看到与下面显示的屏幕类似的屏幕:
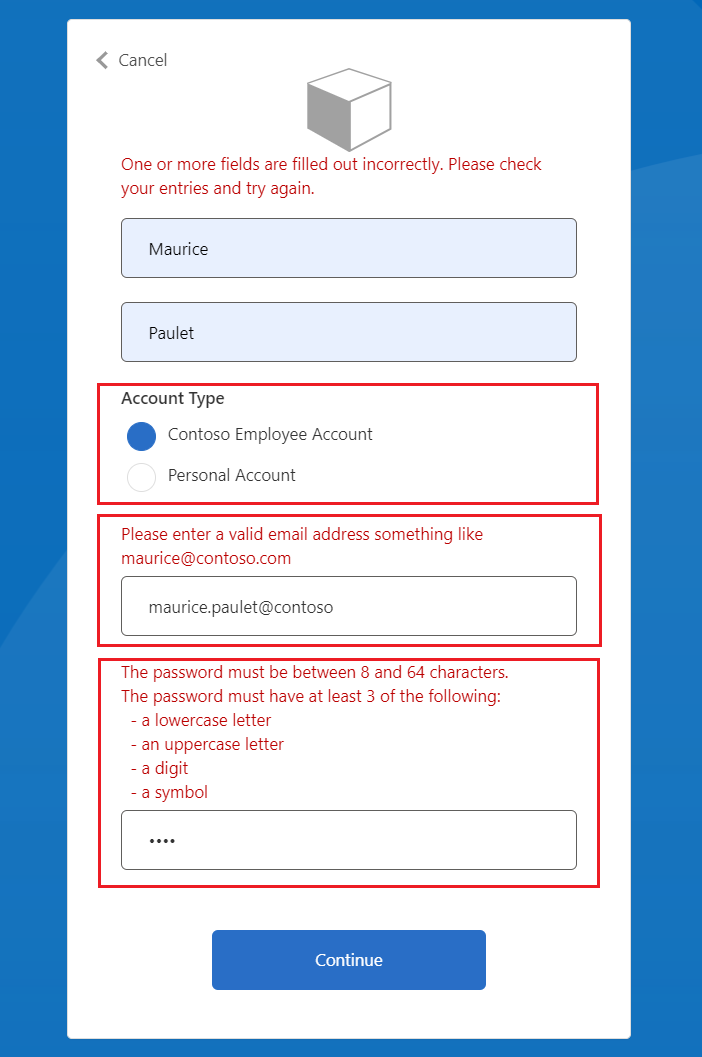
在继续操作之前,必须更正输入。
输入错误消息建议的正确值,然后再次选择“继续”按钮。 策略完成执行后,会重定向到
https://jwt.ms并看到解码的 JWT。 令牌类似于以下 JWT 代码片段:
    {
      "typ": "JWT",
      "alg": "RS256",
      "kid": "pxLOMWFg...."
    }.{
      ...
      "sub": "c7ae4515-f7a7....",
      ...
      "acr": "b2c_1a_contosocustompolicy",
      "accountType": "work",
      ...
      "email": "maurice@contoso.com",
      "name": "Maurice Paulet",
      "message": "Hello Maurice Paulet"
    }.[Signature]
步骤 7 - 使用验证技术配置文件验证用户输入
我们在步骤 1、步骤 2 和步骤 3 中使用的验证技术并不适用于所有方案。 如果业务规则太复杂,无法在声明级别定义,则可以配置一个验证技术,然后从自断言技术配置文件调用它。
注意
只有自断言技术配置文件可以使用验证技术配置文件。 详细了解验证技术配置文件
方案概述
我们要求,如果用户的 帐户类型 是 Contoso 员工帐户,必须确保其电子邮件域基于一组预定义域。 这些域是 contoso.com、fabrikam.com 和 woodgrove.com。 否则,在用户使用有效的 Contoso 员工帐户或切换到个人帐户之前,我们将向用户显示错误。
使用以下步骤了解如何使用验证技术配置文件来验证用户输入。 你使用了声明转换类型验证技术配置文件,但也可以调用 REST API 服务来验证数据,本系列稍后将介绍。
在
ClaimsSchema文件的ContosoCustomPolicy.XML部分中,使用以下代码声明 domain 和 domainStatus 声明:<ClaimType Id="domain"> <DataType>string</DataType> </ClaimType> <ClaimType Id="domainStatus"> <DataType>string</DataType> </ClaimType>找到
ClaimsTransformations部分,然后使用以下代码配置声明转换:<ClaimsTransformation Id="GetDomainFromEmail" TransformationMethod="ParseDomain"> <InputClaims> <InputClaim ClaimTypeReferenceId="email" TransformationClaimType="emailAddress"/> </InputClaims> <OutputClaims> <OutputClaim ClaimTypeReferenceId="domain" TransformationClaimType="domain"/> </OutputClaims> </ClaimsTransformation> <ClaimsTransformation Id="LookupDomain" TransformationMethod="LookupValue"> <InputClaims> <InputClaim ClaimTypeReferenceId="domain" TransformationClaimType="inputParameterId"/> </InputClaims> <InputParameters> <InputParameter Id="contoso.com" DataType="string" Value="valid"/> <InputParameter Id="fabrikam.com" DataType="string" Value="valid"/> <InputParameter Id="woodgrove.com" DataType="string" Value="valid"/> <InputParameter Id="errorOnFailedLookup" DataType="boolean" Value="true"/> </InputParameters> <OutputClaims> <OutputClaim ClaimTypeReferenceId="domainStatus" TransformationClaimType="outputClaim"/> </OutputClaims> </ClaimsTransformation>GetDomainFromEmail 声明转换使用 ParseDomain 方法从电子邮件中提取域,并将其存储在 domain 声明中。 LookupDomain 声明转换使用提取的域来检查它是否有效,其方法是在预定义域中查找该域,并将“有效”分配给 domainStatus 声明。
使用以下代码在与带有
Id=UserInformationCollector的技术配置文件相同的声明提供程序中添加技术配置文件:<TechnicalProfile Id="CheckCompanyDomain"> <DisplayName>Check Company validity </DisplayName> <Protocol Name="Proprietary" Handler="Web.TPEngine.Providers.ClaimsTransformationProtocolProvider, Web.TPEngine, Version=1.0.0.0, Culture=neutral, PublicKeyToken=null"/> <InputClaimsTransformations> <InputClaimsTransformation ReferenceId="GetDomainFromEmail"/> </InputClaimsTransformations> <OutputClaims> <OutputClaim ClaimTypeReferenceId="domain"/> </OutputClaims> <OutputClaimsTransformations> <OutputClaimsTransformation ReferenceId="LookupDomain"/> </OutputClaimsTransformations> </TechnicalProfile>我们已声明了声明转换技术配置文件,该配置文件可执行 GetDomainFromEmail 和 LookupDomain 声明转换。
使用以下代码在
Id=UserInformationCollector元素后面找到包含ValidationTechnicalProfile的技术配置文件和OutputClaims:<ValidationTechnicalProfiles> <ValidationTechnicalProfile ReferenceId="CheckCompanyDomain"> <Preconditions> <Precondition Type="ClaimEquals" ExecuteActionsIf="false"> <Value>accountType</Value> <Value>work</Value> <Action>SkipThisValidationTechnicalProfile</Action> </Precondition> </Preconditions> </ValidationTechnicalProfile> </ValidationTechnicalProfiles>我们已将验证技术配置文件添加到 UserInformationCollector 自断言技术配置文件。 仅当 accountType 值不等于工作时,才会跳过该技术配置文件。 如果执行技术配置文件,并且电子邮件域无效,则会引发错误。
找到带有
Id=UserInformationCollector的技术配置文件,并在metadata标记中添加以下代码。<Item Key="LookupNotFound">The provided email address isn't a valid Contoso Employee email.</Item>我们已设置自定义错误,以防用户未使用有效电子邮件。
按照上传自定义策略文件中的说明上传策略文件。
按照步骤 6 中的说明测试自定义策略:
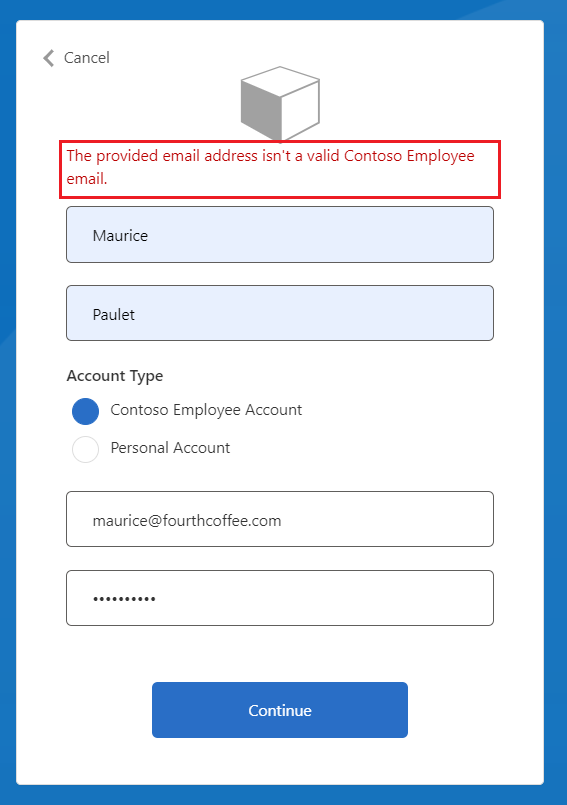
- 对于“帐户类型”,可选择“Contoso 员工帐户”
- 对于“电子邮件地址”,请输入无效的电子邮件地址,例如 maurice@fourthcoffee.com。
- 输入需要的其余详细信息,然后选择“继续”
由于 maurice@fourthcoffee.com 不是有效的电子邮件,因此你将看到类似于以下屏幕截图中所示的错误。 必须使用有效的电子邮件地址才能成功运行自定义策略并接收 JWT。