重要
自 2025 年 5 月 1 日起,Azure AD B2C 将不再可供新客户购买。 在我们的常见问题解答中了解详细信息。
开始之前,请使用此页顶部的“选择策略类型”选择器来选择要设置的策略类型。 Azure Active Directory B2C 提供了两种定义用户如何与应用程序交互的方法:通过预定义的用户流,或者通过可完全配置的自定义策略。 对于每种方法,本文中所需的步骤都不同。
此功能仅适用于自定义策略。 对于设置步骤,请在前面的选择器中选择“自定义策略”。
注意
此功能目前以公共预览版提供。
本文分步讲解如何从 Active Directory B2C (Azure AD B2C) 收集日志来诊断自定义策略存在的问题。 Application Insights 提供了一种方法来诊断异常和直观显示应用程序性能问题。 Azure AD B2C 有一项可将数据发送到 Application Insights 的功能。
只能在自定义策略的开发期间启用此处所述的详细活动日志。
警告
请勿在生产环境中将 DeploymentMode 设置为 Development。 日志会收集发送给以及发送自标识提供者的所有声明。 你作为开发人员对 Application Insights 日志中收集的所有个人数据负责。 仅当策略处于“开发人员模式”时才会收集这些详细日志。
设置 Application Insights
如果还没有,请在订阅中设置一个 Application Insights 实例。
提示
Application Insights 的单个实例可用于多个 Azure AD B2C 租户。 然后可以在查询中按租户或策略名称进行筛选。 有关详细信息,请参阅 Application Insights 中的日志示例。
要在订阅中使用现有的 Application Insights 实例,请执行以下步骤:
- 登录 Azure 门户。
- 请确保使用的是具有 Azure 订阅的 Microsoft Entra 目录,而不是 Azure AD B2C 目录。 在门户工具栏中选择“目录 + 订阅”图标。
- 在“门户设置 | 目录 + 订阅”页上的“目录名称”列表中找到你的 Microsoft Entra 目录,然后选择“切换”。
- 打开之前创建的 Application Insights 资源。
- 在 “概述 ”页上,记录 连接字符串
若要在订阅中创建 Application Insights 的实例,请执行以下步骤:
- 登录 Azure 门户。
- 请确保使用的是具有 Azure 订阅的 Microsoft Entra 目录,而不是 Azure AD B2C 目录。 在门户工具栏中选择“目录 + 订阅”图标。
- 在“门户设置 | 目录 + 订阅”页上的“目录名称”列表中找到你的 Microsoft Entra 目录,然后选择“切换”。
- 在左侧导航菜单中,选择“创建资源”。
- 搜索“Application Insights”并将其选中,然后选择“创建” 。
- 填写窗体,选择“查看 + 创建”,然后选择“创建” 。
- 部署完成后,请选择“转到资源”。
- 在 Application Insights 菜单的“配置”下,选择“属性” 。
- 记录 连接字符串,以便在 后面的步骤中使用。
配置自定义策略
打开信赖方 (RP) 文件,例如 SignUpOrSignin.xml。
将以下属性添加到
<TrustFrameworkPolicy>元素:DeploymentMode="Development" UserJourneyRecorderEndpoint="urn:journeyrecorder:applicationinsights"如果它尚不存在,请将
<UserJourneyBehaviors>子节点添加到<RelyingParty>节点。 它必须位于<DefaultUserJourney ReferenceId="UserJourney Id" from your extensions policy, or equivalent (for example:SignUpOrSigninWithAAD" />之后。 有关 RelyingParty 子元素的完整顺序,请参阅 RelyingParty 架构参考。将以下节点添加为
<UserJourneyBehaviors>元素的子级。 请确保将{Your Application Insights Key}替换为之前记录的 Application Insights 连接字符串。<JourneyInsights TelemetryEngine="ApplicationInsights" ConnectionString="{Your Application Insights ConnectionString}" DeveloperMode="true" ClientEnabled="false" ServerEnabled="true" TelemetryVersion="1.0.0" />-
DeveloperMode="true"指示 Application Insights 使遥测数据更快地通过处理管道。 适用于开发,但在高容量时受到限制。 在生产环境中,将DeveloperMode设置为false。 -
ClientEnabled="true"发送用于跟踪页面视图和客户端错误的 ApplicationInsights 客户端脚本。 可以在 Application Insights 门户的 browserTimings 表中查看此内容。 通过设置ClientEnabled= "true",将 Application Insights 添加到页面脚本,并获取页面加载和 AJAX 调用的时间、浏览器异常和 AJAX 失败的计数和详细信息,以及用户和会话计数。 此字段可选,默认情况下设置为 。 -
ServerEnabled="true"将现有 UserJourneyRecorder JSON 作为自定义事件发送到 Application Insights。
例如:
<TrustFrameworkPolicy ... TenantId="fabrikamb2c.partner.onmschina.cn" PolicyId="SignUpOrSignInWithAAD" DeploymentMode="Development" UserJourneyRecorderEndpoint="urn:journeyrecorder:applicationinsights" > ... <RelyingParty> <DefaultUserJourney ReferenceId="UserJourney ID from your extensions policy, or equivalent (for example: SignUpOrSigninWithAzureAD)" /> <Endpoints> <!--points to refresh token journey when app makes refresh token request--> <Endpoint Id="Token" UserJourneyReferenceId="RedeemRefreshToken" /> </Endpoints> <UserJourneyBehaviors> <JourneyInsights TelemetryEngine="ApplicationInsights" ConnectionString="{Your Application Insights ConnectionString}" DeveloperMode="true" ClientEnabled="false" ServerEnabled="true" TelemetryVersion="1.0.0" /> </UserJourneyBehaviors> ... </TrustFrameworkPolicy>-
上传该策略。
在 Application Insights 中查看日志
在 Application Insights 中看到新日志之前会有一小段延迟(通常不到 5 分钟)。
- 打开在 Azure 门户中创建的 Application Insights 资源。
- 在“概述”页面上,选择“日志” 。
- 在 Application Insights 中打开新选项卡。
下面是可用于查看日志的查询列表:
| 查询 | 说明 |
|---|---|
traces |
获取 Azure AD B2C 生成的所有日志 |
traces | where timestamp > ago(1d) |
获取 Azure AD B2C 为前一天生成的所有日志。 |
traces | where message contains "exception" | where timestamp > ago(2h) |
获取过去两小时的所有日志和错误。 |
traces | where customDimensions.Tenant == "contoso.partner.onmschina.cn" and customDimensions.UserJourney == "b2c_1a_signinandup" |
获取 Azure AD B2C contoso.partner.onmschina.cn 租户生成的所有日志,用户旅程为 b2c_1a_signinandup 。 |
traces | where customDimensions.CorrelationId == "aaaa0000-bb11-2222-33cc-444444dddddd" |
获取 Azure AD B2C 为相关 ID 生成的所有日志。 将相关 ID 替换为你的相关 ID。 |
条目可能较长。 导出到 CSV 进行更深入的了解。
有关查询的详细信息,请参阅 Azure Monitor 中的日志查询概述。
查看 VS Code 扩展中的日志
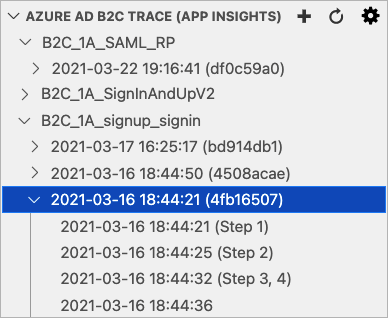
建议为 VS Code 安装 Azure AD B2C 扩展。 使用 Azure AD B2C 扩展,将按策略名称、相关 ID(Application Insights 显示相关 ID 的第一位数字)和日志时间戳组织日志。 此功能可帮助你根据本地时间戳查找相关日志,并查看 Azure AD B2C 执行的用户旅程。
注意
社区开发了 VS Code 扩展,可帮助用户实现和维护 Azure AD B2C 解决方案。 Microsoft 不支持此扩展,它严格按原样提供。
设置 Application Insights API 访问权限
设置 Application Insights 并配置自定义策略后,需要获取 Application Insights API ID,然后创建 API 密钥 。 Azure AD B2C 扩展使用 API ID 和 API 密钥读取 Application Insights 事件(遥测)。 API 密钥的管理与密码类似。 请勿泄露。
注意
之前创建的 Application Insights 连接字符串由 Azure AD B2C 用来将遥测数据发送到 Application Insights。 只能在 Azure AD B2C 策略中使用连接字符串,而不在 VS Code 扩展中使用。
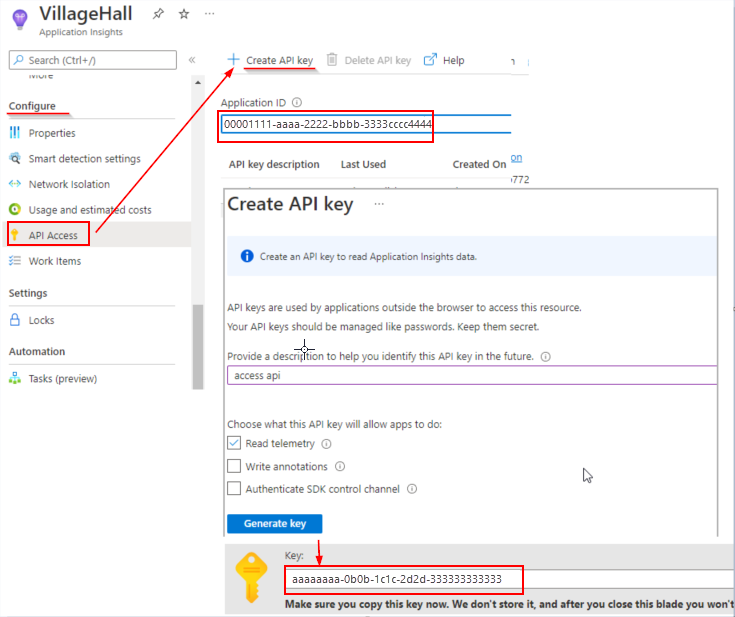
获取 Application Insights ID 和密钥:
在 Azure 门户中,打开应用程序的 Application Insights 资源。
选择“配置”,然后选择“API 访问”。
复制应用程序 ID
选择“创建 API 密钥”
选中“读取遥测”框。
在关闭“创建 API 密钥”边栏选项卡之前复制该密钥并将其保持在安全位置。 如果丢失了密钥,则需要创建另一个密钥。
设置 Azure AD B2C VS Code 扩展
现在已经拥有了 Azure 应用见解 API ID 和密钥,可以配置 VS Code 扩展以读取日志。 Azure AD B2C VS Code 扩展提供了两个设置范围:
- 用户全局设置 - 这些设置全局适用于打开的任何 VS Code 实例。
- 工作区设置 - 这些设置存储在工作区内,仅在工作区打开时才适用(使用 VS Code“打开文件夹”)。
在“Azure AD B2C 跟踪”资源管理器中,单击“设置”图标 。
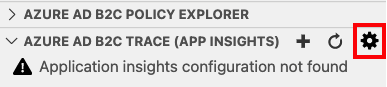
提供 Azure Application Insights ID 和密钥 。
单击“保存”
保存设置后,Application 见解日志将显示在“Azure AD B2C 跟踪 (App Insights)”窗口中。
在生产环境中配置 Application Insights
为了提高生产环境性能和用户体验,有必要配置策略来使其忽略不重要的消息。 还需确保不记录个人身份信息 (PII)。 在生产环境中使用以下配置,不会向应用应用见解发送日志。
将
DeploymentMode的 属性设置为Production。<TrustFrameworkPolicy xmlns:xsi="http://www.w3.org/2001/XMLSchema-instance" xmlns:xsd="http://www.w3.org/2001/XMLSchema" xmlns="http://schemas.microsoft.com/online/cpim/schemas/2013/06" PolicySchemaVersion="0.3.0.0" TenantId="yourtenant.partner.onmschina.cn" PolicyId="B2C_1A_signup_signin" PublicPolicyUri="http://yourtenant.partner.onmschina.cn/B2C_1A_signup_signin" DeploymentMode="Production" UserJourneyRecorderEndpoint="urn:journeyrecorder:applicationinsights">-
<UserJourneyBehaviors>
  <JourneyInsights TelemetryEngine="ApplicationInsights" ConnectionString="{Your Application Insights ConnectionString}" DeveloperMode="false" ClientEnabled="false" ServerEnabled="true" TelemetryVersion="1.0.0" />
</UserJourneyBehaviors>
上传并测试策略。