Azure Kubernetes 服务 (AKS) 是可用于快速部署和管理群集的托管式 Kubernetes 服务。 在此快速入门中,你将了解:
- 下载并安装 Azure Developer CLI (
azd)。 - 从 Azure Developer CLI 模板克隆应用程序(
azd模板)。 - 使用 Azure Developer CLI (
azd) 部署 AKS 群集。 - 运行示例多容器应用程序,其中的一组微服务模拟零售应用。
- 删除和清理
azd模板中创建的容器。
注意
为了开始快速预配 AKS 群集,本文介绍了仅针对评估目的部署具有默认设置的群集的步骤。
开始之前
本快速入门假设读者基本了解 Kubernetes 的概念。 有关详细信息,请参阅 Azure Kubernetes 服务 (AKS) 的 Kubernetes 核心概念。
- 如果没有 Azure 订阅,可在开始前创建一个试用帐户。
可以使用本地 Azure CLI。
如果需要,请安装 Azure CLI 来运行 CLI 参考命令。
本地 Azure CLI,请了解如何安装 Azure CLI。 如果在 Windows 或 macOS 上运行,请考虑在 Docker 容器中运行 Azure CLI。 有关详细信息,请参阅如何在 Docker 容器中运行 Azure CLI。
通过使用 az login 命令登录到 Azure CLI。 若要完成身份验证过程,请遵循终端中显示的步骤。 有关其他登录选项,请参阅使用 Azure CLI 登录。
出现提示时,请在首次使用时安装 Azure CLI 扩展。 有关扩展详细信息,请参阅使用 Azure CLI 的扩展。
运行 az version 以查找安装的版本和依赖库。 若要升级到最新版本,请运行 az upgrade。
- 要在本地使用
azd,请安装Azure Developer CLI版本 1.6.1 或更高版本。
查看应用程序代码
可以在Azure-Samples/aks-store-demo GitHub 存储库中查看应用程序代码。
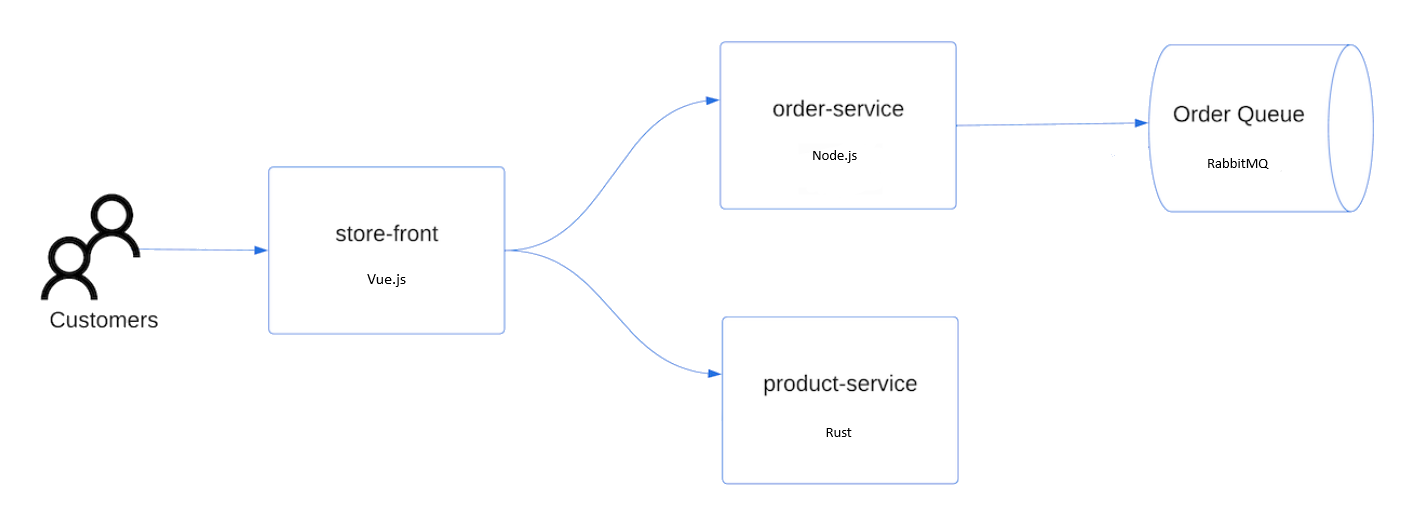
快速入门应用程序包括以下 Kubernetes 部署和服务:
- 门店:Web 应用程序,供客户查看产品和下单。
- 产品服务:显示产品信息。
- 订单服务:下单。
- Rabbit MQ:订单队列的消息队列。
注意
建议不要在没有持久性存储用于生产的情况下运行有状态容器(例如 Rabbit MQ)。 这里使用这些服务是为了简单起见,但我们建议改用托管服务,如 Azure Cosmos DB 或 Azure 服务总线。
克隆 Azure Developer CLI 模板
使用带有
--template参数的azd init命令从 Azure 示例存储库中克隆 AKS 存储演示模板。azd init --template Azure-Samples/aks-store-demo输入仅使用字母数字字符和连字符的项目的环境名称,例如aks-azdqs-1。
Enter a new environment name: aks-azdqs-1
登录到 Azure 云帐户
azd模板包含创建服务所需的所有代码,但需要登录到 Azure 帐户才能在 AKS 上托管应用程序。
使用
azd auth login命令登录到帐户。azd auth login复制输出中显示的设备代码,然后按 Enter 登录。
Start by copying the next code: XXXXXXXXX
Then press enter and continue to log in from your browser...
重要
如果正在使用网络外虚拟机或 GitHub Codespace,则某些 Azure 安全策略在用于使用
azd auth login登录时会导致冲突。 如果在此处遇到问题,可以按照下面提供的 azd auth 解决方法进行操作,这涉及使用对运行 [azd auth login][az-auth-login] 后重定向到的 localhost URL 的curl请求。在组织的登录页上使用凭据进行身份验证。
确认是你在尝试从 Azure CLI 进行连接。
验证消息“设备代码身份验证已完成。 已登录到 Azure。”显示在原始终端中。
Waiting for you to complete authentication in the browser...
Device code authentication completed.
Logged in to Azure.
azd auth 解决方法
此解决方法要求安装Azure CLI。
打开终端窗口,使用
az login命令通过 Azure CLI 登录,--scope参数设置为https://microsoftgraph.chinacloudapi.cn/.default。az login --scope https://microsoftgraph.chinacloudapi.cn/.default应重定向到新选项卡中的身份验证页以创建浏览器访问令牌,如以下示例所示:
https://login.partner.microsoftonline.cn/organizations/oauth2/v2.0/authorize?clientid=<your_client_id>.复制尝试使用
azd auth login登录后收到的网页的 localhost URL。在新终端窗口中,使用以下
curl请求登录。 请确保将<localhost>占位符替换为在上一步中复制的 localhost URL。curl <localhost>成功登录会输出 HTML 网页,如以下示例所示:
<!DOCTYPE html>
<html>
<head>
    <meta charset="utf-8" />
    <meta http-equiv="refresh" content="60;url=https://learn.microsoft.com/cli/azure/">
    <title>Login successfully</title>
    <style>
        body {
            font-family: 'Segoe UI', Tahoma, Geneva, Verdana, sans-serif;
        }

        code {
            font-family: Consolas, 'Liberation Mono', Menlo, Courier, monospace;
            display: inline-block;
            background-color: rgb(242, 242, 242);
            padding: 12px 16px;
            margin: 8px 0px;
        }
    </style>
</head>
<body>
    <h3>You have logged into Azure!</h3>
    <p>You can close this window, or we will redirect you to the <a href="https://learn.microsoft.com/cli/azure/">Azure CLI documentation</a> in 1 minute.</p>
    <h3>Announcements</h3>
    <p>[Windows only] Azure CLI is collecting feedback on using the <a href="https://learn.microsoft.com/windows/uwp/security/web-account-manager">Web Account Manager</a> (WAM) broker for the login experience.</p>
    <p>You may opt-in to use WAM by running the following commands:</p>
    <code>
        az config set core.allow_broker=true<br>
        az account clear<br>
        az login
    </code>
</body>
</html>
关闭当前终端并打开原始终端。 应看到订阅的 JSON 列表。
复制要使用的订阅的
id字段。使用
az account set命令设置订阅。az account set --subscription <subscription_id>
为群集创建和部署资源
azd运行azd-hooks文件夹中的所有挂钩,以预注册、预配和部署应用程序服务。
本快速入门的azd模板使用 AKS 群集和 Azure 密钥保管库新建资源组。 密钥保管库存储客户端机密,并在pets命名空间中运行服务
使用
azd up命令创建所有应用程序资源。azd up为计费使用情况选择 Azure 订阅。
? Select an Azure Subscription to use:  [Use arrows to move, type to filter]
> 1. My Azure Subscription (xxxxxxxx-xxxx-xxxx-xxxx-xxxxxxxxxxxx)
选择要将应用程序部署到的区域。
Select an Azure location to use: [Use arrows to move, type to filter] 1. (Asia) China North 3 2. (Asia) China East 2azd自动运行预配前和预配后命令,以为应用程序创建资源。 此过程可能需要几分钟才能完成。 完成后,应看到类似于以下示例的输出:SUCCESS: Your workflow to provision and deploy to Azure completed in 9 minutes 40 seconds.
测试应用程序
应用程序运行时,Kubernetes 服务将向 Internet 公开应用程序前端。 此过程可能需要几分钟才能完成。 若要管理 Kubernetes 群集,请使用 Kubernetes 命令行客户端 kubectl。 azd up 期间已安装 kubectl。
使用
kubectl set-context命令将命名空间设置为演示命名空间pets。kubectl config set-context --current --namespace=pets使用
kubectl get pods命令查看已部署的 Pod 的状态。 在继续操作之前,请确保所有 Pod 都Running。kubectl get pods使用带有
--watch参数的kubectl get service命令检查存储前端应用程序的公共 IP 地址,并监视进度。kubectl get service store-front --watchstore-front服务的 EXTERNAL-IP 输出最初显示为“pending”:NAME TYPE CLUSTER-IP EXTERNAL-IP PORT(S) AGE store-front LoadBalancer 10.0.100.10 <pending> 80:30025/TCP 4h4m在 EXTERNAL-IP 地址从 pending 更改为实际公共 IP 地址后,请使用
CTRL-C来停止kubectl监视进程。以下示例输出显示向服务分配了有效的公共 IP 地址:
NAME          TYPE           CLUSTER-IP    EXTERNAL-IP    PORT(S)        AGE
store-front   LoadBalancer   10.0.100.10   20.62.159.19   80:30025/TCP   4h5m
打开 Web 浏览器并转到服务的外部 IP 地址,以查看 Azure 应用商店应用的实际效果。
删除群集
完成快速入门后,清理不必要的资源以避免 Azure 费用。
使用
azd down命令删除在快速入门中创建的所有资源。azd down键入
y并按Enter,以确认决定从订阅中删除所有已用资源。? Total resources to delete: 14, are you sure you want to continue? (y/N)键入
y并按Enter,以允许清除以重复使用快速入门变量。[Warning]: These resources have soft delete enabled allowing them to be recovered for a period or time after deletion. During this period, their names may not be reused. In the future, you can use the argument --purge to skip this confirmation. ? Would you like to permanently delete these resources instead, allowing their names to be reused? (y/N)删除资源后,应看到类似于以下示例的输出:
SUCCESS: Your application was removed from Azure in 14 minutes 30 seconds.
注意
此示例应用程序用于演示目的,并不代表 Kubernetes 应用程序的所有最佳做法。
后续步骤
在本快速入门中,你部署了一个 Kubernetes 群集,然后在其中部署了示例多容器应用程序。 此示例应用程序仅用于演示目的,并未展示出 Kubernetes 应用程序的所有最佳做法。
若要详细了解 AKS 并演练完整的代码到部署示例,请继续阅读 Kubernetes 群集教程。

