如果遵循了前面的教程,则拥有一个正常运行的 Kubernetes 群集和 Azure Store Front 应用。
在本教程中,你将横向扩展应用中的 Pod,尝试 Pod 自动缩放,并缩放 Azure VM 节点数,以更改群集用于托管工作负荷的容量。 你将学会如何:
- 缩放 Kubernetes 节点。
- 手动扩缩运行您应用程序的 Kubernetes Pods。
- 配置运行应用前端的自动缩放 Pod。
在您开始之前
在前面的教程中,你将应用程序打包到容器映像中,将映像上传到 Azure 容器注册表,创建了 AKS 群集,部署了应用程序,并使用 Azure 服务总线重新部署更新的应用程序。 如果你尚未完成这些步骤且想要继续学习,请从教程 1:为 AKS 准备应用程序开始。
本教程更改 Pod 和节点计数,并可以增加计算成本。 使用具有缩放 AKS 工作负荷和节点池的权限的标识,例如资源组的 参与者 或 所有者 。
本教程需要 Azure CLI 版本 2.34.1 或更高版本。 运行 az --version 即可查找版本。 如果需要进行安装或升级,请参阅安装 Azure CLI。
手动缩放容器组
AKS 桌面
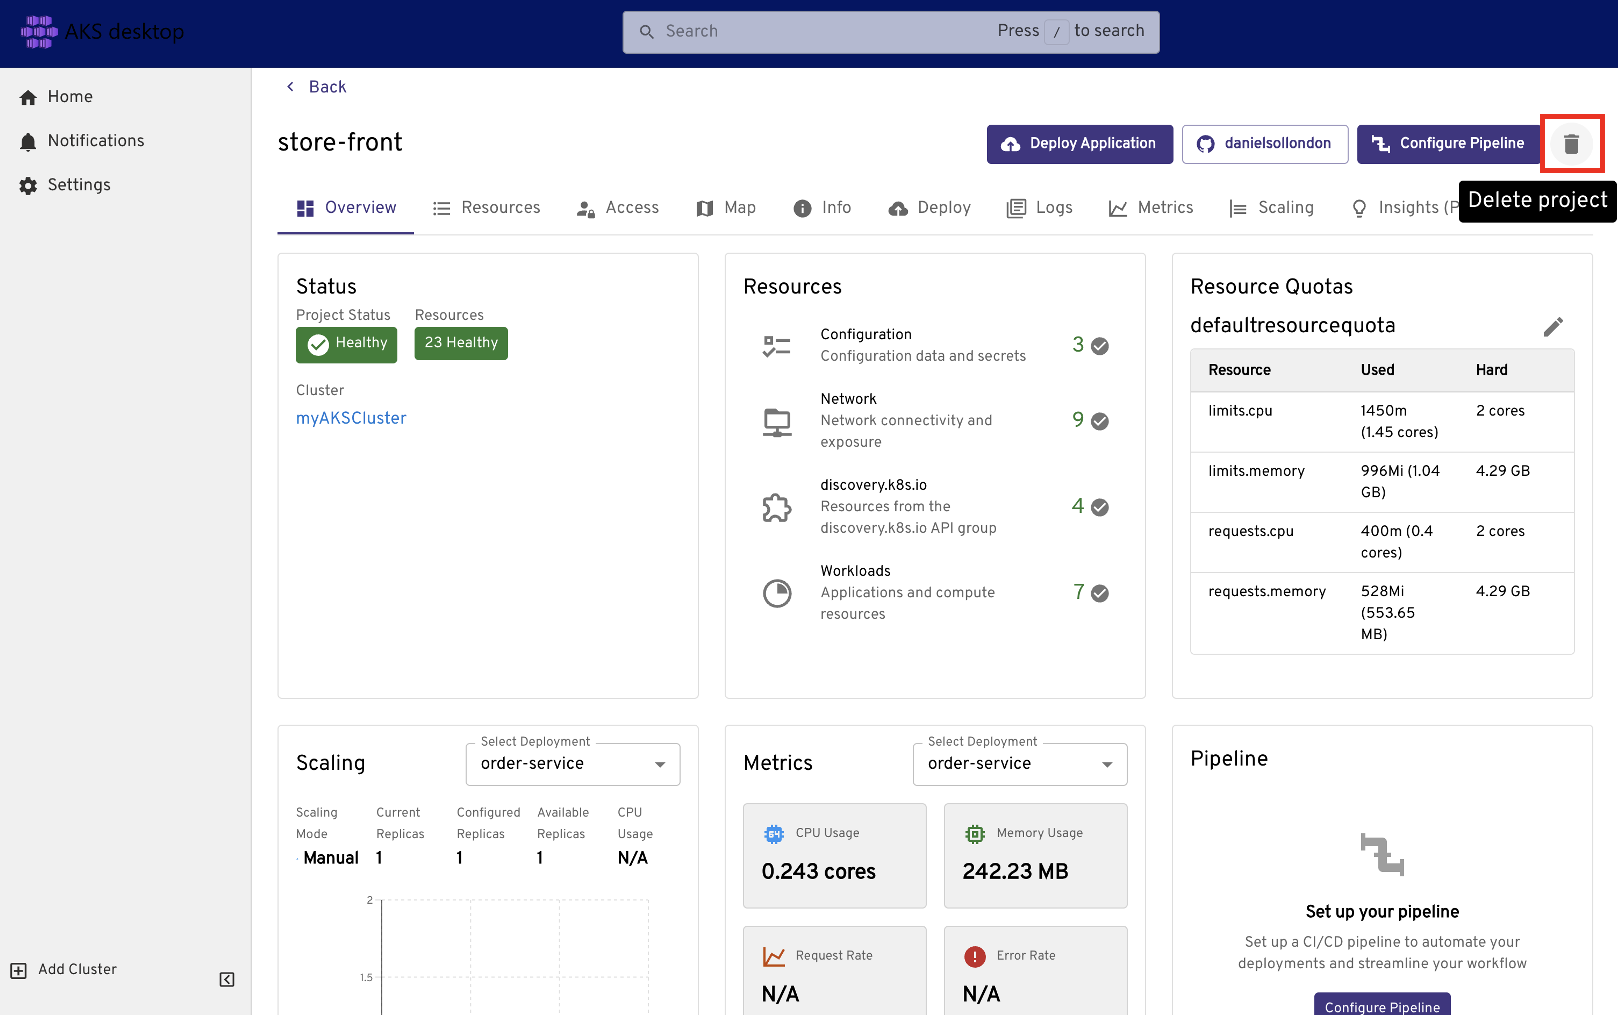
通过选择扩缩容>选择部署:order-service>编辑配置>副本数量:5,编辑 order-service 的扩缩容配置。
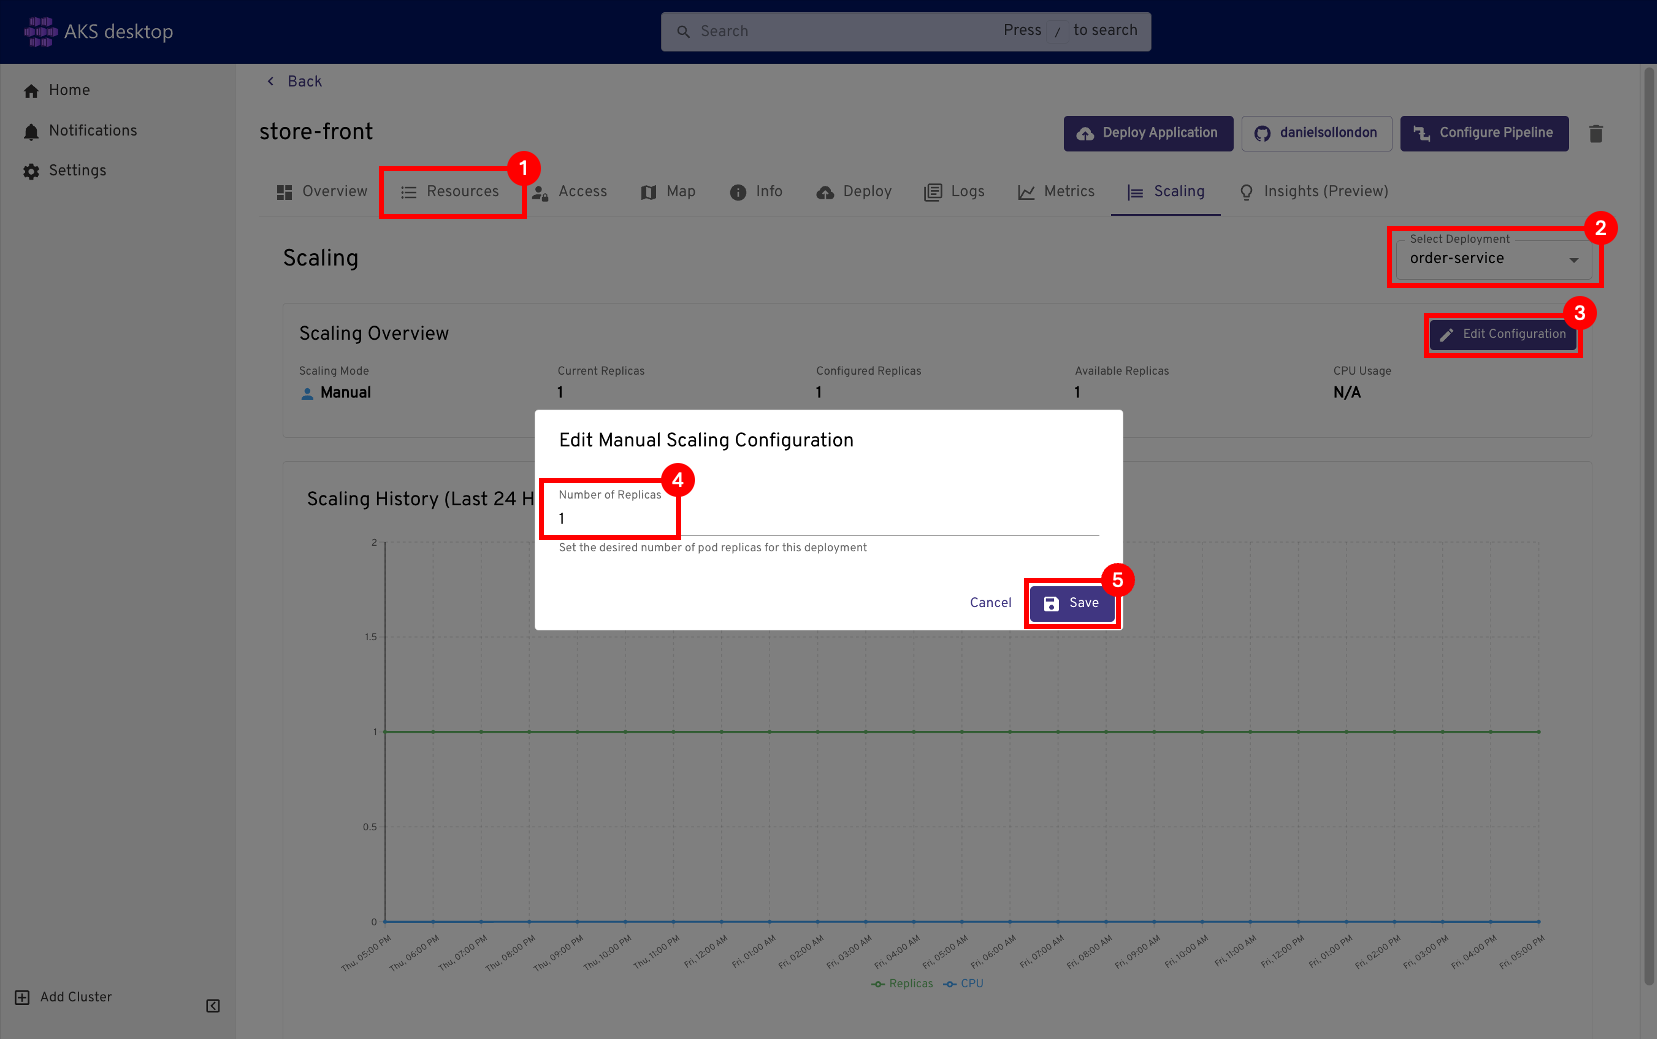
在继续操作之前,请验证部署更新是否已完成。
使用
kubectl get命令查看群集中的 Pod。kubectl get pods以下示例输出显示了运行 Azure Store Front 应用的 Pod:
NAME READY STATUS RESTARTS AGE order-service-848767080-tf34m 1/1 Running 0 31m product-service-4019737227-2q2qz 1/1 Running 0 31m store-front-2606967446-2q2qz 1/1 Running 0 31m使用命令手动更改
kubectl scale部署中的 Pod 数。kubectl scale --replicas=5 deployment.apps/store-front使用
kubectl get pods命令验证是否已创建额外的 Pod。kubectl get pods --selector app=store-front以下示例输出显示了运行 Azure Store Front 应用的其他 Pod:
NAME                              READY     STATUS    RESTARTS   AGE
store-front-3309479140-2hfh0      1/1       Running   0          3m
store-front-3309479140-bzt05      1/1       Running   0          3m
store-front-3309479140-fvcvm      1/1       Running   0          3m
store-front-3309479140-hrbf2      1/1       Running   0          15m
store-front-3309479140-qphz8      1/1       Running   0          3m
自动缩放容器组
AKS 桌面
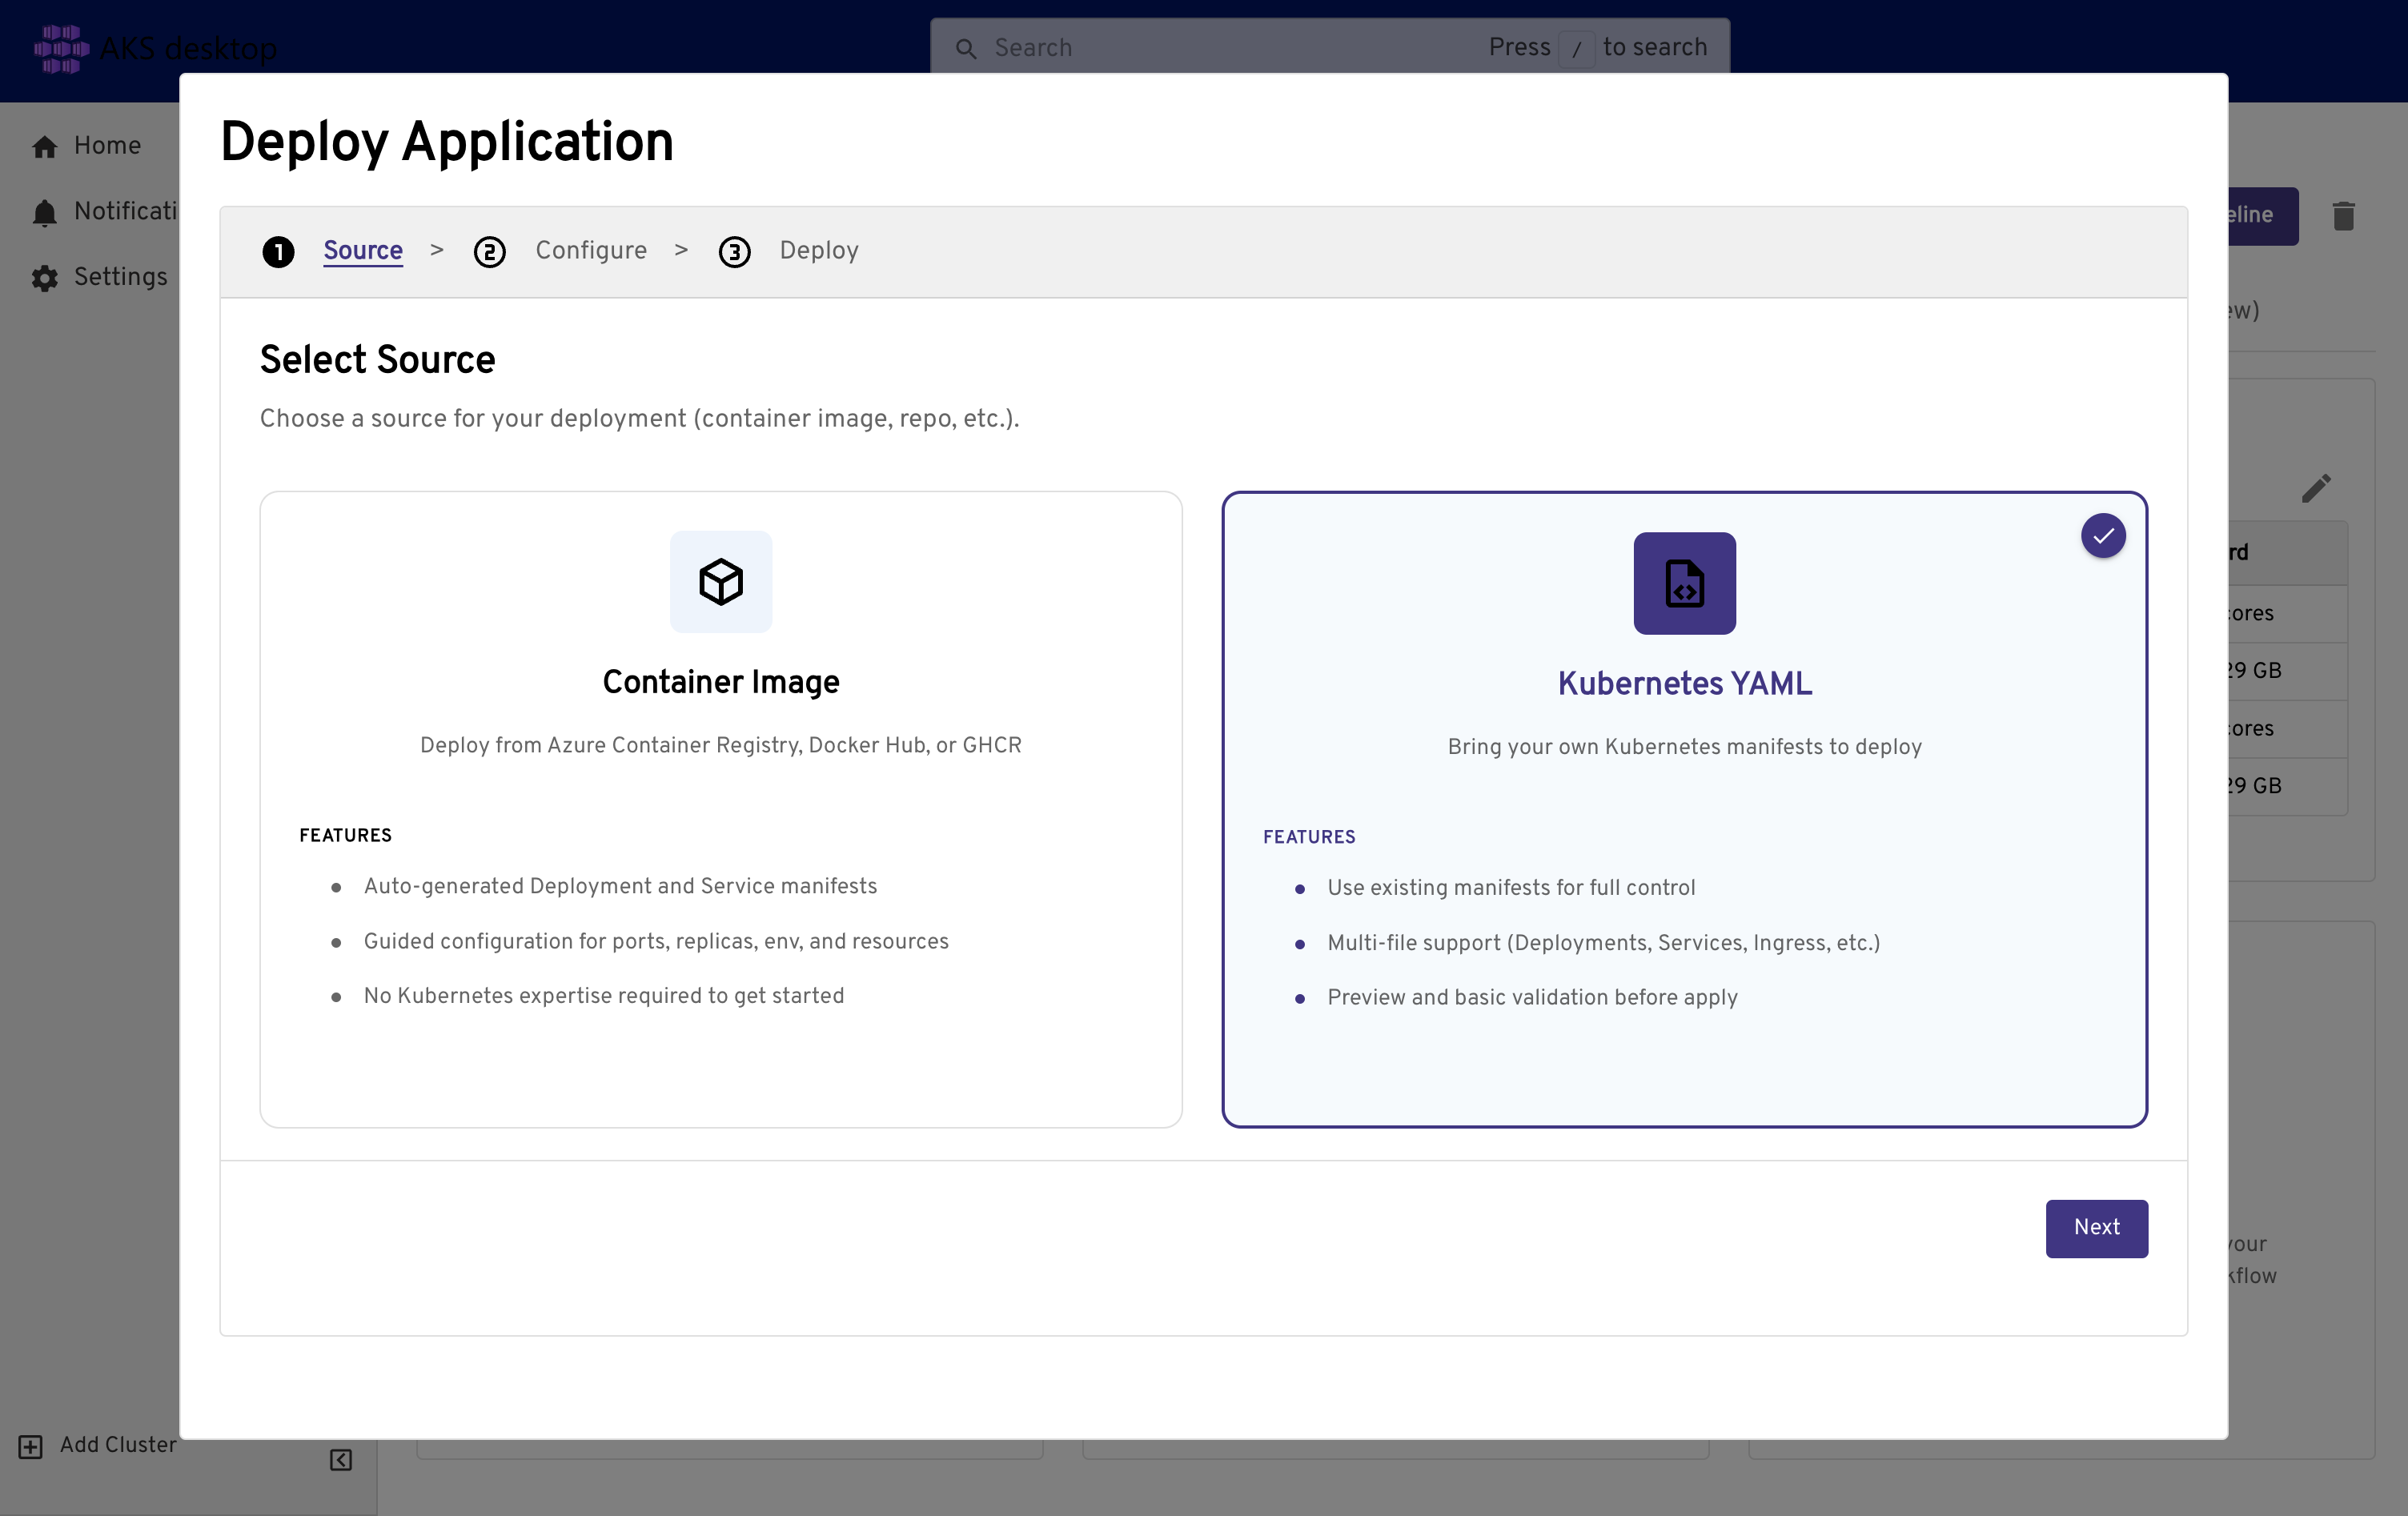
在Project中,选择“部署应用程序”按钮 >Kubernetes YAML。
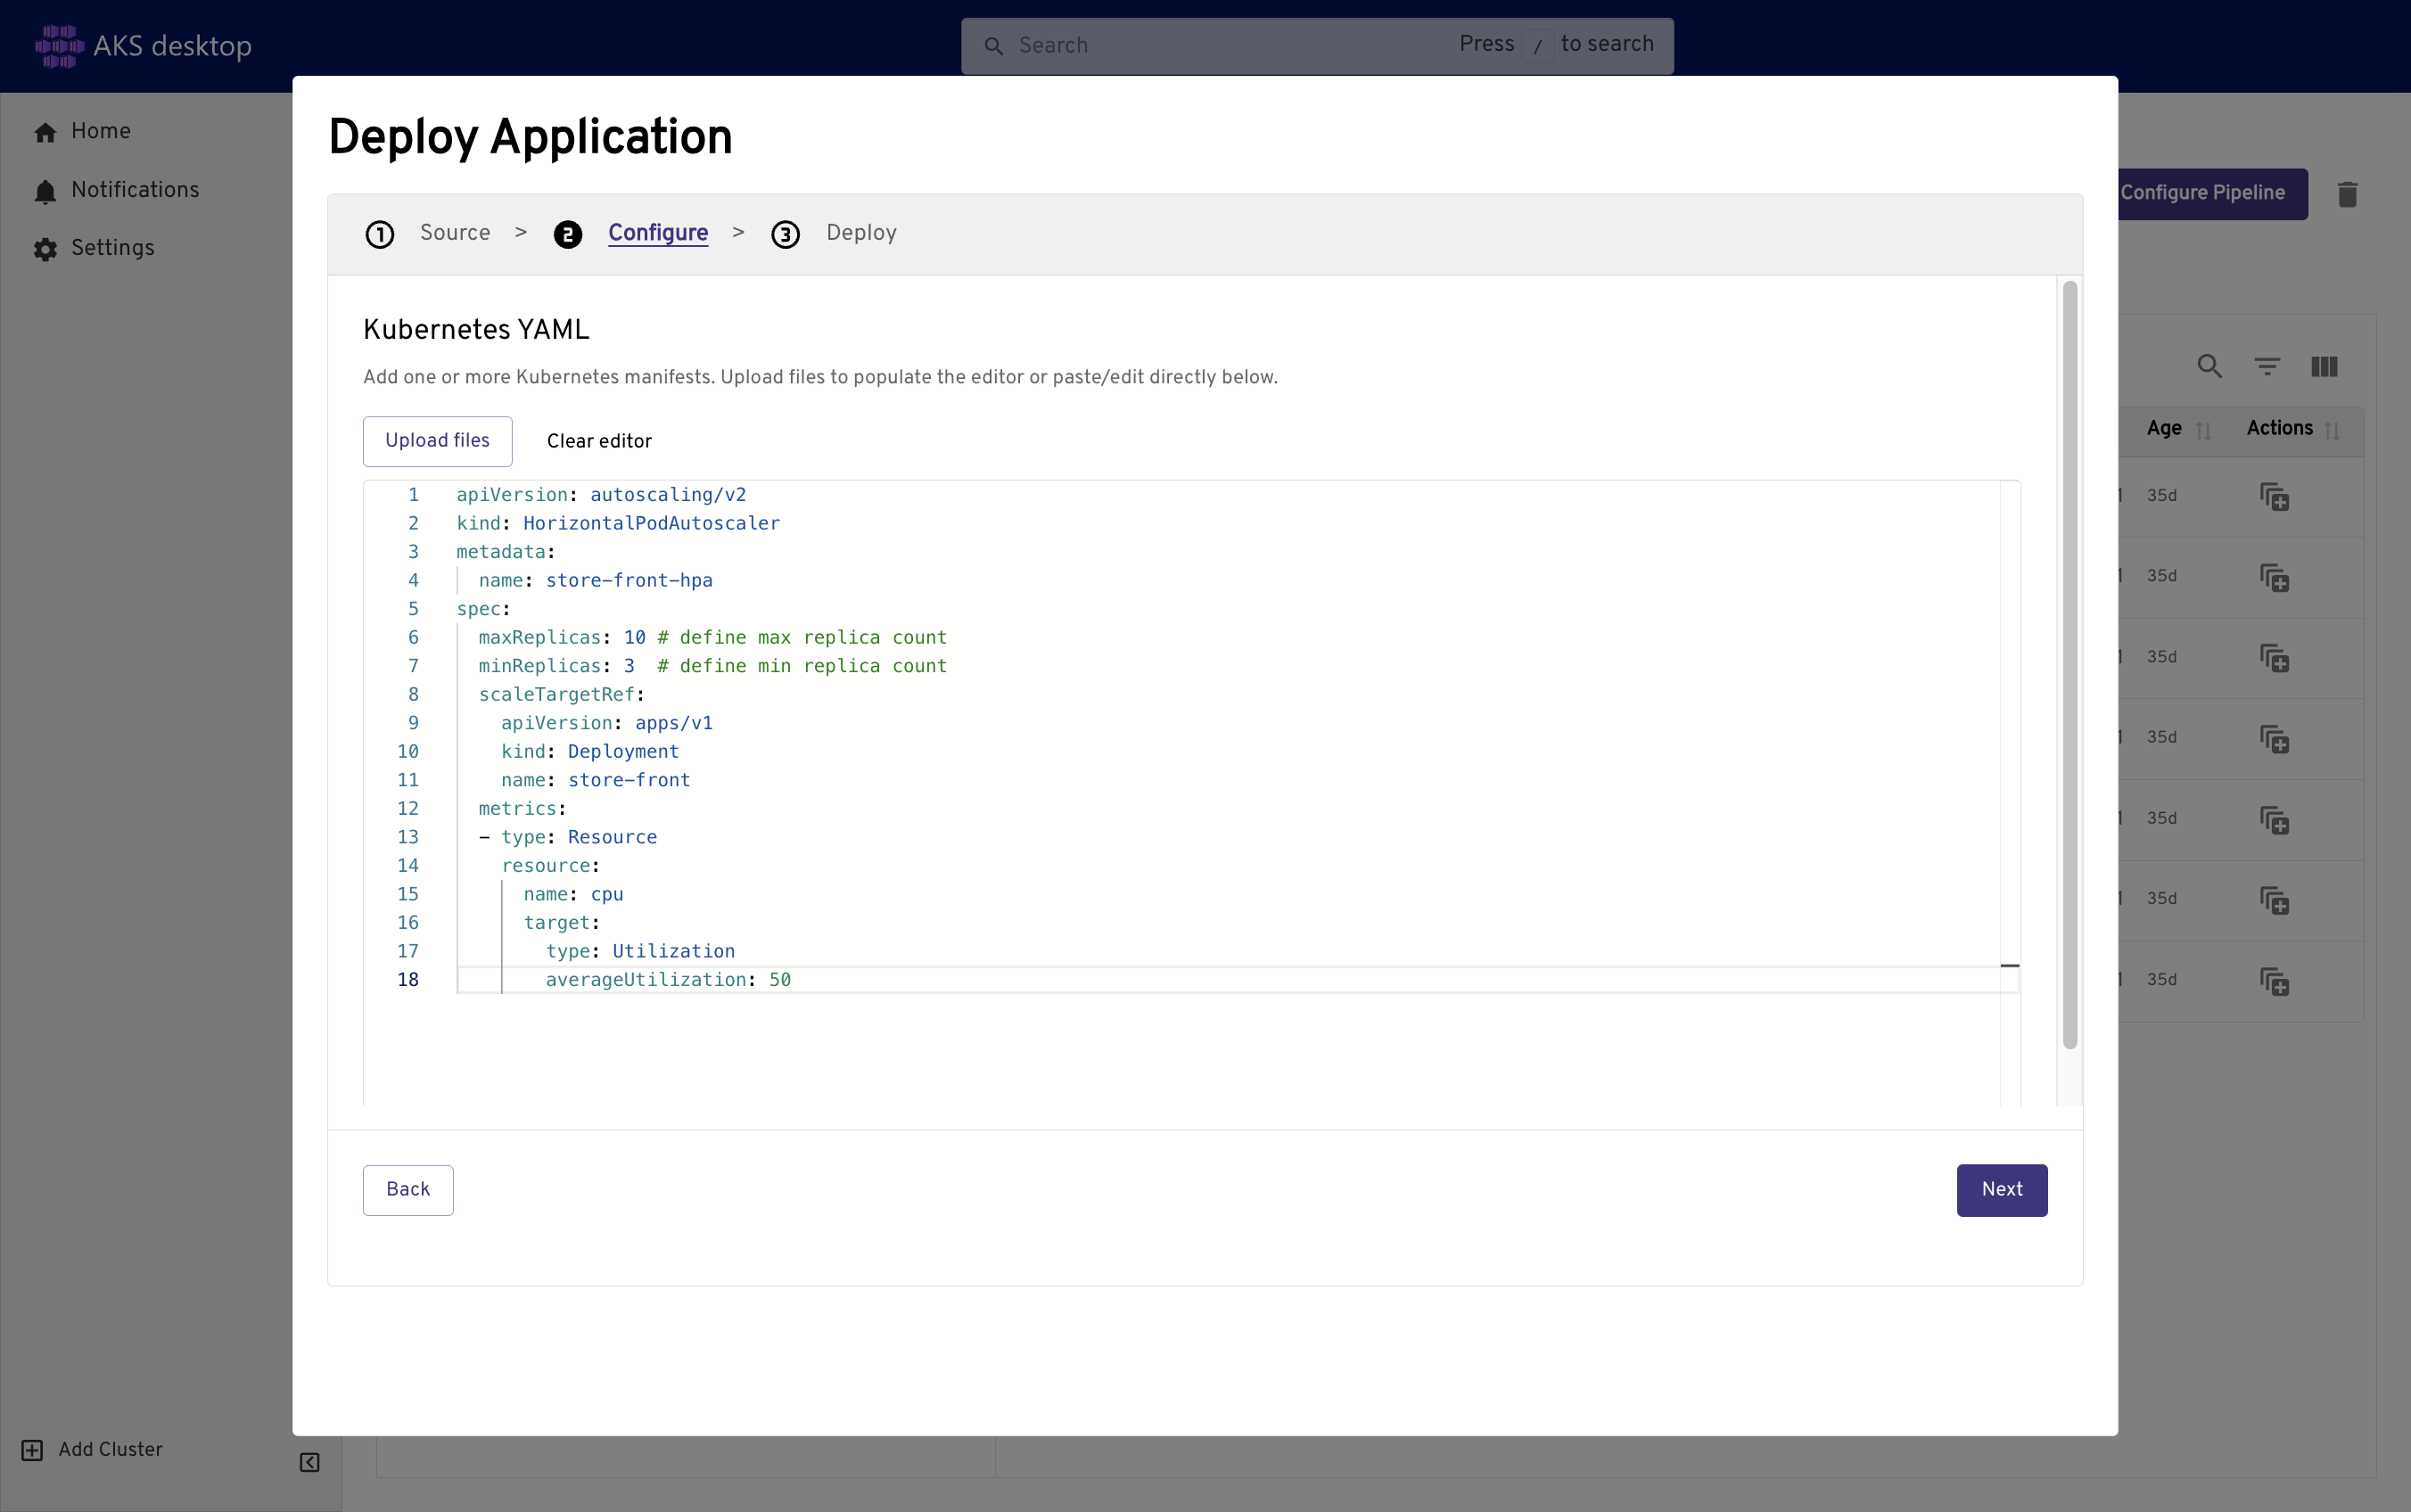
复制并粘贴此 YAML 自动缩放程序清单和资源限制。
apiVersion: autoscaling/v2
kind: HorizontalPodAutoscaler
metadata:
  name: store-front-hpa
spec:
  maxReplicas: 10 # define max replica count
  minReplicas: 3  # define min replica count
  scaleTargetRef:
    apiVersion: apps/v1
    kind: Deployment
    name: store-front
  metrics:
  - type: Resource
    resource:
      name: cpu
      target:
        type: Utilization
        averageUtilization: 50
选择 “下一步>部署>关闭”。
选择 “缩放>选择部署:Store-front”。 现在可以看到缩放模式已设置为 HPA、副本边界和配置设置的 CPU 使用率/目标。
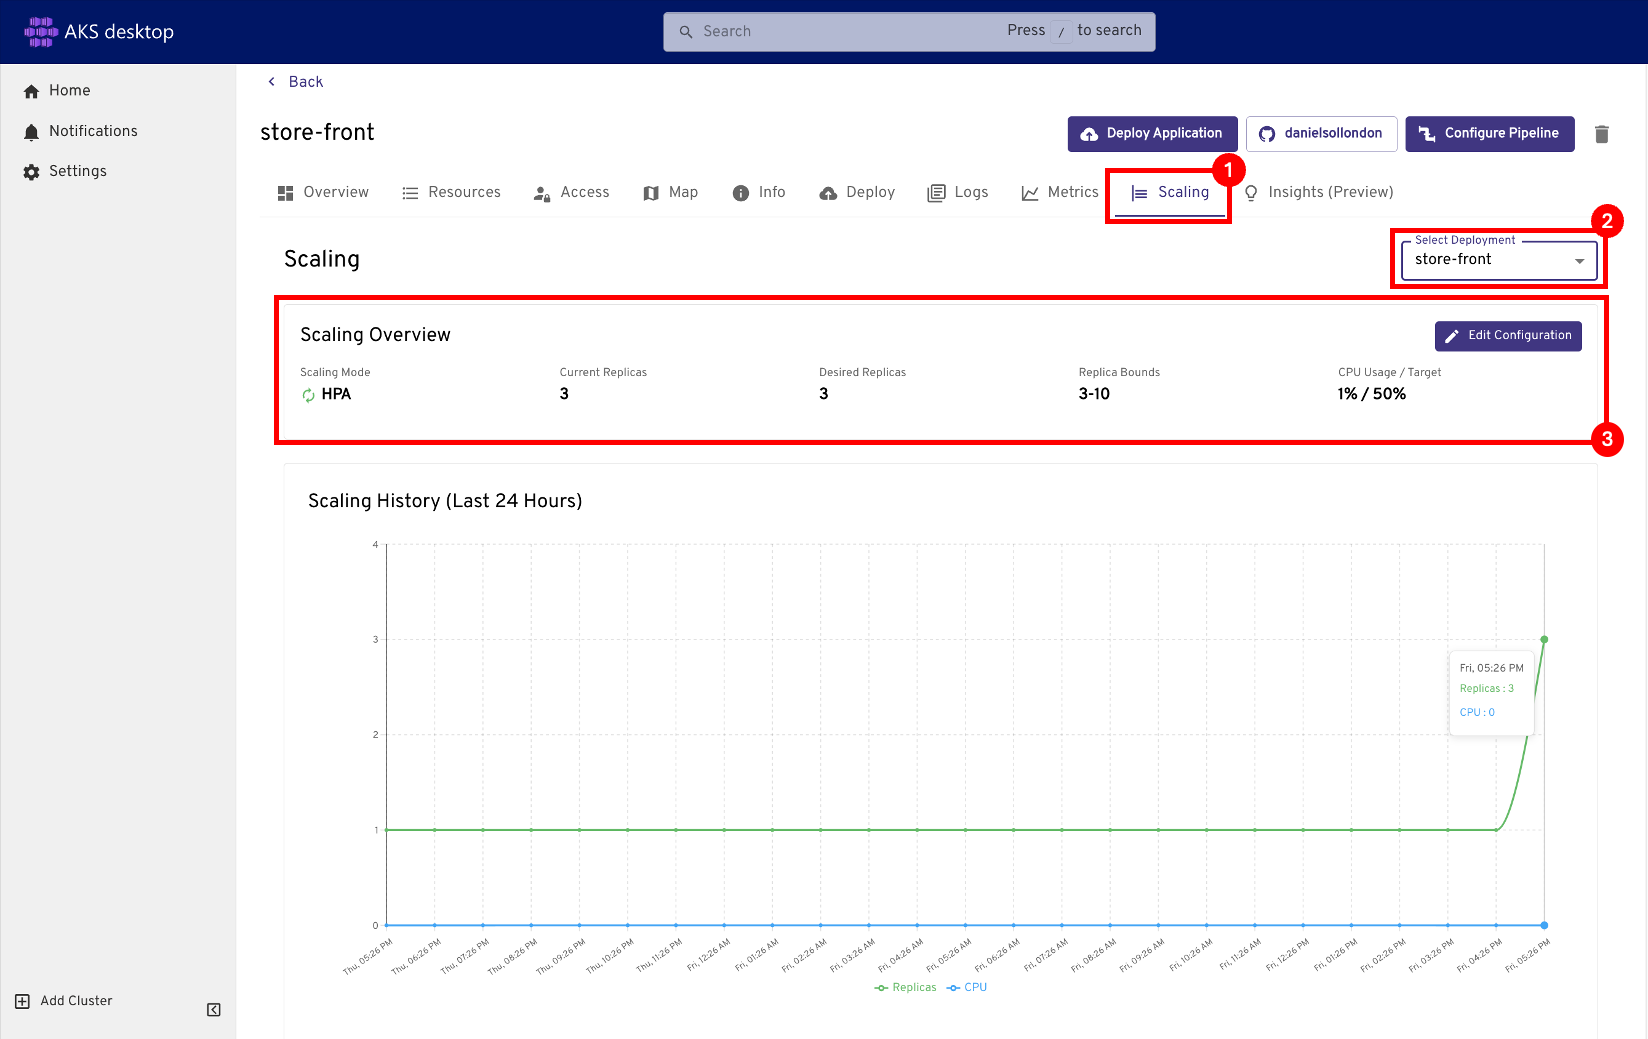
验证是否启用了 HPA 模式,并且副本边界与清单值匹配。
命令行
若要使用水平 Pod 自动缩放程序,所有容器都必须具有定义的 CPU 请求和限制,并且 Pod 必须具有指定的请求。 在aks-store-quickstart部署中,前端容器请求 1m CPU,限制为 1000m CPU。
为每个容器定义这些资源请求和限制,如以下精简示例 YAML 中所示:
...
  containers:
  - name: store-front
    image: ghcr.io/azure-samples/aks-store-demo/store-front:latest
    ports:
    - containerPort: 8080
      name: store-front
...
    resources:
      requests:
        cpu: 1m
...
      limits:
        cpu: 1000m
...
使用清单文件自动缩放 Pod
创建清单文件以定义自动缩放程序行为和资源限制,如以下精简示例清单文件
aks-store-quickstart-hpa.yaml所示:apiVersion: autoscaling/v2 kind: HorizontalPodAutoscaler metadata: name: store-front-hpa spec: maxReplicas: 10 # define max replica count minReplicas: 3 # define min replica count scaleTargetRef: apiVersion: apps/v1 kind: Deployment name: store-front metrics: - type: Resource resource: name: cpu target: type: Utilization averageUtilization: 50使用
kubectl apply命令应用自动扩缩器清单文件。kubectl apply -f aks-store-quickstart-hpa.yaml使用
kubectl get hpa命令检查自动缩放程序的状态。kubectl get hpa几分钟后,在 Azure Store Front 应用负载最小化的情况下,Pod 副本数会减少至 3 个。 可以再次使用
kubectl get pods命令查看不需要的 Pod 已被移除。当
TARGETS和REPLICAS列显示出store-front-hpa的预期自动缩放行为时,继续。
注释
可以在你的群集上启用基于 Kubernetes 的 Event-Driven 自动伸缩程序(KEDA)的 AKS 插件,以根据需要处理的事件数量来驱动扩展。 有关详细信息,请参阅 使用 Kubernetes Event-Driven 自动缩放(KEDA)加载项(预览版)启用简化的应用程序自动缩放。
手动缩放 AKS 节点
注释
如果创建了 AKS 自动群集,则这些步骤不适用,因为群集自动缩放节点。
如果使用上一教程中的命令创建了 AKS 标准群集,则群集有三个节点。 如果要增加或减少此数量,可以手动调整节点数。
以下示例将名为 myAKSCluster 的 Kubernetes 群集中的节点数增加到 5 个。 该命令需要几分钟才能完成。
使用
az aks scale命令缩放群集节点。群集成功缩放后,输出类似于以下示例输出:
az aks nodepool list --resource-group myResourceGroup --cluster-name myAKSCluster --query "[].{name:name,count:count}" -o tableaz aks scale --resource-group myResourceGroup --name myAKSCluster --node-count 5群集成功缩放后,输出将类似于以下示例输出:
"aadProfile": null,
"addonProfiles": null,
"agentPoolProfiles": [
  {
    ...
    "count": 5,
    "mode": "System",
    "name": "nodepool1",
    "osDiskSizeGb": 128,
    "osDiskType": "Managed",
    "osType": "Linux",
    "ports": null,
    "vmSize": "Standard_DS2_v2",
    "vnetSubnetId": null
    ...
  }
  ...
]
还可以自动缩放群集中的节点。 有关详细信息,请参阅 将群集自动缩放程序与节点池配合使用。
后续步骤
在本教程中,你在 Kubernetes 群集中使用了不同的缩放功能。 你已了解如何执行以下操作:
- 手动扩缩运行您应用程序的 Kubernetes Pods。
- 配置运行应用前端的自动缩放 Pod。
- 手动缩放 Kubernetes 节点。
如果已完成,请选择 “删除 ”图标,并在确认消息中选择“ 同时删除命名空间”。
下一教程介绍如何在 AKS 群集中升级 Kubernetes。