在本快速入门中,你将了解如何从使用 TypeScript 语言编写的 Node.js 应用程序中使用 Azure 托管 Redis 缓存,并使用 Microsoft Entra ID 对 Redis 连接进行身份验证。
先决条件
Azure 订阅 - 创建免费帐户
安装 Node.js LTS
安装 TypeScript
将本快速入门中使用的包添加到项目:
npm install redis @redis/entraid @redis/client使用 Azure CLI 向 Azure 进行身份验证,以便开发环境:
az login
本文中的快速入门示例代码在 GitHub 上提供。
创建 Azure 托管 Redis 实例
首先,在 Azure 门户中创建 Azure 托管 Redis 缓存。
创建缓存时,默认情况下会启用Microsoft Entra ID 身份验证,从而使它从头开始安全。 对于本快速入门,缓存使用公共终结点。 在生产环境中,请考虑使用专用终结点和其他网络控制。
- 若要使用门户创建缓存,请遵循以下过程之一:
-
(可选)可以使用 Azure CLI、PowerShell 或首选工具创建缓存。
用于连接到 Redis 缓存的代码
在 TypeScript 代码示例文件的第一部分, index.ts配置与缓存的连接:
import { DefaultAzureCredential } from '@azure/identity';
import { EntraIdCredentialsProviderFactory, REDIS_SCOPE_DEFAULT } from '@redis/entraid';
import { createCluster, RedisClusterType, RedisModules, RedisFunctions, RedisScripts } from '@redis/client';
import * as net from 'node:net';

const redisEndpoint = process.env.REDIS_ENDPOINT!;
if (!redisEndpoint) {
    console.error('REDIS_ENDPOINT is not set. It should look like: `cache-name.region-name.redis.chinacloudapi.cn:<PORT>`. Find the endpoint in the Azure portal.');
    process.exit(1);
}

const [redisHostName, _] = redisEndpoint.split(":");

let client;

function createRedisClient(): RedisClusterType<RedisModules, RedisFunctions, RedisScripts>  {

    const credential = new DefaultAzureCredential();

    const provider = EntraIdCredentialsProviderFactory.createForDefaultAzureCredential({
        credential,
        scopes: REDIS_SCOPE_DEFAULT,
        options: {},
        tokenManagerConfig: {
            expirationRefreshRatio: 0.8
        }
    });

    const client = createCluster<RedisModules, RedisFunctions, RedisScripts>({
        rootNodes: [{ url: `rediss://${redisEndpoint}` }],
        defaults: {
            credentialsProvider: provider,
            socket: {
                connectTimeout: 15000,
                tls: true,

                // This quickstart code uses a fail fast `reconnectStrategy` which
                // is suitable only in sample code. The purpose is to quickly
                // demonstrate the functionality without getting stuck in
                // reconnection loops if your endpoint or authentication is not
                // correctly configured. In production code, a more robust
                // `reconnectStrategy` should be implemented.
                reconnectStrategy: () => new Error('Failure to connect')
            }

        },
        nodeAddressMap(incomingAddress) {
            const [hostNameOrIP, port] = incomingAddress.split(":");

            const address =
                net.isIP(hostNameOrIP) !== 0
                    ? redisHostName
                    : hostNameOrIP;

            return {
                host: address,
                port: Number(port),
            };
        }

    });

    client.on('error', (err) => console.error('Redis cluster error:', err));

    return client;
}
使用该 createRedisClient() 函数创建与 Redis 缓存的 node-redis 客户端连接。
client = createRedisClient();
await client.connect();
测试连接的代码
在下一部分中,使用 Redis PING 命令测试连接。 Redis 服务器返回 PONG。
    const pingResult = await client.ping();
    console.log('Ping result:', pingResult);
代码设置密钥,获取密钥
在本部分中,使用 SET 和 GET 命令以最简单的方式开始在 Redis 缓存中写入和读取数据。
    const setResult = await client.set("Message", "Hello! The cache is working from Node.js!");
    console.log('Set result:', setResult);

    const getResult = await client.get("Message");
    console.log('Get result:', getResult);
运行代码
生成并运行 Node.js 应用程序。
tsc
node index.js
结果如下所示:
Ping result: PONG
Set result: OK
Get result: Hello! The cache is working from Node.js!
在这里,你可以完整地查看此代码示例。
import { DefaultAzureCredential } from '@azure/identity';
import { EntraIdCredentialsProviderFactory, REDIS_SCOPE_DEFAULT } from '@redis/entraid';
import { createCluster, RedisClusterType, RedisModules, RedisFunctions, RedisScripts } from '@redis/client';
import * as net from 'node:net';

const redisEndpoint = process.env.REDIS_ENDPOINT!;
if (!redisEndpoint) {
    console.error('REDIS_ENDPOINT is not set. It should look like: `cache-name.region-name.redis.chinacloudapi.cn:<PORT>`. Find the endpoint in the Azure portal.');
    process.exit(1);
}

const [redisHostName, _] = redisEndpoint.split(":");

let client;

function createRedisClient(): RedisClusterType<RedisModules, RedisFunctions, RedisScripts>  {

    const credential = new DefaultAzureCredential();

    const provider = EntraIdCredentialsProviderFactory.createForDefaultAzureCredential({
        credential,
        scopes: REDIS_SCOPE_DEFAULT,
        options: {},
        tokenManagerConfig: {
            expirationRefreshRatio: 0.8
        }
    });

    const client = createCluster<RedisModules, RedisFunctions, RedisScripts>({
        rootNodes: [{ url: `rediss://${redisEndpoint}` }],
        defaults: {
            credentialsProvider: provider,
            socket: {
                connectTimeout: 15000,
                tls: true,

                // This quickstart code uses a fail fast `reconnectStrategy` which
                // is suitable only in sample code. The purpose is to quickly
                // demonstrate the functionality without getting stuck in
                // reconnection loops if your endpoint or authentication is not
                // correctly configured. In production code, a more robust
                // `reconnectStrategy` should be implemented.
                reconnectStrategy: () => new Error('Failure to connect')
            }

        },
        nodeAddressMap(incomingAddress) {
            const [hostNameOrIP, port] = incomingAddress.split(":");

            const address =
                net.isIP(hostNameOrIP) !== 0
                    ? redisHostName
                    : hostNameOrIP;

            return {
                host: address,
                port: Number(port),
            };
        }

    });

    client.on('error', (err) => console.error('Redis cluster error:', err));

    return client;
}

try {

    client = createRedisClient();

    await client.connect();

    const pingResult = await client.ping();
    console.log('Ping result:', pingResult);

    const setResult = await client.set("Message", "Hello! The cache is working from Node.js!");
    console.log('Set result:', setResult);

    const getResult = await client.get("Message");
    console.log('Get result:', getResult);

} catch (err) {
    console.error('Error:', err);
} finally {
    if (client) {
        try {
            await client.quit();
        } catch (quitErr) {
            console.error('Error occurred while quitting Redis client:', quitErr);

        }
    }
}
清理资源
要继续使用在本文中创建的资源,请保留资源组。
否则,如果您已不再需要使用这些资源,可以删除您创建的 Azure 资源组以避免产生费用。
重要
删除资源组的操作不可逆。 删除资源组时,包含在其中的所有资源会被永久删除。 请确保不会意外删除错误的资源组或资源。 如果在现有资源组(其中包含要保留的资源)内创建了此资源,可以逐个删除这些资源,而不是删除资源组。
删除资源组的步骤
登录到 Azure 门户,然后选择“资源组”。
选择要删除的资源组。
如果有多个资源组,请使用“筛选任何字段...”框,键入为本文创建的资源组的名称。 在结果列表中选择资源组。
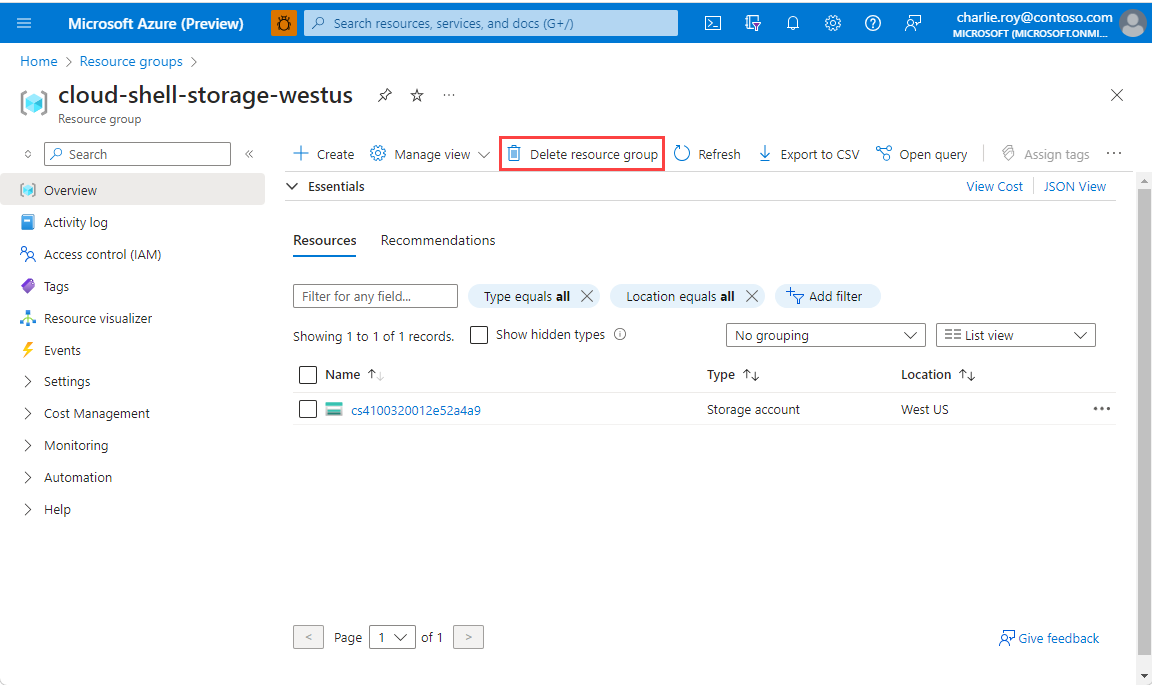
选择“删除资源组”。
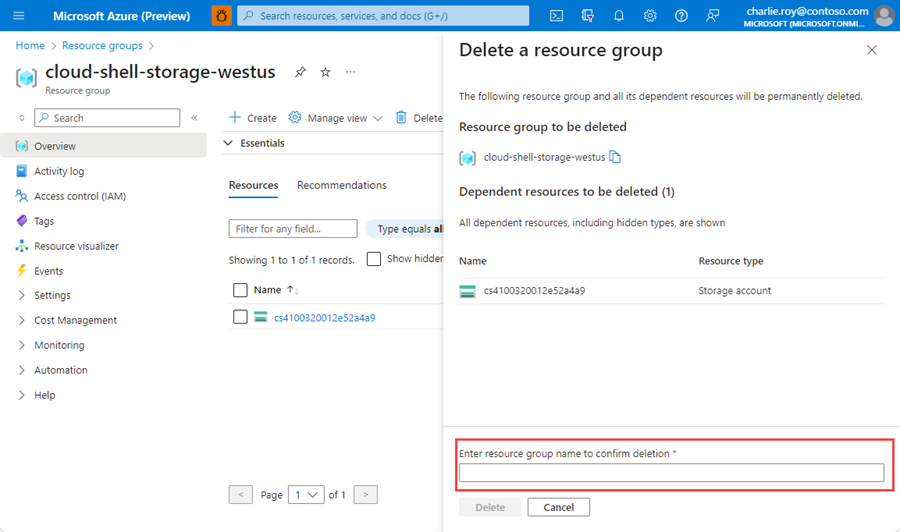
系统会要求确认是否删除资源组。 键入资源组的名称进行确认,然后选择“删除”。
片刻之后,将会删除该资源组及其所有资源。