在本快速入门中,请创建 Python 发送者和接收者应用程序,用于通过 WebSocket 协议发送和接收消息。 这些应用程序使用 Azure 中继的混合连接功能。 若要了解 Azure 中继的常规信息,请参阅 Azure 中继。
在本快速入门中,你将执行以下步骤:
- 使用 Azure 门户创建中继命名空间。
- 使用 Azure 门户在该命名空间中创建混合连接。
- 生成 config.json 属性文件以存储连接详细信息
- 为帮助程序函数开发 relaylib.py(SAS 令牌、URL)
- 编写服务器(侦听器)脚本以接收消息。
- 编写客户端(发送方)脚本以发送消息。
- 执行服务器(侦听器)脚本和客户端(发送方)脚本(可选)。
先决条件
使用 Azure 门户创建命名空间
登录 Azure 门户。
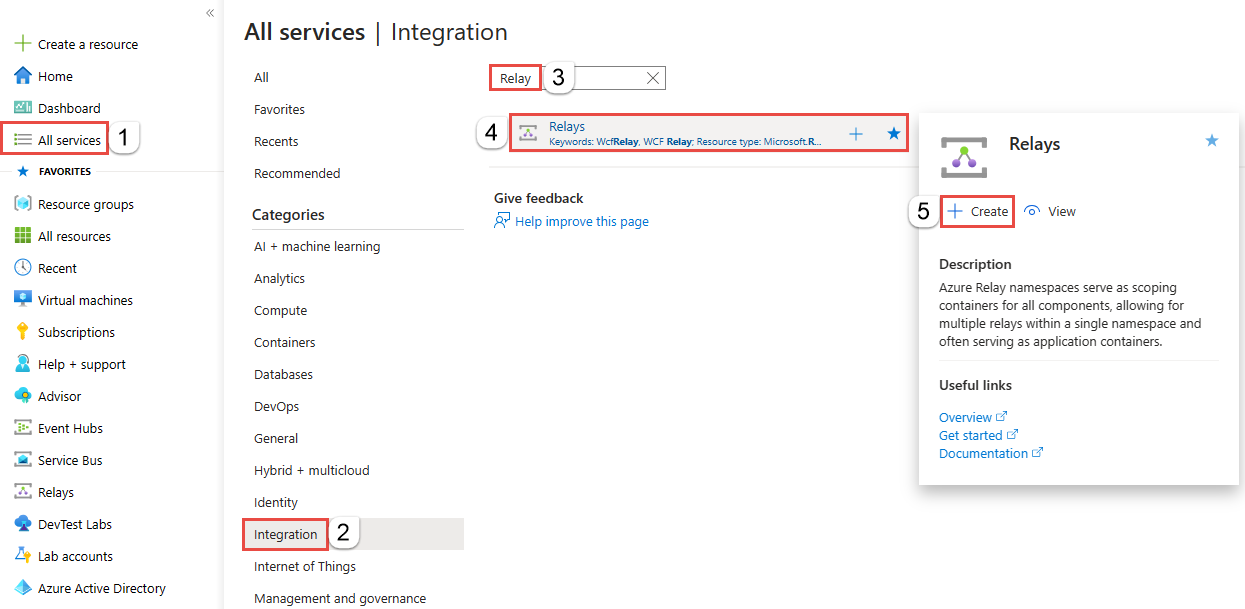
在左侧菜单中,选择“所有服务” 。 选择“集成”,搜索“中继”,将鼠标移到“中继”上方,然后选择“创建”。
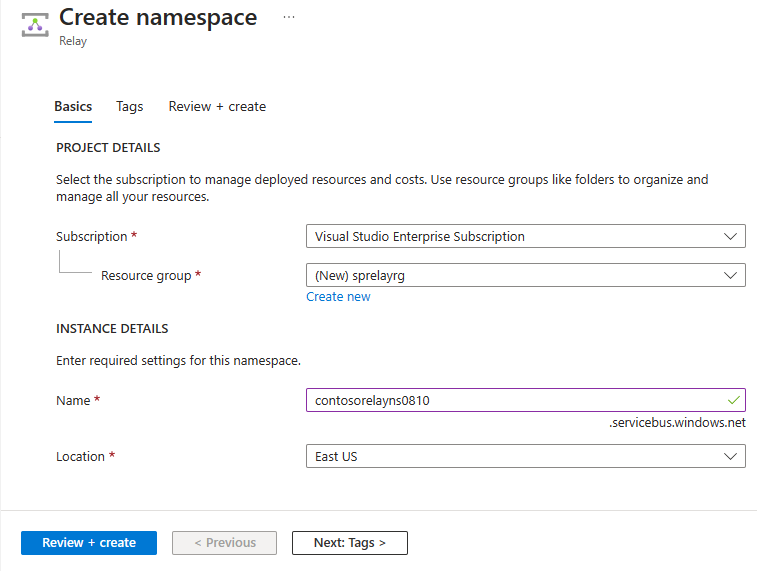
在“创建命名空间”页上,执行以下步骤:
选择要在其中创建命名空间的 Azure 订阅。
对于资源组,选择一个要在其中放置命名空间的现有资源组,或创建一个新资源组。
输入中继命名空间的名称。
选择应托管该命名空间的区域。
在页面底部选择查看 + 创建。
在“查看 + 创建”页面上,选择“创建”。
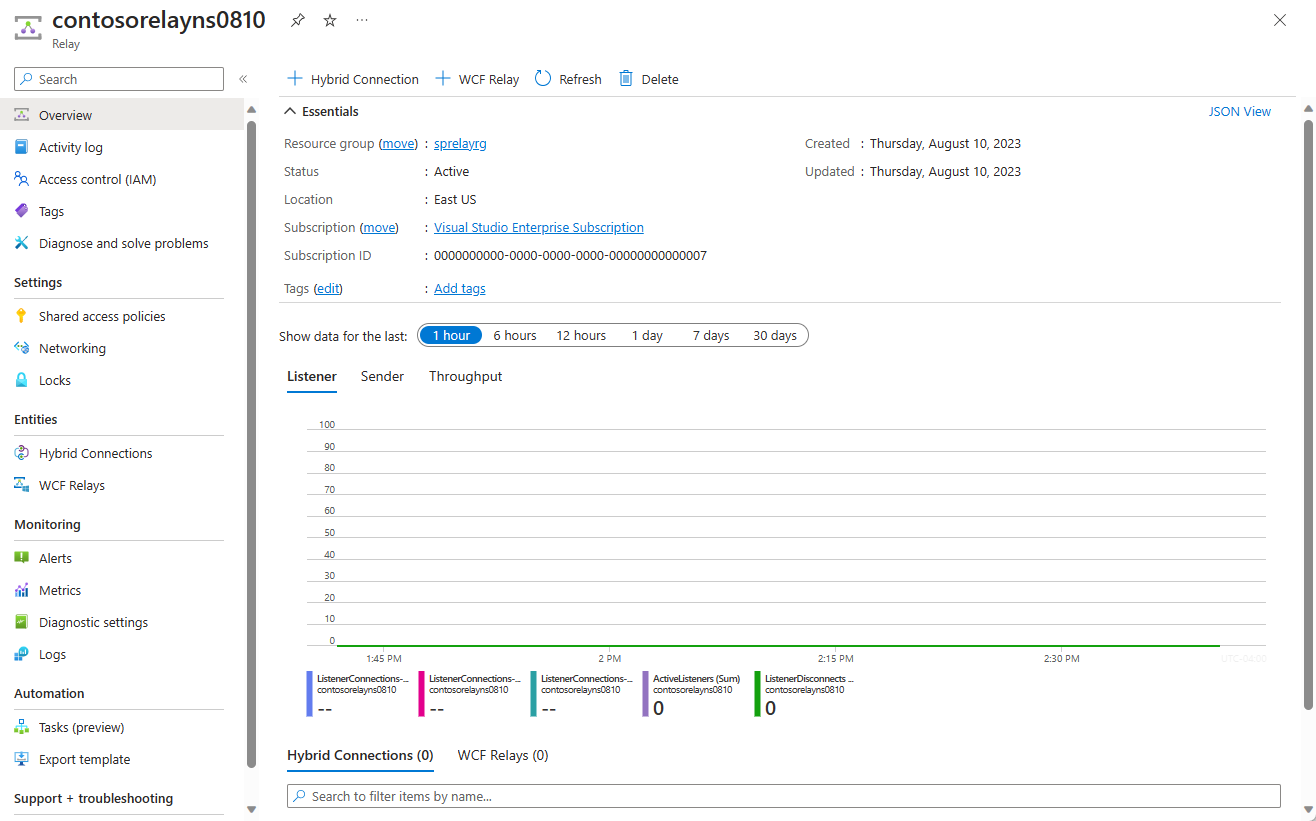
几分钟后,将看到该命名空间的“中继”页面。
获取管理凭据
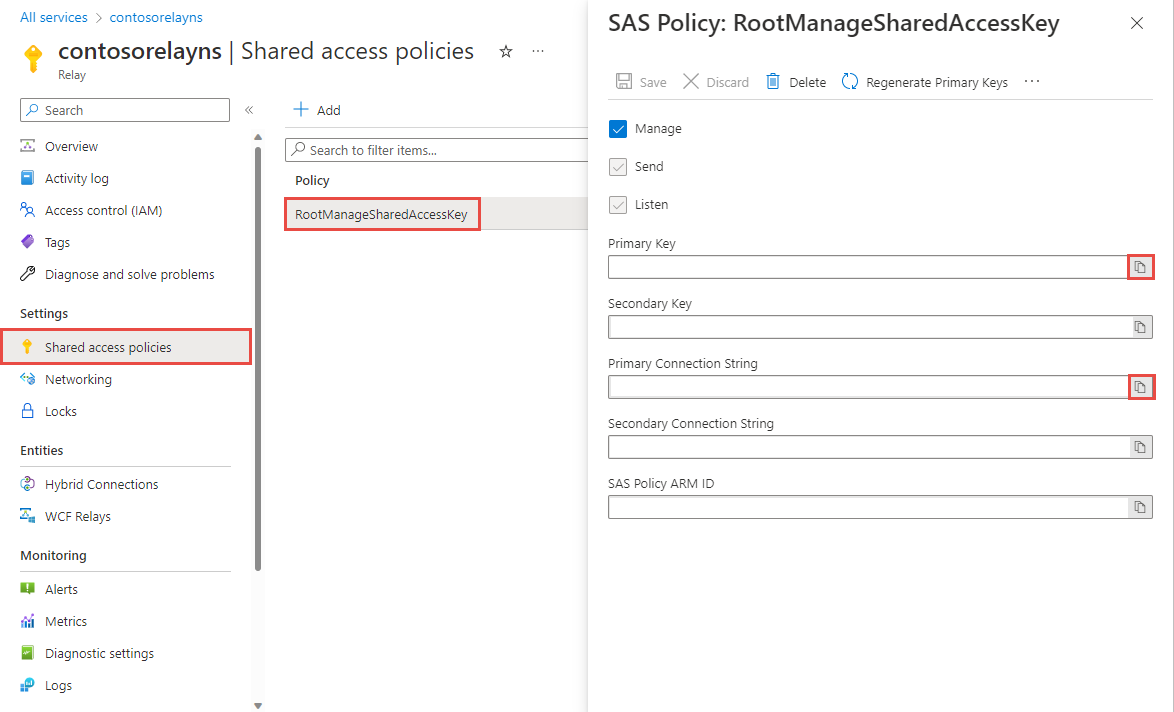
在“中继”页上,选择左侧菜单的“共享访问策略”。
在“共享访问策略”页,选择“RootManageSharedAccessKey” 。
在“SAS 策略:RootManageSharedAccessKey”下,选择“主连接字符串”旁边的“复制”按钮。 此操作会将连接字符串复制到剪贴板,供以后使用。 将此值粘贴到记事本或其他某个临时位置。
重复上述步骤,将主密钥的值复制和粘贴到临时位置,供以后使用。
使用 Azure 门户创建混合连接
在命名空间的“中继”页上,按照以下步骤创建混合连接。
请在左侧菜单中的“实体”下选择“混合连接”,然后选择“+ 混合连接”。
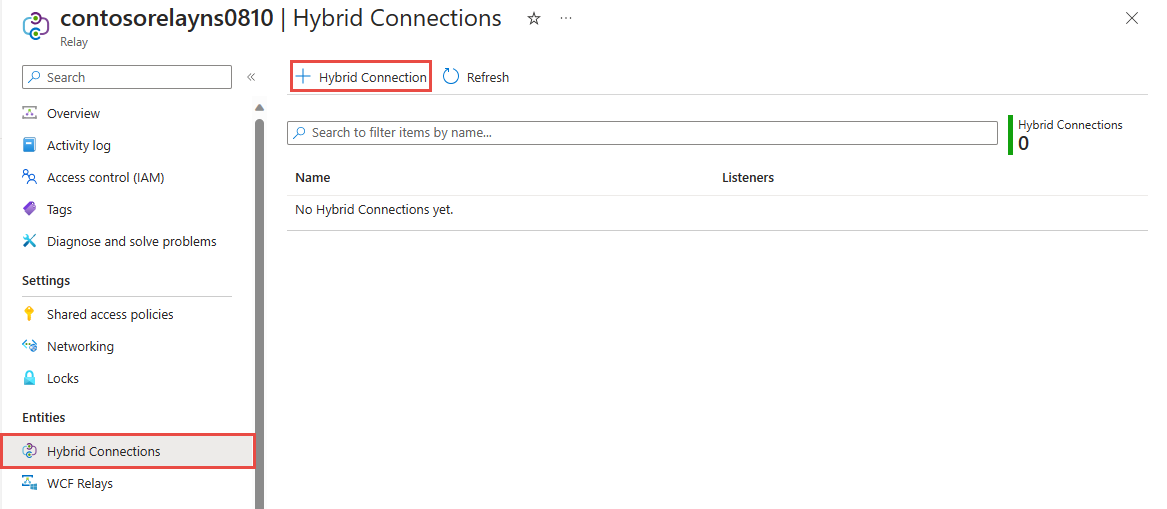
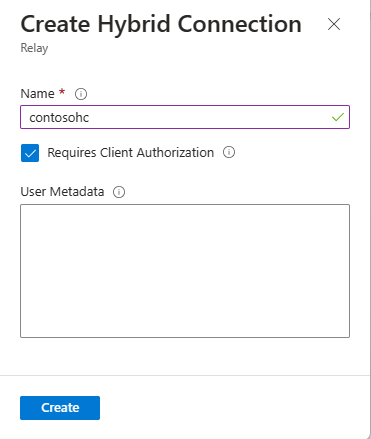
在“创建混合连接”页上,输入混合连接的名称,然后选择“创建”。
开发帮助程序函数
创建 Python 脚本
此脚本为使用 Azure 中继混合连接的应用程序提供帮助程序函数。 这些函数可能有助于生成 SAS 令牌和建立 WebSocket 连接以进行安全通信等任务。
依赖项
在生成帮助程序函数脚本之前,请使用 pip 安装以下 Python 库:base64、hashlib、hmac、math、time、urllib
可以使用以下命令安装这些库:
pip install <package name>
编写帮助程序函数脚本
relaylib.py 文件的内容应如下所示:
import base64
import hashlib
import hmac
import math
import time
import urllib

# Function which generates the HMAC-SHA256 of a given message
def hmac_sha256(key, msg):
   hash_obj = hmac.new(key=key, msg=msg, digestmod=hashlib._hashlib.openssl_sha256)
   return hash_obj.digest()

# Function to create a WebSocket URL for listening for a server application
def createListenUrl(serviceNamespace, entityPath, token = None):
   url = 'wss://' + serviceNamespace + '/$hc/' + entityPath + '?sb-hc-action=listen&sb-hc-id=123456'
   if token is not None:
       url = url + '&sb-hc-token=' + urllib.parse.quote(token)
   return url

# Function which creates the url for the client application
def createSendUrl(serviceNamespace, entityPath, token = None):
   url = 'wss://' + serviceNamespace + '/$hc/' + entityPath + '?sb-hc-action=connect&sb-hc-id=123456'
   if token is not None:
	url = url + '&sb-hc-token=' + urllib.parse.quote(token)
   return url

# Function which creates the Service Bus SAS token.
def createSasToken(serviceNamespace, entityPath, sasKeyName, sasKey):
   uri = "http://" + serviceNamespace + "/" + entityPath
   encodedResourceUri = urllib.parse.quote(uri, safe = '')

   # Define the token validity period in seconds (48 hours in this case)
   tokenValidTimeInSeconds = 60 * 60 * 48
   unixSeconds = math.floor(time.time())
   expiryInSeconds = unixSeconds + tokenValidTimeInSeconds

   # Create the plain signature string by combining the encoded URI and the expiry time
   plainSignature = encodedResourceUri + "\n" + str(expiryInSeconds)

   # Encode the SAS key and the plain signature as bytes
   sasKeyBytes = sasKey.encode("utf-8")
   plainSignatureBytes = plainSignature.encode("utf-8")
   hashBytes = hmac_sha256(sasKeyBytes, plainSignatureBytes)
   base64HashValue = base64.b64encode(hashBytes)

    # Construct the SAS token string
   token = "SharedAccessSignature sr=" + encodedResourceUri + "&sig=" +  urllib.parse.quote(base64HashValue) + "&se=" + str(expiryInSeconds) + "&skn=" + sasKeyName
   return token
创建服务器应用程序(侦听程序)
若要侦听和接收来自中继的消息,请编写 Python WebSocket 服务器脚本。
创建 Python 脚本
如果创建中继时已禁用“需要客户端授权”选项,可使用任何浏览器向混合连接 URL 发送请求。 若要访问受保护的终结点,需创建并传递 SAS 令牌,如下所示。
下面是一个简单的 Python 脚本,演示如何使用 WebSocket 将请求发送到具有 SAS 令牌的混合连接 URL。
依赖项
在运行服务器应用程序之前使用 pip 安装以下 Python 库
asyncio、json、logging、websockets可以使用以下命令安装这些库:
pip install <package name>生成用于存储连接详细信息的
config.json文件{ "namespace": "HYBRID_CONNECTION_NAMESPACE", "path": "HYBRID_CONNECTION_ENTITY_NAME", "keyrule": "SHARED_ACCESS_KEY_NAME", "key": "SHARED_ACCESS_PRIMARY_KEY" }将括号中的占位符替换为在创建混合连接时获得的值。
namespace- 中继命名空间。 请务必使用完全限定的命名空间名称,例如{namespace}.servicebus.chinacloudapi.cn。path- 混合连接的名称。keyrule- 共享访问策略密钥的名称,默认为RootManageSharedAccessKey。key- 先前保存的命名空间的主密钥。
为帮助程序函数生成帮助程序函数文件
以下文件用作
relaylib.py,并具有用于 WebSocket URL 生成和 SAS 令牌的帮助程序函数创建 Python 脚本
此脚本为使用 Azure 中继混合连接的应用程序提供帮助程序函数。 这些函数可能有助于生成 SAS 令牌和建立 WebSocket 连接以进行安全通信等任务。
依赖项
在生成帮助程序函数脚本之前,请使用 pip 安装以下 Python 库:
base64、hashlib、hmac、math、time、urllib可以使用以下命令安装这些库:
pip install <package name>编写帮助程序函数脚本
relaylib.py文件的内容应如下所示:import base64 import hashlib import hmac import math import time import urllib # Function which generates the HMAC-SHA256 of a given message def hmac_sha256(key, msg): hash_obj = hmac.new(key=key, msg=msg, digestmod=hashlib._hashlib.openssl_sha256) return hash_obj.digest() # Function to create a WebSocket URL for listening for a server application def createListenUrl(serviceNamespace, entityPath, token = None): url = 'wss://' + serviceNamespace + '/$hc/' + entityPath + '?sb-hc-action=listen&sb-hc-id=123456' if token is not None: url = url + '&sb-hc-token=' + urllib.parse.quote(token) return url # Function which creates the url for the client application def createSendUrl(serviceNamespace, entityPath, token = None): url = 'wss://' + serviceNamespace + '/$hc/' + entityPath + '?sb-hc-action=connect&sb-hc-id=123456' if token is not None: url = url + '&sb-hc-token=' + urllib.parse.quote(token) return url # Function which creates the Service Bus SAS token. def createSasToken(serviceNamespace, entityPath, sasKeyName, sasKey): uri = "http://" + serviceNamespace + "/" + entityPath encodedResourceUri = urllib.parse.quote(uri, safe = '') # Define the token validity period in seconds (48 hours in this case) tokenValidTimeInSeconds = 60 * 60 * 48 unixSeconds = math.floor(time.time()) expiryInSeconds = unixSeconds + tokenValidTimeInSeconds # Create the plain signature string by combining the encoded URI and the expiry time plainSignature = encodedResourceUri + "\n" + str(expiryInSeconds) # Encode the SAS key and the plain signature as bytes sasKeyBytes = sasKey.encode("utf-8") plainSignatureBytes = plainSignature.encode("utf-8") hashBytes = hmac_sha256(sasKeyBytes, plainSignatureBytes) base64HashValue = base64.b64encode(hashBytes) # Construct the SAS token string token = "SharedAccessSignature sr=" + encodedResourceUri + "&sig=" + urllib.parse.quote(base64HashValue) + "&se=" + str(expiryInSeconds) + "&skn=" + sasKeyName return token
编写一些代码来发送消息
确保依赖项
config.json和relaylib.py在路径中可用listener.py文件的内容应如下所示:import asyncio import json import logging import relaylib import websockets async def run_application(config): serviceNamespace = config["namespace"] entityPath = config["path"] sasKeyName = config["keyrule"] sasKey = config["key"] serviceNamespace += ".servicebus.chinacloudapi.cn" # Configure logging logging.basicConfig(level=logging.INFO) # Enable DEBUG/INFO logging as appropriate try: logging.debug("Generating SAS Token for: %s", serviceNamespace) token = relaylib.createSasToken(serviceNamespace, entityPath, sasKeyName, sasKey) logging.debug("Generating WebSocket URI") wssUri = relaylib.createListenUrl(serviceNamespace, entityPath, token) async with websockets.connect(wssUri) as websocket: logging.info("Listening for messages on Azure Relay WebSocket...") while True: message = await websocket.recv() logging.info("Received message: %s", message) except KeyboardInterrupt: logging.info("Exiting listener.") if __name__ == "__main__": # Load configuration from JSON file with open("config.json") as config_file: config = json.load(config_file) asyncio.run(run_application(config))
创建客户端应用程序(发送程序)
若要将消息发送到中继,可以使用任何 HTTP 或 WebSocket 客户端,包含的示例是 Python 实现。
创建 Python 脚本
如果创建中继时已禁用“需要客户端授权”选项,可使用任何浏览器向混合连接 URL 发送请求。 若要访问受保护的终结点,需创建并传递 SAS 令牌,如下所示。
下面是一个简单的 Python 脚本,演示如何使用 WebSocket 将请求发送到具有 SAS 令牌的混合连接 URL。
依赖项
在运行客户端应用程序之前使用 pip 安装以下 Python 库
asyncio、json、logging、websockets可以使用以下命令安装这些库:
pip install <package name>生成用于存储连接详细信息的
config.json文件{ "namespace": "HYBRID_CONNECTION_NAMESPACE", "path": "HYBRID_CONNECTION_ENTITY_NAME", "keyrule": "SHARED_ACCESS_KEY_NAME", "key": "SHARED_ACCESS_PRIMARY_KEY" }将括号中的占位符替换为在创建混合连接时获得的值。
namespace- 中继命名空间。 请务必使用完全限定的命名空间名称,例如{namespace}.servicebus.chinacloudapi.cn。path- 混合连接的名称。keyrule- 共享访问策略密钥的名称,默认为RootManageSharedAccessKey。key- 先前保存的命名空间的主密钥。
为帮助程序函数生成帮助程序函数文件
以下文件用作
relaylib.py,并具有用于 WebSocket URL 生成和 SAS 令牌的帮助程序函数创建 Python 脚本
此脚本为使用 Azure 中继混合连接的应用程序提供帮助程序函数。 这些函数可能有助于生成 SAS 令牌和建立 WebSocket 连接以进行安全通信等任务。
依赖项
在生成帮助程序函数脚本之前,请使用 pip 安装以下 Python 库:
base64、hashlib、hmac、math、time、urllib可以使用以下命令安装这些库:
pip install <package name>编写帮助程序函数脚本
relaylib.py文件的内容应如下所示:import base64 import hashlib import hmac import math import time import urllib # Function which generates the HMAC-SHA256 of a given message def hmac_sha256(key, msg): hash_obj = hmac.new(key=key, msg=msg, digestmod=hashlib._hashlib.openssl_sha256) return hash_obj.digest() # Function to create a WebSocket URL for listening for a server application def createListenUrl(serviceNamespace, entityPath, token = None): url = 'wss://' + serviceNamespace + '/$hc/' + entityPath + '?sb-hc-action=listen&sb-hc-id=123456' if token is not None: url = url + '&sb-hc-token=' + urllib.parse.quote(token) return url # Function which creates the url for the client application def createSendUrl(serviceNamespace, entityPath, token = None): url = 'wss://' + serviceNamespace + '/$hc/' + entityPath + '?sb-hc-action=connect&sb-hc-id=123456' if token is not None: url = url + '&sb-hc-token=' + urllib.parse.quote(token) return url # Function which creates the Service Bus SAS token. def createSasToken(serviceNamespace, entityPath, sasKeyName, sasKey): uri = "http://" + serviceNamespace + "/" + entityPath encodedResourceUri = urllib.parse.quote(uri, safe = '') # Define the token validity period in seconds (48 hours in this case) tokenValidTimeInSeconds = 60 * 60 * 48 unixSeconds = math.floor(time.time()) expiryInSeconds = unixSeconds + tokenValidTimeInSeconds # Create the plain signature string by combining the encoded URI and the expiry time plainSignature = encodedResourceUri + "\n" + str(expiryInSeconds) # Encode the SAS key and the plain signature as bytes sasKeyBytes = sasKey.encode("utf-8") plainSignatureBytes = plainSignature.encode("utf-8") hashBytes = hmac_sha256(sasKeyBytes, plainSignatureBytes) base64HashValue = base64.b64encode(hashBytes) # Construct the SAS token string token = "SharedAccessSignature sr=" + encodedResourceUri + "&sig=" + urllib.parse.quote(base64HashValue) + "&se=" + str(expiryInSeconds) + "&skn=" + sasKeyName return token
编写一些代码来发送消息
确保依赖项
config.json和relaylib.py在路径中可用sender.py文件的内容应如下所示:import asyncio import json import logging import relaylib import websockets async def run_application(message, config): service_namespace = config["namespace"] entity_path = config["path"] sas_key_name = config["keyrule"] sas_key = config["key"] service_namespace += ".servicebus.chinacloudapi.cn" # Configure logging logging.basicConfig(level=logging.DEBUG) # Enable debug logging token = relaylib.createSasToken(service_namespace, entity_path, sas_key_name, sas_key) logging.debug("Token: %s", token) wss_uri = relaylib.createListenUrl(service_namespace, entity_path, token) logging.debug("WssURI: %s", wss_uri) try: async with websockets.connect(wss_uri) as websocket: logging.info("Sending message to Azure Relay WebSocket...") await websocket.send(json.dumps({"message": message})) logging.info("Message sent: %s", message) except Exception as e: logging.error("An error occurred: %s", str(e)) if __name__ == "__main__": # Load configuration from JSON file with open("config.json") as config_file: config = json.load(config_file) asyncio.run(run_application("This is a message to Azure Relay Hybrid Connections!", config))
注意
本文中的示例代码使用连接字符串对 Azure 中继命名空间进行身份验证,以简化教程。 建议在生产环境中使用 Microsoft Entra ID 身份验证,而不要使用更容易泄密的连接字符串或共享访问签名。 有关使用 Microsoft Entra ID 身份验证的详细信息和示例代码,请参阅使用 Microsoft Entra ID 对访问 Azure 中继资源的托管标识进行身份验证。
运行应用程序
- 运行服务器应用程序:在命令提示符处,键入
python3 listener.py。 - 运行客户端应用程序:从命令提示符处,键入
python3 sender.py。
恭喜,现已使用 Python 创建端到端混合连接应用程序!
后续步骤
在本快速入门中,你创建了 Python 客户端和服务器应用程序,此类程序使用 WebSocket 来发送和接收消息。 Azure 中继的混合连接功能也支持使用 HTTP 发送和接收消息。 若要了解如何将 HTTP 与 Azure 中继混合连接配合使用,请参阅 HTTP 快速入门。
在本快速入门中,你使用了 Python 来创建客户端和服务器应用程序。 若要了解如何使用 .NET Framework 编写客户端和服务器应用程序,请参阅 .NET HTTP 快速入门或 .NET HTTP 快速入门。