本快速入门介绍如何将 Bicep 文件与 Azure Pipelines 集成,以便持续集成和持续部署。
它简要介绍了部署 Bicep 文件所需执行的管道任务。
先决条件
如果没有 Azure 订阅,可在开始前创建一个试用帐户。
需要一个 Azure DevOps 组织。 如果没有,请创建一个试用版订阅。 如果你的团队已创建了一个 Azure DevOps 组织,请确保你是要使用的 Azure DevOps 项目的管理员。
你需要已配置一个指向你的 Azure 订阅的服务连接。 管道中的任务将以服务主体的身份执行。 有关创建连接的步骤,请参阅创建 DevOps 项目。
需要一个定义项目基础结构的 Bicep 文件。 此文件位于存储库中。
需要一个 “.bicepparam” 文件 ,该文件定义 Bicep 文件使用的参数。 此文件位于存储库中。
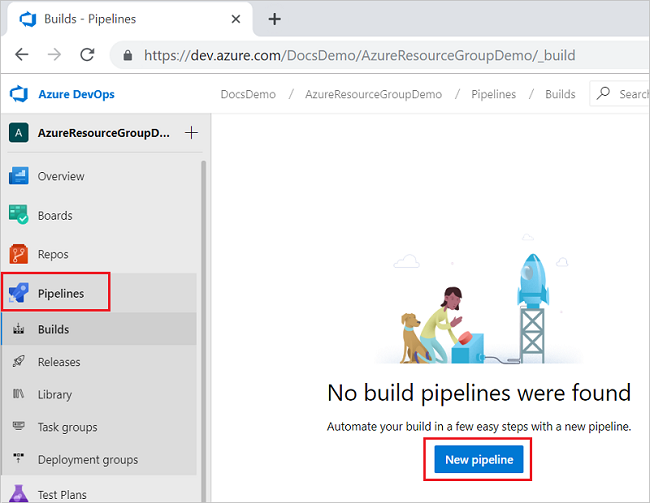
创建管道
从 Azure DevOps 组织中,选择“管道”和“创建管道”。
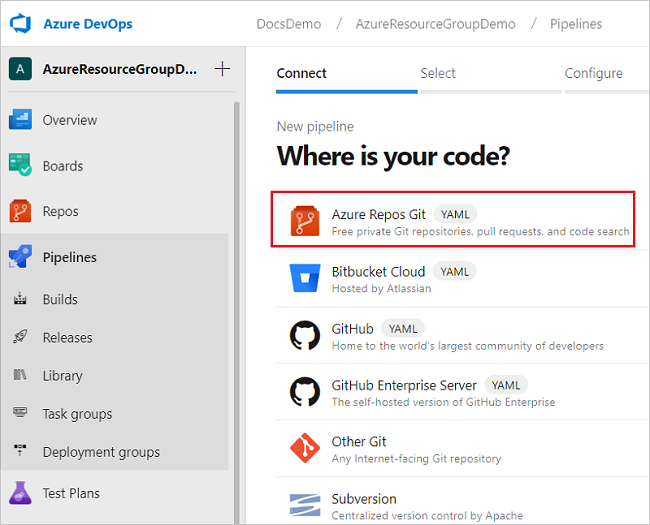
指定代码的存储位置。 本快速入门使用 Azure Repos Git 存储库。
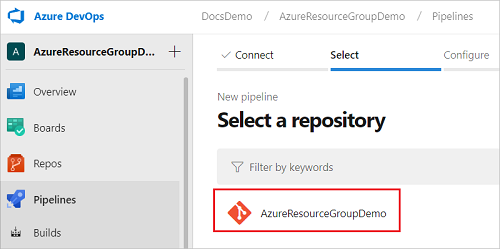
选择包含项目代码的存储库。
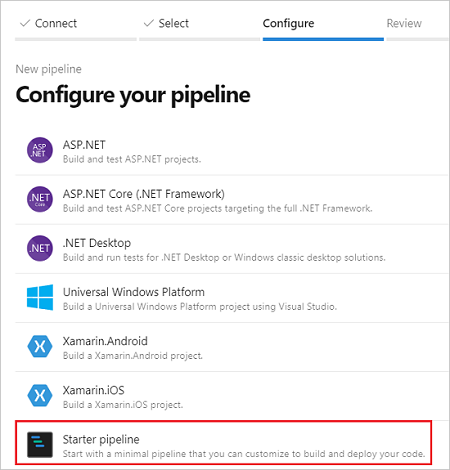
选择“初学者管道”作为要创建的管道的类型。
部署 Bicep 文件
可以使用Bicep部署任务、Azure 资源管理器模板部署任务或Azure CLI任务来部署Bicep文件。 Bicep 部署任务是新管道的推荐选项。
使用 Bicep 部署任务
Bicep部署任务(BicepDeploy@0)是专为Bicep而构建的第一方任务。 它直接部署.bicep和.bicepparam文件,而无需将其预编译到 JSON ARM 模板,并自动下载和缓存Bicep CLI。 该任务支持:
- 标准部署在资源组、订阅、管理组和租户范围内。
- 部署堆栈,包括对非托管资源的拒绝设置和操作,以便可以将资源集合作为单个单元进行管理。
- 通过假设分析操作,在应用更改之前预览这些更改。
- 部署前对 Bicep 模板进行验证。
- 机密和连接字符串等敏感输出的输出掩码。
该任务在Azure Pipelines代理上运行(计算基础结构中安装了运行管道作业的代理软件),并且需要代理软件版本 2.144.0 或更高版本。 Microsoft托管代理自动保持最新状态,始终满足此要求。 如果在 自承载代理上运行任务,请确保代理位于版本 2.144.0 或更高版本。
部署 Bicep 文件
用以下 YAML 替换入门管道。 它使用 Bicep 部署任务将一个 Bicep 文件和一个
.bicepparam文件部署到现有资源组中。trigger: - main name: Deploy Bicep files parameters: - name: azureServiceConnection type: string default: '<your-connection-name>' variables: vmImageName: 'ubuntu-latest' subscriptionId: '<your-subscription-id>' resourceGroupName: 'exampleRG' templateFile: './main.bicep' parametersFile: './main.bicepparam' pool: vmImage: $(vmImageName) steps: - task: BicepDeploy@0 inputs: azureResourceManagerConnection: '${{ parameters.azureServiceConnection }}' type: 'deployment' operation: 'create' scope: 'resourceGroup' subscriptionId: '$(subscriptionId)' resourceGroupName: '$(resourceGroupName)' name: 'DeployPipelineTemplate' templateFile: '$(templateFile)' parametersFile: '$(parametersFile)'更新
azureServiceConnection、subscriptionId和resourceGroupName的值。验证存储库中是否存在有效的
main.bicep文件。验证你的存储库中是否有一个包含
main.bicepparam语句的有效using文件。验证目标资源组是否已存在。 Bicep 部署任务会在
resourceGroup作用域内将资源部署到现有资源组;它不会为你创建该资源组。选择“保存”。 生成管道会自动运行。 返回到构建管道的摘要页,并查看状态。
部署一个部署堆栈
若要将资源作为部署堆栈而非标准部署进行管理,请将type设置为deploymentStack,并提供部署堆栈输入。 以下步骤创建或更新部署堆栈,删除从模板中删除的资源,并阻止对托管资源的带外写入和删除:
steps:
- task: BicepDeploy@0
  inputs:
    azureResourceManagerConnection: '${{ parameters.azureServiceConnection }}'
    type: 'deploymentStack'
    operation: 'create'
    name: 'production-stack'
    scope: 'resourceGroup'
    subscriptionId: '$(subscriptionId)'
    resourceGroupName: '$(resourceGroupName)'
    templateFile: '$(templateFile)'
    parametersFile: '$(parametersFile)'
    actionOnUnmanageResources: 'delete'
    denySettingsMode: 'denyWriteAndDelete'
若要在应用这些更改之前预览部署堆栈将进行的更改,请将 operation 设置为 whatIf。 有关 what-if 操作的更多信息,请参阅 使用 what-if 预览更改。
使用 Azure 资源管理器模板部署任务
注意
从 Azure 资源管理器模板部署任务 版本 3.235.0 开始,支持 使用“.bicepparam” 文件。
注意
AzureResourceManagerTemplateDeployment@3任务需要在使用.bicepparam时提供 Bicep 和.bicepparam文件。 Bicep 文件可以引用模块引用所支持的所有位置。 文件 .bicepparam 必须在 using 语句中引用本地 Bicep 文件。
使用以下 YAML 替换初始管道。 它使用 Azure 资源管理器模板部署任务创建资源组并部署 Bicep 和
.bicepparam文件。trigger: - main name: Deploy Bicep files parameters: - name: azureServiceConnection type: string default: '<your-connection-name>' variables: vmImageName: 'ubuntu-latest' resourceGroupName: 'exampleRG' location: '<your-resource-group-location>' templateFile: './main.bicep' csmParametersFile: './main.bicepparam' pool: vmImage: $(vmImageName) steps: - task: AzureResourceManagerTemplateDeployment@3 inputs: deploymentScope: 'Resource Group' action: 'Create Or Update Resource Group' resourceGroupName: '$(resourceGroupName)' location: '$(location)' templateLocation: 'Linked artifact' csmFile: '$(templateFile)' csmParametersFile: '$(csmParametersFile)' overrideParameters: '-storageAccountType Standard_LRS' deploymentMode: 'Incremental' deploymentName: 'DeployPipelineTemplate' connectedServiceName: '${{ parameters.azureServiceConnection }}'更新
azureServiceConnection和location的值。验证存储库中是否存在有效的
main.bicep文件。验证你的存储库中是否有一个包含
main.bicepparam语句的有效using文件。选择“保存”。 生成管道会自动运行。 返回到构建管道的摘要页面,然后查看状态。
使用 Azure CLI 任务
注意
该 az deployment group create 命令只需要一个 bicepparam. 文件。 文件中的using.bicepparam语句可以定位至任何受支持的位置以引用 Bicep 文件。 zh-CN: 只有在使用 Azure CLI 从本地磁盘路径执行 using 时,存储库中才需要一个 Bicep 文件。
注意
当你将 .bicepparam 文件与 az deployment group create 命令一起使用时,无法覆盖参数。
用以下 YAML 替换你的入门管道。 它使用
.bicepparam创建资源组并部署文件:trigger: - main name: Deploy Bicep files parameters: azureServiceConnection: '<your-connection-name>' variables: vmImageName: 'ubuntu-latest' resourceGroupName: 'exampleRG' location: '<your-resource-group-location>' bicepParamFile: './main.bicepparam' pool: vmImage: $(vmImageName) steps: - task: AzureCLI@2 inputs: azureSubscription: '${{ parameters.azureServiceConnection }}' scriptType: bash scriptLocation: inlineScript useGlobalConfig: false inlineScript: | az --version az group create --name $(resourceGroupName) --location $(location) az deployment group create ` --resource-group $(resourceGroupName) ` --parameters $(bicepParamFile) ` --name DeployPipelineTemplate有关任务输入的说明,请参阅 Azure CLI v2 任务。 在气隙云上使用此任务时,必须将任务的
useGlobalConfig属性设置为true。 默认值为false。更新
azureServiceConnection和location的值。验证你的存储库中是否有一个包含
main.bicepparam语句的有效using文件。选择“保存”。 生成管道会自动运行。 返回到构建管道的摘要页面,并查看状态。
清理资源
当不再需要 Azure 资源时,请使用 Azure CLI 或 Azure PowerShell 删除快速入门资源组。
az group delete --name exampleRG