在本教程系列中,你将创建一个模板来部署 Azure 存储帐户。 在接下来的两个教程中,将添加应用服务计划和网站。 了解如何从 Azure 门户导出模板,以及如何从 Azure 快速入门模板使用示例模板,而不是从头开始创建模板。 自定义这些模板以供使用。 本教程重点介绍如何导出模板并自定义模板的结果。 此说明需要 14 分钟 才能完成。
先决条件
建议完成 有关输出的教程,但不是必需的。
需要具有 Visual Studio Code,以及 Azure PowerShell 或 Azure CLI。 有关详细信息,请参阅 模板工具。
查看模板
在上一教程结束时,模板具有以下 JSON 文件:
{
  "$schema": "https://schema.management.azure.com/schemas/2019-04-01/deploymentTemplate.json#",
  "contentVersion": "1.0.0.0",
  "parameters": {
    "storagePrefix": {
      "type": "string",
      "minLength": 3,
      "maxLength": 11
    },
    "storageSKU": {
      "type": "string",
      "defaultValue": "Standard_LRS",
      "allowedValues": [
        "Standard_LRS",
        "Standard_GRS",
        "Standard_RAGRS",
        "Premium_LRS"
      ]
    },
    "location": {
      "type": "string",
      "defaultValue": "[resourceGroup().location]"
    }
  },
  "variables": {
    "uniqueStorageName": "[concat(parameters('storagePrefix'), uniqueString(resourceGroup().id))]"
  },
  "resources": [
    {
      "type": "Microsoft.Storage/storageAccounts",
      "apiVersion": "2025-06-01",
      "name": "[variables('uniqueStorageName')]",
      "location": "[parameters('location')]",
      "sku": {
        "name": "[parameters('storageSKU')]"
      },
      "kind": "StorageV2",
      "properties": {
        "supportsHttpsTrafficOnly": true
      }
    }
  ],
  "outputs": {
    "storageEndpoint": {
      "type": "object",
      "value": "[reference(variables('uniqueStorageName')).primaryEndpoints]"
    }
  }
}
此模板适用于部署存储帐户,但可能需要向其添加更多资源。 可以从现有资源导出模板,以便快速获取该资源的 JSON。
创建应用服务计划
登录到 Azure 门户。
选择“ 创建资源”。
在 搜索服务和市场中,输入 应用服务计划,然后选择 “应用服务计划”。
选择 创建。
在 “创建应用服务计划 ”页上,输入以下内容:
- 订阅:从下拉菜单中选择 Azure 订阅。
- 资源组:选择 “新建 ”,然后指定名称。 提供与本教程系列中所使用的资源组名称不同的资源组名称。
- 名称:输入应用服务计划的名称。
- 作系统:选择 Linux。
- 区域:从下拉菜单中选择Azure位置,例如中国北部 2。
- 定价层:若要节省成本,请选择 “更改大小 ”以将 SKU 和大小 更改为 第一个基本(B1),在 “开发/测试 ”下,以降低要求较低的工作负荷。
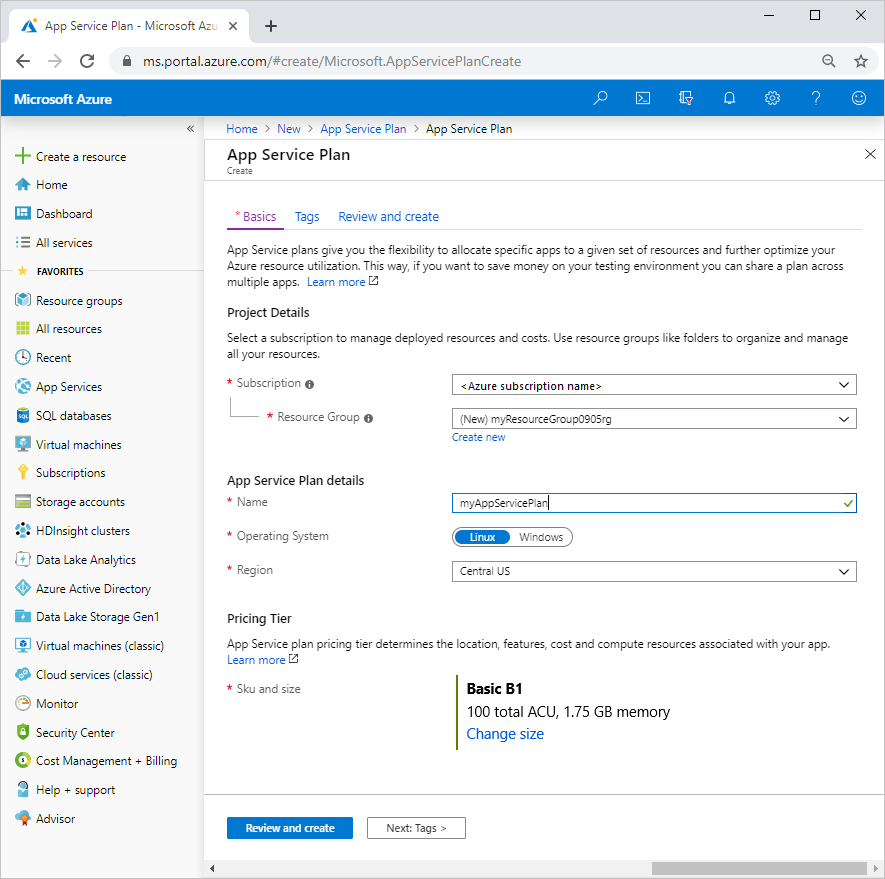
选择“查看并创建”。
选择 创建。 创建资源需要一些时间。
导出模板
选择 转到资源。
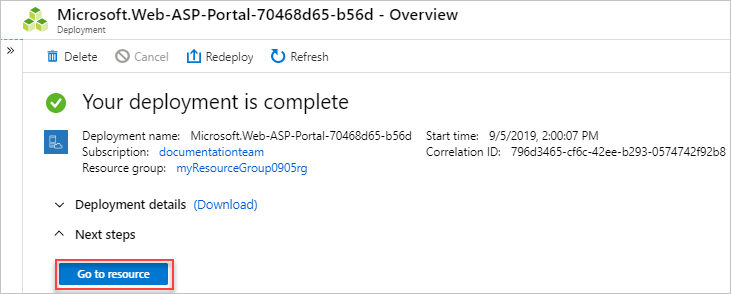
在左侧菜单中的 “自动化”下,选择“ 导出模板”。
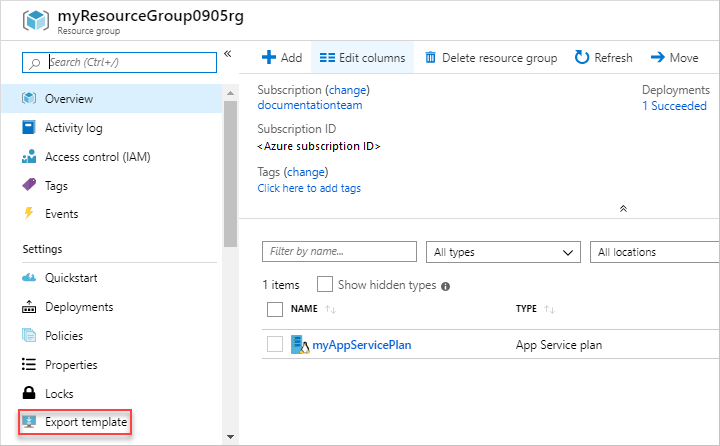
导出模板功能采用资源的当前状态并生成一个模板来部署它。 导出模板是快速获取部署资源所需的 JSON 的有用方法。
查看导出的模板中的
Microsoft.Web/serverfarms定义及参数定义。 无需复制这些部分。 只需将此导出的模板用作如何将此资源添加到模板的示例。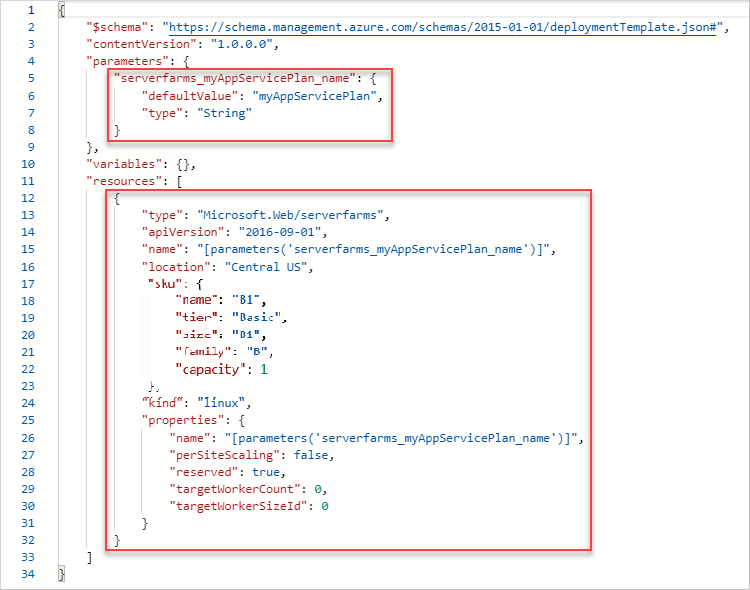
重要
通常,导出的模板比您创建模板时期望的更冗长。 例如,导出的模板中的 SKU 对象具有五个属性。 此模板有效,但只能使用该 name 属性。 可以从导出的模板开始,然后根据需要对其进行修改。
修改现有模板
导出的模板提供所需的大部分 JSON,但必须针对模板对其进行自定义。 请特别注意模板与导出的模板之间的参数和变量之间的差异。 显然,导出过程不知道已在模板中定义的参数和变量。
以下示例显示了模板的新增内容。 它包含导出的代码加上一些更改。 首先,它会更改参数的名称以匹配命名约定。 其次,它会将您的位置参数用于应用服务计划的位置。 第三,它会删除一些默认值正常的属性。
复制整个文件,然后用它的内容替换你的模板。
{
  "$schema": "https://schema.management.azure.com/schemas/2019-04-01/deploymentTemplate.json#",
  "contentVersion": "1.0.0.0",
  "parameters": {
    "storagePrefix": {
      "type": "string",
      "minLength": 3,
      "maxLength": 11
    },
    "storageSKU": {
      "type": "string",
      "defaultValue": "Standard_LRS",
      "allowedValues": [
        "Standard_LRS",
        "Standard_GRS",
        "Standard_RAGRS",
        "Premium_LRS"
      ]
    },
    "location": {
      "type": "string",
      "defaultValue": "[resourceGroup().location]"
    },
    "appServicePlanName": {
      "type": "string",
      "defaultValue": "exampleplan"
    }
  },
  "variables": {
    "uniqueStorageName": "[concat(parameters('storagePrefix'), uniqueString(resourceGroup().id))]"
  },
  "resources": [
    {
      "type": "Microsoft.Storage/storageAccounts",
      "apiVersion": "2025-06-01",
      "name": "[variables('uniqueStorageName')]",
      "location": "[parameters('location')]",
      "sku": {
        "name": "[parameters('storageSKU')]"
      },
      "kind": "StorageV2",
      "properties": {
        "supportsHttpsTrafficOnly": true
      }
    },
    {
      "type": "Microsoft.Web/serverfarms",
      "apiVersion": "2025-03-01",
      "name": "[parameters('appServicePlanName')]",
      "location": "[parameters('location')]",
      "sku": {
        "name": "B1",
        "tier": "Basic",
        "size": "B1",
        "family": "B",
        "capacity": 1
      },
      "kind": "linux",
      "properties": {
        "perSiteScaling": false,
        "reserved": true,
        "targetWorkerCount": 0,
        "targetWorkerSizeId": 0
      }
    }
  ],
  "outputs": {
    "storageEndpoint": {
      "type": "object",
      "value": "[reference(variables('uniqueStorageName')).primaryEndpoints]"
    }
  }
}
部署模板
使用 Azure CLI 或 Azure PowerShell 部署模板。
如果尚未创建资源组,请参阅 “创建资源组”。 本示例假定已将 templateFile 变量设置为模板文件的路径,如 第一个教程所示。
New-AzResourceGroupDeployment `
  -Name addappserviceplan `
  -ResourceGroupName myResourceGroup `
  -TemplateFile $templateFile `
  -storagePrefix "store" `
  -storageSKU Standard_LRS
注释
如果部署失败,请使用 verbose 开关获取有关要创建的资源的信息。 使用 debug 开关获取调试的详细信息。
验证部署
可以通过从 Azure 门户浏览资源组来验证部署。
- 登录到 Azure 门户。
- 在左侧菜单中,选择 “资源组”。
- 选择部署到的资源组。
- 资源组包含存储帐户和应用服务计划。
清理资源
若要继续学习下一篇教程,则无需删除资源组。
如果您此时停止操作,您可能希望删除资源组。
- 在 Azure 门户中,从左侧菜单中选择 资源组 。
- 在Filter for any field...文本字段中键入资源组名称。
- 选中 myResourceGroup 旁边的框,然后选择 myResourceGroup 或资源组名称。
- 在顶部菜单中选择“删除资源组”。
后续步骤
你已了解如何从 Azure 门户导出模板,以及如何将导出的模板用于模板开发。 还可以使用 Azure 快速入门模板来简化模板开发。