Azure SQL Database是云中的关系数据库即服务(DBaaS)(Azure)。 本教程介绍如何使用 Azure 门户和 ADO.NET 结合 Visual Studio 来:
- 使用 Azure 门户创建数据库
- 使用 Azure 门户设置服务器级 IP 防火墙规则
- 使用 ADO.NET 和 Visual Studio 连接到数据库
- 使用 ADO.NET 创建表
- 使用 ADO.NET 插入、更新和删除数据
- 查询数据 ADO.NET
提示
此免费 Learn 模块演示如何开发并配置查询 Azure SQL Database的 ASP.NET 应用程序,包括创建简单数据库。
先决条件
- 安装 Visual Studio 2019 或更高版本。
- 如果没有Azure订阅,在开始之前创建试用帐户。
- 如果尚未创建Azure SQL Database,请访问 Quickstart:创建单一数据库。
登录到 Azure 门户
登录到 Azure 门户。
创建服务器级 IP 防火墙规则
SQL 数据库在服务器级别创建 IP 防火墙。 此防火墙阻止外部应用程序和工具连接到服务器和服务器上的任何数据库,除非防火墙规则允许其 IP 通过防火墙。 若要启用与数据库的外部连接,必须首先为 IP 地址(或 IP 地址范围)添加 IP 防火墙规则。 按照以下步骤创建 服务器级 IP 防火墙规则。
重要
SQL数据库通过端口1433进行通信。 如果尝试从企业网络内部连接到此服务,则该网络的防火墙可能不允许经端口 1433 的出站流量。 如果是这样,则无法连接到数据库,除非管理员打开端口 1433。
部署完成后,在左侧菜单中选择“SQL 数据库”,然后在“SQL 数据库”页上选择“yourDatabase”。 此时会打开您的数据库的概述页,显示完全限定的服务器名称(如yourserver.database.chinacloudapi.cn),并提供进一步配置的选项。
复制此完全限定的服务器名称,用于从 SQL Server Management Studio 连接到您的服务器和数据库。
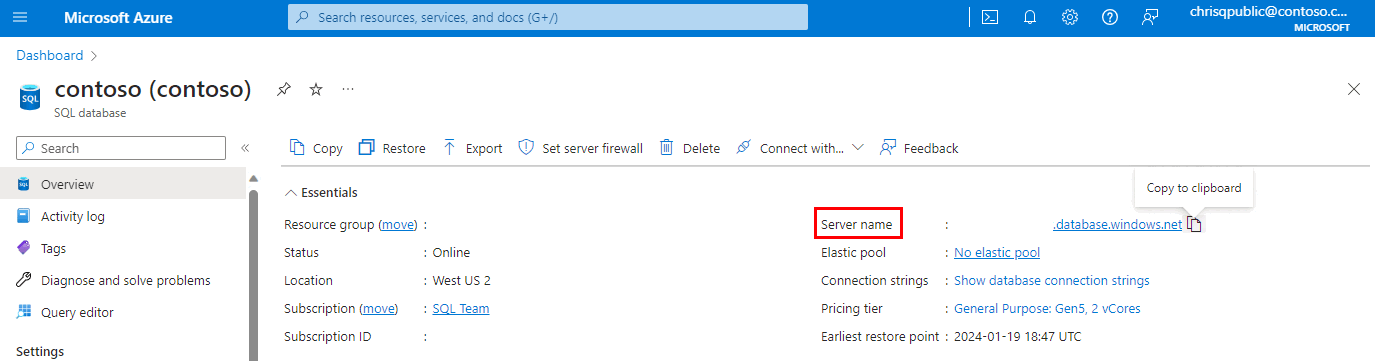
在 Azure 门户中,导航到您的 Azure SQL 数据库的逻辑 SQL 服务器。 最简单的方法是在 SQL 数据库页上选择“服务器名称”值。
在资源菜单的“设置”下,选择“网络”。
选择“公共访问”选项卡,然后选择“公用网络访问”下的“所选网络”。

向下滚动到“防火墙规则”部分。
Azure门户的

选择“添加客户端 IPv4”,将当前 IP 地址添加到新的 IP 防火墙规则。 IP 防火墙规则可以针对单个 IP 地址或一系列 IP 地址打开端口 1433。
选择“保存”。 此时会针对当前的 IP 地址创建服务器级 IP 防火墙规则,在服务器上打开端口 1433。
选择“确定”,然后关闭“防火墙设置”页。


你的 IP 地址现在可以通过 IP 防火墙。 现在可以使用SQL Server Management Studio或其他所选工具连接到数据库。 确保使用之前创建的服务器管理员帐户。
重要
默认情况下,为所有Azure服务启用通过 SQL 数据库 IP 防火墙进行访问。 选择此页面上的 OFF 可禁用所有Azure服务的访问权限。
C# 程序示例
本文的后续部分介绍了一个使用 ADO.NET 的 C# 程序,该程序用于将 Transact-SQL (T-SQL) 语句发送到 SQL 数据库。 该 C# 程序演示以下操作:
使用 ADO.NET -
返回 T-SQL 语句的方法
- 创建表
- 在表中填充数据
- 更新、删除和选择数据
- 将 T-SQL 提交到数据库
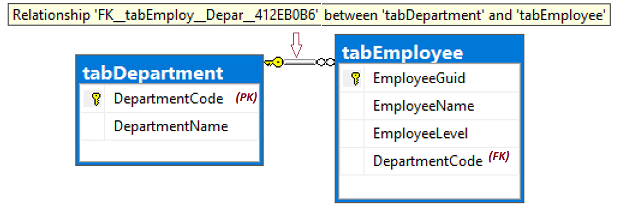
实体关系图 (ERD)
CREATE TABLE 语句涉及 REFERENCES 关键字,该关键字用于在两个表之间创建外键 (FK) 关系。 如果使用 tempdb,请通过一对前导短划线注释掉 --REFERENCES 关键字。
ERD 显示两个表之间的关系。 tabEmployee.DepartmentCode 子列中的值仅限 tabDepartment.DepartmentCode 父列中的值。
注意
可以选择编辑 T-SQL,以便向表名添加前导 #,从而在 tempdb 中以临时表的形式创建这些表。 在没有测试数据库可用时,可以通过这种方法进行演示。 外键引用在使用期间不会强制执行,当连接在程序完成运行后关闭时,临时表会自动删除。
编译和运行
该 C# 程序在逻辑上是一个 .cs 文件,在物理上划分成多个代码块,使每个块更易于理解。 若要编译和运行该程序,请执行以下步骤:
在 Visual Studio 中创建 C# 项目。 项目类型应为 Console,位于 Templates>Visual C #>Windows Desktop>Console App (.NET Framework)。
在 Program.cs 文件中,通过以下步骤替换起始代码行:
将 Microsoft.Data.SqlClient NuGet 包添加到项目。 在 Visual Studio 中,右键单击 Solution Explorer 中的项目,选择 Manage NuGet 包,然后搜索
Microsoft.Data.SqlClient。若要从 Visual Studio 生成和运行程序,请选择 Start 按钮。 报告输出将显示在程序窗口中,不过,GUID 值根据测试运行的不同而异。
=================================
T-SQL to 2 - Create-Tables...
-1 = rows affected.

=================================
T-SQL to 3 - Inserts...
8 = rows affected.

=================================
T-SQL to 4 - Update-Join...
2 = rows affected.

=================================
T-SQL to 5 - Delete-Join...
2 = rows affected.

=================================
Now, SelectEmployees (6)...
8ddeb8f5-9584-4afe-b7ef-d6bdca02bd35 , Alison , 20 , acct , Accounting
9ce11981-e674-42f7-928b-6cc004079b03 , Barbara , 17 , hres , Human Resources
315f5230-ec94-4edd-9b1c-dd45fbb61ee7 , Carol , 22 , acct , Accounting
fcf4840a-8be3-43f7-a319-52304bf0f48d , Elle , 15 , NULL , NULL
View the report output here, then press any key to end the program...
使用 ADO.NET 连接到 SQL 数据库
using System;
using Microsoft.Data.SqlClient;
//using System.Data;           // For:  SqlDbType , ParameterDirection

namespace csharp_db_test
{
    class Program
    {
        static void Main(string[] args)
        {
            try
            {
                var cb = new SqlConnectionStringBuilder();
                cb.DataSource = "your_server.database.chinacloudapi.cn";
                cb.UserID = "your_user";
                cb.Password = "your_password";
                cb.InitialCatalog = "your_database";

                using (var connection = new SqlConnection(cb.ConnectionString))
                {
                    connection.Open();

                    Submit_Tsql_NonQuery(connection, "2 - Create-Tables", Build_2_Tsql_CreateTables());

                    Submit_Tsql_NonQuery(connection, "3 - Inserts", Build_3_Tsql_Inserts());

                    Submit_Tsql_NonQuery(connection, "4 - Update-Join", Build_4_Tsql_UpdateJoin(),
                        "@csharpParmDepartmentName", "Accounting");

                    Submit_Tsql_NonQuery(connection, "5 - Delete-Join", Build_5_Tsql_DeleteJoin(),
                        "@csharpParmDepartmentName", "Legal");

                    Submit_6_Tsql_SelectEmployees(connection);
                }
            }
            catch (SqlException e)
            {
                Console.WriteLine(e.ToString());
            }

            Console.WriteLine("View the report output here, then press any key to end the program...");
            Console.ReadKey();
        }
返回 T-SQL 语句的方法
static string Build_2_Tsql_CreateTables()
{
    return @"
        DROP TABLE IF EXISTS tabEmployee;
        DROP TABLE IF EXISTS tabDepartment;  -- Drop parent table last.

        CREATE TABLE tabDepartment
        (
            DepartmentCode  nchar(4)          not null    PRIMARY KEY,
            DepartmentName  nvarchar(128)     not null
        );

        CREATE TABLE tabEmployee
        (
            EmployeeGuid    uniqueIdentifier  not null  default NewId()    PRIMARY KEY,
            EmployeeName    nvarchar(128)     not null,
            EmployeeLevel   int               not null,
            DepartmentCode  nchar(4)              null
            REFERENCES tabDepartment (DepartmentCode)  -- (REFERENCES would be disallowed on temporary tables.)
        );
    ";
}

static string Build_3_Tsql_Inserts()
{
    return @"
        -- The company has these departments.
        INSERT INTO tabDepartment (DepartmentCode, DepartmentName)
        VALUES
            ('acct', 'Accounting'),
            ('hres', 'Human Resources'),
            ('legl', 'Legal');

        -- The company has these employees, each in one department.
        INSERT INTO tabEmployee (EmployeeName, EmployeeLevel, DepartmentCode)
        VALUES
            ('Alison'  , 19, 'acct'),
            ('Barbara' , 17, 'hres'),
            ('Carol'   , 21, 'acct'),
            ('Deborah' , 24, 'legl'),
            ('Elle'    , 15, null);
    ";
}

static string Build_4_Tsql_UpdateJoin()
{
    return @"
        DECLARE @DName1  nvarchar(128) = @csharpParmDepartmentName;  --'Accounting';

        -- Promote everyone in one department (see @parm...).
        UPDATE empl
        SET
            empl.EmployeeLevel += 1
        FROM
            tabEmployee   as empl
        INNER JOIN
            tabDepartment as dept ON dept.DepartmentCode = empl.DepartmentCode
        WHERE
            dept.DepartmentName = @DName1;
    ";
}

static string Build_5_Tsql_DeleteJoin()
{
    return @"
        DECLARE @DName2  nvarchar(128);
        SET @DName2 = @csharpParmDepartmentName;  --'Legal';

        -- Right size the Legal department.
        DELETE empl
        FROM
            tabEmployee   as empl
        INNER JOIN
            tabDepartment as dept ON dept.DepartmentCode = empl.DepartmentCode
        WHERE
            dept.DepartmentName = @DName2

        -- Disband the Legal department.
        DELETE tabDepartment
            WHERE DepartmentName = @DName2;
    ";
}

static string Build_6_Tsql_SelectEmployees()
{
    return @"
        -- Look at all the final Employees.
        SELECT
            empl.EmployeeGuid,
            empl.EmployeeName,
            empl.EmployeeLevel,
            empl.DepartmentCode,
            dept.DepartmentName
        FROM
            tabEmployee   as empl
        LEFT OUTER JOIN
            tabDepartment as dept ON dept.DepartmentCode = empl.DepartmentCode
        ORDER BY
            EmployeeName;
    ";
}
将 T-SQL 提交到数据库
static void Submit_6_Tsql_SelectEmployees(SqlConnection connection)
{
    Console.WriteLine();
    Console.WriteLine("=================================");
    Console.WriteLine("Now, SelectEmployees (6)...");

    string tsql = Build_6_Tsql_SelectEmployees();

    using (var command = new SqlCommand(tsql, connection))
    {
        using (SqlDataReader reader = command.ExecuteReader())
        {
            while (reader.Read())
            {
                Console.WriteLine("{0} , {1} , {2} , {3} , {4}",
                    reader.GetGuid(0),
                    reader.GetString(1),
                    reader.GetInt32(2),
                    (reader.IsDBNull(3)) ? "NULL" : reader.GetString(3),
                    (reader.IsDBNull(4)) ? "NULL" : reader.GetString(4));
            }
        }
    }
}

static void Submit_Tsql_NonQuery(
    SqlConnection connection,
    string tsqlPurpose,
    string tsqlSourceCode,
    string parameterName = null,
    string parameterValue = null
    )
{
    Console.WriteLine();
    Console.WriteLine("=================================");
    Console.WriteLine("T-SQL to {0}...", tsqlPurpose);

    using (var command = new SqlCommand(tsqlSourceCode, connection))
    {
        if (parameterName != null)
        {
            command.Parameters.AddWithValue(  // Or, use SqlParameter class.
                parameterName,
                parameterValue);
        }
        int rowsAffected = command.ExecuteNonQuery();
        Console.WriteLine(rowsAffected + " = rows affected.");
    }
}
} // EndOfClass
}
提示
若要详细了解如何编写 SQL 查询,请访问 Tutorial:编写Transact-SQL语句。
相关内容
下一步
请转到下一教程,了解数据迁移。