本文将指导你如何使用 Azure 门户、Azure PowerShell 和 Azure CLI 为 Azure SQL 数据库中的单一或共用数据库配置故障转移组。
有关端到端脚本,请查看如何使用 Azure PowerShell 或 Azure CLI 将单一数据库添加到故障转移组。
先决条件
考虑以下为单一数据库创建故障转移组的先决条件:
- 主数据库应已创建。 创建单一数据库以开始使用。
- 如果辅助服务器已存在于主服务器的不同区域中,服务器登录名和防火墙设置必须与主服务器相匹配。
创建故障转移组
可以使用 Azure 门户、PowerShell 和 Azure CLI 创建故障转移组并在其中添加单一数据库。
重要
如果需要在将辅助数据库添加到故障转移组后删除它,请先将其从故障转移组中移除,然后再删除。 如果在从故障转移组中移除辅助数据库之前将其删除,则可能会导致不可预知的行为。
要使用 Azure 门户创建故障转移组并将单一数据库添加到其中,请遵照以下步骤执行:
如果你知道托管数据库的逻辑服务器,请在“Azure 门户”中直接转到它。 如果需要查找服务器,请遵照以下步骤执行:
- 在服务菜单中选择“Azure SQL”。 如果“Azure SQL”不在列表中,请选择“所有服务”,然后在搜索框中键入
Azure SQL。 (可选)选择“Azure SQL”旁边的星号将其收藏并将其添加为服务菜单中的项。 - 在“Azure SQL”页上,找到要添加到故障转移组的数据库,并选择它以打开“SQL 数据库”窗格。
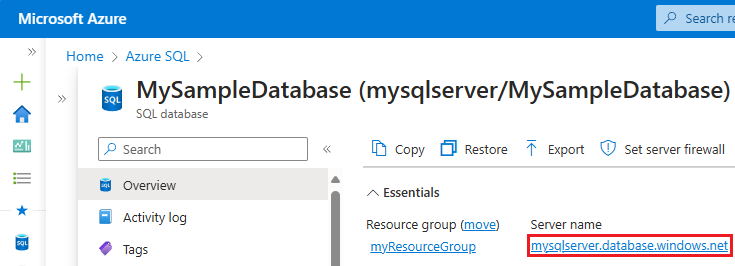
- 在 SQL 数据库的“概述”窗格上,选择“服务器名称”下的服务器名称以打开“SQL Server”窗格。
- 在服务菜单中选择“Azure SQL”。 如果“Azure SQL”不在列表中,请选择“所有服务”,然后在搜索框中键入
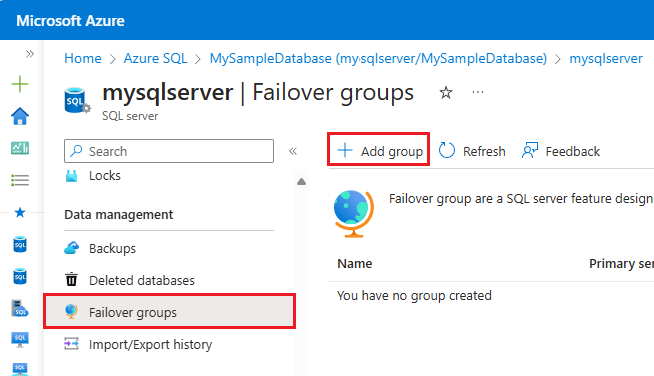
在“SQL Server”资源菜单上,选择“数据管理”下的“故障转移组”。 选择“+ 添加组”以打开“故障转移组”页,你可在其中创建新的故障转移组。
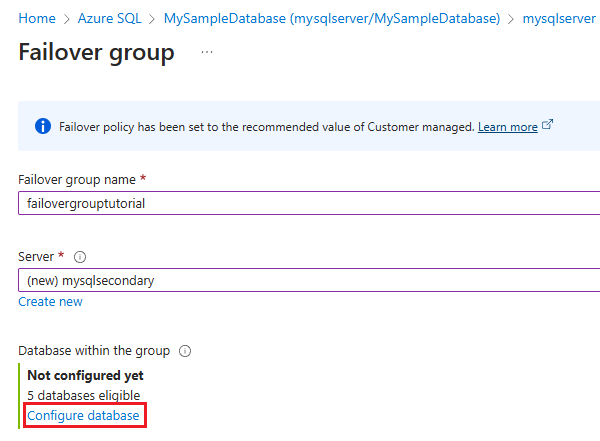
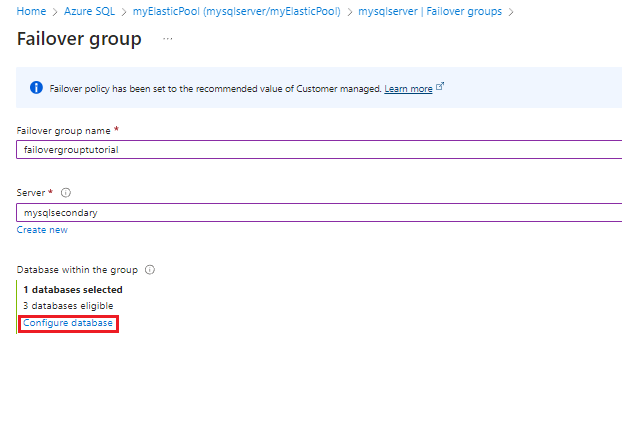
在“故障转移组”页上:
- 提供故障转移组名称。
- 选择现有的辅助服务器,或通过选择“服务器”下的“新建”来创建新服务器。 故障转移组中的辅助服务器必须与主服务器位于不同的区域。
- 选择“配置数据库”以打开“故障转移组的数据库”页。
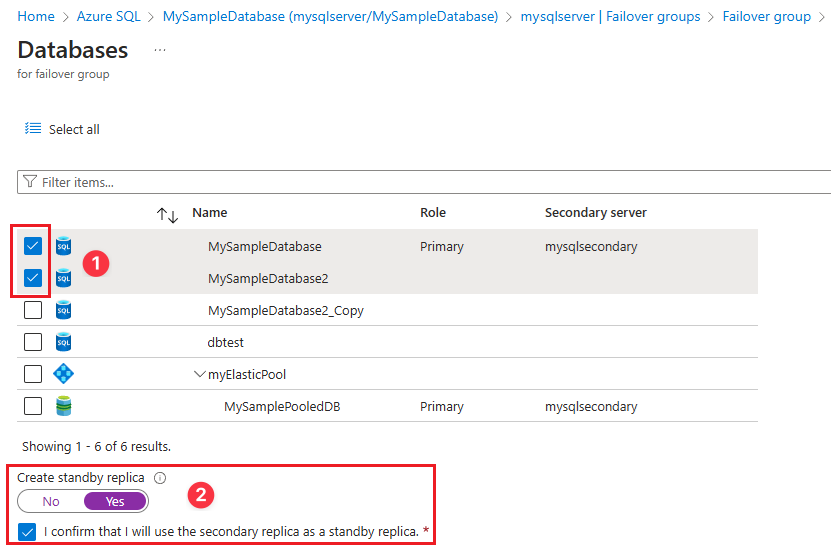
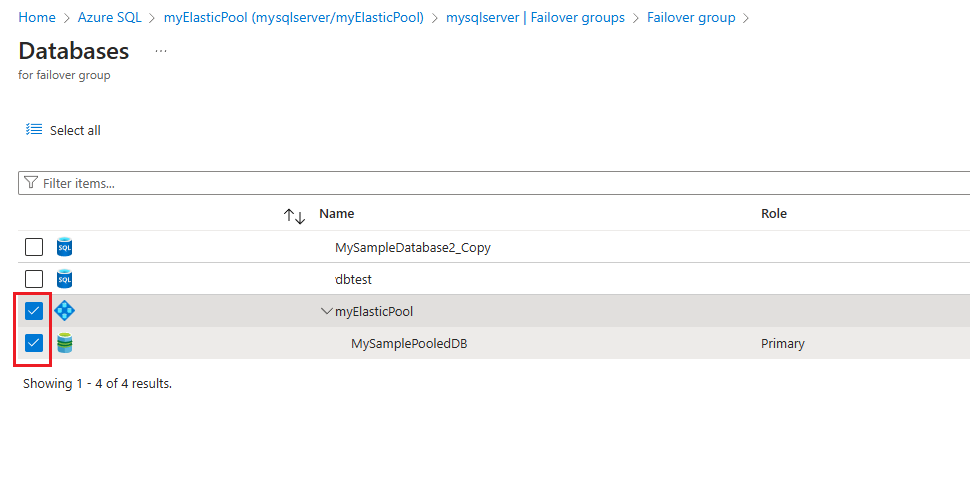
在“故障转移组的数据库”页上:
- 选择要添加到故障转移组中的数据库(屏幕截图中的 #1)。
- (可选)如果打算将这些数据库指定为备用副本以仅用于灾难恢复(屏幕截图中的#2),请选择“是”。 选中此框以确认将该副本用作备用副本。
- 使用“选择”保存数据库选择并返回到“故障转移组”页(在屏幕截图中不可见)。
使用“故障转移组”页上的“创建”来创建故障转移组。
测试计划的故障转移
使用 Azure 门户或 PowerShell 测试故障转移组的故障转移,而不会丢失数据。
要使用 Azure 门户测试故障转移组的故障转移,请遵照以下步骤操作:
如果你知道托管数据库的逻辑服务器,请在“Azure 门户”中直接转到它。 如果需要查找服务器,请遵照以下步骤执行:
- 在服务菜单中选择“Azure SQL”。 如果“Azure SQL”不在列表中,请选择“所有服务”,然后在搜索框中键入
Azure SQL。 (可选)选择“Azure SQL”旁边的星号将其收藏并将其添加为服务菜单中的项。 - 在“Azure SQL”页上,找到要测试故障转移的数据库,并选择它以打开“SQL 数据库”窗格。
- 在 SQL 数据库的“概述”窗格上,选择“服务器名称”下的服务器名称以打开“SQL Server”窗格。
- 在服务菜单中选择“Azure SQL”。 如果“Azure SQL”不在列表中,请选择“所有服务”,然后在搜索框中键入
在“SQL Server” 资源菜单上,选择“数据管理”下的“故障转移组”,然后选择一个现有故障转移组以打开“故障转移组”页面。
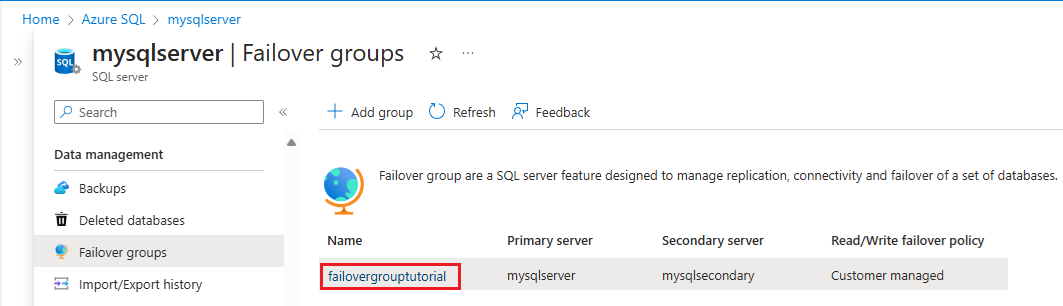
在“故障转移组”页上:
- 查看哪个服务器是主服务器,哪个服务器是辅助服务器。
- 从命令栏中选择“故障转移”,以对包含数据库的故障转移组进行故障转移。
- 在告知将会断开 TDS 会话连接的警告中选择是。
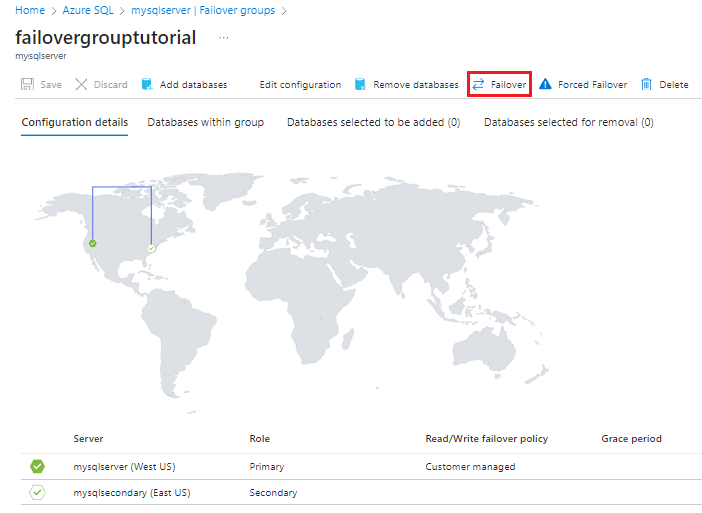
查看哪个服务器现在是主服务器,哪个服务器是辅助服务器。 故障转移成功后,两台服务器交换角色,从而使以前的主服务器成为辅助服务器。
(可选)再次选择“故障转移”,使服务器恢复其原始角色。
有关端到端脚本,请查看如何使用 Azure PowerShell 或 Azure CLI 将弹性池添加到故障转移组。
先决条件
考虑以下为共用数据库创建故障转移组的先决条件:
- 你的主弹性池应已存在。 创建弹性池以开始使用。
- 如果辅助服务器已存在,则服务器登录名和防火墙设置必须与主服务器相匹配。
创建故障转移组
使用 Azure 门户、PowerShell 或 Azure CLI 为弹性池创建故障转移组。
重要
如果需要在将辅助数据库添加到故障转移组之后删除它,请先将其从故障转移组中移除,然后再将其删除。 如果在从故障转移组中移除辅助数据库之前将其删除,则可能会导致不可预知的行为。
要使用 Azure 门户创建故障转移组并将弹性池添加到其中,请遵照以下步骤操作:
转到 Azure 门户中的“创建 SQL 弹性池”页。 创建具有以下特征的弹性池:
- 与主服务器上的弹性池具有相同的名称。
- 使用打算用于故障转移组的辅助服务器。 辅助服务器必须在与主服务器不同的区域中,且服务器登录名和防火墙设置必须与主服务器相匹配。 如果辅助服务器尚不存在,请创建新的服务器。
如果你知道托管主弹性池的逻辑服务器,请在“Azure 门户”中直接转到该服务器。 如果需要查找服务器,请遵照以下步骤执行:
- 在服务菜单中选择“Azure SQL”。 如果“Azure SQL”不在列表中,请选择“所有服务”,然后在搜索框中键入
Azure SQL。 (可选)选择“Azure SQL”旁边的星号将其收藏并将其添加为服务菜单中的项。 - 在“Azure SQL”页上,找到要添加到故障转移组的弹性池,并选择它以打开“SQL 弹性池”窗格。
- 在“SQL 弹性池”的“概述”窗格上,选择“服务器名称”下的服务器名称以打开“SQL Server”窗格。
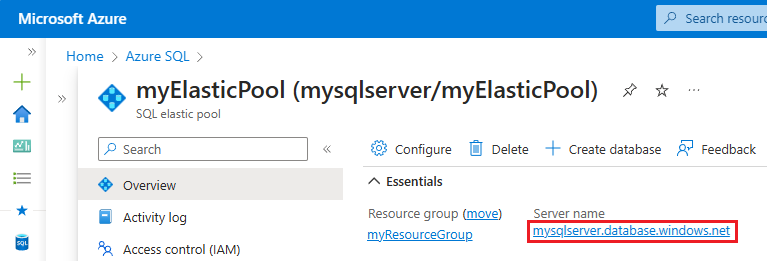
- 在服务菜单中选择“Azure SQL”。 如果“Azure SQL”不在列表中,请选择“所有服务”,然后在搜索框中键入
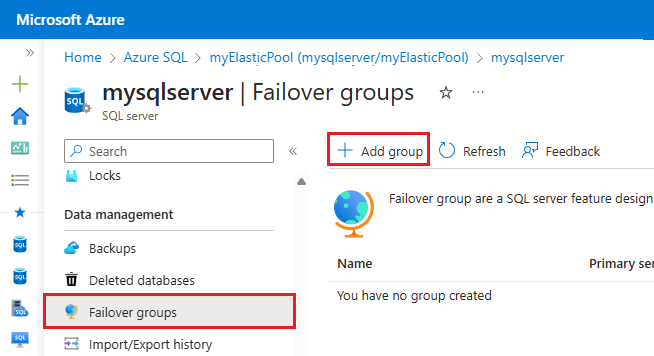
在“SQL Server”资源菜单上,选择“数据管理”下的“故障转移组”。 选择“+ 添加组”以打开“故障转移组”页,你可在其中创建新的故障转移组。
在“故障转移组”页上:
- 提供故障转移组名称。
- 选择现有的辅助服务器。 故障转移组中的辅助服务器必须与主服务器位于不同的区域,且包含名称与主服务器相同的弹性池。
- 选择“配置数据库”以打开“故障转移组的数据库”页。
在“故障转移组的数据库”页上,选择要添加到故障转移组的入池数据库。 使用“选择”保存数据库选择并返回到“故障转移组”页。
选择“故障转移组”页上的“创建”来创建故障转移组。 将弹性池添加到故障转移组的操作会自动启动异地复制过程。
测试计划的故障转移
使用 Azure 门户、PowerShell 或 Azure CLI 测试弹性池的故障转移,而不会丢失数据。
将故障转移组故障转移到辅助服务器,然后使用 Azure 门户故障回复。
如果你知道托管主弹性池的逻辑服务器,请在“Azure 门户”中直接转到该服务器。 如果需要查找服务器,请遵照以下步骤执行:
- 在服务菜单中选择“Azure SQL”。 如果“Azure SQL”不在列表中,请选择“所有服务”,然后在搜索框中键入
Azure SQL。 (可选)选择“Azure SQL”旁边的星号将其收藏并将其添加为服务菜单中的项。 - 在“Azure SQL”页上,找到要添加到故障转移组的弹性池,并选择它以打开“SQL 弹性池”窗格。
- 在“SQL 弹性池”的“概述”窗格上,选择“服务器名称”下的服务器名称以打开“SQL Server”窗格。
- 在服务菜单中选择“Azure SQL”。 如果“Azure SQL”不在列表中,请选择“所有服务”,然后在搜索框中键入
在“SQL Server” 资源菜单上,选择“数据管理”下的“故障转移组”,然后选择一个现有故障转移组以打开“故障转移组”页面。
在“故障转移组”页上:
- 查看哪个服务器是主服务器,哪个服务器是辅助服务器。
- 从命令栏中选择“故障转移”,以对包含数据库的故障转移组进行故障转移。
- 在告知将会断开 TDS 会话连接的警告中选择是。
查看哪个服务器现在是主服务器,哪个服务器是辅助服务器。 故障转移成功后,两台服务器交换角色,从而使以前的主服务器成为辅助服务器。
(可选)再次选择“故障转移”,使服务器恢复其原始角色。
修改现有故障转移组
可以使用 Azure 门户、PowerShell 和 Azure CLI 从现有故障转移组添加或移除数据库,或者编辑故障转移组配置设置。
要使用 Azure 门户对现有故障转移组进行更改,请遵照以下步骤执行:
如果你知道托管数据库或弹性池的逻辑服务器,请在“Azure 门户”中直接转到它。 如果需要查找服务器,请遵照以下步骤执行:
- 在服务菜单中选择“Azure SQL”。 如果“Azure SQL”不在列表中,请选择“所有服务”,然后在搜索框中键入
Azure SQL。 (可选)选择“Azure SQL”旁边的星号将其收藏并将其添加为服务菜单中的项。 - 在“Azure SQL”页上,找到要修改的数据库或弹性池,并选择它以打开“SQL 数据库”或“SQL 弹性池”窗格。
- 在“SQL 数据库”或“SQL 弹性池”的“概述”窗格上,选择“服务器名称”下的服务器名称以打开“SQL Server”窗格。
- 在服务菜单中选择“Azure SQL”。 如果“Azure SQL”不在列表中,请选择“所有服务”,然后在搜索框中键入
在“SQL Server” 资源菜单上,选择“数据管理”下的“故障转移组”,然后选择一个现有故障转移组以打开“故障转移组”页面。
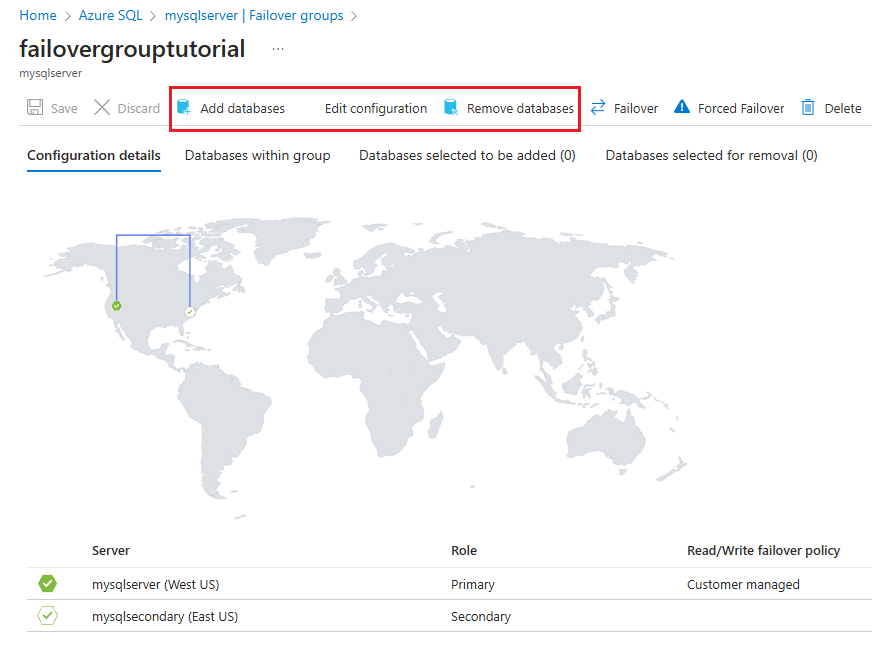
在“故障转移组”页上,使用命令栏:
- 要添加数据库,请选择“添加数据库”以打开“将数据库添加到故障转移组”窗格,然后展开“#Databases”以显示主服务器上的数据库列表。 选中要添加到故障转移组的数据库旁边的框,然后使用“选择”保存更改并添加数据库。
- 要移除数据库,请选择“移除数据库”以打开“从故障转移组中移除数据库”窗格,然后展开“#Databases”以列出故障转移组中的数据库。 选中要从故障转移组中移除的数据库旁边的框,然后使用“选择”保存更改并移除数据库。
- 要编辑故障转移策略或配置宽限期,请选择“编辑配置”以打开“编辑配置故障转移组”窗格并修改设置。 使用“选择”,保存所做更改。
使用专用链接
使用专用链接,可以将逻辑服务器关联到虚拟网络和子网中的特定专用 IP 地址。
若要将专用链接用于故障转移组,请执行以下操作:
- 请确保主服务器和辅助服务器位于配对区域中。
- 在每个区域中创建虚拟网络和子网,以托管主服务器和辅助服务器的专用终结点,使其的 IP 地址空间不重叠。 例如,主虚拟网络地址范围 10.0.0.0/16 与辅助虚拟网络地址范围 10.0.0.1/16 重叠。 有关虚拟网络地址范围的详细信息,请参阅博客:设计 Azure 虚拟网络。
- 创建主服务器的专用终结点和 Azure 专用 DNS 区域。
- 同时为辅助服务器创建专用终结点,但这次选择重复使用为主服务器创建的同一专用 DNS 区域。
- 建立专用链接后,可以按照本文前面所述的步骤创建故障转移组。
定位侦听器终结点
配置故障转移组后,更新应用程序的连接字符串,以指向“读/写”侦听器终结点,以便应用程序在故障转移后继续连接到主数据库。 通过使用侦听器终结点,无需在每次故障转移组故障转移时都手动更新连接字符串,因为流量始终会被路由到当前的主数据库。 还可以将只读工作负载指向“只读”侦听器终结点。
若要在 Azure 门户中找到侦听器终结点,请转到 Azure 门户中的逻辑服务器,然后在“数据管理”下选择“故障转移组”。 选择你感兴趣的故障转移组。
向下滚动,查找侦听器终结点:
- “读/写”侦听器终结点,其形式是
fog-name.database.chinacloudapi.cn,会将流量路由到主数据库。 - “只读”侦听器终结点,其形式是
fog-name.secondary.database.chinacloudapi.cn,会将流量路由到辅助数据库。

在故障转移组中缩放数据库
无需断开任何异地辅助数据库,即可将主数据库纵向扩展或纵向缩减到不同的计算大小(在相同服务层级中)。 在纵向扩展时,建议你首先扩展异地辅助数据库,然后再扩展主数据库。 纵向缩减时,则按相反顺序进行:先缩减主数据库,再缩减辅助数据库。 将数据库缩放到不同服务层级时,将强制执行此建议操作。
特别建议按此顺序进行,以避免出现以下问题:较低 SKU 的异地辅助数据库过载,并且必须在升级或降级过程中重新设定种子。 此外,可以通过将主数据库设为只读来避免问题,代价是针对主数据库的所有读写工作负荷会受到影响。
注意
如果在故障转移组配置过程中创建了异地辅助数据库,则不建议对其进行缩减。 这是为了确保进行异地故障转移后,数据层有足够的容量来处理常规工作负载。 如果以前的异地主数据库因服务中断而不可用,则可能无法在计划外故障转移后缩放异地辅助数据库。 这是一个已知限制。
故障转移组中的主数据库不能扩展到较高的服务层级(版本),除非第一次将辅助数据库扩展到更高层级。 例如,如果想要从“常规用途”纵向扩展到“业务关键”,则必须先将异地辅助数据库扩展为“业务关键”。 如果尝试以违反此规则的方式来扩展主数据库或异地辅助数据库,将收到以下错误:
The source database 'Primaryserver.DBName' cannot have higher edition than the target database 'Secondaryserver.DBName'. Upgrade the edition on the target before upgrading the source.
防止关键数据丢失
由于广域网的延迟时间较长,异地复制使用了异步复制机制。 如果主数据库发生故障,异步复制会导致数据丢失不可避免。 为了防止这些关键事务数据丢失,应用程序开发人员可以在提交事务后立即调用 sp_wait_for_database_copy_sync 存储过程。 调用 sp_wait_for_database_copy_sync 会阻止调用线程,直到最后提交的事务已传输并强制执行到辅助数据库的事务日志中。 但是,它不会等待传输的事务在辅助数据库上进行重播(恢复)。
sp_wait_for_database_copy_sync 范围限定为特定异地复制链接。 对主数据库具有连接权限的任何用户都可以调用此过程。
注意
sp_wait_for_database_copy_sync 防止特定事务异地故障转移后数据丢失,但不保证完全同步进行读取访问。
sp_wait_for_database_copy_sync 过程调用导致的延迟可能很明显,具体取决于调用时主数据库上尚未传输的事务日志大小。
更改次要区域
为了演示更改顺序,我们假设服务器 A 是主服务器,服务器 B 是现有的辅助服务器,服务器 C 是第三个区域中的新辅助服务器。 若要进行转换,请执行以下步骤:
- 使用活动异地复制,在服务器 C 中为服务器 A 上的每个数据库创建额外的辅助数据库。 服务器 A 上的每个数据库具有两个辅助数据库,其中一个位于服务器 B 上,另一个位于服务器 C 上。这可以保证主数据库在转换过程中仍受保护。
- 删除故障转移组。 此时,使用故障转移组终结点的登录尝试开始失败。
- 在服务器 A 和 C 之间重新创建同名的故障转移组。
- 将服务器 A 上的所有主数据库添加到新的故障转移组。 此时,登录尝试将不再失败。
- 删除服务器 B。将自动删除 B 上的所有数据库。
更改主要区域
为了演示更改顺序,我们假设服务器 A 是主服务器,服务器 B 是现有的辅助服务器,服务器 C 是第三个区域中的新主服务器。 若要进行转换,请执行以下步骤:
- 执行计划的异地故障转移以将主服务器切换到 B。服务器 A 成为新的辅助服务器。 故障转移可能会导致几分钟的停机。 实际时间取决于故障转移组的大小。
- 使用活动异地复制,在服务器 C 中为服务器 B 上的每个数据库创建额外的辅助数据库。 服务器 B 上的每个数据库具有两个辅助数据库,其中一个位于服务器 A 上,另一个位于服务器 C 上。这可以保证主数据库在转换过程中仍受保护。
- 删除故障转移组。 此时,使用故障转移组终结点的登录尝试开始失败。
- 在服务器 B 和 C 之间重新创建同名的故障转移组。
- 将服务器 B 上的所有主数据库添加到新的故障转移组。 此时,登录尝试不再失败。
- 执行故障转移组的计划异地故障转移以切换 B 和 C。现在服务器 C 将成为主服务器,B 成为辅助服务器。 服务器 A 上的所有辅助数据库将自动链接到 C 上的主数据库。如步骤 1 中所述,故障转移可能会导致几分钟的停机。
- 删除服务器 A。将自动删除 A 上的所有数据库。
重要
删除故障转移组时,也会删除侦听器终结点的 DNS 记录。 此时,其他人有可能创建同名的故障转移组或服务器 DNS 别名。 由于故障转移组名称和 DNS 别名必须全局唯一,因此这将阻止你再次使用相同名称。 为最大程度地降低这种风险,请勿使用通用的故障转移组名称。
故障转移组和网络安全
对于某些应用程序,安全规则要求只允许特定组件(如 VM、Web 服务等)通过网络访问数据层。此要求对业务连续性设计和故障转移组的使用提出了一些挑战。 在实施此类受限访问时,请考虑以下选项。
使用故障转移组和虚拟网络服务终结点
如果使用虚拟网络服务终结点和规则来限制对数据库的访问,请注意每个虚拟网络服务终结点仅适用于一个 Azure 区域。 终结点不允许其他区域接受来自子网的通信。 因此,只有部署在同一区域中的客户端应用程序才能连接到主数据库。 因为异地故障转移会导致 SQL 数据库客户端会话重新路由到不同(次要)区域中的服务器,所以源自该区域之外的客户端的这些会话可能失败。 因此,如果参与的服务器包含在虚拟网络规则中,则无法启用 Azure 托管故障转移策略。 若要支持手动故障转移策略,请执行以下步骤:
- 在次要区域中预配应用程序前端组件(Web 服务、虚拟机等)的冗余副本。
- 为主服务器和辅助服务器分别配置虚拟网络规则。
- 使用流量管理器配置启用前端故障转移。
- 检测到服务中断时启动手动异地故障转移。 此选项针对需要在前端和数据层之间保持一致延迟的应用程序进行了优化,并支持在前端和/或数据层受到服务中断的影响时进行恢复。
注意
如果使用只读侦听器对只读工作负荷进行负载均衡,请确保在次要区域中的 VM 或其他资源上执行此工作负荷,以便它可以连接到辅助数据库。
使用故障转移组和防火墙规则
如果业务连续性计划要求使用故障转移组进行故障转移,则可以使用公共 IP 防火墙规则限制对 SQL 数据库的访问。 该配置可确保异地故障转移不会阻止来自前端组件的连接,并假定应用程序可以容忍前端与数据层之间的较长延迟。
若要支持故障转移组,请执行以下步骤:
- 创建公共 IP。
- 创建公共负载均衡器并为其分配公共 IP。
- 为前端组件创建虚拟网络和虚拟机。
- 创建网络安全组并配置入站连接。
- 使用
Sql.<Region>服务标记确保出站连接向某一区域中的 Azure SQL 数据库开放。 - 创建 SQL 数据库防火墙规则,以允许来自步骤 1 中创建的公共 IP 地址的入站流量。
有关如何配置出站访问以及在防火墙规则中使用哪个 IP 的详细信息,请参阅负载均衡器出站连接。
重要
若要保证区域服务中断期间的业务连续性,则必须确保前端组件和数据库的地理冗余。
权限
通过 Azure 基于角色的访问控制 (Azure RBAC) 管理故障转移组的权限。
创建和管理故障转移组需要具有 Azure RBAC 写入访问权限。 SQL Server 参与者角色拥有管理故障转移组所需的全部权限。
下表列出了 Azure SQL 数据库的特定权限范围:
| 操作 | 权限 | 范围 |
|---|---|---|
| 创建故障转移组 | Azure RBAC 写入访问权限 | 主服务器 辅助服务器 故障转移组中的所有数据库 |
| 更新故障转移组 | Azure RBAC 写入访问权限 | 故障转移组 当前主服务器上的所有数据库 |
| 对故障转移组进行故障转移 | Azure RBAC 写入访问权限 | 新服务器的故障转移组 |
限制
注意以下限制:
- 只能在同 一Microsoft Entra 租户中的逻辑服务器之间创建故障转移组。
- 无法在同一 Azure 区域中的两个服务器之间创建故障转移组。
- 故障转移组支持将组中所有数据库异地复制到另一个区域中唯一的辅助逻辑服务器。
- 无法重命名故障转移组。 需要删除该组,并使用不同的名称重新创建它。
- 故障转移组中的数据库不支持数据库重命名。 你需要暂时删除故障转移组才能重命名数据库,或者从故障转移组中删除数据库。
- 删除单个数据库或共用数据库的故障转移组既不会停止复制,也不会删除复制的数据库。 如果要在删除单个数据库或共用数据库后将其重新添加到故障转移组,则需要手动停止异地复制并从辅助服务器中删除数据库。 尝试将数据库添加到故障转移组时,不执行上述两项操作可能会导致类似于
The operation cannot be performed due to multiple errors的错误。 - 故障转移组名称受命名限制的约束。
- 创建新故障转移组或将数据库添加到现有故障转移组时,如果使用 Azure 门户(Azure PowerShell 和 Azure CLI 当前不可用),则只能将数据库指定为备用副本。
- Azure 门户不支持跨不同订阅创建故障转移组。 而是使用 PowerShell cmdlet 以编程方式管理故障转移组。
以编程方式管理故障转移组
也可以使用 Azure PowerShell、Azure CLI 和 REST API 以编程方式管理故障转移组。 下表描述了可用的命令集。 故障转移组包含一组用于管理的 Azure Resource Manager API,其中包括 Azure SQL 数据库 REST API 和 Azure PowerShell cmdlet。 这些 API 需要使用资源组,并支持 Azure 基于角色的访问控制 (Azure RBAC)。 有关如何实现访问角色的详细信息,请参阅 Azure 基于角色的访问控制 (Azure RBAC)。
| Cmdlet | 说明 |
|---|---|
| New-AzSqlDatabaseFailoverGroup | 此命令会创建故障转移组,并将其同时注册到主服务器和辅助服务器 |
| Add-AzSqlDatabaseToFailoverGroup | 将一个或更多个数据库添加到故障转移组 |
| Remove-AzSqlDatabaseFromFailoverGroup | 将一个或更多个数据库从故障转移组中移除 |
| Remove-AzSqlDatabaseFailoverGroup | 从服务器中删除故障转移组 |
| Get-AzSqlDatabaseFailoverGroup | 检索故障转移组的配置 |
| Set-AzSqlDatabaseFailoverGroup | 修改故障转移组的配置 |
| Switch-AzSqlDatabaseFailoverGroup | 触发故障转移组到辅助服务器的故障转移 |
注意
可以使用 Azure Powershell 中的 -PartnerSubscriptionId 参数(从 Az.SQL 3.11.0 开始)跨订阅部署故障转移组。 若要了解详细信息,请查看以下示例。