适用于:Azure Stack HCI 版本 22H2
本主题分步说明如何使用 Ubuntu 虚拟机 (VM) 的离散设备分配 (DDA) 技术在 Azure Stack HCI 中安装和配置 NVIDIA 图形处理单元 (GPU)。 本文档假定已部署 Azure Stack HCI 群集且已安装 VM。
按照 OEM 说明和 BIOS 建议,将 NVIDIA GPU 物理安装到相应的服务器。
打开每台服务器。
使用具有管理员权限的帐户登录到已安装 NVIDIA GPU 的服务器。
打开“设备管理器”,然后导航到“其他设备”部分。 此时应显示列出为“3D 视频控制器”的设备。
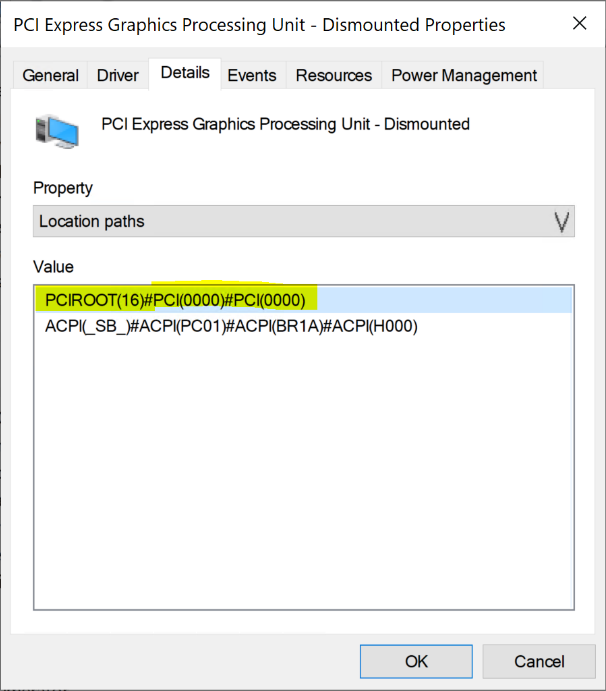
右键单击“3D 视频控制器”以打开“属性”页。 单击“详细信息”。 在“属性”下的下拉列表中,选择“位置路径”。
记下字符串 PCIRoot 的值,如截图中所示。 右键单击“值”以将其复制/保存。
使用提升的特权打开 Windows PowerShell,然后执行
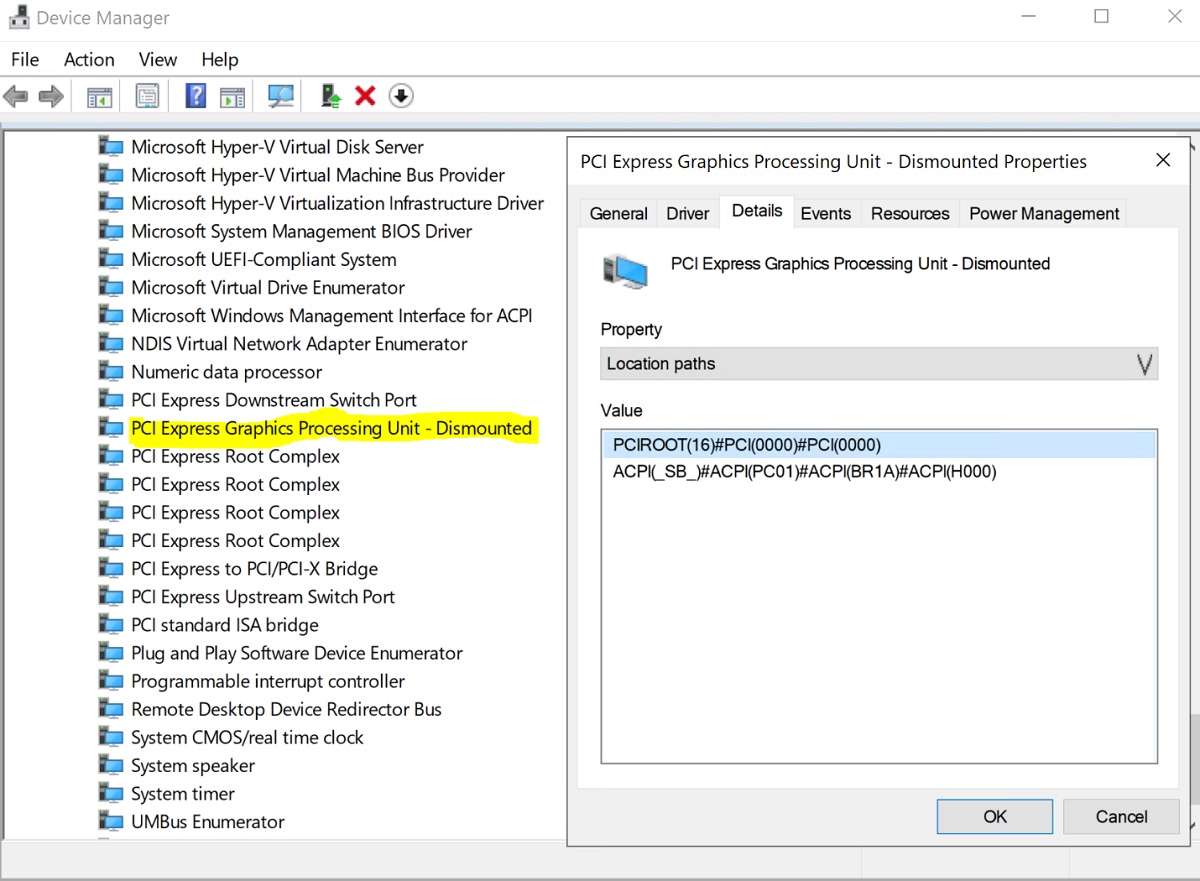
Dismount-VMHostAssignableDevicecmdlet 将 DDA 的 GPU 设备卸除到 VM。 将 LocationPath 值替换为在步骤 6 中为设备获取的值。Dismount-VMHostAssignableDevice -LocationPath "PCIROOT(16)#PCI(0000)#PCI(0000)" -force确认设备在“设备管理器”的系统设备下列为“已卸除”。


在已安装 GPU 的系统节点上打开 Hyper-V 管理器。
备注
DDA 不支持故障转移。 这是 DDA 的 VM 限制。 因此,建议使用 Hyper-V 管理器(而不是“故障转移群集管理器”)在节点上部署 VM 。 结合使用故障转移群集管理器与 DDA 会导致失败,并显示一条错误消息,表示 VM 的设备不支持高可用性。
使用步骤 1 中下载的 Ubuntu ISO,使用 Hyper-V 管理器中的“新建虚拟机向导”创建新 VM,以创建内存为 2 GB 的 Ubuntu 第 1 代 VM,以及附加到它的网卡。
在 PowerShell 中,使用 cmdlet 将已卸载的 GPU 设备分配给 VM,并将 LocationPath 的值替换为你的设备的路径值。
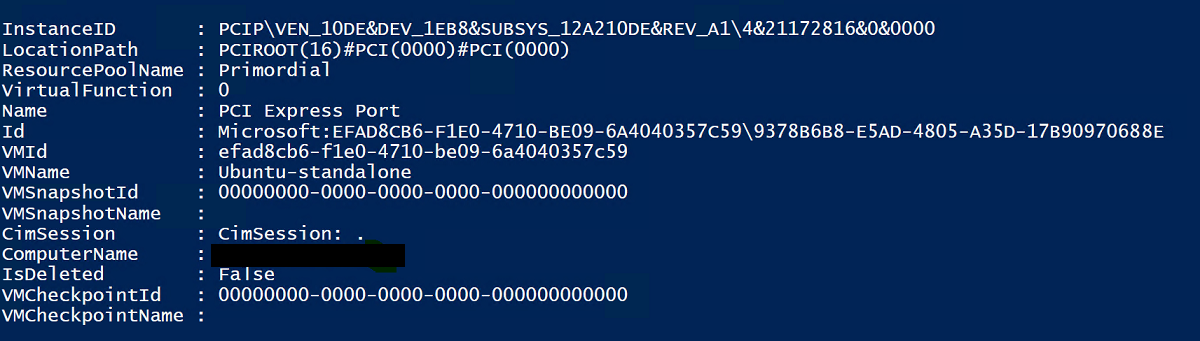
# Confirm that there are no DDA devices assigned to the VM
Get-VMAssignableDevice -VMName Ubuntu

# Assign the GPU to the VM
Add-VMAssignableDevice -LocationPath "PCIROOT(16)#PCI(0000)#PCI(0000)" -VMName Ubuntu

# Confirm that the GPU is assigned to the VM
Get-VMAssignableDevice -VMName Ubuntu
下面是将 GPU 成功分配到 VM 的输出:
按照 GPU 文档在此处配置其他值:
 # Enable Write-Combining on the CPU
 Set-VM -GuestControlledCacheTypes $true -VMName VMName

 # Configure the 32 bit MMIO space
 Set-VM -LowMemoryMappedIoSpace 3Gb -VMName VMName

 # Configure greater than 32 bit MMIO space
 Set-VM -HighMemoryMappedIoSpace 33280Mb -VMName VMName
备注
该值
33280Mb应足以满足大多数 GPU,但应替换为大于 GPU 内存的值。使用 Hyper-V 管理器连接到 VM 并开始安装 Ubuntu OS。 选择默认值,在 VM 上安装 Ubuntu OS。
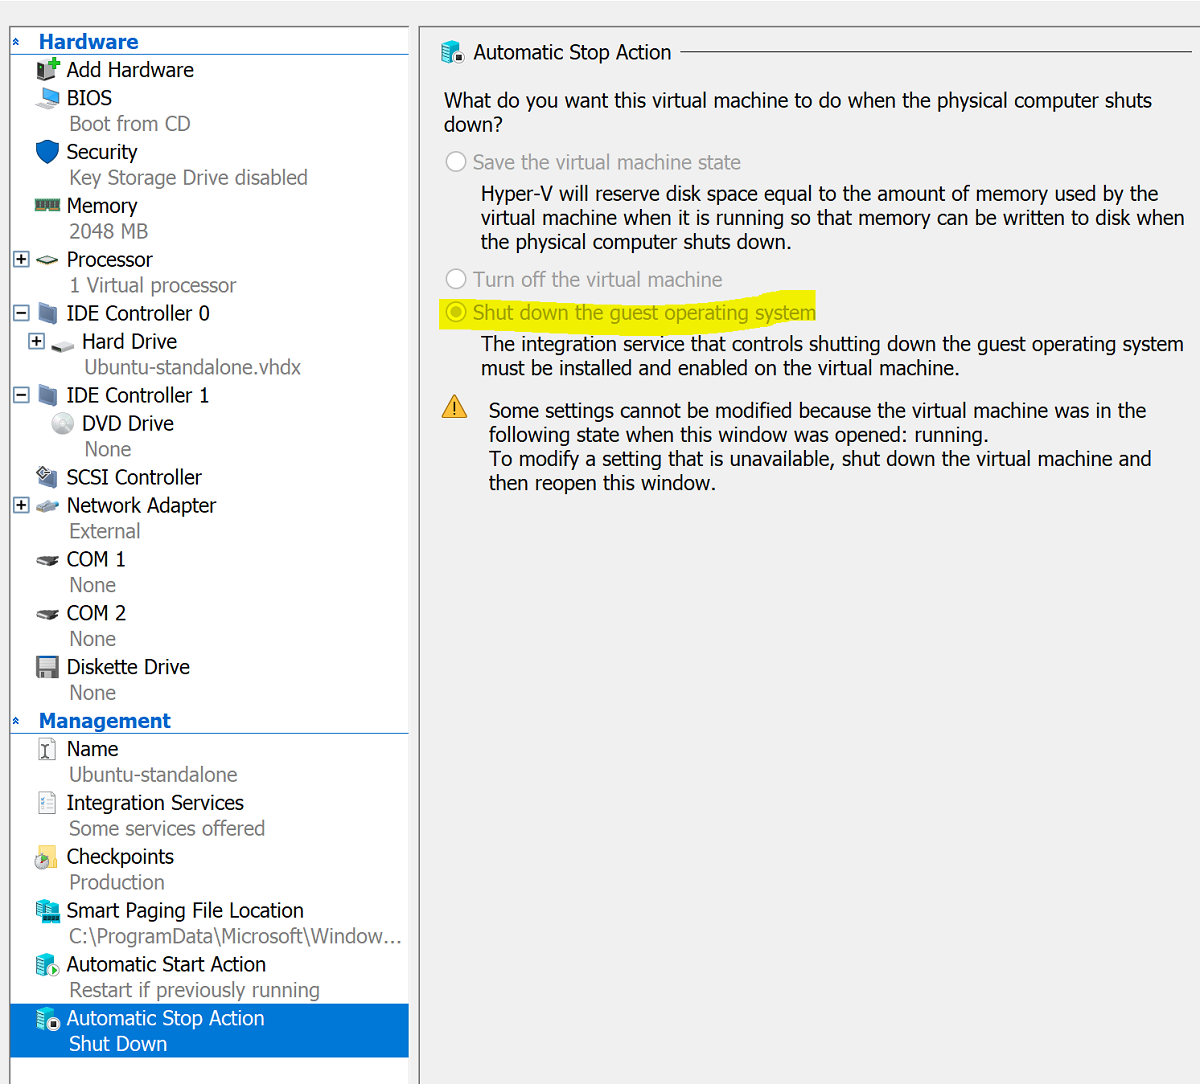
安装完成后,使用 Hyper-V 管理器 关闭 VM,并配置 VM 的 自动停止操作,使来宾操作系统关闭,如屏幕截图所示。
登录到 Ubuntu 并打开终端以安装 SSH:
$ sudo apt install openssh-server使用 ifconfig 命令查找 TCP/IP 地址以安装 Ubuntu,并复制 eth0 接口的 IP 地址 。
使用 OpenSSH(默认情况下随 Windows 10 一起安装的 ssh.exe)等 SSH 客户端或 Putty 连接到 Ubuntu VM,以便进行进一步的配置。
通过 SSH 客户端登录时,请发出 lspci 命令,并验证 NVIDIA GPU 是否以“3D 控制器”列出。
重要
如果 NVIDIA GPU 不被视为“3D 控制器”,请不要继续。 继续操作之前,请确保已遵循上述步骤。
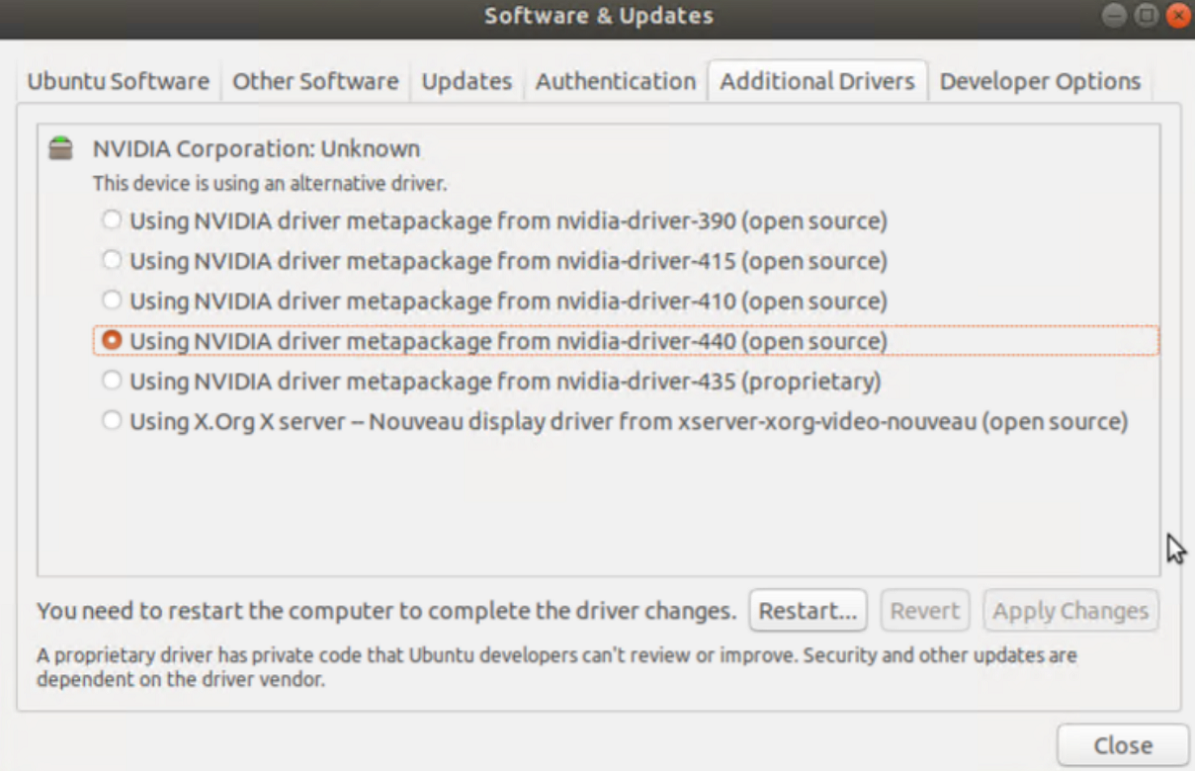
在 VM 中,搜索并打开“软件和更新”。 导航到“其他驱动程序”,然后选择列出的最新 NVIDIA GPU 驱动程序。 单击“应用更改”按钮,完成驱动程序的安装。
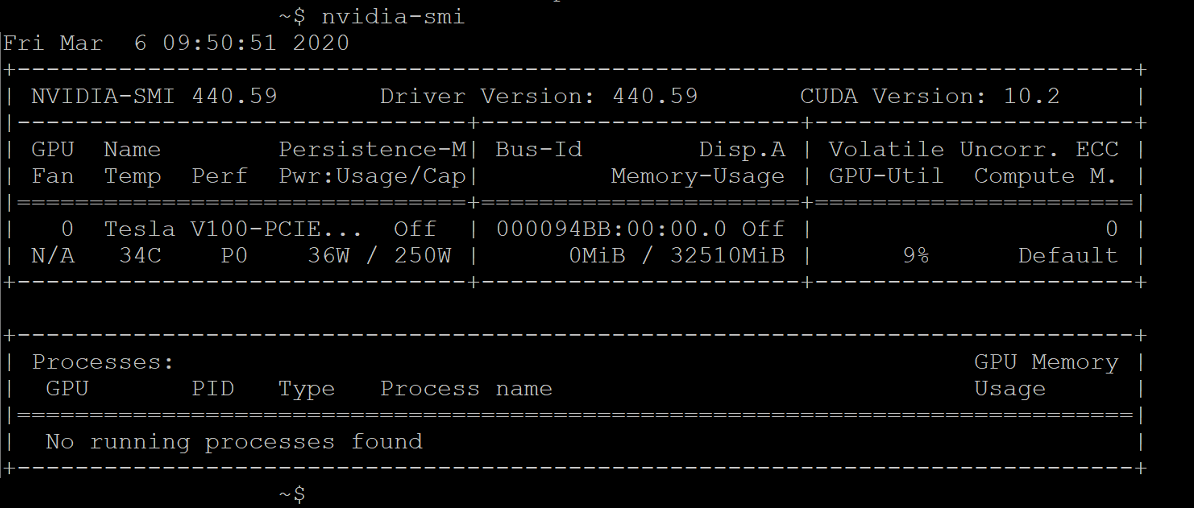
完成驱动程序的安装后,重启 Ubuntu VM。 VM 启动后,通过 SSH 客户端进行连接,并发出 nvidia-smi 命令,以验证 NVIDIA GPU 驱动程序安装是否已成功完成。 输出应类似于屏幕截图:
使用 SSH 客户端,设置存储库并安装 Docker CE 引擎:
$ sudo apt-get update
$ sudo apt-get install \
apt-transport-https \
ca-certificates \
curl \
gnupg-agent \
software-properties-common
添加 Docker 的官方 GPG 密钥:
$ curl -fsSL https://download.docker.com/linux/ubuntu/gpg | sudo apt-key add -搜索指纹的后八位字符,以验证目前是否拥有具有指纹 9DC8 5822 9FC7 DD38 854A E2D8 8D81 803C 0EBF CD88 的密钥:
$ sudo apt-key fingerprint 0EBFCD88输出应如下所示:
pub   rsa4096 2017-02-22 [SCEA]
9DC8 5822 9FC7 DD38 854A  E2D8 8D81 803C 0EBF CD88
uid           [ unknown] Docker Release (CE deb) <docker@docker.com>
sub   rsa4096 2017-02-22 [S]
为 Ubuntu AMD64 体系结构设置稳定存储库:
$ sudo add-apt-repository \
"deb [arch=amd64] https://download.docker.com/linux/ubuntu \
$(lsb_release -cs) \
stable"
更新包并安装 Docker CE:
$ sudo apt-get update
$ sudo apt-get install docker-ce docker-ce-cli containerd.io
验证 Docker CE 安装:
$ sudo docker run hello-world


若要为此配置做好准备,请查看 NVIDIA-Deepstream-Azure-IoT-Edge-on-a-NVIDIA-Jetson-Nano GitHub 存储库中包含的常见问题解答,其中说明了为何需要安装 Docker 而不是 Moby。 查看后,继续执行后续步骤。
从 SSH 客户端添加包存储库:
curl -s -L https://nvidia.github.io/nvidia-docker/gpgkey | \
sudo apt-key add -
distribution=$(. /etc/os-release;echo $ID$VERSION_ID)

curl -s -L https://nvidia.github.io/nvidia-docker/$distribution/nvidia-docker.list | \
sudo tee /etc/apt/sources.list.d/nvidia-docker.list

sudo apt-get update
安装 nvidia-docker2 并重载 Docker 守护程序配置:
sudo apt-get install -y nvidia-docker2
sudo pkill -SIGHUP dockerd
重新启动 VM:
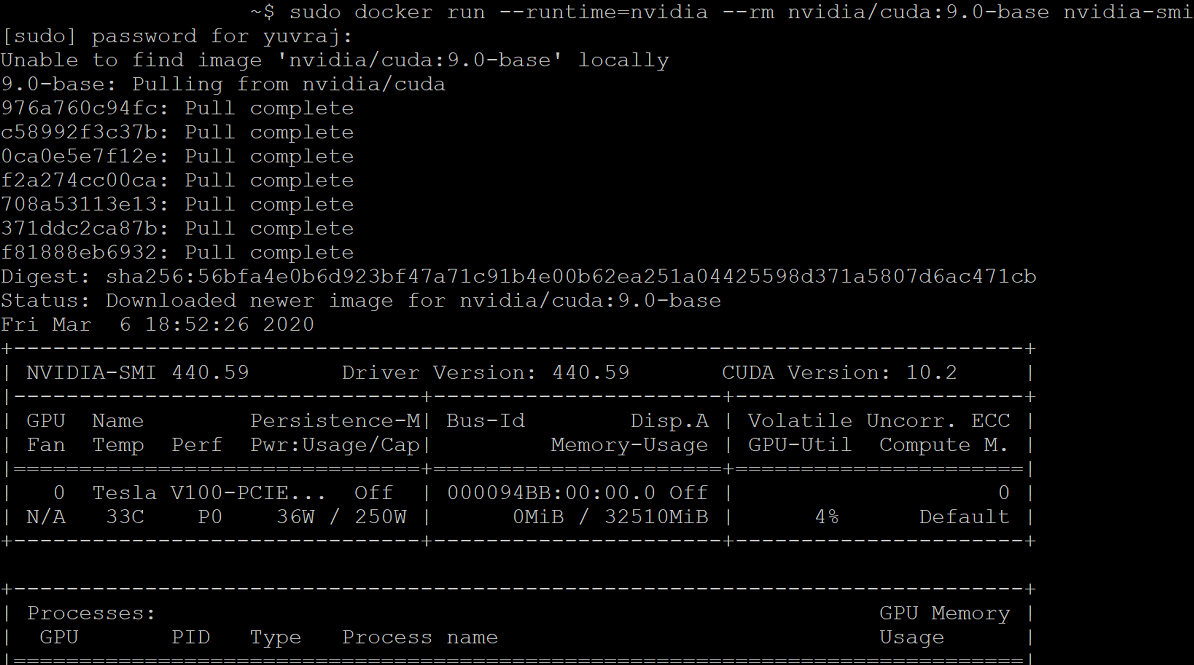
sudo /sbin/shutdown -r now重新启动后,验证 NVIDIA Docker 是否安装成功:
sudo docker run --runtime=nvidia --rm nvidia/cuda:9.0-base nvidia-smi下面是成功安装输出:
按照此处的说明操作,继续安装 Azure IoT Edge,跳过运行时安装:
curl https://packages.microsoft.com/config/ubuntu/18.04/multiarch/prod.list > ./microsoft-prod.list

sudo cp ./microsoft-prod.list /etc/apt/sources.list.d/

curl https://packages.microsoft.com/keys/microsoft.asc | gpg --dearmor > microsoft.gpg
sudo cp ./microsoft.gpg /etc/apt/trusted.gpg.d/
sudo apt-get update

sudo apt-get install iotedge
备注
安装 Azure IoT Edge 后,验证 config.yaml 是否位于 Ubuntu VM 的 /etc/iotedge/config.yaml
按照此处的指导操作,在 Azure 门户中创建 IoT Edge 设备标识。 接下来,为刚创建的 IoT Edge 复制设备连接字符串。
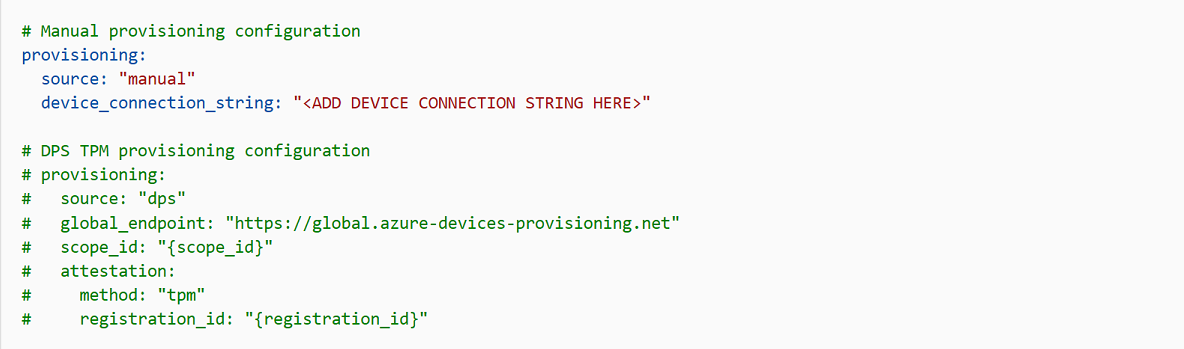
使用 SSH 客户端在 Ubuntu VM 上更新 config.yaml 中的设备连接字符串:
sudo nano /etc/iotedge/config.yaml找到文件的预配配置,并取消注释“手动预配配置”节。 使用 IoT Edge 设备的连接字符串更新 device_connection_string 的值。 请确保注释掉任何其他预配部分。请确保 provisioning: 行前面没有空格,并且嵌套项缩进了两个空格:
若要将剪贴板内容粘贴到 Nano,请按住 shift 键并右键单击或按 shift 并按 insert。 保存并关闭 (Ctrl + X, Y, Enter) 文件。
使用 SSH 客户端重启 IoT Edge 守护程序:
sudo systemctl restart iotedge验证安装并检查 IoT Edge 守护程序的状态:
systemctl status iotedge

journalctl -u iotedge --no-pager --no-full
使用 SSH 客户端在 Ubuntu VM 上创建以下目录结构:
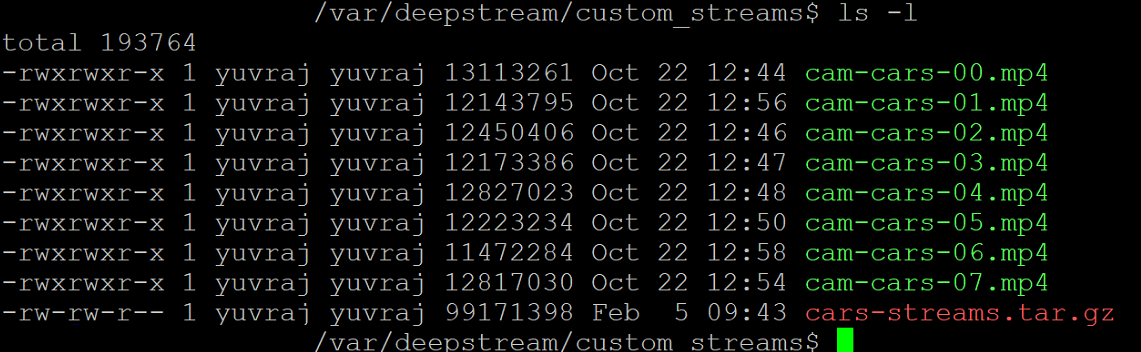
cd /var
sudo mkdir deepstream
mkdir ./deepstream/custom_configs
cd /var/deepstream
sudo mkdir custom_streams
sudo chmod -R 777 /var/deepstream
cd ./custom_streams
确保工作目录是 /var/deepstream/custom_streams,并通过在 SSH 客户端中执行以下命令下载演示视频文件:
wget -O cars-streams.tar.gz --no-check-certificate https://onedrive.live.com/download?cid=0C0A4A69A0CDCB4C&resid=0C0A4A69A0CDCB4C%21588371&authkey=AAavgrxG95v9gu0取消压缩视频文件:
tar -xzvf cars-streams.tar.gz目录 /var/deepstream/custom_streams的内容应类似于屏幕截图:
在 /var/deepstream/custom_configs 目录中,新建名为 test5_config_file_src_infer_azure_iotedge_edited.txt 文件。 使用文本编辑器打开文件并粘贴以下代码,然后保存并关闭文件。
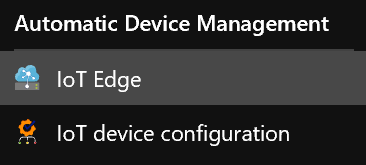
# Copyright (c) 2018 NVIDIA Corporation.  All rights reserved.
#
# NVIDIA Corporation and its licensors retain all intellectual property
# and proprietary rights in and to this software, related documentation
# and any modifications thereto.  Any use, reproduction, disclosure or
# distribution of this software and related documentation without an express
# license agreement from NVIDIA Corporation is strictly prohibited.

[application]
enable-perf-measurement=1
perf-measurement-interval-sec=5
#gie-kitti-output-dir=streamscl

[tiled-display]
enable=1
rows=2
columns=2
width=1280
height=720
gpu-id=0
#(0): nvbuf-mem-default - Default memory allocated, specific to particular platform
#(1): nvbuf-mem-cuda-pinned - Allocate Pinned/Host cuda memory, applicable for Tesla
#(2): nvbuf-mem-cuda-device - Allocate Device cuda memory, applicable for Tesla
#(3): nvbuf-mem-cuda-unified - Allocate Unified cuda memory, applicable for Tesla
#(4): nvbuf-mem-surface-array - Allocate Surface Array memory, applicable for Jetson
nvbuf-memory-type=0

[source0]
enable=1
#Type - 1=CameraV4L2 2=URI 3=MultiURI
type=3
uri=file://../../../../../samples/streams/sample_1080p_h264.mp4
num-sources=2
gpu-id=0
nvbuf-memory-type=0

[source1]
enable=1
#Type - 1=CameraV4L2 2=URI 3=MultiURI
type=3
uri=file://../../../../../samples/streams/sample_1080p_h264.mp4
num-sources=2
gpu-id=0
nvbuf-memory-type=0

[sink0]
enable=0

[sink3]
enable=1
#Type - 1=FakeSink 2=EglSink 3=File 4=RTSPStreaming
type=4
#1=h264 2=h265
codec=1
sync=0
bitrate=4000000
# set properties in case of RTSPStreaming
rtsp-port=8554
udp-port=5400

[sink1]
enable=1
#Type - 1=FakeSink 2=EglSink 3=File 4=UDPSink 5=nvoverlaysink 6=MsgConvBroker
type=6
msg-conv-config=../configs/dstest5_msgconv_sample_config.txt
#(0): PAYLOAD_DEEPSTREAM - Deepstream schema payload
#(1): PAYLOAD_DEEPSTREAM_MINIMAL - Deepstream schema payload minimal
#(256): PAYLOAD_RESERVED - Reserved type
#(257): PAYLOAD_CUSTOM   - Custom schema payload
msg-conv-payload-type=1
msg-broker-proto-lib=/opt/nvidia/deepstream/deepstream-4.0/lib/libnvds_azure_edge_proto.so
topic=mytopic
#Optional:
#msg-broker-config=../../../../libs/azure_protocol_adaptor/module_client/cfg_azure.txt

[sink2]
enable=0
type=3
#1=mp4 2=mkv
container=1
#1=h264 2=h265 3=mpeg4
## only SW mpeg4 is supported right now.
codec=3
sync=1
bitrate=2000000
output-file=out.mp4
source-id=0

[osd]
enable=1
gpu-id=0
border-width=1
text-size=15
text-color=1;1;1;1;
text-bg-color=0.3;0.3;0.3;1
font=Arial
show-clock=0
clock-x-offset=800
clock-y-offset=820
clock-text-size=12
clock-color=1;0;0;0
nvbuf-memory-type=0

[streammux]
gpu-id=0
##Boolean property to inform muxer that sources are live
live-source=0
batch-size=4
##time out in usec, to wait after the first buffer is available
##to push the batch even if the complete batch isn't formed
batched-push-timeout=40000
## Set muxer output width and height
width=1920
height=1080
##Enable to maintain aspect ratio wrt source, and allow black borders, works
##along with width, height properties
enable-padding=0
nvbuf-memory-type=0

[primary-gie]
enable=1
gpu-id=0
batch-size=4
## 0=FP32, 1=INT8, 2=FP16 mode
bbox-border-color0=1;0;0;1
bbox-border-color1=0;1;1;1
bbox-border-color2=0;1;1;1
bbox-border-color3=0;1;0;1
nvbuf-memory-type=0
interval=0
gie-unique-id=1
model-engine-file=../../../../../samples/models/Primary_Detector/resnet10.caffemodel_b4_int8.engine
labelfile-path=../../../../../samples/models/Primary_Detector/labels.txt
config-file=../../../../../samples/configs/deepstream-app/config_infer_primary.txt
#infer-raw-output-dir=../../../../../samples/primary_detector_raw_output/

[tracker]
enable=1
tracker-width=600
tracker-height=300
ll-lib-file=/opt/nvidia/deepstream/deepstream-4.0/lib/libnvds_mot_klt.so
#ll-config-file required for DCF/IOU only
#ll-config-file=tracker_config.yml
#ll-config-file=iou_config.txt
gpu-id=0
#enable-batch-process applicable to DCF only
enable-batch-process=0

[tests]
file-loop=1
导航到 Azure 门户。 选择“IoT 中心预配”,单击“自动设备管理”,然后单击 IoT Edge :
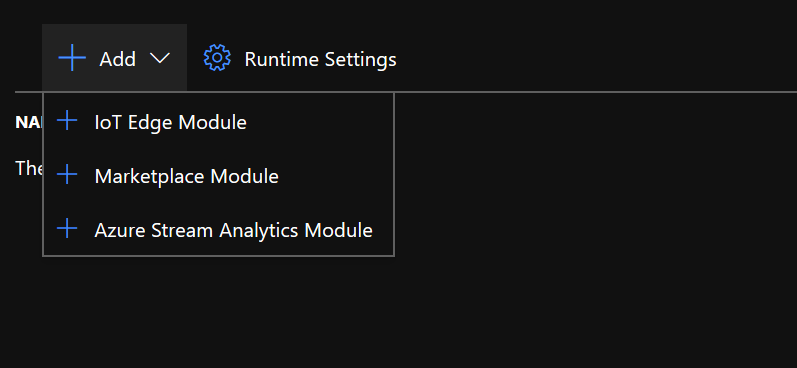
在右侧窗格中,选择使用了设备连接字符串的设备标识。 单击“设置模块”:

在“IoT Edge 模块”下,单击并选择“IoT Edge 模块”:
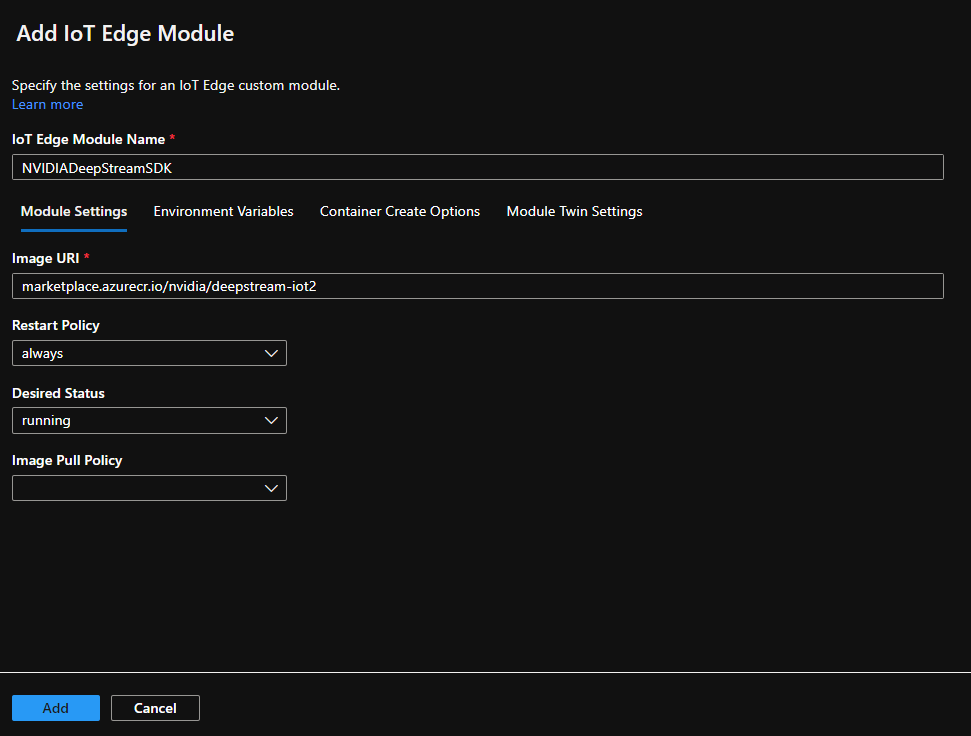
在“添加 IoT Edge 模块”窗格中,选择“模块设置”选项卡,然后输入或选择以下值:
IoT Edge 模块名称:NVIDIADeepStreamSDK
映像 URI:marketplace.azurecr.io/nvidia/deepstream-iot2
重启策略:始终
所需状态:正在运行
映像拉取策略:空白
选择 添加 。
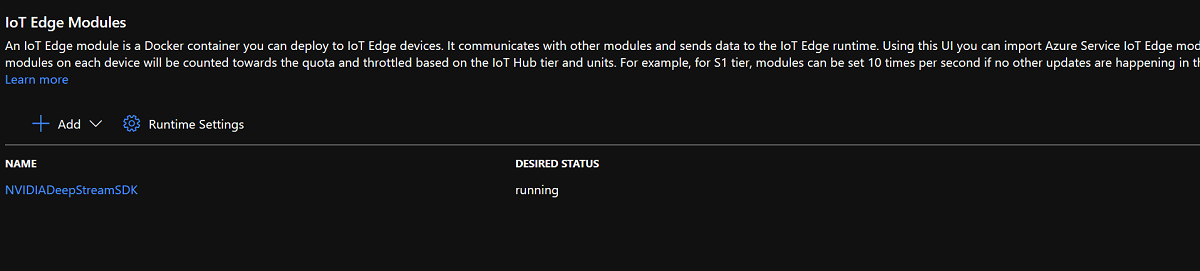
确保 NvidiaDeepStreamSDK 模块在 IoT Edge 模块下列出:
单击“NVIDIADeepStreamSDK”模块,并选择“容器创建选项”。默认配置如下所示:
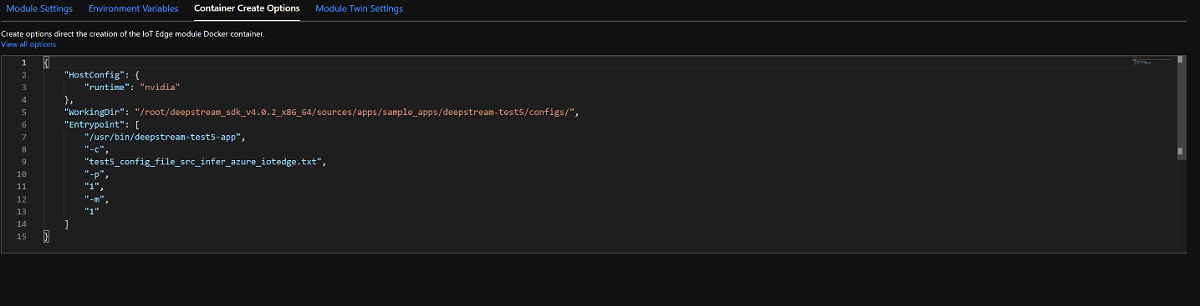
将上述配置替换为配置:
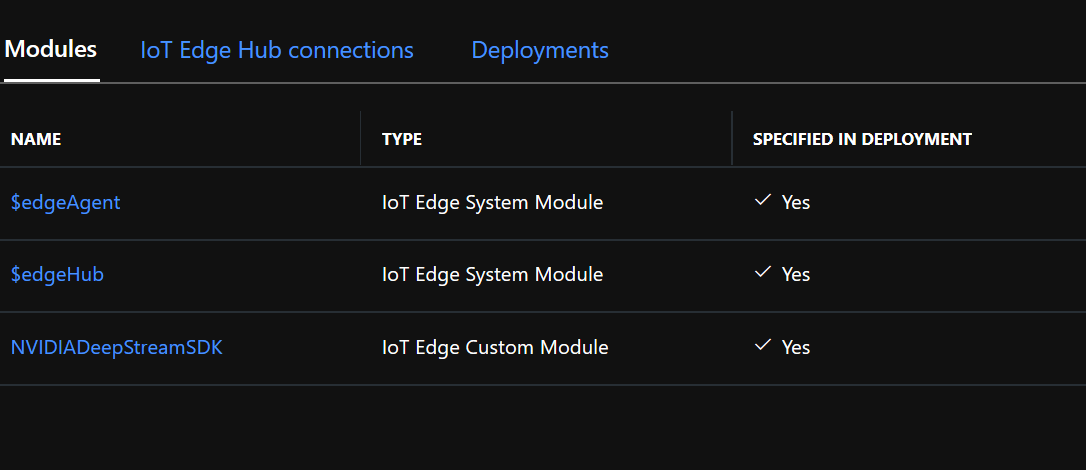
{
  "ExposedPorts": {
    "8554/tcp": {}
  },
  "Entrypoint": [
    "/usr/bin/deepstream-test5-app",
    "-c",
    "test5_config_file_src_infer_azure_iotedge_edited.txt",
    "-p",
    "1",
    "-m",
    "1"
  ],
  "HostConfig": {
    "runtime": "nvidia",
    "Binds": [
      "/var/deepstream/custom_configs:/root/deepstream_sdk_v4.0.2_x86_64/sources/apps/sample_apps/deepstream-test5/custom_configs/",
      "/var/deepstream/custom_streams:/root/deepstream_sdk_v4.0.2_x86_64/sources/apps/sample_apps/deepstream-test5/custom_streams/"
    ],
    "PortBindings": {
      "8554/tcp": [
        {
          "HostPort": "8554"
        }
      ]
    }
  },
  "WorkingDir": "/root/deepstream_sdk_v4.0.2_x86_64/sources/apps/sample_apps/deepstream-test5/custom_configs/"
}
选择“ 审阅和创建”,然后在下一页上单击“ 创建”。 现在,您应在 Azure 门户中看到为您的 IoT Edge 设备列出的三个模块:
使用 SSH 客户端连接到 Ubuntu VM,并验证是否正在运行正确的模块:
sudo iotedge list
nvidia-smi
备注
下载 NvidiaDeepstream 容器需要几分钟时间。 可以使用命令
journalctl -u iotedge --no-pager --no-full验证下载,查看 iotedge 守护程序日志。确认 NvdiaDeepStreem 容器是否正常运行。 屏幕截图中的命令输出指示成功。
sudo iotedge list
sudo iotedge logs -f NVIDIADeepStreamSDK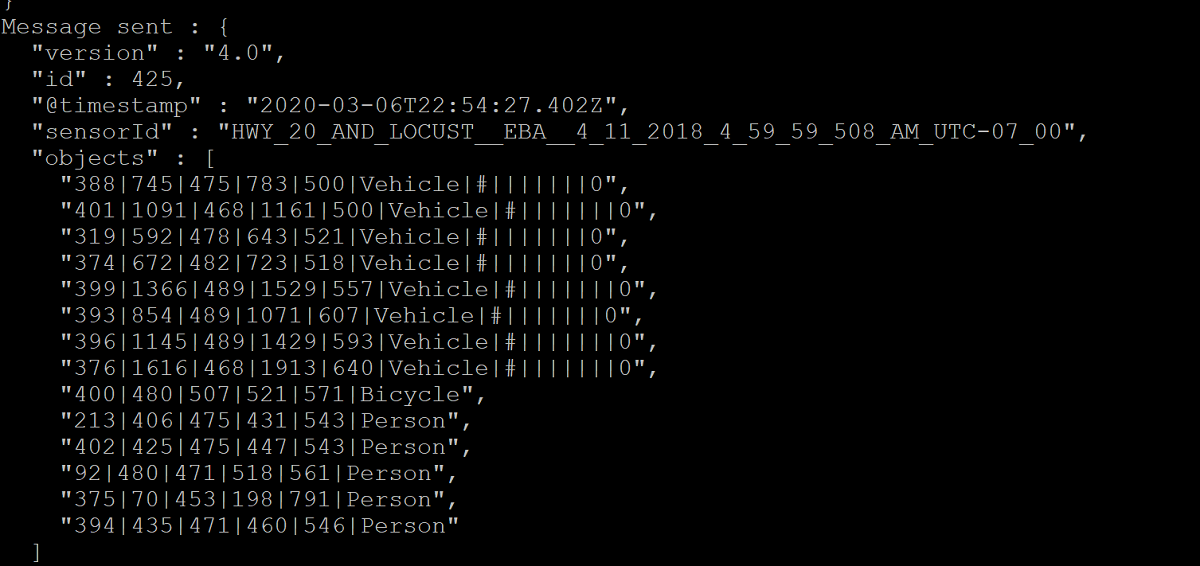
nvidia-smi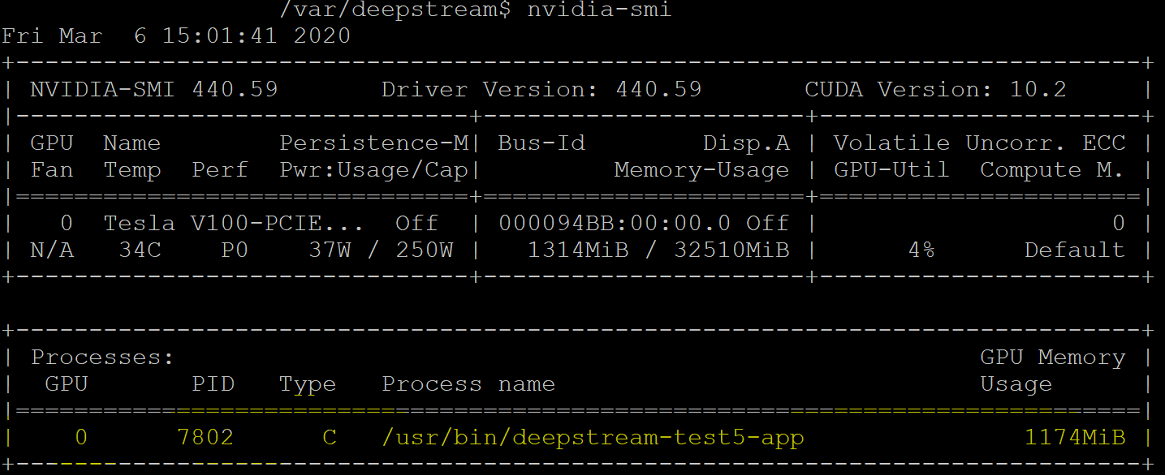
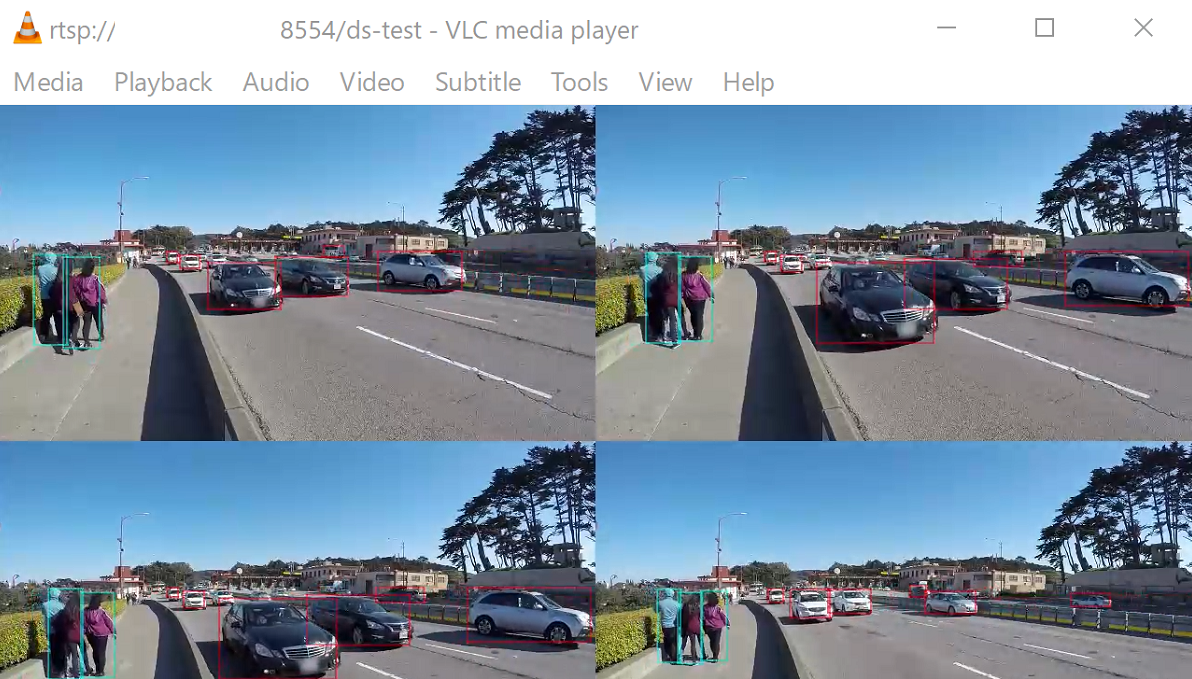
使用 ifconfig 命令确认 Ubuntu VM 的 TCP/IP 地址,并查看 eth0 接口旁边的 TCP/IP 地址 。
在工作站上安装 VLC 播放机。 在 VLC 播放机中,单击“媒体 -> 打开网络流”,并使用以下格式键入地址:
rtsp://ipaddress:8554/ds-test
其中,ipaddress 是 VM 的 TCP/IP 地址。


有关 GPU 和 DDA 的详细信息,另请参阅:
- Plan for deploying devices using Discrete Device Assignment(使用离散设备分配计划部署设备)
- Deploy graphics devices using Discrete Device Assignment(使用离散设备分配部署图形设备)