通过 Azure 资源管理器部署或配置资源的应用程序必须由其自身的标识(称为“安全主体”)来表示。 就如同用户由用户主体表示那样,应用由服务主体来表示。
使用标识还可以做到仅向用户或应用委托必要的权限。 例如,配置管理应用可能使用 Azure 资源管理器来清点 Azure 资源。 应用将在目录中注册,然后添加到适当范围的“读取者”角色,从而仅限应用进行只读访问。
概述
与用户一样,应用在身份验证期间必须出示凭据,这需要以下两个元素:
- 应用程序 ID,有时也称为客户端 ID。 一个用于唯一标识 Active Directory 租户中应用的注册的 GUID。
- 一个机密。 你可以生成客户端密码字符串(类似于密码),也可以指定 X509 证书指纹(使用其公钥)。
在应用自己的标识下运行应用比在用户标识下运行更有利,原因如下:
- 更强的凭据 - 应用可使用 X509 证书登录,而不使用共享的文本机密/密码。
- 可向应用分配限制更高的权限。 一般而言,这些权限限制为只能执行应用程序需要执行的操作,即所谓的“最低特权原则”。
- 应用的凭据和权限的更改频率不像用户凭据那么高。 例如,当用户的职责发生变化、密码要求规定要更改,或用户从公司离职时。
首先请在目录中创建新的应用注册,这会创建关联的服务主体对象来代表应用在目录中的标识。 注册过程因为实例选择的 Azure Stack Hub 实例而异:
- Microsoft Entra ID:Microsoft Entra ID 是多租户、基于云的目录和标识管理服务。 可将 Microsoft Entra ID 与联网 Azure Stack Hub 实例配合使用。 稍后提供的示例将使用 Azure 门户进行 Microsoft Entra 应用注册。
- Active Directory 联合身份验证服务 (AD FS) :AD FS 可提供简化、安全的标识联合身份验证和 Web 单一登录 (SSO) 功能。 可将 AD FS 与联网和离线 Azure Stack Hub 实例配合使用。 稍后提供的示例将使用 Azure Stack Hub PowerShell 进行 AD FS 应用注册。
注册应用后,你将了解如何为其分配角色,从而限制其对资源的访问权限。
管理 Microsoft Entra 应用
如果在使用 Microsoft Entra ID 作为标识管理服务的情况下部署了 Azure Stack Hub,请为应用创建和管理标识,就像为 Azure 所做的那样。 本部分介绍如何使用 Azure 门户执行这些步骤。 在开始之前,请查看 注册应用所需的权限,以确保有足够的权限来注册应用。
创建使用客户端密码凭据的应用注册
在本部分,你将使用 Azure 门户在 Microsoft Entra 租户中注册应用。 在以下示例中,你将指定客户端机密凭据,但门户也支持基于 X509 证书的凭据。
使用 Azure 帐户登录到 Azure 门户。
选择“Microsoft Entra ID”>“应用注册”>“新建注册”。
为应用提供一个名称。
选择相应的受支持帐户类型。
在“重定向 URI”下,选择“Web”作为应用类型,并(可选)指定重定向 URI(如果应用需要它)。
设置这些值后,选择“注册”。 随即会创建应用注册,并显示“概述”页。
复制“应用程序 ID”以便在应用代码中使用。 此值也称为“客户端 ID”。
若要生成客户端机密,请选择“证书和机密”页。 选择“新建客户端机密”。
提供机密的说明以及过期时间。
完成后,选择“添加”。
此时会显示机密值。 请复制此值并将其保存到另一位置,因为以后无法检索它。 在客户端应用中提供机密与应用程序 ID,以便登录。

转到分配角色以了解如何为应用标识建立基于角色的访问控制。
其他 Microsoft Entra 应用管理文章
有关管理 Microsoft Entra 应用的更多详细信息,请参阅以下 Azure 文章:
- 有关注册 Microsoft Entra 应用的更多详细信息,包括使用证书凭据如何创建应用注册。
- 如何删除应用注册。
- 如何还原或删除最近已删除的应用注册。
管理 AD FS 应用
如果你已部署 Azure Stack Hub 与 AD FS 作为标识管理服务,则必须使用 PowerShell 来管理应用标识。 以下示例演示 X509 证书和客户端密码凭据。
脚本必须在权限提升(“以管理员身份运行”)的 PowerShell 控制台中运行,这会打开另一个会话来连接到托管了 Azure Stack Hub 实例特权终结点的 VM。 建立特权终结点会话后,其他 cmdlet 将用于创建和管理应用注册。 有关特权终结点的详细信息,请参阅使用 Azure Stack Hub 中的特权终结点。
创建使用证书凭据的应用注册
创建证书凭据时,必须符合以下要求:
- 对于生产环境,证书必须由内部证书颁发机构或公共证书颁发机构颁发。 使用公共颁发机构时,必须将基础操作系统映像中的颁发机构包括为 Microsoft 受信任根颁发机构计划的一部分。 如需完整列表,请查看参与者列表 - Microsoft 受信任根计划。 稍后在更新证书凭据期间,还将显示创建“自签名”测试证书的示例。
- 加密提供程序必须指定为 Microsoft 旧版加密服务提供程序 (CSP) 密钥提供程序。
- 证书格式必须是 PFX 文件,因为公钥和私钥都是必需的。 Windows 服务器使用包含公钥文件(TLS/SSL 证书文件)和关联的私钥文件的 .pfx 文件。
- Azure Stack Hub 基础结构必须能够通过网络访问证书中发布的证书颁发机构的证书吊销列表 (CRL) 位置。 此 CRL 必须是一个 HTTP 终结点。
获得证书后,使用以下 PowerShell 脚本来注册应用,然后使用该应用的标识登录。 请将以下占位符替换为自己的值:
| 占位符 | 说明 | 示例 |
|---|---|---|
| <PepVM> | Azure Stack Hub 实例上特权终结点 VM 的名称。 | "AzS-ERCS01" |
| <YourCertificateLocation> | X509 证书在本地证书存储中的位置。 | "Cert:\CurrentUser\My\AB5A8A3533CC7AA2025BF05120117E06DE407B34" |
| <YourAppName> | 新应用注册的描述性名称。 | "My management tool" |
打开权限提升的 Windows PowerShell 会话,并运行以下脚本。
# Sign in to PowerShell interactively, using credentials that have access to the VM running the Privileged Endpoint (typically <domain>\cloudadmin)
$Creds = Get-Credential

# Create a PSSession to the Privileged Endpoint VM
$Session = New-PSSession -ComputerName "<PepVm>" -ConfigurationName PrivilegedEndpoint -Credential $Creds -SessionOption (New-PSSessionOption -Culture en-US -UICulture en-US)

# To use a managed certificate from the certificate store, use the Get-Item cmdlet.
# To use a certificate file, use Get-Certificate for a .cer file, or Get-PfxCertificate for a .pfx file.
# To use a test certificate, use the New-SelfSignedCertificate cmdlet
#   See https://learn.microsoft.com/powershell/module/pki/new-selfsignedcertificate for usage details, including using the -Provider parameter
#   $Cert = New-SelfSignedCertificate -CertStoreLocation "cert:\CurrentUser\My" -Subject "CN=<YourAppName>" -KeySpec KeyExchange
$Cert = Get-Item "<YourCertificateLocation>"

# Use the privileged endpoint to create the new app registration
$SpObject = Invoke-Command -Session $Session -ScriptBlock {New-GraphApplication -Name "<YourAppName>" -ClientCertificates $using:cert}
$AzureStackInfo = Invoke-Command -Session $Session -ScriptBlock {Get-AzureStackStampInformation}
$Session | Remove-PSSession

# Using the stamp info for your Azure Stack Hub instance, populate the following variables:
# - Az endpoint used for Azure Resource Manager operations
# - Audience for acquiring an OAuth token used to access Graph API
# - GUID of the directory tenant
$ArmEndpoint = $AzureStackInfo.TenantExternalEndpoints.TenantResourceManager
$GraphAudience = "https://graph." + $AzureStackInfo.ExternalDomainFQDN + "/"
$TenantID = $AzureStackInfo.AADTenantID

# Register and set an Az environment that targets your Azure Stack Hub instance
Add-AzEnvironment -Name "AzureStackUser" -ArmEndpoint $ArmEndpoint

# Sign in using the new service principal
$SpSignin = Connect-AzAccount -Environment "AzureStackUser" `
-ServicePrincipal `
-CertificateThumbprint $SpObject.Thumbprint `
-ApplicationId $SpObject.ClientId `
-TenantId $TenantID

# Output the service principal details
$SpObject
该脚本完成后,将显示应用注册信息。
ClientID和Thumbprint已经过身份验证,稍后将授权其访问 Azure 资源管理器托管的资源。ApplicationIdentifier : S-1-5-21-1512385356-3796245103-1243299919-1356 ClientId : 00001111-aaaa-2222-bbbb-3333cccc4444 Thumbprint : 30202C11BE6864437B64CE36C8D988442082A0F1 ApplicationName : Azurestack-MyApp-c30febe7-1311-4fd8-9077-3d869db28342 ClientSecret : PSComputerName : azs-ercs01 RunspaceId : a78c76bb-8cae-4db4-a45a-c1420613e01b
请将 PowerShell 控制台会话保持打开状态,因为在下一部分要将它与 ApplicationIdentifier 值配合使用。
更新证书凭据
现在,你已注册了应用程序,本部分介绍如何执行以下操作:
- 创建新的自签名 X509 证书用于测试。
- 更新应用程序的凭据,方法是:更新其 Thumbprint 属性,使之与新证书匹配。
使用 PowerShell 更新证书凭据(请将以下占位符替换为自己的值):
| 占位符 | 说明 | 示例 |
|---|---|---|
| <PepVM> | Azure Stack Hub 实例上特权终结点 VM 的名称。 | "AzS-ERCS01" |
| <YourAppName> | 新应用注册的描述性名称。 | "My management tool" |
| <YourCertificateLocation> | X509 证书在本地证书存储中的位置。 | "Cert:\CurrentUser\My\AB5A8A3533CC7AA2025BF05120117E06DE407B34" |
| <AppIdentifier> | 分配给应用程序注册的标识符。 | "S-1-5-21-1512385356-3796245103-1243299919-1356" |
使用权限提升的 Windows PowerShell 会话运行以下 cmdlet:
# Create a PSSession to the PrivilegedEndpoint VM
$Session = New-PSSession -ComputerName "<PepVM>" -ConfigurationName PrivilegedEndpoint -Credential $Creds -SessionOption (New-PSSessionOption -Culture en-US -UICulture en-US)

# Create a self-signed certificate for testing purposes, using the New-SelfSignedCertificate cmdlet
# See https://learn.microsoft.com/powershell/module/pki/new-selfsignedcertificate for usage details, including using the -Provider parameter
$NewCert = New-SelfSignedCertificate -CertStoreLocation "cert:\CurrentUser\My" -Subject "CN=<YourAppName>" -KeySpec KeyExchange
# In production, use Get-Item to retrieve a managed certificate from the certificate store.
# Alteratively, use Get-Certificate for a .cer file, or Get-PfxCertificate for a .pfx file.
# $Cert = Get-Item "<YourCertificateLocation>"

# Use the privileged endpoint to update the certificate thumbprint, used by <AppIdentifier>
$SpObject = Invoke-Command -Session $Session -ScriptBlock {Set-GraphApplication -ApplicationIdentifier "<AppIdentifier>" -ClientCertificates $using:NewCert}
$Session | Remove-PSSession

# Output the updated service principal details
$SpObject
脚本完成后,会显示更新后的应用注册信息,包括新的自签名证书的指纹值。
ApplicationIdentifier : S-1-5-21-1512385356-3796245103-1243299919-1356
ClientId              :
Thumbprint            : AF22EE716909041055A01FE6C6F5C5CDE78948E9
ApplicationName       : Azurestack-MyApp-c30febe7-1311-4fd8-9077-3d869db28342
ClientSecret          :
PSComputerName        : azs-ercs01
RunspaceId            : a580f894-8f9b-40ee-aa10-77d4d142b4e5
创建使用客户端密码凭据的应用注册
警告
使用客户端机密不如使用 X509 证书凭据那么安全。 这不仅会降低身份验证机制的安全性,而且通常还要求在客户端应用的源代码中嵌入机密。 因此,我们强烈建议在生产应用中使用证书凭据。
现在你将创建另一个应用注册,但这次需要指定客户端机密凭据。 不同于证书凭据,目录能够生成客户端机密凭据。 无需指定客户端机密,而可以使用 -GenerateClientSecret 开关来请求生成客户端机密。 请将以下占位符替换为自己的值:
| 占位符 | 说明 | 示例 |
|---|---|---|
| <PepVM> | Azure Stack Hub 实例上特权终结点 VM 的名称。 | "AzS-ERCS01" |
| <YourAppName> | 新应用注册的描述性名称。 | "My management tool" |
打开权限提升的 Windows PowerShell 会话,并运行以下 cmdlet:
# Sign in to PowerShell interactively, using credentials that have access to the VM running the Privileged Endpoint (typically <domain>\cloudadmin)
$Creds = Get-Credential

# Create a PSSession to the Privileged Endpoint VM
$Session = New-PSSession -ComputerName "<PepVM>" -ConfigurationName PrivilegedEndpoint -Credential $Creds -SessionOption (New-PSSessionOption -Culture en-US -UICulture en-US)

# Use the privileged endpoint to create the new app registration
$SpObject = Invoke-Command -Session $Session -ScriptBlock {New-GraphApplication -Name "<YourAppName>" -GenerateClientSecret}
$AzureStackInfo = Invoke-Command -Session $Session -ScriptBlock {Get-AzureStackStampInformation}
$Session | Remove-PSSession

# Using the stamp info for your Azure Stack Hub instance, populate the following variables:
# - Az endpoint used for Azure Resource Manager operations
# - Audience for acquiring an OAuth token used to access Graph API
# - GUID of the directory tenant
$ArmEndpoint = $AzureStackInfo.TenantExternalEndpoints.TenantResourceManager
$GraphAudience = "https://graph." + $AzureStackInfo.ExternalDomainFQDN + "/"
$TenantID = $AzureStackInfo.AADTenantID

# Register and set an Az environment that targets your Azure Stack Hub instance
Add-AzEnvironment -Name "AzureStackUser" -ArmEndpoint $ArmEndpoint

# Sign in using the new service principal
$securePassword = $SpObject.ClientSecret | ConvertTo-SecureString -AsPlainText -Force
$credential = New-Object -TypeName System.Management.Automation.PSCredential -ArgumentList $SpObject.ClientId, $securePassword
$SpSignin = Connect-AzAccount -Environment "AzureStackUser" -ServicePrincipal -Credential $credential -TenantId $TenantID

# Output the service principal details
$SpObject
该脚本完成后,将显示应用注册信息。
ClientID和ClientSecret已经过身份验证,稍后将授权其访问 Azure 资源管理器托管的资源。ApplicationIdentifier : S-1-5-21-1634563105-1224503876-2692824315-2623 ClientId : 11112222-bbbb-3333-cccc-4444dddd5555 Thumbprint : ApplicationName : Azurestack-YourApp-6967581b-497e-4f5a-87b5-0c8d01a9f146 ClientSecret : 6RUWLRoBw3EebBLgaWGiowCkoko5_j_ujIPjA8dS PSComputerName : azs-ercs01 RunspaceId : 286daaa1-c9a6-4176-a1a8-03f543f90998
请将 PowerShell 控制台会话保持打开状态,因为在下一部分要将它与 ApplicationIdentifier 值配合使用。
更新客户端密码凭据
在 PowerShell 中使用 ResetClientSecret 参数更新客户端机密凭据,以立即更改客户端机密。 请将以下占位符替换为自己的值:
| 占位符 | 说明 | 示例 |
|---|---|---|
| <PepVM> | Azure Stack Hub 实例上特权终结点 VM 的名称。 | "AzS-ERCS01" |
| <AppIdentifier> | 分配给应用程序注册的标识符。 | "S-1-5-21-1634563105-1224503876-2692824315-2623" |
使用权限提升的 Windows PowerShell 会话运行以下 cmdlet:
# Create a PSSession to the PrivilegedEndpoint VM
$Session = New-PSSession -ComputerName "<PepVM>" -ConfigurationName PrivilegedEndpoint -Credential $Creds -SessionOption (New-PSSessionOption -Culture en-US -UICulture en-US)

# Use the privileged endpoint to update the client secret, used by <AppIdentifier>
$SpObject = Invoke-Command -Session $Session -ScriptBlock {Set-GraphApplication -ApplicationIdentifier "<AppIdentifier>" -ResetClientSecret}
$Session | Remove-PSSession

# Output the updated service principal details
$SpObject
脚本完成后,会显示更新后的应用注册信息,包括新生成的客户端机密。
ApplicationIdentifier : S-1-5-21-1634563105-1224503876-2692824315-2623
ClientId              : 11112222-bbbb-3333-cccc-4444dddd5555
Thumbprint            :
ApplicationName       : Azurestack-YourApp-6967581b-497e-4f5a-87b5-0c8d01a9f146
ClientSecret          : MKUNzeL6PwmlhWdHB59c25WDDZlJ1A6IWzwgv_Kn
PSComputerName        : azs-ercs01
RunspaceId            : 6ed9f903-f1be-44e3-9fef-e7e0e3f48564
删除应用注册
现在介绍如何使用 PowerShell 从目录中删除应用注册。
请将以下占位符替换为自己的值:
| 占位符 | 说明 | 示例 |
|---|---|---|
| <PepVM> | Azure Stack Hub 实例上特权终结点 VM 的名称。 | "AzS-ERCS01" |
| <AppIdentifier> | 分配给应用程序注册的标识符。 | "S-1-5-21-1634563105-1224503876-2692824315-2623" |
# Sign in to PowerShell interactively, using credentials that have access to the VM running the Privileged Endpoint (typically <domain>\cloudadmin)
$Creds = Get-Credential

# Create a PSSession to the PrivilegedEndpoint VM
$Session = New-PSSession -ComputerName "<PepVM>" -ConfigurationName PrivilegedEndpoint -Credential $Creds -SessionOption (New-PSSessionOption -Culture en-US -UICulture en-US)

# OPTIONAL: Use the privileged endpoint to get a list of applications registered in AD FS
$AppList = Invoke-Command -Session $Session -ScriptBlock {Get-GraphApplication}

# Use the privileged endpoint to remove application <AppIdentifier>
Invoke-Command -Session $Session -ScriptBlock {Remove-GraphApplication -ApplicationIdentifier "<AppIdentifier>"}
在特权终结点上调用 Remove-GraphApplication cmdlet 后不会返回任何输出,但在运行 cmdlet 期间,控制台中会显示原义确认输出:
VERBOSE: Deleting graph application with identifier S-1-5-21-1634563105-1224503876-2692824315-2623.
VERBOSE: Remove-GraphApplication : BEGIN on AZS-ADFS01 on ADFSGraphEndpoint
VERBOSE: Application with identifier S-1-5-21-1634563105-1224503876-2692824315-2623 was deleted.
VERBOSE: Remove-GraphApplication : END on AZS-ADFS01 under ADFSGraphEndpoint configuration
分配角色
可以通过基于角色的访问控制 (RBAC) 来授权用户和应用访问 Azure 资源。 若要允许应用访问订阅中的资源,必须将该服务主体分配到特定资源的某个角色。 首先决定哪个角色表示应用的相应权限。 若要了解可用的角色,请参阅 Azure 资源的内置角色。
选择的资源类型也会建立适用于该应用的访问范围。 可将访问范围设置为订阅、资源组或资源级别。 较低级别的作用域会继承权限。 例如,将某个应用添加到资源组的“读取者”角色意味着该应用程序可以读取该资源组及其包含的所有资源。
根据在安装 Azure Stack Hub 期间指定的目录登录到相应的门户(例如,如果指定了 Microsoft Entra ID,则登录到 Azure 门户;如果指定了 AD FS,则登录到 Azure Stack Hub 用户门户)。 在本示例中,用户已登录到 Azure Stack Hub 用户门户。
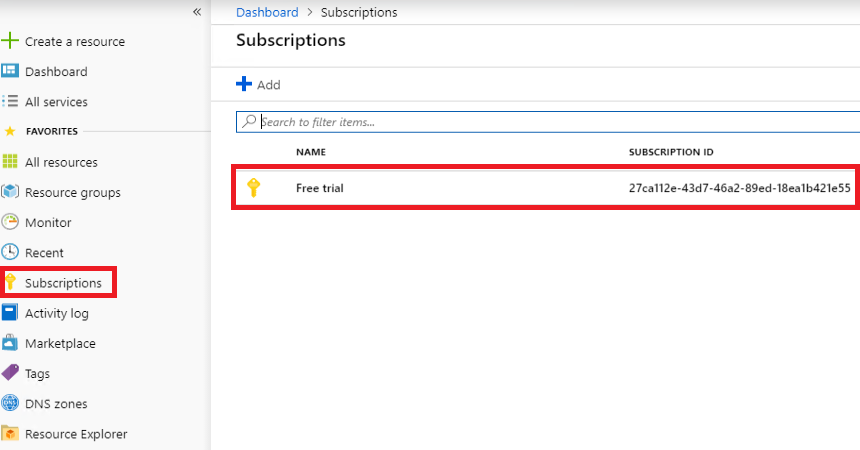
导航到要允许应用访问的资源。 在此示例中,请选择“订阅”,然后选择一个特定的订阅,以将应用分配到订阅范围的角色。 也可以改为选择资源组,或者虚拟机之类的特定资源。
选择“访问控制(IAM)”页。支持 RBAC 的所有资源都会提供此页。
选择“+ 添加”。
在“角色”下,选择要将应用分配到哪个角色。
在“选择”下,使用完整或部分应用名称来搜索你的应用程序。 在注册期间,生成的应用程序名称为 Azurestack-<YourAppName>-<GUID>。 例如,如果使用的应用程序名为 App2,在创建期间分配的客户端 GUID 为 2bbe67d8-3fdb-4b62-87cf-cc41dd4344ff,则完整名称为 Azurestack-App2-2bbe67d8-3fdb-4b62-87cf-cc41dd4344ff。 可以搜索确切的字符串,也可以只搜索其一部分,例如 Azurestack 或 Azurestack-App2。
找到应用后,请选择它,然后它会显示在“已选择的成员”下。
选择“保存”完成角色分配。
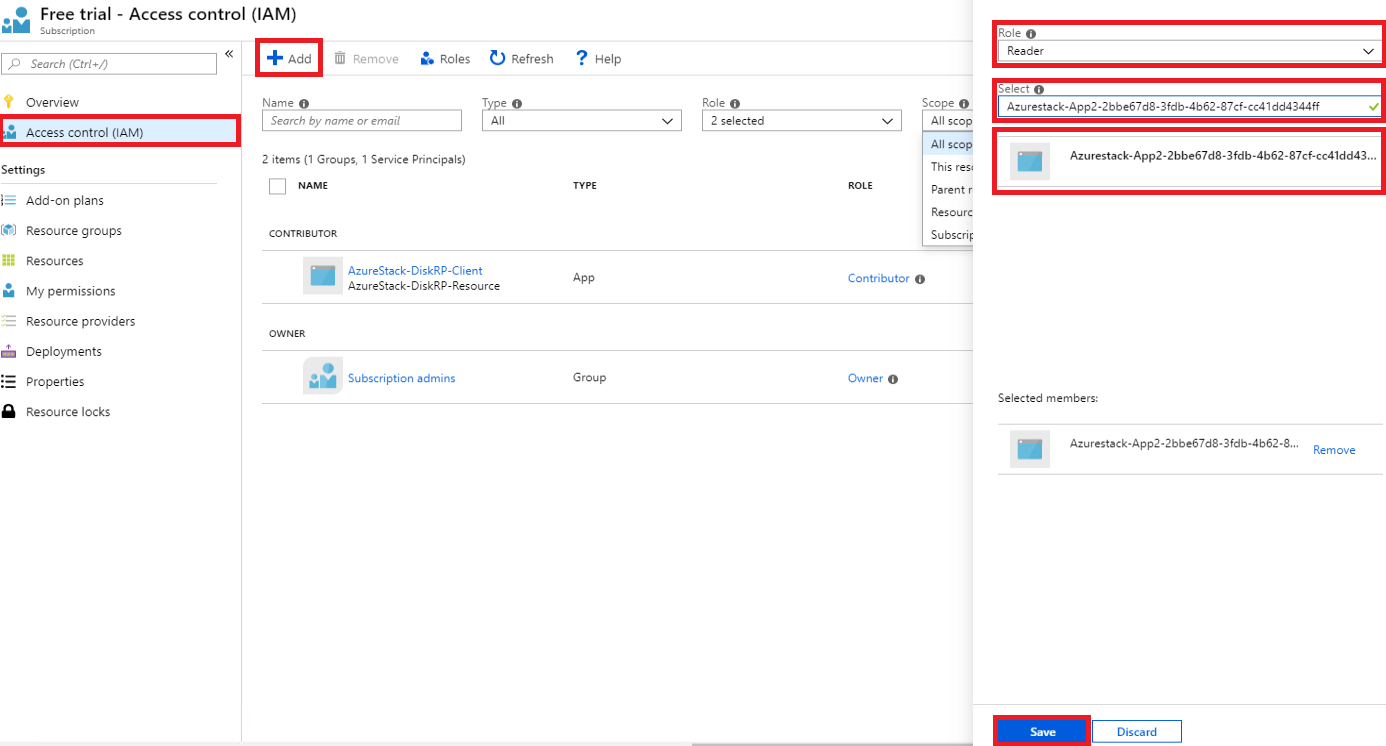
完成后,在当前范围分配到给定角色的主体列表中会显示该应用。


现在已为应用提供标识并授予其访问资源的权限,接下来可以启用脚本或代码以登录并安全地访问 Azure Stack Hub 资源。