Note
Access to this page requires authorization. You can try signing in or changing directories.
Access to this page requires authorization. You can try changing directories.
Important
Cloud Services (classic) is now deprecated for all customers as of September 1st, 2024. Any existing running deployments will be stopped and shut down by Microsoft and the data will be permanently lost starting October 2024. New deployments should use the new Azure Resource Manager based deployment model Azure Cloud Services (extended support).
See Azure Diagnostics Overview for a background on Azure Diagnostics.
This walkthrough describes how to implement an Azure worker role that emits telemetry data using the .NET EventSource class. Azure Diagnostics is used to collect the telemetry data and store it in an Azure storage account. When you create a worker role, Visual Studio automatically enables Diagnostics 1.0 as part of the solution in Azure Software Development Kits (SDKs) for .NET 2.4 and earlier. The following instructions describe the process for creating the worker role, disabling Diagnostics 1.0 from the solution, and deploying Diagnostics 1.2 or 1.3 to your worker role.
This article assumes you have an Azure subscription and are using Visual Studio with the Azure SDK. If you don't have an Azure subscription, you can sign up for the Free Trial. Make sure to Install and configure Azure PowerShell version 0.8.7 or later.
- Launch Visual Studio.
- Create an Azure Cloud Service project from the Cloud template that targets .NET Framework 4.5. Name the project "WadExample" and select Ok.
- Select Worker Role and select Ok. The project is created.
- In Solution Explorer, double-click the WorkerRole1 properties file.
- In the Configuration tab, uncheck Enable Diagnostics to disable Diagnostics 1.0 (Azure SDK 2.4 and earlier).
- Build your solution to verify that you have no errors.
Replace the contents of WorkerRole.cs with the following code. The class SampleEventSourceWriter, inherited from the EventSource Class, implements four logging methods: SendEnums, MessageMethod, SetOther, and HighFreq. The first parameter to the WriteEvent method defines the ID for the respective event. The Run method implements an infinite loop that calls each of the logging methods implemented in the SampleEventSourceWriter class every 10 seconds.
using Microsoft.WindowsAzure.ServiceRuntime;
using System;
using System.Diagnostics;
using System.Diagnostics.Tracing;
using System.Net;
using System.Threading;

namespace WorkerRole1
{
    sealed class SampleEventSourceWriter : EventSource
    {
        public static SampleEventSourceWriter Log = new SampleEventSourceWriter();
        public void SendEnums(MyColor color, MyFlags flags) { if (IsEnabled())  WriteEvent(1, (int)color, (int)flags); }// Cast enums to int for efficient logging.
        public void MessageMethod(string Message) { if (IsEnabled())  WriteEvent(2, Message); }
        public void SetOther(bool flag, int myInt) { if (IsEnabled())  WriteEvent(3, flag, myInt); }
        public void HighFreq(int value) { if (IsEnabled()) WriteEvent(4, value); }

    }

    enum MyColor
    {
        Red,
        Blue,
        Green
    }

    [Flags]
    enum MyFlags
    {
        Flag1 = 1,
        Flag2 = 2,
        Flag3 = 4
    }

    public class WorkerRole : RoleEntryPoint
    {
        public override void Run()
        {
            // This is a sample worker implementation. Replace with your logic.
            Trace.TraceInformation("WorkerRole1 entry point called");

            int value = 0;

            while (true)
            {
                Thread.Sleep(10000);
                Trace.TraceInformation("Working");

                // Emit several events every time we go through the loop
                for (int i = 0; i < 6; i++)
                {
                    SampleEventSourceWriter.Log.SendEnums(MyColor.Blue, MyFlags.Flag2 | MyFlags.Flag3);
                }

                for (int i = 0; i < 3; i++)
                {
                    SampleEventSourceWriter.Log.MessageMethod("This is a message.");
                    SampleEventSourceWriter.Log.SetOther(true, 123456789);
                }

                if (value == int.MaxValue) value = 0;
                SampleEventSourceWriter.Log.HighFreq(value++);
            }
        }

        public override bool OnStart()
        {
            // Set the maximum number of concurrent connections
            ServicePointManager.DefaultConnectionLimit = 12;

            // For information on handling configuration changes
            // see the MSDN topic at https://go.microsoft.com/fwlink/?LinkId=166357.

            return base.OnStart();
        }
    }
}
Warning
When you enable diagnostics for an existing role, any extensions that you have already set are disabled when the package is deployed. These include:
- Microsoft Monitoring Agent Diagnostics
- Microsoft Azure Security Monitoring
- Microsoft Antimalware
- Microsoft Monitoring Agent
- Microsoft Service Profiler Agent
- Windows Azure Domain Extension
- Windows Azure Diagnostics Extension
- Windows Azure Remote Desktop Extension
- Windows Azure Log Collector
You can reset your extensions via the Azure portal or PowerShell after you deploy the updated role.
- Deploy your worker role to Azure from within Visual Studio by selecting the WadExample project in the Solution Explorer then Publish from the Build menu.
- Choose your subscription.
- In the Microsoft Azure Publish Settings dialog, select Create New….
- In the Create Cloud Service and Storage Account dialog, enter a Name (for example, "WadExample") and select a region or affinity group.
- Set the Environment to Staging.
- Modify any other Settings as appropriate and select Publish.
- After the deployment completes, verify in the Azure portal that your cloud service is in a Running state.
Download the public configuration file schema definition by executing the following PowerShell command:
(Get-AzureServiceAvailableExtension -ExtensionName 'PaaSDiagnostics' -ProviderNamespace 'Microsoft.Azure.Diagnostics').PublicConfigurationSchema | Out-File -Encoding utf8 -FilePath 'WadConfig.xsd'Add an XML file to your WorkerRole1 project by right-clicking on the WorkerRole1 project and select Add -> New Item… -> Visual C# items -> Data -> XML File. Name the file
WadExample.xml.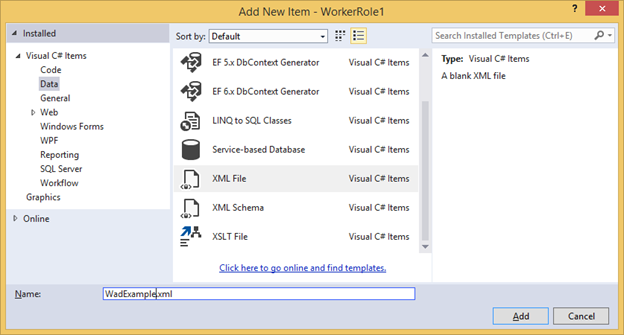
Associate the WadConfig.xsd with the configuration file. Make sure the WadExample.xml editor window is the active window. Press F4 to open the Properties window. Select the Schemas property in the Properties window. Select the … in the Schemas property. Select the Add… button and navigate to the location where you saved the .xsd file and select the file WadConfig.xsd. Select OK.
Replace the contents of the WadExample.xml configuration file with the following XML and save the file. This configuration file defines a couple performance counters to collect: one for CPU utilization and one for memory utilization. Then the configuration defines the four events corresponding to the methods in the SampleEventSourceWriter class.
<?xml version="1.0" encoding="utf-8"?>
<PublicConfig xmlns="http://schemas.microsoft.com/ServiceHosting/2010/10/DiagnosticsConfiguration">
  <WadCfg>
    <DiagnosticMonitorConfiguration overallQuotaInMB="25000">
      <PerformanceCounters scheduledTransferPeriod="PT1M">
        <PerformanceCounterConfiguration counterSpecifier="\Processor(_Total)\% Processor Time" sampleRate="PT1M" unit="percent" />
        <PerformanceCounterConfiguration counterSpecifier="\Memory\Committed Bytes" sampleRate="PT1M" unit="bytes"/>
      </PerformanceCounters>
      <EtwProviders>
        <EtwEventSourceProviderConfiguration provider="SampleEventSourceWriter" scheduledTransferPeriod="PT5M">
          <Event id="1" eventDestination="EnumsTable"/>
          <Event id="2" eventDestination="MessageTable"/>
          <Event id="3" eventDestination="SetOtherTable"/>
          <Event id="4" eventDestination="HighFreqTable"/>
          <DefaultEvents eventDestination="DefaultTable" />
        </EtwEventSourceProviderConfiguration>
      </EtwProviders>
    </DiagnosticMonitorConfiguration>
  </WadCfg>
</PublicConfig>
The PowerShell cmdlets for managing Diagnostics on a web or worker role are: Set-AzureServiceDiagnosticsExtension, Get-AzureServiceDiagnosticsExtension, and Remove-AzureServiceDiagnosticsExtension.
- Open Azure PowerShell.
- Execute the script to install Diagnostics on your worker role (replace StorageAccountKey with the storage account key for your wadexample storage account and config_path with the path to the WadExample.xml file):
$storage_name = "wadexample"
$key = "<StorageAccountKey>"
$config_path="c:\users\<user>\documents\visual studio 2013\Projects\WadExample\WorkerRole1\WadExample.xml"
$service_name="wadexample"
$storageContext = New-AzureStorageContext -StorageAccountName $storage_name -StorageAccountKey $key
Set-AzureServiceDiagnosticsExtension -StorageContext $storageContext -DiagnosticsConfigurationPath $config_path -ServiceName $service_name -Slot Staging -Role WorkerRole1
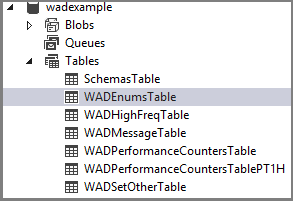
In the Visual Studio Server Explorer, navigate to the wadexample storage account. After the cloud service has been running about five (5) minutes, you should see the tables WADEnumsTable, WADHighFreqTable, WADMessageTable, WADPerformanceCountersTable, and WADSetOtherTable. Double-click one of the tables to view the collected telemetry.
The Diagnostics configuration file defines values that are used to initialize diagnostic configuration settings when the diagnostics agent starts. See the latest schema reference for valid values and examples.
If you have trouble, see Troubleshooting Azure Diagnostics for help with common problems.
See a list of related Azure virtual-machine diagnostic articles to change the data you collect, troubleshoot problems, or learn more about diagnostics in general.