本教程介绍如何收集最终用户反馈、添加开发人员注释、创建专家评审会话,以及使用该反馈评估 GenAI 应用的质量。
你将实现的目标
在本教程结束时,你将:
- 使用 MLflow 跟踪工具配置生成式 AI 应用
- 收集最终用户反馈,在本示例中使用 SDK 模拟
- 通过 UI 以交互方式添加开发人员反馈
- 在追踪数据旁查看反馈
- 通过为结构化专家评审创建标签会话来收集专家反馈
环境设置
安装所需程序包:
-
mlflow[databricks]:使用最新版本的 MLflow 获取更多功能和改进。 -
openai:此应用将使用 OpenAI API 客户端调用 Databricks 托管的模型。
%pip install -q --upgrade "mlflow[databricks]>=3.1.0" databricks-openai
dbutils.library.restartPython()
创建 MLflow 实验。 如果使用 Databricks 笔记本,则可以跳过此步骤并使用默认笔记本试验。 否则,请按照 环境设置快速指南 创建实验并连接到 MLflow 跟踪服务器。
步骤 1:创建和跟踪简单应用
首先,使用 LLM 和 MLflow 跟踪创建简单的 GenAI 应用。 应用使用 OpenAI API 调用 Databricks 托管的基础模型终结点。
from databricks_openai import DatabricksOpenAI
import mlflow

# Enable automatic tracing for the OpenAI client
mlflow.openai.autolog()

# Create an OpenAI client that is connected to Databricks-hosted LLMs.
client = DatabricksOpenAI()

# Create a RAG app with tracing
@mlflow.trace
def my_chatbot(user_question: str) -> str:
    # Retrieve relevant context
    context = retrieve_context(user_question)

    # Generate response using LLM with retrieved context
    response = client.chat.completions.create(
        model="databricks-claude-sonnet-4",  # If using OpenAI directly, use "gpt-4o" or "gpt-3.5-turbo"
        messages=[
            {"role": "system", "content": "You are a helpful assistant. Use the provided context to answer questions."},
            {"role": "user", "content": f"Context: {context}\n\nQuestion: {user_question}"}
        ],
        temperature=0.7,
        max_tokens=150
    )
    return response.choices[0].message.content

@mlflow.trace(span_type="RETRIEVER")
def retrieve_context(query: str) -> str:
    # Simulated retrieval. In production, this could search a vector database
    if "mlflow" in query.lower():
        return "MLflow is the largest open source AI engineering platform for agents, LLMs, and ML models. MLflow enables teams of all sizes to debug, evaluate, monitor, and optimize their AI applications while controlling costs and managing access to models and data. With over 30 million monthly downloads, thousands of organizations rely on MLflow each day to ship AI to production with confidence."
    return "General information about machine learning and data science."

# Run the app to generate a trace
response = my_chatbot("What is MLflow?")
print(f"Response: {response}")

# Get the trace ID for the next step
trace_id = mlflow.get_last_active_trace_id()
print(f"Trace ID: {trace_id}")
步骤 2:收集最终用户反馈
当用户与应用交互时,他们可以通过 UI 元素(如向上/向下按钮)提供反馈。 本快速入门指南通过直接使用 SDK 来模拟最终用户提交负面反馈。
from mlflow.entities.assessment import AssessmentSource, AssessmentSourceType

# Simulate end-user feedback from your app
# In production, this could be triggered when a user clicks thumbs down in your UI
mlflow.log_feedback(
    trace_id=trace_id,
    name="user_feedback",
    value=False,  # False for thumbs down - user is unsatisfied
    rationale="Missing details about MLflow's key features like Projects and Model Registry",
    source=AssessmentSource(
        source_type=AssessmentSourceType.HUMAN,
        source_id="enduser_123",  # In production, this is the actual user ID
    ),
)

print("End-user feedback recorded!")

# In a real app, you could:
# 1. Return the trace_id with your response to the frontend
# 2. When user clicks thumbs up/down, call your backend API
# 3. Your backend calls mlflow.log_feedback() with the trace_id
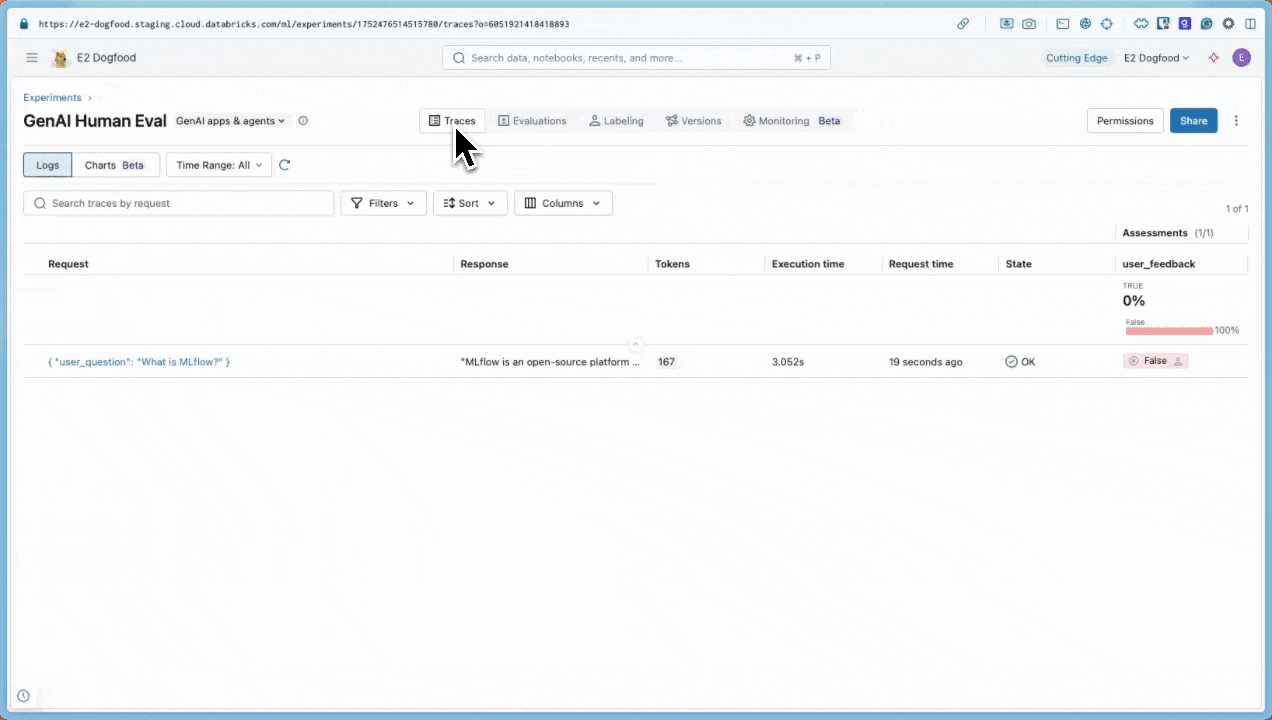
步骤 3:在 UI 中查看反馈
启动 MLflow UI,查看包含反馈的跟踪记录。
进入您的 MLflow 实验。
导航到“ 日志 ”选项卡。
单击跟踪。
此时会显示“跟踪详细信息”对话框。 在对话框右侧的“评估”下, 显示
user_feedback,表明用户将响应标记为差评。false
步骤 4:使用 UI 添加开发人员注释
作为开发人员,还可以直接在 UI 中添加自己的反馈和备注:
在日志选项卡中,单击跟踪以打开。
单击任何范围(选择用于跟踪级别反馈的根范围)。
在右侧的“ 评估 ”选项卡中,单击“ 添加新评估 ”并填写以下内容:
-
类型:
Feedback。 -
名称:
accuracy_score. -
值:
.75. -
理由:
This answer includes the core elements of ML lifecycle management, experiment tracking, packaging, and deployment. However, it does not mention the model registry, project packaging, integration with Generative AI and LLMs, or unique features available in Databricks-managed MLflow, which are now considered essential to a complete description of the platform.
-
类型:
单击 “创建” 。
刷新页面后,新评估的列将显示在“日志”表中。
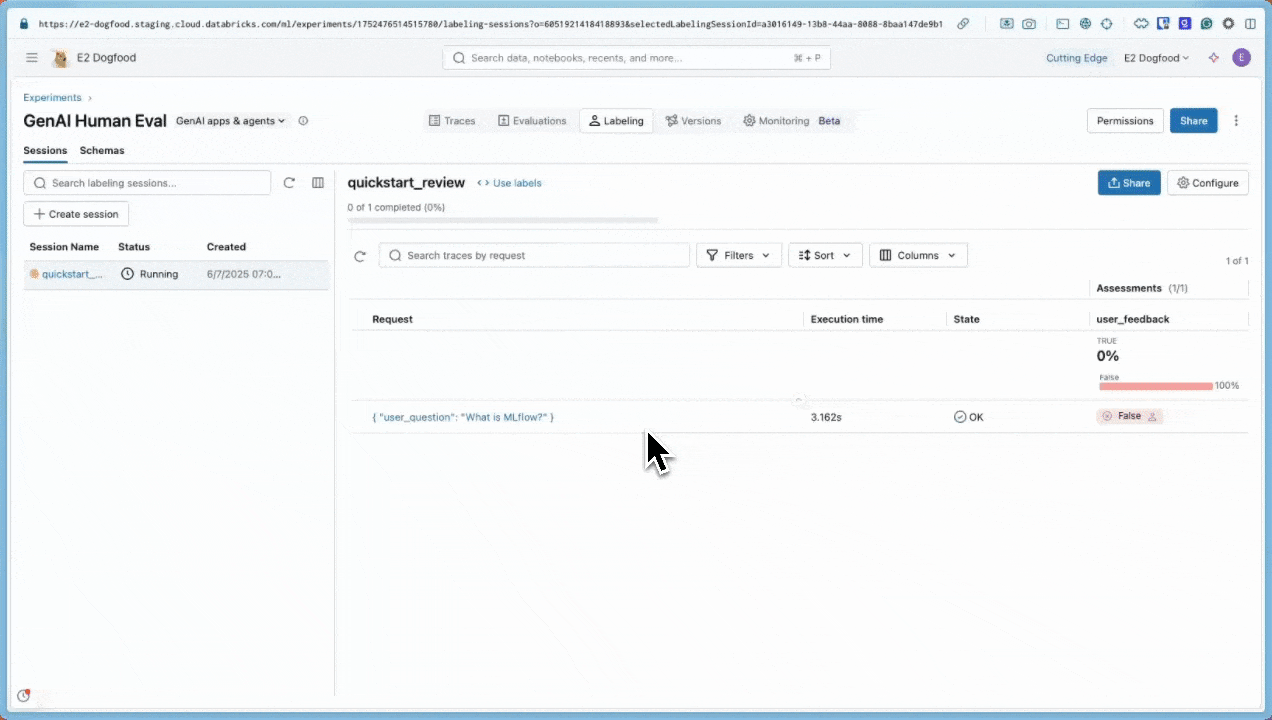
步骤 5:发送跟踪以供专家评审
步骤 2 中的负面最终用户反馈表明存在潜在的质量问题,但只有域专家可以确认是否存在真正的问题并提供正确的答案。 创建标签会话以获取权威专家反馈:
from mlflow.genai.label_schemas import create_label_schema, InputCategorical, InputText
from mlflow.genai.labeling import create_labeling_session

# Define what feedback to collect
accuracy_schema = create_label_schema(
    name="response_accuracy",
    type="feedback",
    title="Is the response factually accurate?",
    input=InputCategorical(options=["Accurate", "Partially Accurate", "Inaccurate"]),
    overwrite=True
)

ideal_response_schema = create_label_schema(
    name="expected_response",
    type="expectation",
    title="What would be the ideal response?",
    input=InputText(),
    overwrite=True
)

# Create a labeling session
labeling_session = create_labeling_session(
    name="quickstart_review",
    label_schemas=[accuracy_schema.name, ideal_response_schema.name],
)

# Add your trace to the session
# Get the most recent trace from the current experiment
traces = mlflow.search_traces(
    max_results=1  # Gets the most recent trace
)
labeling_session.add_traces(traces)

# Share with reviewers
print(f"Trace sent for review!")
print(f"Share this link with reviewers: {labeling_session.url}")
专业评审员现在可以执行以下操作:
打开审阅应用程序的 URL。
通过问题和响应(包括任何最终用户反馈)查看追踪。
评估响应是否实际准确。
请在
expected_response中提供问题“什么是 MLflow?”的正确答案。MLflow is the largest open source AI engineering platform for agents, LLMs, and ML models. MLflow enables teams of all sizes to debug, evaluate, monitor, and optimize their AI applications while controlling costs and managing access to models and data. With over 30 million monthly downloads, thousands of organizations rely on MLflow each day to ship AI to production with confidence.提交专家评估作为基本事实。
还可以使用 MLflow 3 UI 创建标记会话,如下所示:
在“试验”页上,单击“标记”选项卡。
在左侧,使用 “会话 和 架构 ”选项卡添加新标签架构并创建新会话。
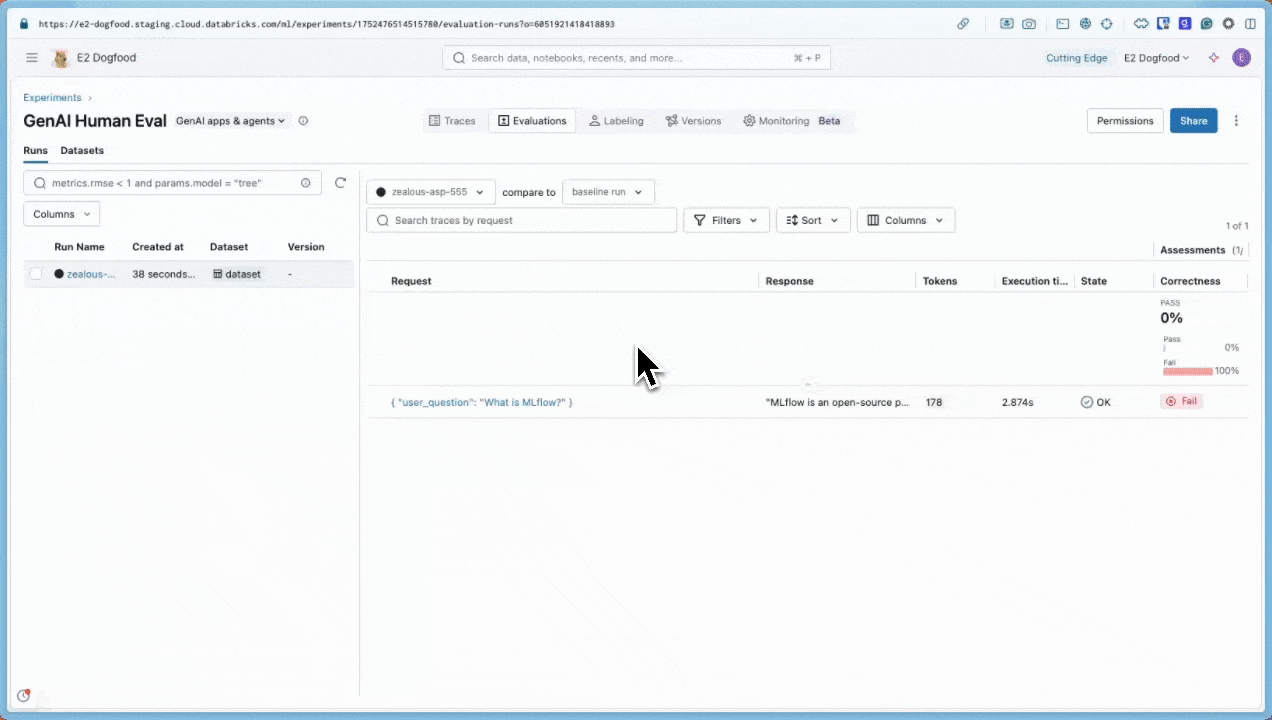
步骤 6:使用反馈评估应用
专家提供反馈后,使用其 expected_response 标签通过 MLflow 的 Correctness 记分器评估你的应用:
此示例直接使用踪迹进行评估。 在应用程序中,Databricks 建议将标记的跟踪添加到提供版本跟踪和世系的 MLflow 评估数据集中。 了解如何 生成评估数据集。
from mlflow.genai.scorers import Correctness

# Get traces from the labeling session
labeled_traces = mlflow.search_traces(
    run_id=labeling_session.mlflow_run_id,  # Labeling Sessions are MLflow Runs
)

# Evaluate your app against expert expectations
eval_results = mlflow.genai.evaluate(
    data=labeled_traces,
    predict_fn=my_chatbot,  # The app we created in Step 1
    scorers=[Correctness()]  # Compares outputs to expected_response
)
正确性评分器将应用输出与专家提供的 expected_response输出进行比较,从而提供与专家期望一致的定量反馈。
后续步骤
详细了解如何收集不同类型的人工反馈:
- 开发期间进行标记 - 了解用于开发的高级注释技术
- 与领域专家进行用户体验检查 - 与专家以交互方式测试应用
- 收集域专家反馈 - 设置系统专家评审流程