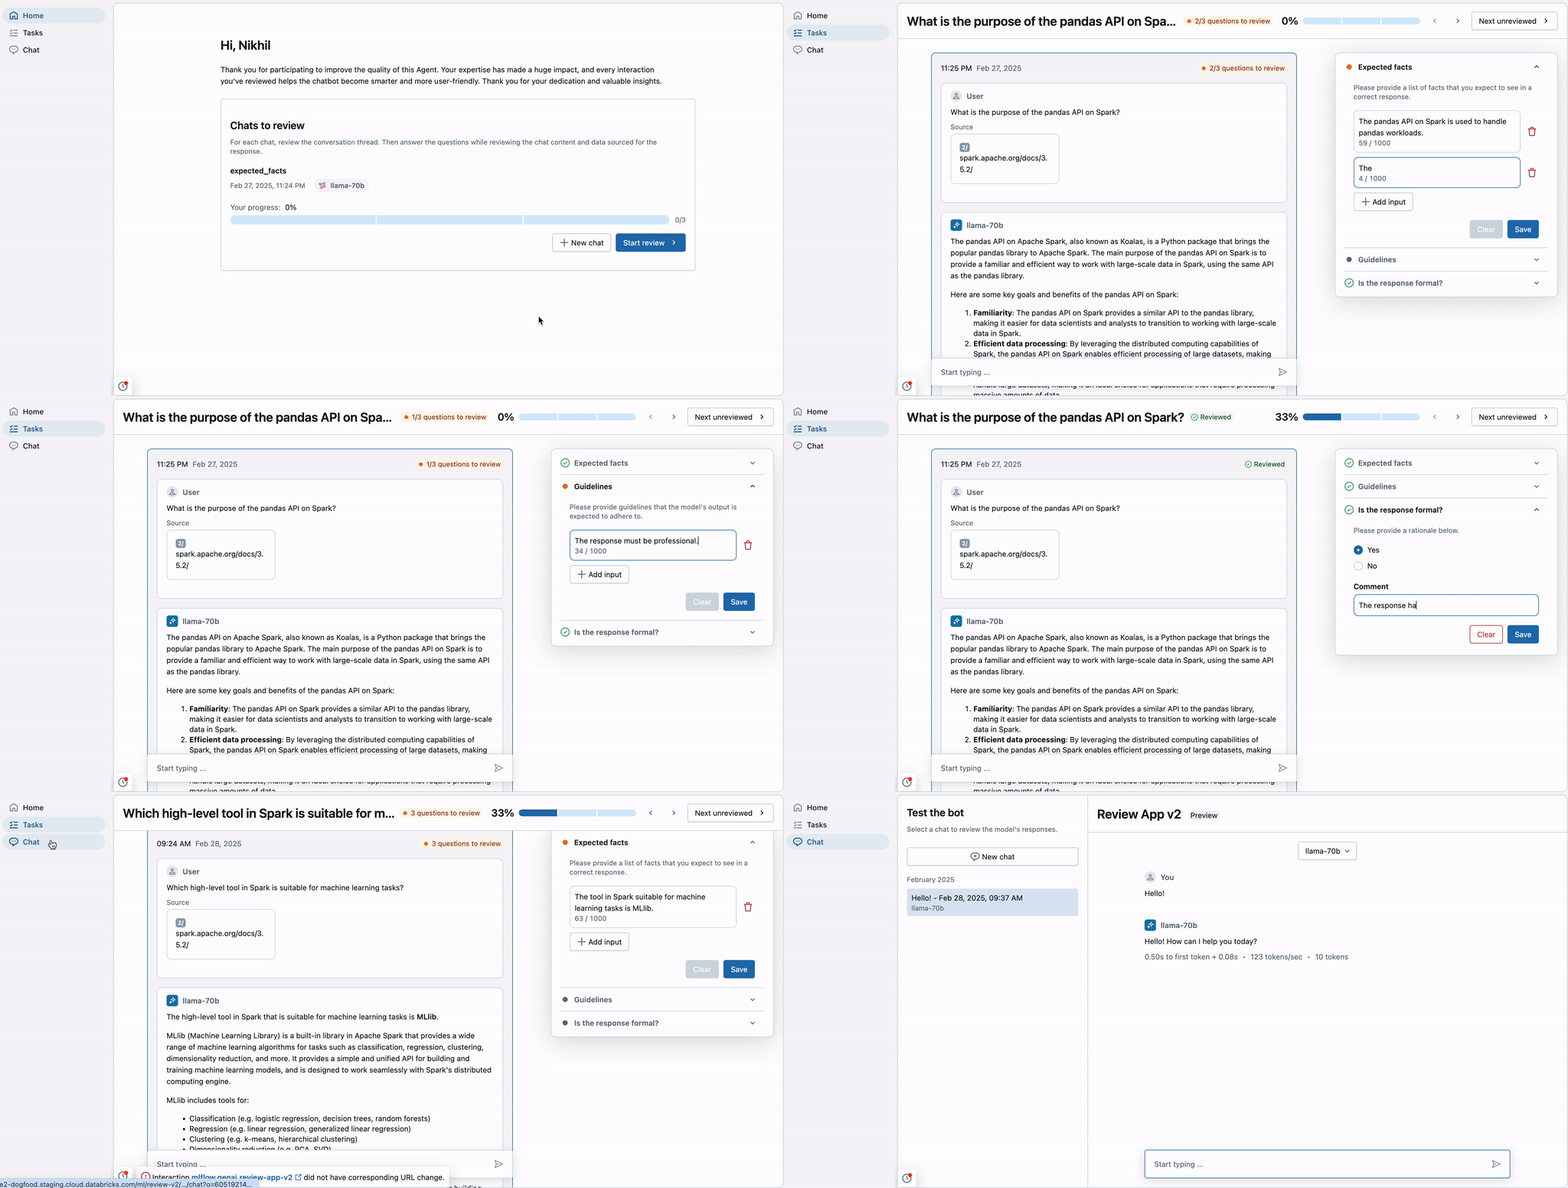
改进 GenAI 应用程序的最有效方法之一是让域专家评审和标记现有跟踪。 MLflow 的评审应用提供了一个结构化的过程,用于收集此专家反馈,了解与应用程序的实际交互。

何时标识现有跟踪记录
使用此方法可以:
- 了解特定查询的高质量正确响应
- 收集输入,使 LLM 法官符合你的业务需求
- 从生产跟踪创建评估数据集
确定专家评审的痕迹
在创建标注会话之前,请识别那些会因专家评审而受益的踪迹。 重点介绍需要人工判断的案件:
- 具有不明确或临界质量的迹线
- 自动法官未涵盖的边缘案件
- 自动化指标与预期质量不一致的示例
- 不同用户交互模式的代表示例
可以通过状态、标记或时间范围筛选 MLflow UI 中的跟踪。 有关使用高级筛选器进行编程选择,请参阅 通过 SDK 进行查询跟踪。
先决条件
必须安装 MLflow 和所需的包。 本指南中所述的功能需要 MLflow 3.1.0 或更高版本。 运行以下命令来安装或升级 MLflow SDK,包括 Databricks 集成所需的附加内容:
pip install --upgrade "mlflow[databricks]>=3.1.0" openai "databricks-connect>=16.1"您的开发环境必须连接到记录您的 GenAI 应用程序运行轨迹的 MLflow 实验 。
- 按照 教程:将开发环境连接到 MLflow 以连接开发环境。
域专家需要具备以下权限才能使用“审核应用程序”来标记现有的跟踪记录:
帐户访问权限:必须在 Databricks 帐户中预配,但不需要访问工作区。
对于没有工作区访问权限的用户,帐户管理员可以:
- 使用帐户级 SCIM 预配从标识提供者同步用户
- 在 Databricks 中手动注册用户和组
试验访问权限: CAN_EDIT MLflow 试验的权限。
步骤 1:创建具有跟踪的应用
在收集反馈之前,需要从 GenAI 应用程序记录跟踪。 这些记录包括应用程序执行过程中的输入、输出和中间步骤,以及任何工具调用或检索操作。
下面是一个如何记录跟踪的示例。 此示例包含一个假检索器,这样我们就可以演示如何在评审应用中呈现跟踪中检索到的文档。 有关“审阅应用”如何呈现跟踪的详细信息,请参阅“ 查看应用”内容呈现 。
初始化 OpenAI 客户端以连接到 OpenAI 托管的 LLM。
OpenAI 托管的 LLM
使用本地 OpenAI SDK 连接到由 OpenAI 托管的模型。 从 可用的 OpenAI 模型中选择一个模型。
import mlflow
import os
import openai

# Ensure your OPENAI_API_KEY is set in your environment
# os.environ["OPENAI_API_KEY"] = "<YOUR_API_KEY>" # Uncomment and set if not globally configured

# Enable auto-tracing for OpenAI
mlflow.openai.autolog()

# Set up MLflow tracking to Databricks
mlflow.set_tracking_uri("databricks")
mlflow.set_experiment("/Shared/docs-demo")

# Create an OpenAI client connected to OpenAI SDKs
client = openai.OpenAI()

# Select an LLM
model_name = "gpt-4o-mini"
定义应用程序:
from mlflow.entities import Document
from typing import List, Dict

# Spans of type RETRIEVER are rendered in the Review App as documents.
@mlflow.trace(span_type="RETRIEVER")
def retrieve_docs(query: str) -> List[Document]:
 normalized_query = query.lower()
 if "john doe" in normalized_query:
     return [
         Document(
             id="conversation_123",
             page_content="John Doe mentioned issues with login on July 10th. Expressed interest in feature X.",
             metadata={"doc_uri": "http://domain.com/conversations/123"},
         ),
         Document(
             id="conversation_124",
             page_content="Follow-up call with John Doe on July 12th. Login issue resolved. Discussed pricing for feature X.",
             metadata={"doc_uri": "http://domain.com/conversations/124"},
         ),
     ]
 else:
     return [
         Document(
             id="ticket_987",
             page_content="Acme Corp raised a critical P0 bug regarding their main dashboard on July 15th.",
             metadata={"doc_uri": "http://domain.com/tickets/987"},
         )
     ]

# Sample app to review traces from
@mlflow.trace
def my_app(messages: List[Dict[str, str]]):
 # 1. Retrieve conversations based on the last user message
 last_user_message_content = messages[-1]["content"]
 retrieved_documents = retrieve_docs(query=last_user_message_content)
 retrieved_docs_text = "\n".join([doc.page_content for doc in retrieved_documents])

 # 2. Prepare messages for the LLM
 messages_for_llm = [
     {"role": "system", "content": "You are a helpful assistant!"},
     {
         "role": "user",
         "content": f"Additional retrieved context:\n{retrieved_docs_text}\n\nNow, please provide the one-paragraph summary based on the user's request {last_user_message_content} and this retrieved context.",
     },
 ]

 # 3. Call LLM to generate the summary
 return client.chat.completions.create(
     model=model_name,  # This example uses Databricks hosted claude-sonnet-4-5. If you provide your own OpenAI credentials, replace with a valid OpenAI model e.g., gpt-4o, etc.
     messages=messages_for_llm,
 )
步骤 2:定义标记架构
标注架构定义了域专家将用来提供有关你跟踪的反馈的问题和输入类型。 可以使用 MLflow 的内置架构,也可以创建自定义架构,这些架构是针对特定评估条件定制的。
有两种主要类型的标记架构:
-
期望类型(
type="expectation"):当专家提供“地面真相”或正确的答案时使用。 例如,为 RAG 系统的响应提供expected_facts。 这些标签通常可直接用于评估数据集。 -
反馈类型 (
type="feedback"):用于主观评估、评级或分类。 例如,以 1-5 为礼貌程度对响应进行评分,或者对响应是否满足特定条件进行分类。
请参阅 “创建和管理标记架构 ”,了解架构的各种输入方法,例如分类选项(单选按钮)、数字刻度或自由格式文本。
from mlflow.genai.label_schemas import create_label_schema, InputCategorical, InputText

# Collect feedback on the summary
summary_quality = create_label_schema(
    name="summary_quality",
    type="feedback",
    title="Is this summary concise and helpful?",
    input=InputCategorical(options=["Yes", "No"]),
    instruction="Please provide a rationale below.",
    enable_comment=True,
    overwrite=True,
)

# Collect a ground truth summary
expected_summary = create_label_schema(
    name="expected_summary",
    type="expectation",
    title="Please provide the correct summary for the user's request.",
    input=InputText(),
    overwrite=True,
)
步骤 3:创建标记会话
标记会话是一种特殊的 MLflow Run 类型,它使用选定的标记架构组织一组跟踪供特定专家评审。 它充当评审过程的队列。
有关更多详细信息 ,请参阅“创建和管理标记会话 ”。
下面介绍如何创建标记会话:
from mlflow.genai.labeling import create_labeling_session

# Create the labeling session with the schemas we created in the previous step
label_summaries = create_labeling_session(
    name="label_summaries",
    assigned_users=[],
    label_schemas=[summary_quality.name, expected_summary.name],
)
步骤 4:生成追踪记录并添加到标注会话中
创建标记会话后,你需要向其中添加跟踪。 跟踪被复制到标记会话中,因此在评审过程中所做的任何标记或修改都不会影响原始记录的跟踪。
可以在 MLflow 试验中添加任何跟踪。 有关更多详细信息 ,请参阅“创建和管理标记会话 ”。
注释
生成跟踪后,还可以通过在“跟踪”选项卡中选择跟踪,单击“ 导出跟踪”,然后选择上面创建的标记会话,将它们添加到标记会话。
import mlflow

# Use verison tracking to be able to easily query for the traces
tracked_model = mlflow.set_active_model(name="my_app")

# Run the app to generate traces
sample_messages_1 = [
    {"role": "user", "content": "what issues does john doe have?"},
]
summary1_output = my_app(sample_messages_1)

sample_messages_2 = [
    {"role": "user", "content": "what issues does acme corp have?"},
]
summary2_output = my_app(sample_messages_2)

# Query for the traces we just generated
traces = mlflow.search_traces(model_id=tracked_model.model_id)

# Add the traces to the session
label_summaries.add_traces(traces)

# Print the URL to share with your domain experts
print(f"Share this Review App with your team: {label_summaries.url}")
步骤 5:与专家共享评审应用
在你的标记会话中填充跟踪后,你可以与你的域专家共享其 URL。 他们可以使用此 URL 访问评审应用、查看分配给他们的跟踪(或从未分配的跟踪中进行选择),并使用配置的标记架构提供反馈。
重要
你的域专家需要具有访问 Databricks 工作区的权限,以及对 MLflow 试验具有 CAN_EDIT 权限。

步骤 6:查看和使用收集的标签
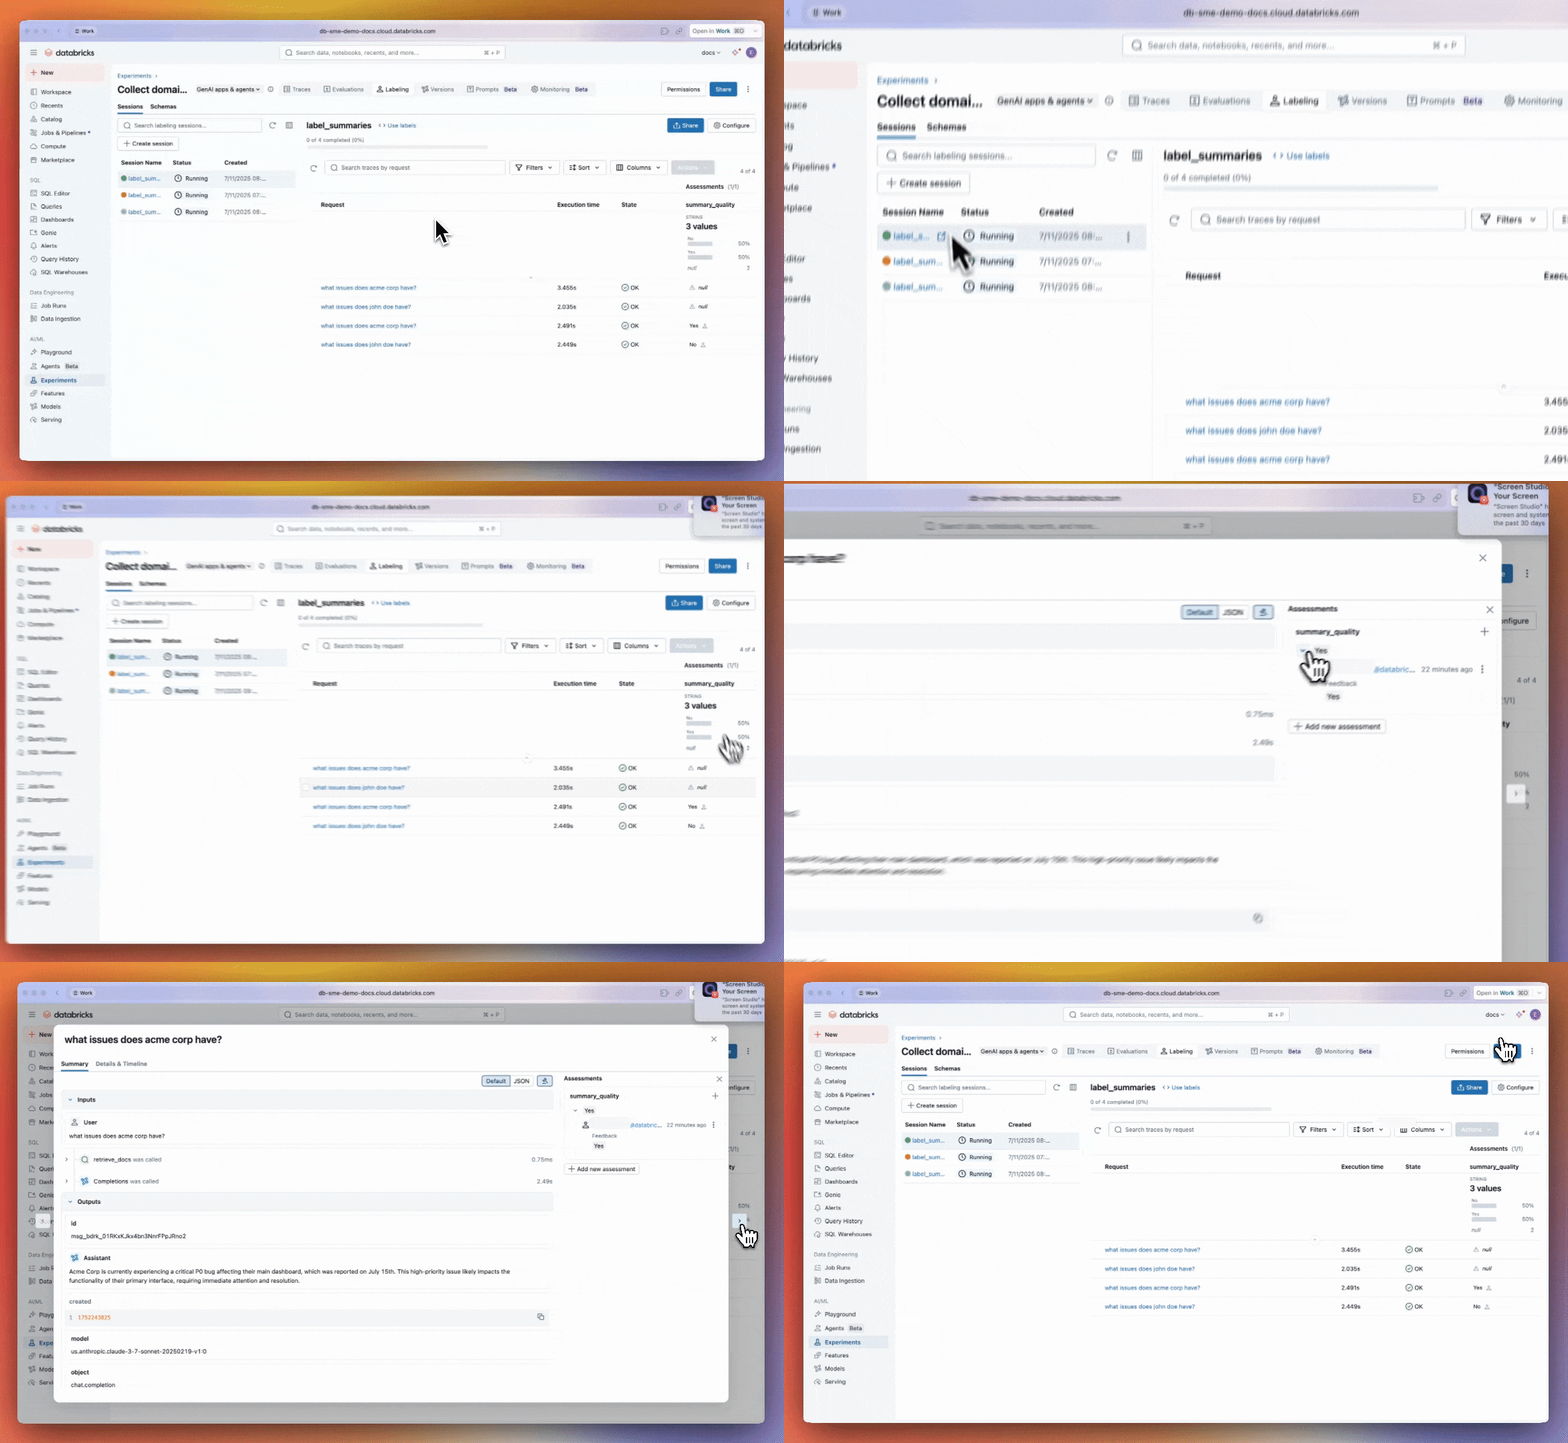
领域专家们完成评审后,收集的反馈将附加到标记会话中的追踪记录上。 你可以以编程方式检索这些标签来分析这些标签,或使用它们来创建评估数据集。
标签存储为 Assessment 对象,位于标记会话中的每个 Trace 上。
使用 MLflow UI
若要查看结果,请导航到 MLflow 试验。

使用 MLflow SDK
以下代码从标记会话的运行中获取所有跟踪,并将评估(标记)提取到 pandas 数据帧中,以便于更便捷的分析。
labeled_traces_df = mlflow.search_traces(run_id=label_summaries.mlflow_run_id)
审查应用内容呈现
标记现有跟踪时,审阅应用使用现有跟踪的输入和输出,并将结果存储在 标记会话中的 MLflow 跟踪中。 需要提供自定义 标记架构 来定义用例的自定义问题和条件。
“审阅应用”会自动呈现 MLflow 跟踪中的不同内容类型:
-
检索的文档:跨度内的
RETRIEVER文档呈现以供显示 -
OpenAI 格式消息:呈现以下 OpenAI 聊天对话的 MLflow 跟踪的输入和输出:
-
outputs包含 OpenAI 格式 ChatCompletions 对象的 -
inputs或outputs包含具有messages听写-
messages如果数组包含 OpenAI 格式工具调用,则它们也会呈现
-
-
- 字典:作为听写的 MLflow 跟踪的输入和输出呈现为相当打印的 JSON
否则,每个跟踪的 input 根范围和 output 根范围的内容将用作主要内容以供审阅。
示例笔记本
以下笔记本包括此页上的所有代码。
收集域专家反馈笔记本
后续步骤
转换为评估数据集
“预期”类型的标签(如 expected_summary 示例中的标签)对于创建 评估数据集特别有用。 然后,这些数据集可以与 mlflow.genai.evaluate() 一起使用,根据专家定义的基础真相系统地测试 GenAI 应用程序的新版本。