适用于:![]() IoT Edge 1.5
IoT Edge 1.5
重要
IoT Edge 1.5 LTS 是 受支持的版本。 IoT Edge 1.4 LTS 于 2024 年 11 月 12 日终止。 如果使用的是早期版本,请参阅 Update IoT Edge。
Azure IoT Edge 运行时将设备转换为 IoT Edge 设备。 可以将运行时部署在设备上,设备可以像 Raspberry Pi 一样小,也可以像工业服务器一样大。 设置 IoT Edge 运行时后,从云将业务逻辑部署到设备。
若要详细了解 IoT Edge 运行时的工作原理及其包含哪些组件,请参阅 了解 Azure IoT Edge 运行时及其体系结构。
从 Azure CLI 部署
无法部署远程 Bicep 文件。 在本地将 Bicep 文件的副本保存为 main.bicep。
使用以下命令来确保已安装 Azure CLI IoT 扩展:
az extension add --name azure-iot接下来,如果在桌面上使用 Azure CLI,请先登录:
az cloud set -n AzureChinaCloud
az login
# az cloud set -n AzureCloud   //means return to Public Azure.
如果你有多个订阅,请选择要使用的订阅:
列出您的订阅:
az account list --output table复制要使用的订阅的 SubscriptionID 字段。
使用复制的 ID 设置工作订阅:
az account set -s <SubscriptionId>
创建新资源组(或者在后续步骤中指定现有的资源组):
az group create --name IoTEdgeResources --location chinanorth2创建新虚拟机:
要使用
password的 认证类型,请参阅以下示例:az deployment group create \ --resource-group IoTEdgeResources \ --template-file "main.bicep" \ --parameters dnsLabelPrefix='my-edge-vm1' \ --parameters deviceConnectionString=$(az iot hub device-identity connection-string show --device-id <REPLACE_WITH_DEVICE-NAME> --hub-name <REPLACE-WITH-HUB-NAME> -o tsv) \ --parameters authenticationType='password' \ --parameters adminUsername='<REPLACE_WITH_USERNAME>' \ --parameters adminPasswordOrKey="<REPLACE_WITH_SECRET_PASSWORD>"若要使用 SSH 密钥进行身份验证,请指定 authenticationType ,
sshPublicKey然后在参数中adminPasswordOrKey提供 SSH 密钥的值。 例如:#Generate the SSH Key ssh-keygen -m PEM -t rsa -b 4096 -q -f ~/.ssh/iotedge-vm-key -N "" #Create a VM using the iotedge-vm-deploy script az deployment group create \ --resource-group IoTEdgeResources \ --template-file "main.bicep" \ --parameters dnsLabelPrefix='my-edge-vm1' \ --parameters deviceConnectionString=$(az iot hub device-identity connection-string show --device-id <REPLACE_WITH_DEVICE-NAME> --hub-name <REPLACE-WITH-HUB-NAME> -o tsv) \ --parameters authenticationType='sshPublicKey' \ --parameters adminUsername='<REPLACE_WITH_USERNAME>' \ --parameters adminPasswordOrKey="$(< ~/.ssh/iotedge-vm-key.pub)"检查部署是否已成功完成。 虚拟机资源部署到所选资源组中。 记下计算机名称,格式为
vm-0000000000000。 此外,请注意关联的 DNS 名称,格式为<dnsLabelPrefix>.<location>.cloudapp.chinacloudapi.cn。可以从上一步的 JSON 格式输出(作为公共 SSH 条目的一部分的输出部分)获取 DNS 名称。 使用此值通过 SSH 连接到新部署的计算机。
"outputs": {
  "public SSH": {
    "type": "String",
    "value": "ssh <adminUsername>@<DNS_Name>"
  }
}
还可以从 Azure 门户中新部署的虚拟机的“概述”部分获取 DNS 名称。
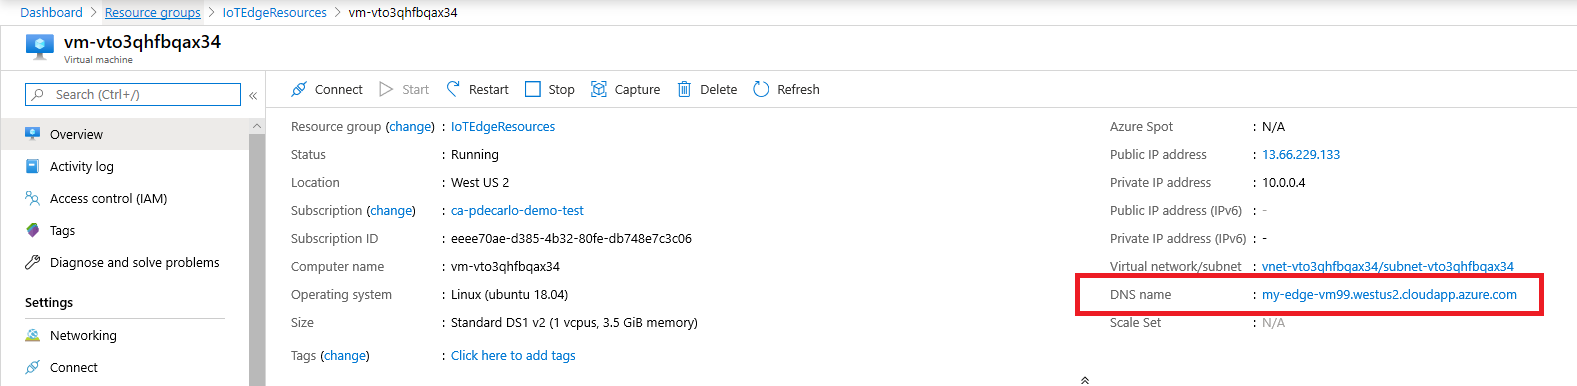
设置后若要通过 SSH 连接到此 VM,请在命令中使用关联的“DNS 名称”:

后续步骤
在对 IoT Edge 设备预配并安装了运行时之后,现在可以部署 IoT Edge 模块。
如果在正确安装 IoT Edge 运行时时遇到问题,请查看 故障排除 页。
若要将现有安装更新到最新版本的 IoT Edge,请参阅更新 IoT Edge 安全守护程序和运行时。
若要通过 SSH 或其他入站连接打开端口以访问 VM,请参阅有关打开 Linux VM 的端口和终结点的 Azure 虚拟机文档。