本文介绍如何将 IPv6 连接添加到 Azure 虚拟网络中使用标准负载均衡器和公共 IP 的现有 IPv4 应用程序。 就地升级涉及到:
- 虚拟网络和子网的 IPv6 地址空间
- 采用 IPv4 和 IPV6 前端配置的标准负载均衡器
- 包含采用 IPv4 + IPv6 配置的 NIC 的 VM
- IPv6 公共 IP,使负载均衡器能够建立面向 Internet 的 IPv6 连接
注意
在可以在由世纪互联运营的 Microsoft Azure 中使用 Azure CLI 之前,请先运行 az cloud set -n AzureChinaCloud 来更改云环境。 若要切换回 Azure 公有云,请再次运行 az cloud set -n AzureCloud。
如果你选择在本地安装和使用 PowerShell,本文要求使用 Azure PowerShell 模块 6.9.0 或更高版本。 运行 Get-Module -ListAvailable Az 查找已安装的版本。 如果需要进行升级,请参阅 Install Azure PowerShell module(安装 Azure PowerShell 模块)。 如果在本地运行 PowerShell,则还需运行 Connect-AzAccount -Environment AzureChinaCloud 以创建与 Azure 的连接。
先决条件
本文假设已根据以下文章所述部署了一个标准负载均衡器:快速入门:创建标准负载均衡器 - Azure PowerShell。
检索资源组
在创建双堆栈虚拟网络之前,必须先使用 Get-AzResourceGroup 创建检索资源组。
$rg = Get-AzResourceGroup -ResourceGroupName "myResourceGroupSLB"
创建 IPv6 IP 地址
使用 New-AzPublicIpAddress 为标准负载均衡器创建公共 IPv6 地址。 以下示例在 myResourceGroupSLB 资源组中创建名为 PublicIP_v6 的 IPv6 公共 IP 地址:
$PublicIP_v6 = New-AzPublicIpAddress `
  -Name "PublicIP_v6" `
  -ResourceGroupName $rg.ResourceGroupName `
  -Location $rg.Location  `
  -Sku Standard  `
  -AllocationMethod Static `
  -IpAddressVersion IPv6
配置负载均衡器前端
检索现有的负载均衡器配置,然后使用 Add-AzLoadBalancerFrontendIpConfig 添加新的 IPv6 IP 地址,如下所示:
# Retrieve the load balancer configuration
$lb = Get-AzLoadBalancer -ResourceGroupName $rg.ResourceGroupName -Name "MyLoadBalancer"

# Add IPv6 components to the local copy of the load balancer configuration
$lb | Add-AzLoadBalancerFrontendIpConfig `
  -Name "dsLbFrontEnd_v6" `
  -PublicIpAddress $PublicIP_v6

#Update the running load balancer with the new frontend
$lb | Set-AzLoadBalancer
配置负载均衡器后端池
在负载均衡器配置的本地副本中创建后端池,并使用新的后端池配置更新正在运行的负载均衡器,如下所示:
$lb | Add-AzLoadBalancerBackendAddressPoolConfig -Name "LbBackEndPool_v6"

# Update the running load balancer with the new backend pool
$lb | Set-AzLoadBalancer
配置负载均衡器规则
检索现有的负载均衡器前端和后端池配置,然后使用 Add-AzLoadBalancerRuleConfig 添加新的负载均衡规则。
# Retrieve the updated (live) versions of the frontend and backend pool
$frontendIPv6 = Get-AzLoadBalancerFrontendIpConfig -Name "dsLbFrontEnd_v6" -LoadBalancer $lb
$backendPoolv6 = Get-AzLoadBalancerBackendAddressPoolConfig -Name "LbBackEndPool_v6" -LoadBalancer $lb

# Create new LB rule with the frontend and backend
$lb | Add-AzLoadBalancerRuleConfig `
  -Name "dsLBrule_v6" `
  -FrontendIpConfiguration $frontendIPv6 `
  -BackendAddressPool $backendPoolv6 `
  -Protocol Tcp `
  -FrontendPort 80 `
  -BackendPort 80

#Finalize all the load balancer updates on the running load balancer
$lb | Set-AzLoadBalancer
添加 IPv6 地址范围
将 IPv6 地址范围添加到托管 VM 的虚拟网络和子网,如下所示:
#Add IPv6 ranges to the VNET and subnet
#Retrieve the VNET object
$vnet = Get-AzVirtualNetwork  -ResourceGroupName $rg.ResourceGroupName -Name "myVnet"

#Add IPv6 prefix to the VNET
$vnet.addressspace.addressprefixes.add("fd00:db8:deca::/48")

#Update the running VNET
$vnet |  Set-AzVirtualNetwork

#Retrieve the subnet object from the local copy of the VNET
$subnet= $vnet.subnets[0]

#Add IPv6 prefix to the Subnet (subnet of the VNET prefix, of course)
$subnet.addressprefix.add("fd00:db8:deca::/64")

#Update the running VNET with the new subnet configuration
$vnet |  Set-AzVirtualNetwork
将 IPv6 配置添加到 NIC
运行 Add-AzNetworkInterfaceIpConfig 配置使用 IPv6 地址的所有 VM NIC,如下所示:
#Retrieve the NIC objects
$NIC_1 = Get-AzNetworkInterface -Name "myNic1" -ResourceGroupName $rg.ResourceGroupName
$NIC_2 = Get-AzNetworkInterface -Name "myNic2" -ResourceGroupName $rg.ResourceGroupName
$NIC_3 = Get-AzNetworkInterface -Name "myNic3" -ResourceGroupName $rg.ResourceGroupName

#Add an IPv6 IPconfig to NIC_1 and update the NIC on the running VM
$NIC_1 | Add-AzNetworkInterfaceIpConfig -Name MyIPv6Config -Subnet $vnet.Subnets[0]  -PrivateIpAddressVersion IPv6 -LoadBalancerBackendAddressPool $backendPoolv6
$NIC_1 | Set-AzNetworkInterface

#Add an IPv6 IPconfig to NIC_2 and update the NIC on the running VM
$NIC_2 | Add-AzNetworkInterfaceIpConfig -Name MyIPv6Config -Subnet $vnet.Subnets[0]  -PrivateIpAddressVersion IPv6 -LoadBalancerBackendAddressPool $backendPoolv6
$NIC_2 | Set-AzNetworkInterface

#Add an IPv6 IPconfig to NIC_3 and update the NIC on the running VM
$NIC_3 | Add-AzNetworkInterfaceIpConfig -Name MyIPv6Config -Subnet $vnet.Subnets[0]  -PrivateIpAddressVersion IPv6 -LoadBalancerBackendAddressPool $backendPoolv6
$NIC_3 | Set-AzNetworkInterface
在 Azure 门户中查看 IPv6 双堆栈虚拟网络
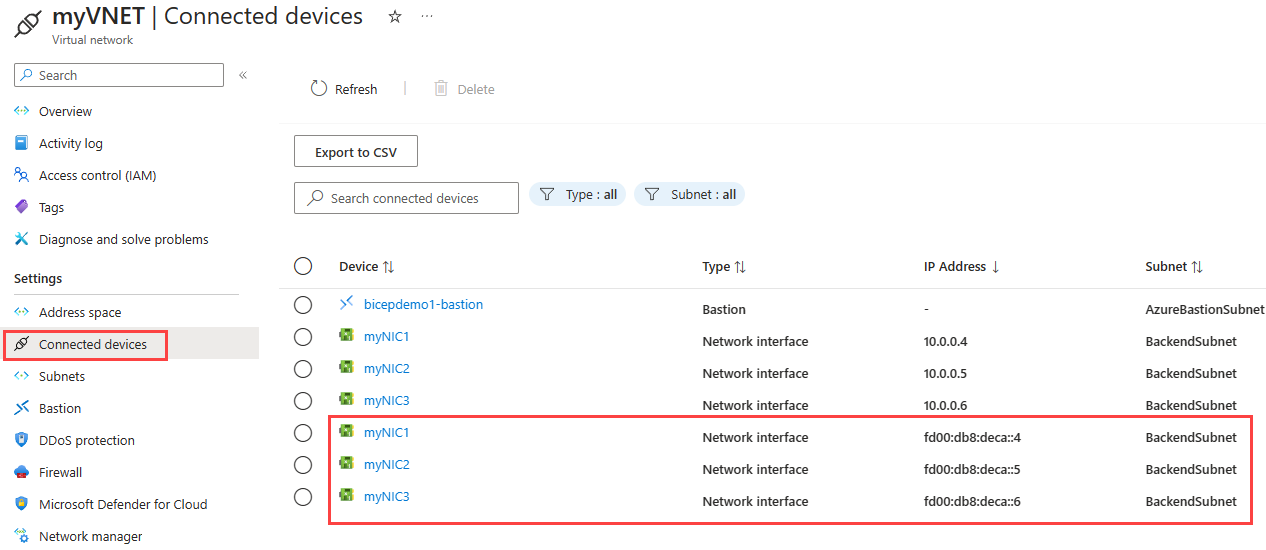
可以在 Azure 门户中查看 IPv6 双堆栈虚拟网络,如下所述:
在门户的搜索框中,输入“虚拟网络”和
在“虚拟网络”窗口中,选择“myVNet”。
选择“设置”下的“已连接设备”,查看附加的网络接口。 双堆栈虚拟网络显示了三个 NIC,它们同时采用 IPv4 和 IPv6 配置。

清理资源
如果不再需要资源组、VM 和所有相关的资源,可以使用 Remove-AzResourceGroup 命令将其删除。
Remove-AzResourceGroup -Name MyAzureResourceGroupSLB
后续步骤
在本文中,你已将采用 IPv4 前端 IP 配置的现有标准负载均衡器更新为双堆栈(IPv4 和 IPv6)配置。 你还将 IPv6 配置添加到了后端池中 VM 的 NIC,并添加到了托管这些 VM 的虚拟网络。 若要详细了解 Azure 虚拟网络中的 IPv6 支持,请参阅 Azure 虚拟网络 IPv6 是什么?