适用范围: Azure CLI ml 扩展 v2(最新版)Python SDK azure-ai-ml v2(最新版)
Warning
Azure 机器学习中的外部源(预览版)和数据连接(预览版)导入数据已弃用,在 2026 年 9 月 30 日之后不可用。 在此之前,可以继续使用这些功能,而不会中断。 在该日期之后,依赖于它们的任何工作负荷都会中断。
建议的操作: 将外部数据导入迁移到 Microsoft Fabric ,并使用 Azure 机器学习数据存储在 Azure 机器学习中提供数据。
本文介绍如何连接到外部数据源,使其数据可供 Azure 机器学习使用。 你还将了解如何连接到多个外部非数据服务。 可以使用 Azure 机器学习 CLI、用于 Python 的 Azure 机器学习 SDK 或机器学习工作室来创建这些连接。
Azure 机器学习连接安全地将用户名和密码存储为密钥保管库中的机密。 Azure 连接充当密钥保管库代理,与连接的交互是与 Azure Key Vault 的直接交互。 Key Vault 基于角色的访问控制(RBAC)管理对数据资源的访问。 在将凭据存储到密钥保管库后,您无需直接处理这些凭据。
Azure 支持连接到以下外部源以实现数据可用性:
重要
此功能目前处于公开预览状态。 此预览版在提供时没有附带服务级别协议,我们不建议将其用于生产工作负荷。 某些功能可能不受支持或者受限。
有关详细信息,请参阅适用于 Azure 预览版的补充使用条款。
先决条件
Azure 机器学习的订阅。
Azure 机器学习工作区。
安装了扩展版本 2.15.1 或更高版本的 ml Azure CLI。
如果有较旧的 Azure CLI 版本或扩展,请使用以下代码卸载它并安装新版本。
az extension remove -n ml
az extension add -n ml --yes
az extension show -n ml 2.15.1
Azure 机器学习的订阅。
Azure 机器学习工作区。
安装了 1.5.0 或更高版本包的适用于 Python 的 azure-ai-ml。
如果有较旧的 SDK 包,请使用以下代码卸载它并安装新包。
pip uninstall azure-ai-ml
pip install azure-ai-ml
pip show azure-ai-ml 1.5.0
- Azure 机器学习的订阅。
- Azure 机器学习工作区。
创建 Snowflake 数据连接
可以使用 Azure 机器学习 CLI、用于 Python 的 Azure 机器学习 SDK 或机器学习工作室创建使用用户名/密码身份验证的 Snowflake 数据连接。
还可以使用 Azure CLI 或 Python SDK 创建将 OAuth 与服务主体配合使用的 Snowflake 连接。 机器学习工作室不支持创建 OAuth 连接。
创建使用用户名/密码身份验证的连接
若要创建 Snowflake 连接,请先组装定义连接的 YAML 文件,然后运行调用 YAML 文件的命令或脚本。 对于 Python SDK,还可以直接指定连接信息,而无需使用 YAML 文件。
可以在 YAML 文件中存储凭据,并在创建连接时重写 Azure CLI 命令行中的存储凭据。 但是,最好避免将凭据存储在文件中,因为安全漏洞可能会导致凭据泄漏。 你可以省略 credentials 值,并在命令行中提供这些值。
以下 YAML 文件定义使用用户名/密码身份验证的 Snowflake 连接。 若要创建文件,请提供一个<connection-name> ,并将<account> 、<database> 、<warehouse> 和<role>占位符替换为 Snowflake 帐户中的值。 如果未提供值 <role>,则值默认为 PUBLIC。 使用 my_snowflake_connection.yaml 等名称保存文件。
$schema: http://azureml/sdk-2-0/Connection.json
type: snowflake
name: <connection-name>

target: jdbc:snowflake://<account>.snowflakecomputing.com/?db=<database>&warehouse=<warehouse>&role=<role>
credentials:
    type: username_password
    username: <snowflake-username>
    password: <snowflake-password>
可以在机器学习工作室中创建与 Snowflake 数据库的数据连接,并使用连接来运行数据导入作业。 用户名/密码凭据安全地存储在与工作区关联的密钥保管库中。
若要在 Azure 机器学习工作室中创建数据连接,请执行以下作:
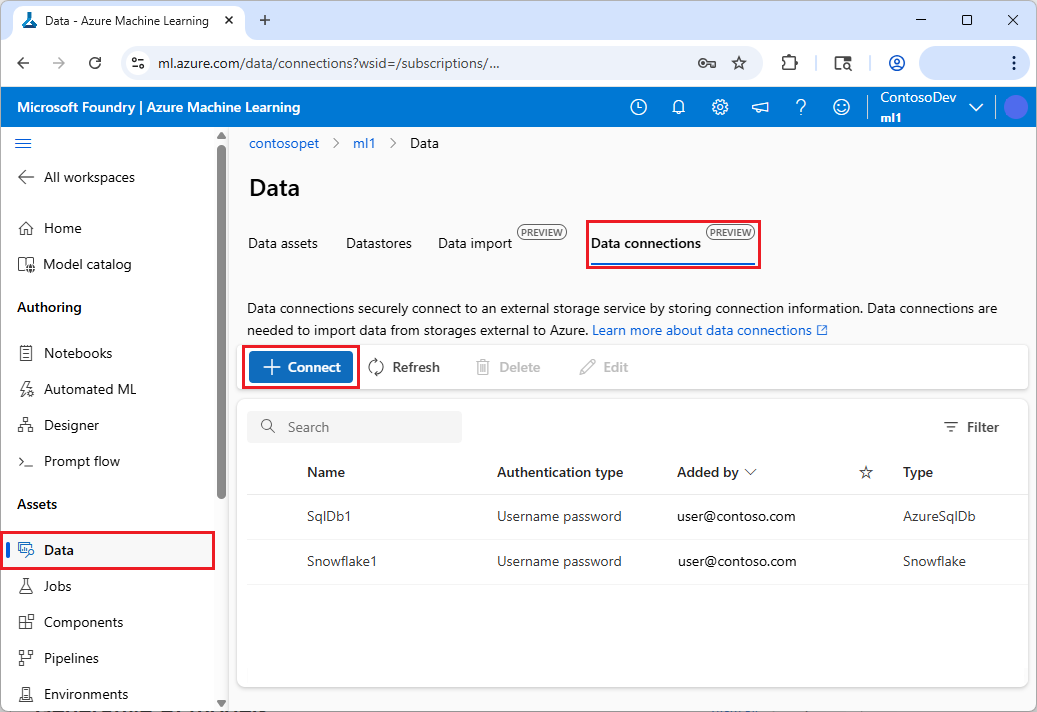
在机器学习工作区中,在左侧导航菜单中的“资产”下选择“数据”。
在 “数据 ”页上,选择“ 数据连接 ”选项卡,然后选择“ 连接”。
若要创建连接,请运行以下命令行之一,为占位符提供 YAML 文件名 <yaml-filename> 。
若要使用存储在 YAML 文件中的用户名和密码,请运行以下命令:
az ml connection create --file <yaml-filename>.yaml
要在命令行中作为参数提供用户名和密码,请运行以下命令,并在占位符 <username> 和 <password> 处输入您的信息:
az ml connection create --file <yaml-filename>.yaml --set credentials.username="<username>" credentials.password="<password>"
若要通过调用 YAML 文件创建 Snowflake 连接,请运行以下 Python 脚本,将 <yaml-filename> 占位符替换为 YAML 文件名。
from azure.ai.ml import MLClient, load_workspace_connection

ml_client = MLClient.from_config()

wps_connection = load_workspace_connection(source="./<yaml-filename>.yaml")
wps_connection.credentials.username="<snowflake-username>"
wps_connection.credentials.password="<snowflake-password>"
ml_client.connections.create_or_update(workspace_connection=wps_connection)
直接创建
若要直接指定连接信息而不使用 YAML 文件,请运行以下 Python 脚本。 提供<connection-name>并使用您的 Snowflake 帐户中的值替换<account>、<database>、<warehouse>和<role>占位符。
如果未提供值 <role>,则值默认为 PUBLIC。 对于用户名-密码身份验证类型,名称/密码值应采用 URL 编码。
from azure.ai.ml import MLClient
from azure.ai.ml.entities import WorkspaceConnection
from azure.ai.ml.entities import UsernamePasswordConfiguration

import urllib.parse
username = urllib.parse.quote(os.environ["SNOWFLAKEDB_USERNAME"], safe="")
password = urllib.parse.quote(os.environ["SNOWFLAKEDB_PASSWORD"], safe="")

target= "jdbc:snowflake://<account>.snowflakecomputing.com/?db=<database>&warehouse=<warehouse>&role=<role>"
name= <connection-name>
wps_connection = WorkspaceConnection(name= name,
type="snowflake",
target= target,
credentials= UsernamePasswordConfiguration(username=username, password=password)
)

ml_client.connections.create_or_update(workspace_connection=wps_connection)
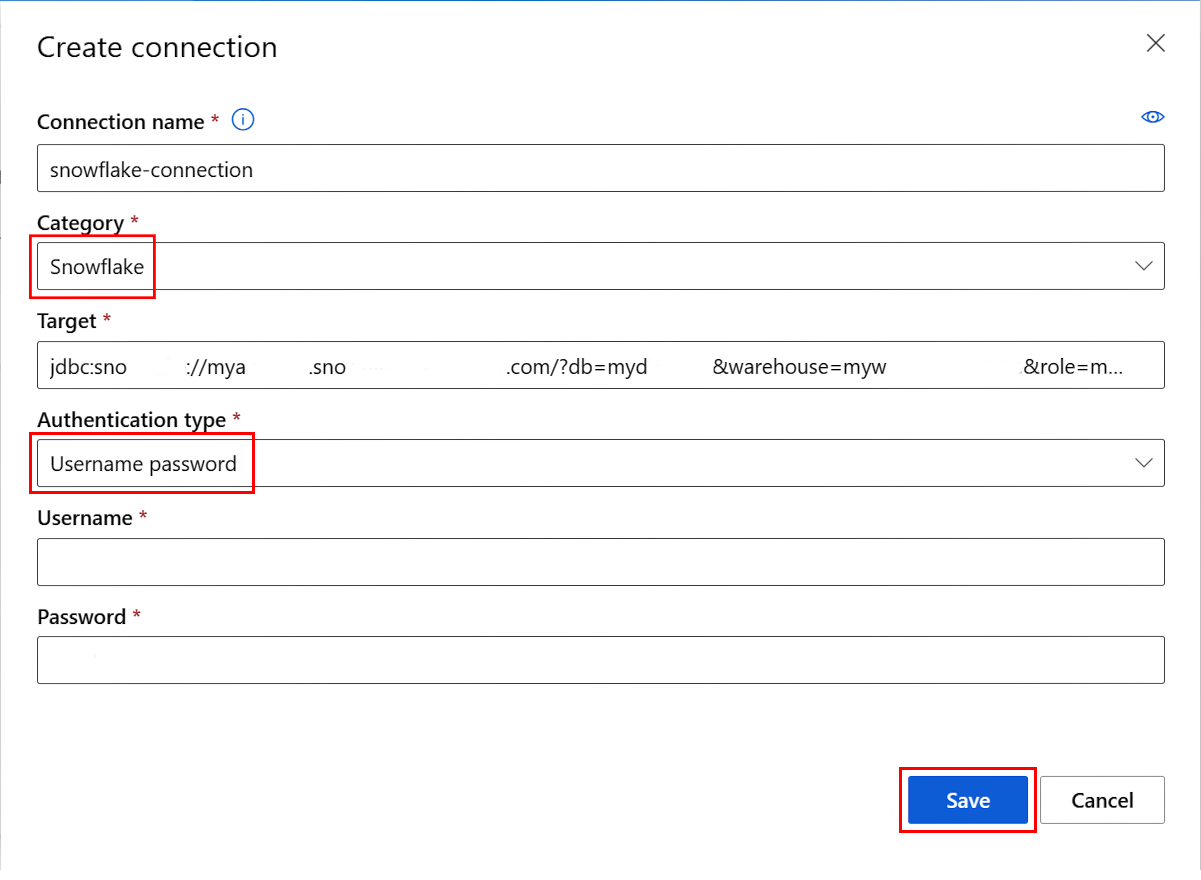
在 “创建连接 ”屏幕上,完成以下信息:
-
服务:选择 Snowflake。
-
目标:请输入以下目标信息,使用您 Snowflake 帐户中的值替换占位符:
jdbc:snowflake://account.snowflakecomputing.com/?db=database&warehouse=warehouse&role=role
-
身份验证类型:选择 用户名密码。
-
用户名:输入 Snowflake 用户名。
-
密码:输入 Snowflake 密码。
-
连接名称:输入 Snowflake 连接的名称。
(可选)选择 “测试连接 ”以测试连接,然后选择“ 保存”。
使用 Azure CLI 或 Python SDK 创建与 OAuth 身份验证的连接
可以使用 Azure CLI 或 Python SDK 创建一个 Snowflake 连接,该连接使用 OAuth 的服务主体进行身份验证。
若要为 Azure 机器学习创建 OAuth 连接,需要以下信息:
-
客户端 ID:服务主体的 ID
-
客户端密码:服务主体机密
-
租户 ID:Microsoft Entra ID 租户的 ID
若要创建连接,请先组装定义连接的 YAML 文件,然后运行调用 YAML 文件的命令或脚本。 对于 Python SDK,还可以直接指定连接信息,而无需使用 YAML 文件。
创建以下 YAML 文件以定义使用 OAuth 的 Snowflake 连接。 请提供一个<connection-name>,并将<account>、<database>、<warehouse>和<service-principal-scope>占位符替换为您 Snowflake 帐户中的值。 对于凭据,请提供你的<client-id>、<client-secret>和<tenant_id>。
name: <connection-name>
type: snowflake
target: jdbc:snowflake://<account>.snowflakecomputing.com/?db=<database>&warehouse=<warehouse>&scope=<service-principal-scope>
credentials:
  type: service_principal
  client_id: <client-id>
  client_secret: <client-secret>
  tenant_id: <tenant-id>
机器学习工作室不支持创建使用 OAuth 身份验证的数据连接。
若要使用存储在 YAML 文件中的凭据信息创建连接,请运行以下命令,将 <yaml-filename> 占位符替换为 YAML 文件名。
az ml connection create --file <yaml-filename>.yaml
若要覆盖 YAML 文件中的凭据信息或在命令行中提供凭据,请运行以下命令,并为占位符输入您的 <client-id>、<client-secret> 和 <tenant-id> 值:
az ml connection create --file <yaml-filename>.yaml --set credentials.client_id="<client-id>" credentials.client_secret="<client-secret>" credentials.tenant_id="<tenant-id>"
若要通过调用 YAML 文件创建 OAuth 连接,请运行以下 Python 脚本,将 <yaml-filename> 占位符替换为 YAML 文件名。 可以选择提供或替代 <wps_connection.credentials> 值。
from azure.ai.ml import MLClient, load_workspace_connection

ml_client = MLClient.from_config()

wps_connection = load_workspace_connection(source="./<yaml-filename>.yaml")
wps_connection.credentials.client_id="<client-id>"
wps_connection.credentials.client_secret="<client-secret>"
wps_connection.credentials.tenant_id="<tenant-id>"
ml_client.connections.create_or_update(workspace_connection=wps_connection)
直接创建
运行以下 Python 脚本来直接指定 OAuth 连接信息,而无需使用 YAML 文件。 请提供一个<connection-name>,并将<account>、<database>、<warehouse>和<role>占位符替换为您 Snowflake 帐户中的值。 在相应的占位符中输入你的 <client-id> 值、<client-secret> 值和 <tenant-id> 值。
from azure.ai.ml import MLClient
from azure.ai.ml.entities import WorkspaceConnection
from azure.ai.ml.entities import ServicePrincipalConfiguration

target= "jdbc:snowflake://<account>.snowflakecomputing.com/?db=<database>&warehouse=<warehouse>&role=<role>"
name= <connection-name>
auth = ServicePrincipalConfiguration(client_id="<client-id>", client_secret="<client-secret>", tenant_id="<tenant-id>")
wps_connection = WorkspaceConnection(name= name,
                                     type="snowflake",
                                     target=target,
                                     credentials=auth
)

ml_client.connections.create_or_update(workspace_connection=wps_connection)
可以使用用户名/密码身份验证创建 Snowflake 连接,或使用 Azure CLI 或 Python SDK 创建与 OAuth 身份验证的连接。
创建 Azure SQL 数据库数据连接
可以使用 Azure 机器学习 CLI、用于 Python 的 Azure 机器学习 SDK 或机器学习工作室创建 Azure SQL 数据库数据连接。
若要创建 Azure SQL 数据库连接,请先组装定义连接的 YAML 文件,然后运行调用 YAML 文件的 Azure CLI 或 Python SDK 命令或脚本。 对于 Python SDK,还可以直接指定连接信息,而无需使用 YAML 文件。
创建以下 YAML 文件以定义 Azure SQL 数据库连接,并使用名称(如 my_azuresqldb_connection.yaml)保存该文件。 提供 <connection-name>,并将<server>、<port>和<database>占位符替换为 Azure SQL 数据库中的相应值。
可以将 Azure SQL 数据库用户名和密码存储在此文件中,但更安全的做法是将这些值留空,并在创建连接的命令行中提供它们。
$schema: http://azureml/sdk-2-0/Connection.json

type: azure_sql_db
name: <connection-name>

target: Server=tcp:<server>,<port>;Database=<database>;Trusted_Connection=False;Encrypt=True;Connection Timeout=30
credentials:
    type: sql_auth
    username: <username>
    password: <password>
可以在机器学习工作室中创建与 Azure SQL 数据库的数据连接,并使用该连接运行数据导入作业。 用户名/密码凭据安全地存储在与工作区关联的密钥保管库中。
若要在 Azure 机器学习工作室中创建数据连接,请执行以下作:
在机器学习工作区中,在左侧导航菜单中的“资产”下选择“数据”。
在 “数据 ”页上,选择“ 数据连接 ”选项卡,然后选择“ 连接”。
若要创建连接,请运行以下 CLI 命令行之一,为占位符提供 YAML 文件名 <yaml-filename> 。
若要使用 YAML 文件中存储的用户名和密码,请运行以下命令:
az ml connection create --file <yaml-filename>.yaml
要在命令行中作为参数提供用户名和密码,请运行以下命令,并在占位符 <username> 和 <password> 处输入您的信息:
az ml connection create --file <yaml-filename>.yaml --set credentials.username="<username>" credentials.password="<password>"
若要通过调用 YAML 文件创建 Azure SQL 数据库连接,请运行以下 Python 脚本,将 <yaml-filename> 占位符替换为 YAML 文件名。
from azure.ai.ml import MLClient, load_workspace_connection

ml_client = MLClient.from_config()

wps_connection = load_workspace_connection(source="./<yaml-filename>.yaml")
wps_connection.credentials.username="<username>"
wps_connection.credentials.password="<password>"
ml_client.connections.create_or_update(workspace_connection=wps_connection)
直接创建
若要直接指定连接信息而不使用 YAML 文件,请运行以下 Python 脚本。 提供一个<connection-name>,并将<server>、<port>和<database>占位符替换为您的 Azure SQL 数据库的值。 对于用户名-密码身份验证类型,名称和密码值应采用 URL 编码。
from azure.ai.ml import MLClient
from azure.ai.ml.entities import WorkspaceConnection
from azure.ai.ml.entities import UsernamePasswordConfiguration

import urllib.parse
username = urllib.parse.quote(os.environ["MYSQL_USERNAME"], safe="")
password = urllib.parse.quote(os.environ["MYSQL_PASSWORD"], safe="")

target= "Server=tcp:<server>,<port>;Database=<database>;Trusted_Connection=False;Encrypt=True;Connection Timeout=30"
# add the sql servername, port address and database

name= <connection-name>
wps_connection = WorkspaceConnection(name= name,
type="azure_sql_db",
target= target,
credentials= UsernamePasswordConfiguration(username=username, password=password)
)

ml_client.connections.create_or_update(workspace_connection=wps_connection)
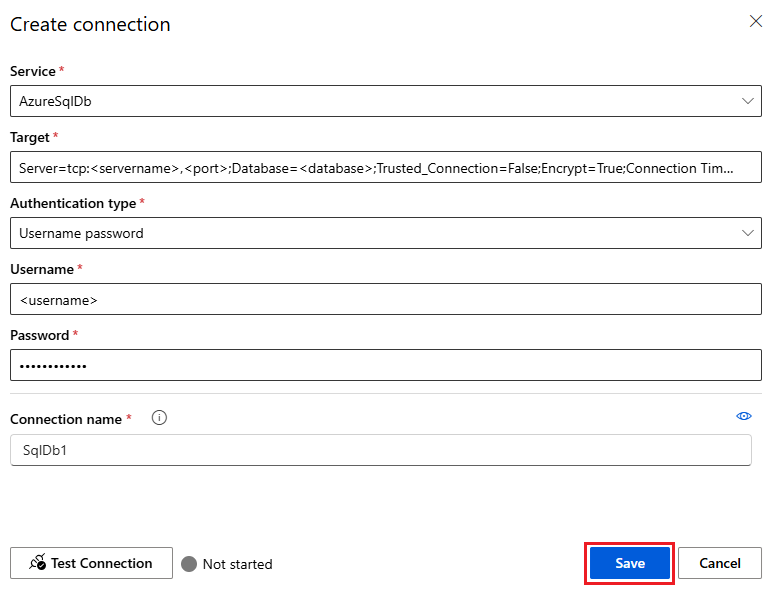
在 “创建连接 ”屏幕上,完成以下信息:
-
服务:选择 AzureSqlDb。
-
目标:使用 Azure SQL 数据库中的占位符的值输入以下目标:
Server=tcp:<server>,<port>;Database=<database>;Trusted_Connection=False;Encrypt=True;连接超时=30
-
身份验证类型:选择 用户名密码。
-
用户名:输入 Azure SQL 数据库用户名。
-
密码:输入 Azure SQL 数据库密码。
-
连接名称:输入 Azure SQL 数据库连接的名称。
(可选)选择 “测试连接 ”以测试连接,然后选择“ 保存”。
创建外部非数据连接
还可以创建与代码中使用的外部服务的非数据 Azure 机器学习连接。 本部分演示如何创建以下非数据连接:
- Git
- Python 源
- Azure 容器注册表
- 通用容器注册表
- API 密钥
创建 Git 连接
可以使用 Azure CLI、Python SDK 或机器学习工作室创建 Git 连接。
若要使用 Azure CLI 创建 Git 连接,请使用以下 YAML 文件之一定义连接。 将文件命名为类似git-connection.yml的名字。
若要使用个人访问令牌(PAT)进行连接,请提供<connection-name>,并将 <account>、<repo> 和 <PAT> 占位符替换为您 Git 帐户、存储库和 PAT 的值。
name: <connection-name>
type: git
target: https://github.com/<account>/<repo>
credentials:
   type: pat
   pat: <PAT>
若要在不使用凭据的情况下连接到公共存储库,请提供<connection-name>,并将<account>和<repo>占位符替换为你的值。
name: <connection-name>
type: git
target: https://github.com/<account>/<repo>
通过运行以下命令创建 Azure 机器学习连接,为占位符提供 YAML 文件名 <yaml-filename> 。
az ml connection create --file <yaml-filename>.yaml
若要使用 Python SDK 创建与 Git 存储库的连接,请使用以下脚本。 使用 GitHub 个人访问令牌(PAT)对连接进行身份验证。 提供<connection-name>,并将<account>、<repo>和<PAT>占位符替换为你的值。
from azure.ai.ml.entities import WorkspaceConnection
from azure.ai.ml.entities import UsernamePasswordConfiguration, PatTokenConfiguration

name = "<connection-name>"

target = "https://github.com/<account>/<repo>"

wps_connection = WorkspaceConnection(
    name=name,
    type="git",
    target=target,
    credentials=PatTokenConfiguration(pat="<PAT>"),
)
ml_client.connections.create_or_update(workspace_connection=wps_connection)
在机器学习工作室中创建 Git 连接:
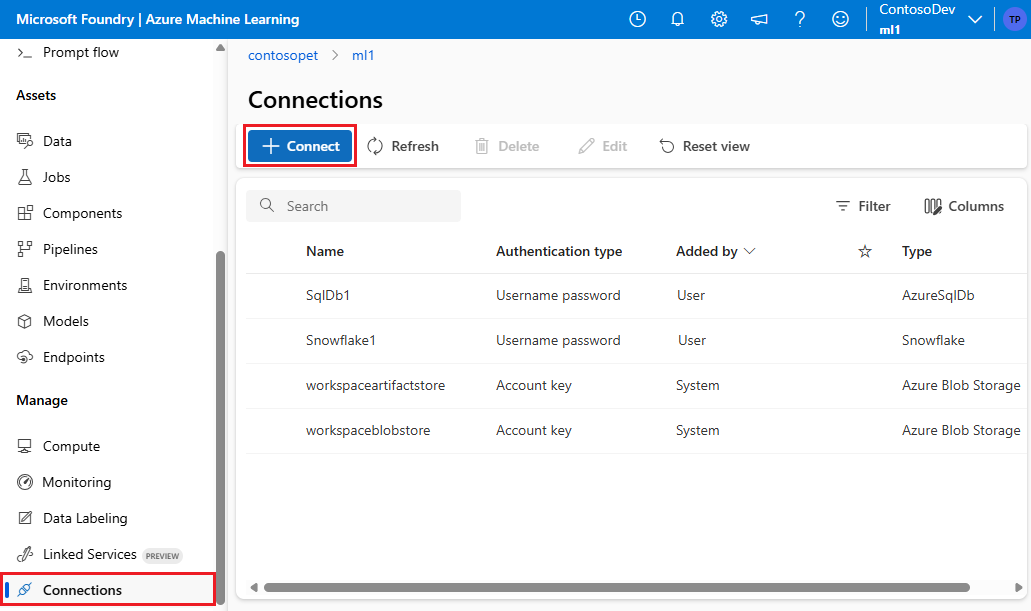
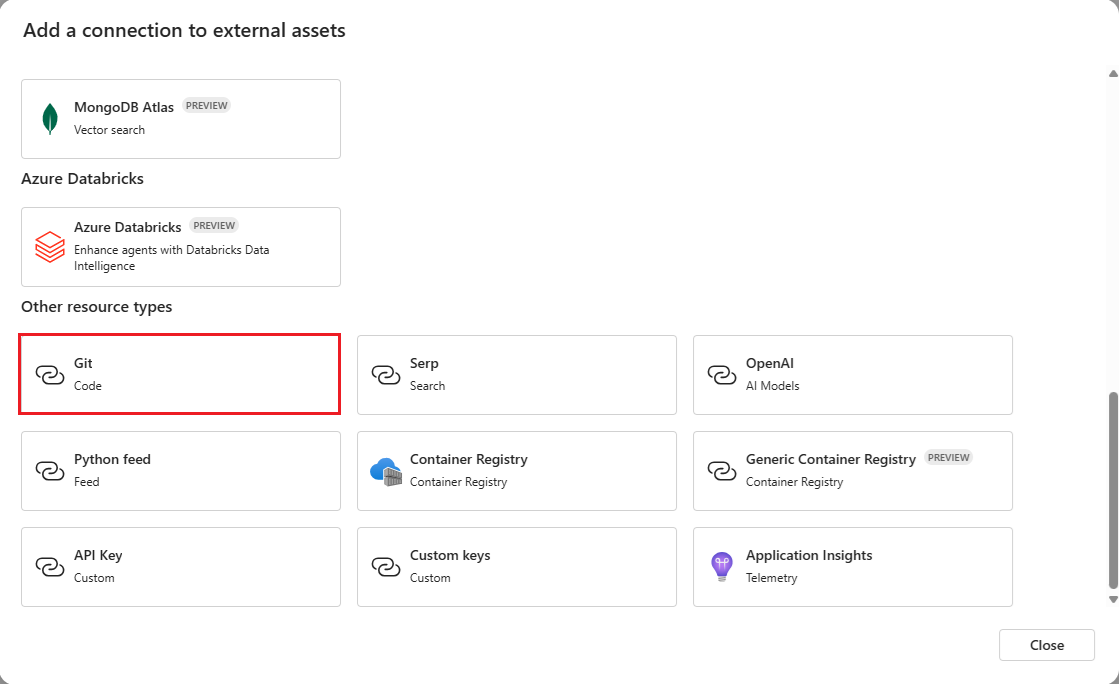
在 Azure 机器学习工作室的左侧导航中选择“管理”下的“连接”,然后选择“连接”。
在 “添加与外部资产的连接 ”屏幕上,向下滚动到 “其他资源类型”,然后选择 “Git”。
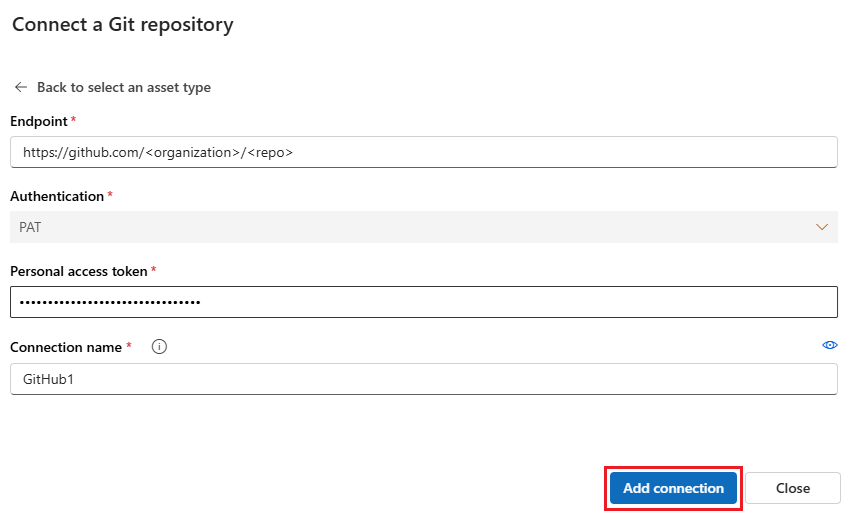
在 “连接 Git 存储库 ”屏幕上,在 “终结点 ”下输入 Git 存储库的路径,并在 “个人访问令牌”下输入 Git 个人访问令牌(PAT)。 提供 连接名称,然后选择“ 添加连接”。
Python 源
可以使用 Azure CLI、Python SDK 或机器学习 Studio 创建与 Python 馈送的连接。
使用以下 YAML 文件之一定义 Python 源连接。 将文件命名 为python-feed-connection.yml。
若要使用 PAT 进行连接,请提供一个<connection-name>,并将<feed-url>和<PAT>占位符替换为您源的值。
name: <connection-name>
type: python_feed
target: https://<feed-url>
credentials:
   type: pat
   pat: <PAT>
若要使用用户名和密码进行连接,请提供<connection-name>,并将<feed-url>、<username>和<password>占位符替换为您的feed的值。
name: <connection-name>
type: python_feed
target: https://<feed-url>
credentials:
   type: username_password
   username: <username>
   password: <password>
若要在不使用凭据的情况下连接到公共源,请提供<connection-name>,并将<feed-url>占位符替换为您的 Python 源 URL。
name: <connection-name>
type: python_feed
target: https://<feed-url>
通过运行以下命令创建 Azure 机器学习连接,为占位符提供 YAML 文件名 <yaml-filename> 。
az ml connection create --file <yaml-filename>.yaml
使用以下脚本通过 Python SDK 创建 Python 源连接。 请提供 <connection-name>,并将 <feed-url> 占位符替换为您的 Python feed URL。
可以使用 PAT 或用户名和密码对连接进行身份验证,或连接到没有凭据的公共源。 对于 PAT 身份验证类型,请为 <PAT> 占位符提供 PAT。 对于用户名-密码身份验证类型,名称/密码值应采用 URL 编码。
若要使用用户名/密码或不使用 PAT 身份验证,请取消注释以下脚本中的相应行,并注释掉包含credentials=PatTokenConfiguration(pat="<PAT>"),的那一行。
from azure.ai.ml.entities import WorkspaceConnection
from azure.ai.ml.entities import UsernamePasswordConfiguration, PatTokenConfiguration

# import urllib.parse
# username = urllib.parse.quote(os.environ["FEED_USERNAME"], safe="")
# password = urllib.parse.quote(os.environ["FEED_PASSWORD"], safe="")

name = "<connection-name>"

target = "https://<feed-url>"

wps_connection = WorkspaceConnection(
    name=name,
    type="python_feed",
    target=target,
    #credentials=UsernamePasswordConfiguration(username=username, password=password),
    credentials=PatTokenConfiguration(pat="<PAT>"),

    #credentials=None
)
ml_client.connections.create_or_update(workspace_connection=wps_connection)
若要在机器学习工作室中创建与 Python 数据流的连接,请执行以下操作:
在 Azure 机器学习工作室工作区中,在左侧导航中选择“管理”下的“连接”,然后选择“连接”。
在 “添加与外部资产的连接 ”屏幕上,向下滚动到 “其他资源类型”,然后选择 “Python 源”。
在 “连接 Python 源 ”屏幕上:
- 在 Endpoint 下输入 Git 存储库的路径。
-
选择“无”、“PAT”或“用户名密码进行身份验证”,并提供适当的值。
- 提供连接名称。
选择“添加连接”。
Azure 容器注册表
可以使用 Azure CLI、Python SDK 或机器学习工作室创建到 Azure 容器注册表的连接。
使用以下 YAML 文件通过用户名/密码身份验证定义与 Azure 容器注册表的连接。
name: <connection-name>
type: container_registry
target: https://<container-registry-url>
credentials:
   type: username_password
   username: <username>
   password: <password>
若要创建连接,请运行以下命令:
az ml connection create --file connection.yaml
以下示例将会创建 Azure 容器注册表连接:
from azure.ai.ml.entities import WorkspaceConnection
from azure.ai.ml.entities import UsernamePasswordConfiguration

# If using username/password, the name/password values should be url-encoded
import urllib.parse
username = os.environ["REGISTRY_USERNAME"]
password = os.environ["REGISTRY_PASSWORD"]

name = "my_acr_conn"

target = "https://iJ5kL6mN7.core.chinacloudapi.cn/mycontainer"

wps_connection = WorkspaceConnection(
    name=name,
    type="container_registry",
    target=target,
    credentials=UsernamePasswordConfiguration(username=username, password=password),
)
ml_client.connections.create_or_update(workspace_connection=wps_connection)
若要在机器学习工作室中创建与 Azure 容器注册表的连接,请执行以下作:
在 Azure 机器学习工作区中,在左侧导航中选择“管理”下的“连接”,然后选择“连接”。
在 “添加与外部资产的连接 ”屏幕上,向下滚动到 “其他资源类型”,然后选择“ 容器注册表”。
在“终结点”下输入 Azure 容器注册表的路径,选择“无”或“用户名密码”以使用适当的值进行身份验证,并输入连接名称。
选择“添加连接”。
通用容器注册表
GenericContainerRegistry 工作区连接指定了用于镜像构建的外部注册表,例如 Nexus 或 Artifactory。 环境映像从指定的注册表推送,先前的缓存会被忽略。 可以使用 Azure CLI、Python SDK 或机器学习工作室创建与通用容器注册表的连接。
对于 Azure CLI 和 Python SDK,以下示例 YAML 文件定义了一个通用容器注册表连接。 使用自己的值更新示例值。
#myenv.yml
$schema: https://azuremlschemas.azureedge.net/latest/environment.schema.json
name: docker-image-plus-conda-example
image: mcr.microsoft.com/azureml/openmpi4.1.0-ubuntu20.04
type: python_feed
conda_file: conda_dep.yml
description: Environment created from a Docker image plus Conda environment
#conda_dep.yml
name: project_environment
dependencies:
  - python=3.10
  - pip:
    - azureml-defaults
channels:
  - anaconda
  - conda-forge
#connection.yml
name: ws_conn_generic_container_registry
type: container_registry
target: https://test-registry.com
credentials:
  type: username_password
  username: myusername
  password: <password>
#hello_world_job.yml
$schema: https://azuremlschemas.azureedge.net/latest/commandJob.schema.json
command: echo "hello world"
environment: azureml:myenv@latest
还可以在Studio开发环境中创建通用容器注册表连接(预览版)。
在 Azure 机器学习工作室的左侧导航中选择“管理”下的“连接”,然后选择“连接”。
在“添加与外部资产的连接”屏幕上,选择“其他资源类型”下的“通用容器注册表”(预览版)。
运行以下命令,使用前面的 YAML 文件和凭据创建连接。 使用自己的值更新示例值。
az ml connection create --file connection.yml --credentials username=myusername password=<password> --resource-group my-resource-group --workspace-name my-workspace
若要创建环境,请运行以下命令:
az ml environment create --name docker-image-plus-conda-example --version 1 --file myenv.yml --conda-file conda_dep.yml --image mcr.microsoft.com/azureml/openmpi4.1.0-ubuntu20.04 --resource-group my-resource-group --workspace-name my-workspace
运行以下命令,验证是否已成功创建环境。
az ml environment show --name docker-image-plus-conda-example --version 1 --resource-group my-resource-group --workspace-name my-workspace
以下 Python 示例脚本使用前面的示例文件创建一个通用容器注册表连接。 使用自己的值更新示例值。
import os
from azure.ai.ml import MLClient
from azure.identity import DefaultAzureCredential
from azure.ai.ml.entities import Environment
from azure.ai.ml.entities import WorkspaceConnection
from azure.ai.ml.entities import UsernamePasswordConfiguration
from azureml.core.conda_dependencies import CondaDependencies
from azure.ai.ml import command

username = os.environ["REGISTRY_USERNAME"]
password = os.environ["REGISTRY_PASSWORD"]

# Enter details of Azure Machine Learning workspace
subscription_id = "00000000-0000-0000-0000-000000000000"
resource_group = "my-resource-group"
workspace = "my-workspace"

ml_client = MLClient( DefaultAzureCredential(), subscription_id, resource_group, workspace)
credentials = UsernamePasswordConfiguration(username=username, password=password)

# Create GenericContainerRegistry workspace connection for a generic registry
ws_connection = WorkspaceConnection(name="ws_conn_generic_container_registry", target="https://test-registry.com", type="GenericContainerRegistry", credentials=credentials)
ml_client.connections.create_or_update(ws_connection)

# Create an environment
env_docker_conda = Environment(image="mcr.microsoft.com/azureml/openmpi4.1.0-ubuntu20.04", conda_file="conda_dep.yml", name="docker-image-plus-conda-example", description="Environment created from a Docker image plus Conda environment.")
ml_client.environments.create_or_update(env_docker_conda)

job = command(command="echo 'hello world'", environment=env_docker_conda,display_name="v2-job-example")
returned_job = ml_client.create_or_update(job)
在 “连接容器注册表 ”屏幕上:
- 在 Endpoint 下输入容器注册表的路径。
- 输入用户名和密码。
- 提供连接名称。
选择“添加连接”。
API 密钥
创建以下 YAML 文件以定义与 API 密钥的连接。 使用自己的值更新示例值。
name: my_api_key
type: api_key
api_base: "https://myapi.core.chinacloudapi.cn/mycontainer"
api_key: "aAbBcCdD"
若要创建连接,请运行以下命令:
az ml connection create --file connection.yaml
为了提高安全性,请不要在 YAML 文件中包含 api_key 值,而是在命令行中提供它。
az ml connection create --file connection.yml --set api_key="aAbBcCdD"
以下 Python SDK 示例创建 API 密钥连接。 使用自己的值更新示例值。
from azure.ai.ml.entities import WorkspaceConnection
from azure.ai.ml.entities import UsernamePasswordConfiguration, ApiKeyConfiguration

name = "my_api_key"

target = "https://myapi.core.chinacloudapi.cn/mycontainer"

wps_connection = WorkspaceConnection(
    name=name,
    type="apikey",
    target=target,
    credentials=ApiKeyConfiguration(key="aAbBcCdD"),
)
ml_client.connections.create_or_update(workspace_connection=wps_connection)
若要在机器学习工作室中创建与 API 密钥的连接,请执行以下作:
在 Azure 机器学习工作区中,在左侧导航中选择“管理”下的“连接”,然后选择“连接”。
在 “添加与外部资产的连接 ”屏幕上,向下滚动到 “其他资源类型”,然后选择 “API 密钥”。
在 “终结点”下输入 API 密钥的路径,在 “密钥”下输入 API 密钥机密,输入 连接名称,然后选择“ 添加连接”。
相关内容


