适用于: Azure CLI ml 扩展 v2 (当前)Python SDK azure-ai-ml v2 (当前)
本文介绍如何将模型部署到联机终结点以用于实时推理。 首先在本地计算机上部署一个模型以调试任何错误。 然后,在 Azure 中部署和测试模型,查看部署日志,并监视服务级别协议 (SLA)。 本文结束时,你有一个可缩放的 HTTPS/REST 终结点,可用于实时推理。
联机终结点是用于实时推理的终结点。 有两种类型的联机终结点:托管联机终结点和 Kubernetes 联机终结点。 关于差异的更多信息,请参阅 托管在线端点与 Kubernetes 在线端点。
托管联机终结点有助于以统包方式部署机器学习模型。 托管联机终结点在 Azure 中以一种可缩放的、完全托管的方式使用功能强大的 CPU 和 GPU 计算机。 托管在线端点负责服务、扩展、安全和监控模型。 此帮助可让你免于设置和管理底层基础结构的开销。
本文中的主要示例使用托管联机终结点进行部署。 若要改用 Kubernetes,请参阅本文档中与托管联机终结点讨论内联的注释。
先决条件
适用于:Azure CLI ml 扩展 v2 (当前)
Azure 基于角色的访问控制(Azure RBAC)用于授予对 Azure 机器学习中操作的访问权限。 若要执行本文中的步骤,必须为用户帐户分配 Azure 机器学习工作区的“所有者”或“参与者”角色,或者必须允许 Microsoft.MachineLearningServices/workspaces/onlineEndpoints/*自定义角色。 如果使用 Azure 机器学习工作室创建和管理联机终结点或部署,则需要资源组所有者的额外权限 Microsoft.Resources/deployments/write 。 有关详细信息,请参阅管理对 Azure 机器学习工作区的访问。
(可选)在本地部署时,您必须在自己的计算机上安装 Docker 引擎。 我们 强烈建议 使用此选项,这样可以更轻松地调试问题。
适用于: Python SDK azure-ai-ml v2 (当前)
Azure 机器学习工作区。 有关创建工作区的步骤,请参阅 “创建工作区”。
适用于 Python v2 的 Azure 机器学习 SDK。 若要安装 SDK,请使用以下命令:
pip install azure-ai-ml azure-identity
要将 SDK 的现有安装更新到最新版本,请使用以下命令:
pip install --upgrade azure-ai-ml azure-identity
有关详细信息,请参阅 适用于 Python 的 Azure 机器学习包客户端库。
Azure RBAC 用于授予对 Azure 机器学习中操作的访问权限。 若要执行本文中的步骤,必须为用户帐户分配 Azure 机器学习工作区的“所有者”或“参与者”角色,或者必须允许 Microsoft.MachineLearningServices/workspaces/onlineEndpoints/*自定义角色。 有关详细信息,请参阅管理对 Azure 机器学习工作区的访问。
(可选)在本地部署时,您必须在自己的计算机上安装 Docker 引擎。 我们 强烈建议 使用此选项,这样可以更轻松地调试问题。
在按照本文中的步骤作之前,请确保满足以下先决条件:
- Azure 订阅。 如果没有 Azure 订阅,可在开始前创建一个试用帐户。 试用免费或付费版本的 Azure 机器学习。
- 一个 Azure 机器学习工作区和一个计算实例。 如果没有这些资源,请参阅 “创建需要开始使用的资源”。
- Azure RBAC 用于授予对 Azure 机器学习中操作的访问权限。 若要执行本文中的步骤,必须为用户帐户分配 Azure 机器学习工作区的“所有者”或“参与者”角色,或者必须允许
Microsoft.MachineLearningServices/workspaces/onlineEndpoints/*自定义角色。 有关详细信息,请参阅 管理对 Azure 机器学习工作区的访问权限。
这些步骤中使用了用于机器学习的 Azure CLI 和 CLI 扩展,但它们不是主要重点。 它们用作实用工具,用于将模板传递到 Azure 并检查模板部署的状态。
- Azure RBAC 用于授予对 Azure 机器学习中操作的访问权限。 若要执行本文中的步骤,必须为用户帐户分配 Azure 机器学习工作区的“所有者”或“参与者”角色,或者必须允许
Microsoft.MachineLearningServices/workspaces/onlineEndpoints/*自定义角色。 有关详细信息,请参阅 管理对 Azure 机器学习工作区的访问权限。
确保为部署分配了足够的虚拟机 (VM) 配额。 Azure 机器学习会保留 20% 的计算资源,用于对某些 VM 版本进行升级。 例如,如果在部署中请求 10 个实例,则必须为 VM 版本的每个核心数指定 12 个配额。 未能考虑额外的计算资源会导致错误。 某些 VM 版本不受额外的配额预留限制。 有关配额分配的详细信息,请参阅 用于部署的虚拟机配额分配。
或者,可以在有限的时间内使用 Azure 机器学习共享配额池中的配额。 Azure 机器学习提供了一个共享配额池,不同区域中的用户可以根据可用性从中访问配额以执行有限时间的测试。
使用工作室将 Llama-2、Phi、Nemotron、Mistral、Dolly 和 Deci-DeciLM 模型从模型目录部署到托管联机终结点时,Azure 机器学习允许你在短时间访问其共享配额池,以便执行测试。 有关共享配额池的详细信息,请参阅 Azure 机器学习共享配额。
准备你的系统
设置环境变量。
如果尚未为 Azure CLI 指定默认设置,则应保存默认设置。 若要避免多次传入订阅、工作区和资源组的值,请运行此代码:
az account set --subscription <subscription ID>
az configure --defaults workspace=<Azure Machine Learning workspace name> group=<resource group>
克隆示例存储库
若要跟随本文进行操作,请先克隆 azureml-examples 存储库,然后切换到存储库的 azureml-examples/cli 目录:
git clone --depth 1 https://github.com/Azure/azureml-examples
cd azureml-examples/cli
使用 --depth 1 仅克隆最新提交到目录,这将减少操作完成的时间。
本教程中的命令位于 cli 目录中的文件 deploy-local-endpoint.sh 和 deploy-managed-online-endpoint.sh。 YAML 配置文件位于 endpoints/online/managed/sample/ 子目录中。
注意
Kubernetes 联机终结点的 YAML 配置文件位于 endpoints/online/kubernetes/ 子目录中。
克隆示例存储库
若要运行训练示例,请先克隆 azureml-examples 存储库,然后更改为 azureml-examples/sdk/python/endpoints/online/managed directory:
git clone --depth 1 https://github.com/Azure/azureml-examples
cd azureml-examples/sdk/python/endpoints/online/managed
使用 --depth 1 仅克隆最新提交到目录,这将减少操作完成的时间。
本文中的信息来源于online-endpoints-simple-deployment.ipynb笔记本。 该笔记本包含与本文相同的内容,尽管代码的顺序略有不同。
连接到 Azure 机器学习工作区
工作区是 Azure 机器学习的顶级资源。 它提供了一个集中的位置,用于处理使用 Azure 机器学习时创建的所有项目。 在本部分,你将连接到在其中执行部署任务的工作区。 若要继续操作,请打开您的 online-endpoints-simple-deployment.ipynb 笔记本。
导入所需的库:
# import required libraries
from azure.ai.ml import MLClient
from azure.ai.ml.entities import (
    ManagedOnlineEndpoint,
    ManagedOnlineDeployment,
    Model,
    Environment,
    CodeConfiguration
)
from azure.identity import DefaultAzureCredential
注意
如果使用 Kubernetes 联机终结点,请从KubernetesOnlineEndpoint库导入KubernetesOnlineDeployment和azure.ai.ml.entities类。
配置工作区详细信息并获取工作区的句柄。
若要连接到工作区,需要以下标识符参数:订阅、资源组和工作区名称。 使用 MLClient 的 azure.ai.ml 中的这些详细信息来获取所需的 Azure 机器学习工作区的句柄。 此示例使用默认的 Azure 身份验证。
# enter details of your Azure Machine Learning workspace
subscription_id = "<subscription ID>"
resource_group = "<resource group>"
workspace = "<workspace name>"
# get a handle to the workspace
ml_client = MLClient(
    DefaultAzureCredential(), subscription_id, resource_group, workspace
)
如果在本地计算机上安装了 Git,则可以按照说明克隆示例存储库。 否则,请按照说明从示例存储库下载文件。
克隆示例存储库
若要按照本文的步骤进行操作,请先克隆 azureml-examples 存储库,然后切换到 azureml-examples/cli/endpoints/online/model-1 目录。
git clone --depth 1 https://github.com/Azure/azureml-examples
cd azureml-examples/cli/endpoints/online/model-1
使用 --depth 1 仅克隆最新提交到目录,这将减少操作完成的时间。
从示例存储库下载文件
如果克隆了示例存储库,则本地计算机已有此示例的文件副本,你可以跳到下一部分。 如果未克隆存储库,请将其下载到本地计算机。
- 转到示例存储库(azureml-examples)。
- 转到页面上的 <> “代码 ”按钮,然后在 “本地 ”选项卡上,选择“ 下载 ZIP”。
- 找到文件夹 /cli/endpoints/online/model-1/model 和文件 /cli/endpoints/online/model-1/onlinescoring/score.py。
设置环境变量。
设置以下环境变量,以便在本文中的示例中使用这些环境变量。 将这些值替换为 Azure 订阅 ID、工作区所在的 Azure 区域、包含工作区的资源组和工作区名称:
export SUBSCRIPTION_ID="<subscription ID>"
export LOCATION="<your region>"
export RESOURCE_GROUP="<resource group>"
export WORKSPACE="<workspace name>"
几个模板示例要求将文件上传到工作区的 Azure Blob 存储。 以下步骤可查询工作区,并将此信息存储在示例中使用的环境变量中:
获取访问令牌:
TOKEN=$(az account get-access-token --query accessToken -o tsv)
设置 REST API 版本:
API_VERSION="2022-05-01"
获取存储信息:
# Get values for storage account
response=$(curl --location --request GET "https://management.chinacloudapi.cn/subscriptions/$SUBSCRIPTION_ID/resourceGroups/$RESOURCE_GROUP/providers/Microsoft.MachineLearningServices/workspaces/$WORKSPACE/datastores?api-version=$API_VERSION&isDefault=true" \
--header "Authorization: Bearer $TOKEN")
AZUREML_DEFAULT_DATASTORE=$(echo $response | jq -r '.value[0].name')
AZUREML_DEFAULT_CONTAINER=$(echo $response | jq -r '.value[0].properties.containerName')
export AZURE_STORAGE_ACCOUNT=$(echo $response | jq -r '.value[0].properties.accountName')
克隆示例存储库
若要跟随本文阅读,请先克隆azureml-examples 存储库,然后进入azureml-examples 目录:
git clone --depth 1 https://github.com/Azure/azureml-examples
cd azureml-examples
使用 --depth 1 仅克隆最新提交到目录,这将减少操作完成的时间。
定义终结点
若要定义联机终结点,请指定终结点名称和身份验证模式。 有关托管联机终结点的详细信息,请参阅 联机终结点。
设置终结点名称
要设置你的终结点名称,请运行以下命令。 将 <YOUR_ENDPOINT_NAME> 替换为在 Azure 区域中唯一的名称。 有关命名规则的详细信息,请参阅 终结点限制。
export ENDPOINT_NAME="<YOUR_ENDPOINT_NAME>"
以下代码片段显示了 endpoints/online/managed/sample/endpoint.yml 文件:
$schema: https://azuremlschemas.azureedge.net/latest/managedOnlineEndpoint.schema.json
name: my-endpoint
auth_mode: key
下表描述了 YAML 格式的终结点的参考资料。 若要了解如何指定这些属性,请参阅联机终结点 YAML 参考。 有关与托管终结点相关的限制的信息,请参阅 Azure 机器学习联机终结点和批处理终结点。
| Key |
说明 |
$schema |
(可选)YAML 架构。 若要查看 YAML 文件的所有可用选项,可在浏览器中查看上述代码片段中的架构。 |
name |
终结点的名称。 |
auth_mode |
使用 key 可执行基于密钥的身份验证。
使用 aml_token 可执行基于 Azure 机器学习令牌的身份验证。
使用 aad_token 进行基于 Microsoft Entra 令牌的身份验证(预览版)。
有关身份验证的详细信息,请参阅 对联机终结点的客户端进行身份验证。 |
首先定义联机终结点的名称,然后配置终结点。
将<YOUR_ENDPOINT_NAME>替换为在 Azure 区域中的唯一名称,或者使用示例方法定义一个随机名称。 请务必删除不使用的方法。 有关命名规则的详细信息,请参阅 终结点限制。
# method 1: define an endpoint name
endpoint_name = "<YOUR_ENDPOINT_NAME>"

# method 2: example way to define a random name
import datetime

endpoint_name = "endpt-" + datetime.datetime.now().strftime("%m%d%H%M%f")

# create an online endpoint
endpoint = ManagedOnlineEndpoint(
    name = endpoint_name,
    description="this is a sample endpoint",
    auth_mode="key"
)
前面的代码使用 key 进行基于密钥的身份验证。 若要使用基于 Azure 机器学习令牌的身份验证,请使用 aml_token。 若要使用基于 Microsoft Entra 令牌的身份验证(预览版),请使用 aad_token。 有关身份验证的详细信息,请参阅 对联机终结点的客户端进行身份验证。
从工作室部署到 Azure 时,将创建一个终结点和一个要添加到其中的部署。 此时,系统会提示你输入终结点和部署的名称。
定义部署
部署是一组资源,用于承载执行实际推理的模型。 在此示例中,你将部署一个 scikit-learn 执行回归的模型,并使用评分脚本 score.py 在特定输入请求上运行模型。
若要了解部署的关键属性,请参阅 联机部署。
部署配置使用要部署的模型的位置。
以下代码片段显示了 endpoints/online/managed/sample/blue-deployment.yml 文件,其中包含配置部署所需的所有输入:
$schema: https://azuremlschemas.azureedge.net/latest/managedOnlineDeployment.schema.json
name: blue
endpoint_name: my-endpoint
model:
  path: ../../model-1/model/
code_configuration:
  code: ../../model-1/onlinescoring/
  scoring_script: score.py
environment:
  conda_file: ../../model-1/environment/conda.yaml
  image: mcr.microsoft.com/azureml/openmpi4.1.0-ubuntu20.04:latest
instance_type: Standard_DS3_v2
instance_count: 1
blue-deployment.yml文件指定以下部署属性:
-
model - 使用 path 参数(上传文件的位置)指定模型属性内联。 CLI 自动上传模型文件并使用自动生成的名称注册模型。
-
environment:使用内联定义,包括从何处上传文件。 CLI 会自动上传 conda.yaml 文件并注册环境。 稍后,为了构建环境,部署使用 image 参数来指定基础映像。 在此示例中,它是 mcr.microsoft.com/azureml/openmpi4.1.0-ubuntu20.04:latest。 依赖项 conda_file 安装在基础映像之上。
-
code_configuration:在部署期间,从开发环境上传本地文件,例如评分模型的 Python 源。
有关 YAML 架构的详细信息,请参阅 联机终结点 YAML 参考。
注意
若要使用 Kubernetes 终结点而不是托管联机终结点作为计算目标:
- 使用 Azure 机器学习工作室创建 Kubernetes 群集并将其作为计算目标附加到 Azure 机器学习工作区。
- 使用 终结点 YAML 以 Kubernetes 而不是托管终结点 YAML 为目标。 需要编辑 YAML,将
compute 的值更改为注册的计算目标的名称。 可以使用此 deployment.yaml 文件,它具有适用于 Kubernetes 部署的其他属性。
本文中针对托管联机终结点使用的所有命令也适用于 Kubernetes 终结点,但以下功能不适用于 Kubernetes 终结点:
使用以下代码配置部署:
model = Model(path="../model-1/model/sklearn_regression_model.pkl")
env = Environment(
    conda_file="../model-1/environment/conda.yaml",
    image="mcr.microsoft.com/azureml/openmpi4.1.0-ubuntu20.04:latest",
)

blue_deployment = ManagedOnlineDeployment(
    name="blue",
    endpoint_name=endpoint_name,
    model=model,
    environment=env,
    code_configuration=CodeConfiguration(
        code="../model-1/onlinescoring", scoring_script="score.py"
    ),
    instance_type="Standard_DS3_v2",
    instance_count=1,
)
-
Model - 使用 path 参数(上传文件的位置)指定模型属性内联。 SDK 会自动上传模型文件并使用自动生成的名称注册模型。
-
Environment:使用内联定义,包括从何处上传文件。 SDK 会自动上传 conda.yaml 文件并注册环境。 稍后,为了构建环境,部署使用 image 参数来指定基础映像。 在此示例中,它是 mcr.microsoft.com/azureml/openmpi4.1.0-ubuntu20.04:latest。 依赖项 conda_file 安装在基础映像之上。
-
CodeConfiguration:在部署期间,从开发环境上传本地文件,例如评分模型的 Python 源。
关于在线部署定义的详细信息,请参阅 OnlineDeployment 类。
部署到 Azure 时,将创建一个终结点和一个要添加到它的部署。 此时,系统会提示你输入终结点和部署的名称。
了解评分脚本
联机终结点的评分脚本格式与早期版本的 CLI 和 Python SDK 中使用的格式相同。
code_configuration.scoring_script 中指定的评分脚本必须具有一个 init() 函数和一个 run() 函数。
评分脚本必须具有一个 init() 函数和一个 run() 函数。
评分脚本必须具有一个 init() 函数和一个 run() 函数。
评分脚本必须具有一个 init() 函数和一个 run() 函数。 本文使用 score.py 文件。
使用模板进行部署时,必须先将评分文件上传到 Blob 存储,然后注册它:
- 以下代码使用 Azure CLI 命令
az storage blob upload-batch 上传评分文件:
set -x

#<get_access_token>
TOKEN=$(az account get-access-token --query accessToken -o tsv)
#</get_access_token>

# <create_variables>
SUBSCRIPTION_ID=$(az account show --query id -o tsv)
LOCATION=$(az ml workspace show --query location -o tsv)
RESOURCE_GROUP=$(az group show --query name -o tsv)
WORKSPACE=$(az configure -l --query "[?name=='workspace'].value" -o tsv)
#</create_variables>

# <set_endpoint_name>
export ENDPOINT_NAME=endpoint-`echo $RANDOM`
# </set_endpoint_name>

#<api_version>
API_VERSION="2022-05-01"
#</api_version>

echo -e "Using:\nSUBSCRIPTION_ID=$SUBSCRIPTION_ID\nLOCATION=$LOCATION\nRESOURCE_GROUP=$RESOURCE_GROUP\nWORKSPACE=$WORKSPACE"

# define how to wait
wait_for_completion () {
    operation_id=$1
    status="unknown"

    if [[ $operation_id == "" || -z $operation_id  || $operation_id == "null" ]]; then
        echo "operation id cannot be empty"
        exit 1
    fi

    while [[ $status != "Succeeded" && $status != "Failed" ]]
    do
        echo "Getting operation status from: $operation_id"
        operation_result=$(curl --location --request GET $operation_id --header "Authorization: Bearer $TOKEN")
        # TODO error handling here
        status=$(echo $operation_result | jq -r '.status')
        echo "Current operation status: $status"
        sleep 5
    done

    if [[ $status == "Failed" ]]
    then
        error=$(echo $operation_result | jq -r '.error')
        echo "Error: $error"
    fi
}

# <get_storage_details>
# Get values for storage account
response=$(curl --location --request GET "https://management.chinacloudapi.cn/subscriptions/$SUBSCRIPTION_ID/resourceGroups/$RESOURCE_GROUP/providers/Microsoft.MachineLearningServices/workspaces/$WORKSPACE/datastores?api-version=$API_VERSION&isDefault=true" \
--header "Authorization: Bearer $TOKEN")
AZUREML_DEFAULT_DATASTORE=$(echo $response | jq -r '.value[0].name')
AZUREML_DEFAULT_CONTAINER=$(echo $response | jq -r '.value[0].properties.containerName')
export AZURE_STORAGE_ACCOUNT=$(echo $response | jq -r '.value[0].properties.accountName')
# </get_storage_details>

# <upload_code>
az storage blob upload-batch -d $AZUREML_DEFAULT_CONTAINER/score -s cli/endpoints/online/model-1/onlinescoring --account-name $AZURE_STORAGE_ACCOUNT
# </upload_code>

# <create_code>
az deployment group create -g $RESOURCE_GROUP \
--template-file arm-templates/code-version.json \
--parameters \
workspaceName=$WORKSPACE \
codeAssetName="score-sklearn" \
codeUri="https://$AZURE_STORAGE_ACCOUNT.blob.core.chinacloudapi.cn/$AZUREML_DEFAULT_CONTAINER/score"
# </create_code>

# <upload_model>
az storage blob upload-batch -d $AZUREML_DEFAULT_CONTAINER/model -s cli/endpoints/online/model-1/model --account-name $AZURE_STORAGE_ACCOUNT
# </upload_model>

# <create_model>
az deployment group create -g $RESOURCE_GROUP \
--template-file arm-templates/model-version.json \
--parameters \
workspaceName=$WORKSPACE \
modelAssetName="sklearn" \
modelUri="azureml://subscriptions/$SUBSCRIPTION_ID/resourceGroups/$RESOURCE_GROUP/workspaces/$WORKSPACE/datastores/$AZUREML_DEFAULT_DATASTORE/paths/model/sklearn_regression_model.pkl"
# </create_model>

# <read_condafile>
CONDA_FILE=$(cat cli/endpoints/online/model-1/environment/conda.yaml)
# </read_condafile>

# <create_environment>
ENV_VERSION=$RANDOM
az deployment group create -g $RESOURCE_GROUP \
--template-file arm-templates/environment-version.json \
--parameters \
workspaceName=$WORKSPACE \
environmentAssetName=sklearn-env \
environmentAssetVersion=$ENV_VERSION \
dockerImage=mcr.microsoft.com/azureml/openmpi3.1.2-ubuntu18.04:20210727.v1 \
condaFile="$CONDA_FILE"
# </create_environment>

# <create_endpoint>
az deployment group create -g $RESOURCE_GROUP \
--template-file arm-templates/online-endpoint.json \
--parameters \
workspaceName=$WORKSPACE \
onlineEndpointName=$ENDPOINT_NAME \
identityType=SystemAssigned \
authMode=AMLToken \
location=$LOCATION
# </create_endpoint>

# <get_endpoint>
response=$(curl --location --request GET "https://management.chinacloudapi.cn/subscriptions/$SUBSCRIPTION_ID/resourceGroups/$RESOURCE_GROUP/providers/Microsoft.MachineLearningServices/workspaces/$WORKSPACE/onlineEndpoints/$ENDPOINT_NAME?api-version=$API_VERSION" \
--header "Content-Type: application/json" \
--header "Authorization: Bearer $TOKEN")

operation_id=$(echo $response | jq -r '.properties.properties.AzureAsyncOperationUri')
wait_for_completion $operation_id
# </get_endpoint>

# <create_deployment>
resourceScope="/subscriptions/$SUBSCRIPTION_ID/resourceGroups/$RESOURCE_GROUP/providers/Microsoft.MachineLearningServices"
az deployment group create -g $RESOURCE_GROUP \
 --template-file arm-templates/online-endpoint-deployment.json \
 --parameters \
 workspaceName=$WORKSPACE \
 location=$LOCATION \
 onlineEndpointName=$ENDPOINT_NAME \
 onlineDeploymentName=blue \
 codeId="$resourceScope/workspaces/$WORKSPACE/codes/score-sklearn/versions/1" \
 scoringScript=score.py \
 environmentId="$resourceScope/workspaces/$WORKSPACE/environments/sklearn-env/versions/$ENV_VERSION" \
 model="$resourceScope/workspaces/$WORKSPACE/models/sklearn/versions/1" \
 endpointComputeType=Managed \
 skuName=Standard_F2s_v2 \
 skuCapacity=1
 # </create_deployment>

# <get_deployment>
response=$(curl --location --request GET "https://management.chinacloudapi.cn/subscriptions/$SUBSCRIPTION_ID/resourceGroups/$RESOURCE_GROUP/providers/Microsoft.MachineLearningServices/workspaces/$WORKSPACE/onlineEndpoints/$ENDPOINT_NAME/deployments/blue?api-version=$API_VERSION" \
--header "Content-Type: application/json" \
--header "Authorization: Bearer $TOKEN")

operation_id=$(echo $response | jq -r '.properties.properties.AzureAsyncOperationUri')
wait_for_completion $operation_id

scoringUri=$(echo $response | jq -r '.properties.scoringUri')
# </get_endpoint>

# <get_endpoint_access_token>
response=$(curl -H "Content-Length: 0" --location --request POST "https://management.chinacloudapi.cn/subscriptions/$SUBSCRIPTION_ID/resourceGroups/$RESOURCE_GROUP/providers/Microsoft.MachineLearningServices/workspaces/$WORKSPACE/onlineEndpoints/$ENDPOINT_NAME/token?api-version=$API_VERSION" \
--header "Authorization: Bearer $TOKEN")
accessToken=$(echo $response | jq -r '.accessToken')
# </get_endpoint_access_token>

# <score_endpoint>
curl --location --request POST $scoringUri \
--header "Authorization: Bearer $accessToken" \
--header "Content-Type: application/json" \
--data-raw @cli/endpoints/online/model-1/sample-request.json
# </score_endpoint>

# <get_deployment_logs>
curl --location --request POST "https://management.chinacloudapi.cn/subscriptions/$SUBSCRIPTION_ID/resourceGroups/$RESOURCE_GROUP/providers/Microsoft.MachineLearningServices/workspaces/$WORKSPACE/onlineEndpoints/$ENDPOINT_NAME/deployments/blue/getLogs?api-version=$API_VERSION" \
--header "Authorization: Bearer $TOKEN" \
--header "Content-Type: application/json" \
--data-raw "{ \"tail\": 100 }"
# </get_deployment_logs>

# <delete_endpoint>
curl --location --request DELETE "https://management.chinacloudapi.cn/subscriptions/$SUBSCRIPTION_ID/resourceGroups/$RESOURCE_GROUP/providers/Microsoft.MachineLearningServices/workspaces/$WORKSPACE/onlineEndpoints/$ENDPOINT_NAME?api-version=$API_VERSION" \
--header "Content-Type: application/json" \
--header "Authorization: Bearer $TOKEN" || true
# </delete_endpoint>
- 以下代码使用模板注册代码:
set -x

#<get_access_token>
TOKEN=$(az account get-access-token --query accessToken -o tsv)
#</get_access_token>

# <create_variables>
SUBSCRIPTION_ID=$(az account show --query id -o tsv)
LOCATION=$(az ml workspace show --query location -o tsv)
RESOURCE_GROUP=$(az group show --query name -o tsv)
WORKSPACE=$(az configure -l --query "[?name=='workspace'].value" -o tsv)
#</create_variables>

# <set_endpoint_name>
export ENDPOINT_NAME=endpoint-`echo $RANDOM`
# </set_endpoint_name>

#<api_version>
API_VERSION="2022-05-01"
#</api_version>

echo -e "Using:\nSUBSCRIPTION_ID=$SUBSCRIPTION_ID\nLOCATION=$LOCATION\nRESOURCE_GROUP=$RESOURCE_GROUP\nWORKSPACE=$WORKSPACE"

# define how to wait
wait_for_completion () {
    operation_id=$1
    status="unknown"

    if [[ $operation_id == "" || -z $operation_id  || $operation_id == "null" ]]; then
        echo "operation id cannot be empty"
        exit 1
    fi

    while [[ $status != "Succeeded" && $status != "Failed" ]]
    do
        echo "Getting operation status from: $operation_id"
        operation_result=$(curl --location --request GET $operation_id --header "Authorization: Bearer $TOKEN")
        # TODO error handling here
        status=$(echo $operation_result | jq -r '.status')
        echo "Current operation status: $status"
        sleep 5
    done

    if [[ $status == "Failed" ]]
    then
        error=$(echo $operation_result | jq -r '.error')
        echo "Error: $error"
    fi
}

# <get_storage_details>
# Get values for storage account
response=$(curl --location --request GET "https://management.chinacloudapi.cn/subscriptions/$SUBSCRIPTION_ID/resourceGroups/$RESOURCE_GROUP/providers/Microsoft.MachineLearningServices/workspaces/$WORKSPACE/datastores?api-version=$API_VERSION&isDefault=true" \
--header "Authorization: Bearer $TOKEN")
AZUREML_DEFAULT_DATASTORE=$(echo $response | jq -r '.value[0].name')
AZUREML_DEFAULT_CONTAINER=$(echo $response | jq -r '.value[0].properties.containerName')
export AZURE_STORAGE_ACCOUNT=$(echo $response | jq -r '.value[0].properties.accountName')
# </get_storage_details>

# <upload_code>
az storage blob upload-batch -d $AZUREML_DEFAULT_CONTAINER/score -s cli/endpoints/online/model-1/onlinescoring --account-name $AZURE_STORAGE_ACCOUNT
# </upload_code>

# <create_code>
az deployment group create -g $RESOURCE_GROUP \
--template-file arm-templates/code-version.json \
--parameters \
workspaceName=$WORKSPACE \
codeAssetName="score-sklearn" \
codeUri="https://$AZURE_STORAGE_ACCOUNT.blob.core.chinacloudapi.cn/$AZUREML_DEFAULT_CONTAINER/score"
# </create_code>

# <upload_model>
az storage blob upload-batch -d $AZUREML_DEFAULT_CONTAINER/model -s cli/endpoints/online/model-1/model --account-name $AZURE_STORAGE_ACCOUNT
# </upload_model>

# <create_model>
az deployment group create -g $RESOURCE_GROUP \
--template-file arm-templates/model-version.json \
--parameters \
workspaceName=$WORKSPACE \
modelAssetName="sklearn" \
modelUri="azureml://subscriptions/$SUBSCRIPTION_ID/resourceGroups/$RESOURCE_GROUP/workspaces/$WORKSPACE/datastores/$AZUREML_DEFAULT_DATASTORE/paths/model/sklearn_regression_model.pkl"
# </create_model>

# <read_condafile>
CONDA_FILE=$(cat cli/endpoints/online/model-1/environment/conda.yaml)
# </read_condafile>

# <create_environment>
ENV_VERSION=$RANDOM
az deployment group create -g $RESOURCE_GROUP \
--template-file arm-templates/environment-version.json \
--parameters \
workspaceName=$WORKSPACE \
environmentAssetName=sklearn-env \
environmentAssetVersion=$ENV_VERSION \
dockerImage=mcr.microsoft.com/azureml/openmpi3.1.2-ubuntu18.04:20210727.v1 \
condaFile="$CONDA_FILE"
# </create_environment>

# <create_endpoint>
az deployment group create -g $RESOURCE_GROUP \
--template-file arm-templates/online-endpoint.json \
--parameters \
workspaceName=$WORKSPACE \
onlineEndpointName=$ENDPOINT_NAME \
identityType=SystemAssigned \
authMode=AMLToken \
location=$LOCATION
# </create_endpoint>

# <get_endpoint>
response=$(curl --location --request GET "https://management.chinacloudapi.cn/subscriptions/$SUBSCRIPTION_ID/resourceGroups/$RESOURCE_GROUP/providers/Microsoft.MachineLearningServices/workspaces/$WORKSPACE/onlineEndpoints/$ENDPOINT_NAME?api-version=$API_VERSION" \
--header "Content-Type: application/json" \
--header "Authorization: Bearer $TOKEN")

operation_id=$(echo $response | jq -r '.properties.properties.AzureAsyncOperationUri')
wait_for_completion $operation_id
# </get_endpoint>

# <create_deployment>
resourceScope="/subscriptions/$SUBSCRIPTION_ID/resourceGroups/$RESOURCE_GROUP/providers/Microsoft.MachineLearningServices"
az deployment group create -g $RESOURCE_GROUP \
 --template-file arm-templates/online-endpoint-deployment.json \
 --parameters \
 workspaceName=$WORKSPACE \
 location=$LOCATION \
 onlineEndpointName=$ENDPOINT_NAME \
 onlineDeploymentName=blue \
 codeId="$resourceScope/workspaces/$WORKSPACE/codes/score-sklearn/versions/1" \
 scoringScript=score.py \
 environmentId="$resourceScope/workspaces/$WORKSPACE/environments/sklearn-env/versions/$ENV_VERSION" \
 model="$resourceScope/workspaces/$WORKSPACE/models/sklearn/versions/1" \
 endpointComputeType=Managed \
 skuName=Standard_F2s_v2 \
 skuCapacity=1
 # </create_deployment>

# <get_deployment>
response=$(curl --location --request GET "https://management.chinacloudapi.cn/subscriptions/$SUBSCRIPTION_ID/resourceGroups/$RESOURCE_GROUP/providers/Microsoft.MachineLearningServices/workspaces/$WORKSPACE/onlineEndpoints/$ENDPOINT_NAME/deployments/blue?api-version=$API_VERSION" \
--header "Content-Type: application/json" \
--header "Authorization: Bearer $TOKEN")

operation_id=$(echo $response | jq -r '.properties.properties.AzureAsyncOperationUri')
wait_for_completion $operation_id

scoringUri=$(echo $response | jq -r '.properties.scoringUri')
# </get_endpoint>

# <get_endpoint_access_token>
response=$(curl -H "Content-Length: 0" --location --request POST "https://management.chinacloudapi.cn/subscriptions/$SUBSCRIPTION_ID/resourceGroups/$RESOURCE_GROUP/providers/Microsoft.MachineLearningServices/workspaces/$WORKSPACE/onlineEndpoints/$ENDPOINT_NAME/token?api-version=$API_VERSION" \
--header "Authorization: Bearer $TOKEN")
accessToken=$(echo $response | jq -r '.accessToken')
# </get_endpoint_access_token>

# <score_endpoint>
curl --location --request POST $scoringUri \
--header "Authorization: Bearer $accessToken" \
--header "Content-Type: application/json" \
--data-raw @cli/endpoints/online/model-1/sample-request.json
# </score_endpoint>

# <get_deployment_logs>
curl --location --request POST "https://management.chinacloudapi.cn/subscriptions/$SUBSCRIPTION_ID/resourceGroups/$RESOURCE_GROUP/providers/Microsoft.MachineLearningServices/workspaces/$WORKSPACE/onlineEndpoints/$ENDPOINT_NAME/deployments/blue/getLogs?api-version=$API_VERSION" \
--header "Authorization: Bearer $TOKEN" \
--header "Content-Type: application/json" \
--data-raw "{ \"tail\": 100 }"
# </get_deployment_logs>

# <delete_endpoint>
curl --location --request DELETE "https://management.chinacloudapi.cn/subscriptions/$SUBSCRIPTION_ID/resourceGroups/$RESOURCE_GROUP/providers/Microsoft.MachineLearningServices/workspaces/$WORKSPACE/onlineEndpoints/$ENDPOINT_NAME?api-version=$API_VERSION" \
--header "Content-Type: application/json" \
--header "Authorization: Bearer $TOKEN" || true
# </delete_endpoint>
此示例使用前面克隆或下载的存储库中的 score.py 文件 :
import os
import logging
import json
import numpy
import joblib


def init():
    """
    This function is called when the container is initialized/started, typically after create/update of the deployment.
    You can write the logic here to perform init operations like caching the model in memory
    """
    global model
    # AZUREML_MODEL_DIR is an environment variable created during deployment.
    # It is the path to the model folder (./azureml-models/$MODEL_NAME/$VERSION)
    # Please provide your model's folder name if there is one
    model_path = os.path.join(
        os.getenv("AZUREML_MODEL_DIR"), "model/sklearn_regression_model.pkl"
    )
    # deserialize the model file back into a sklearn model
    model = joblib.load(model_path)
    logging.info("Init complete")


def run(raw_data):
    """
    This function is called for every invocation of the endpoint to perform the actual scoring/prediction.
    In the example we extract the data from the json input and call the scikit-learn model's predict()
    method and return the result back
    """
    logging.info("model 1: request received")
    data = json.loads(raw_data)["data"]
    data = numpy.array(data)
    result = model.predict(data)
    logging.info("Request processed")
    return result.tolist()
初始化或启动容器时,将调用函数 init()。 初始化通常在创建或更新部署后立即发生。 可以通过 init 函数编写逻辑来执行全局初始化操作,例如在内存中缓存模型(如 score.py 文件所示)。
每次调用终结点时都会调用该 run() 函数。 它执行实际评分和预测。 在此 score.py 文件中,run() 函数从 JSON 输入中提取数据,调用 scikit-learn 模型的 predict() 方法,然后返回预测结果。
使用本地终结点在本地部署和调试
强烈建议在部署到 Azure 之前在本地测试运行终结点,以验证和调试代码和配置。 Azure CLI 和 Python SDK 支持本地终结点和部署,但 Azure 机器学习工作室和 ARM 模板不支持。
若要在本地部署,必须安装并运行 Docker Engine。 Docker 引擎通常在计算机启动时启动。 如果它不启动,可以对 Docker 引擎进行故障排除。
可以使用 Azure 机器学习推理 HTTP 服务器 Python 包 在本地调试评分脚本, 而无需 Docker 引擎。 使用推理服务器进行调试有助于在部署到本地终结点之前调试评分脚本,以便无需受部署容器配置影响即可进行调试。
有关在部署到 Azure 之前在本地调试联机终结点的详细信息,请参阅 联机终结点调试。
在本地部署模型
首先,创建终结点。 (可选)对于本地终结点,可以跳过此步骤。 可以直接创建部署(下一步),进而创建所需的元数据。 在本地部署模型对于开发和测试目的很有用。
az ml online-endpoint create --local -n $ENDPOINT_NAME -f endpoints/online/managed/sample/endpoint.yml
ml_client.online_endpoints.begin_create_or_update(endpoint, local=True)
工作室不支持本地终结点。 有关在本地测试终结点的步骤,请参阅 Azure CLI 或 Python 选项卡。
模板不支持本地终结点。 有关在本地测试终结点的步骤,请参阅 Azure CLI 或 Python 选项卡。
现在,在终结点下面创建一个名为 blue 的部署。
az ml online-deployment create --local -n blue --endpoint $ENDPOINT_NAME -f endpoints/online/managed/sample/blue-deployment.yml
--local 标志指示 CLI 在 Docker 环境中部署终结点。
ml_client.online_deployments.begin_create_or_update(
    deployment=blue_deployment, local=True
)
local=True 标志指示 SDK 在 Docker 环境中部署终结点。
工作室不支持本地终结点。 有关在本地测试终结点的步骤,请参阅 Azure CLI 或 Python 选项卡。
模板不支持本地终结点。 有关在本地测试终结点的步骤,请参阅 Azure CLI 或 Python 选项卡。
验证本地部署是否成功
检查部署状态,查看模型是否已部署且未出错:
az ml online-endpoint show -n $ENDPOINT_NAME --local
输出应类似于以下 JSON。 参数 provisioning_state 为 Succeeded.
{
  "auth_mode": "key",
  "location": "local",
  "name": "docs-endpoint",
  "properties": {},
  "provisioning_state": "Succeeded",
  "scoring_uri": "http://localhost:49158/score",
  "tags": {},
  "traffic": {}
}
ml_client.online_endpoints.get(name=endpoint_name, local=True)
该方法返回 ManagedOnlineEndpoint 实体。 参数 provisioning_state 为 Succeeded.
ManagedOnlineEndpoint({'public_network_access': None, 'provisioning_state': 'Succeeded', 'scoring_uri': 'http://localhost:49158/score', 'swagger_uri': None, 'name': 'endpt-10061534497697', 'description': 'this is a sample endpoint', 'tags': {}, 'properties': {}, 'id': None, 'Resource__source_path': None, 'base_path': '/path/to/your/working/directory', 'creation_context': None, 'serialize': <msrest.serialization.Serializer object at 0x7ffb781bccd0>, 'auth_mode': 'key', 'location': 'local', 'identity': None, 'traffic': {}, 'mirror_traffic': {}, 'kind': None})
工作室不支持本地终结点。 有关在本地测试终结点的步骤,请参阅 Azure CLI 或 Python 选项卡。
模板不支持本地终结点。 有关在本地测试终结点的步骤,请参阅 Azure CLI 或 Python 选项卡。
下表包含 provisioning_state 的可能值:
| 值 |
说明 |
Creating |
正在创建资源。 |
Updating |
正在更新资源。 |
Deleting |
正在删除此资源。 |
Succeeded |
创建或更新操作成功。 |
Failed |
创建、更新或删除操作失败。 |
调用本地终结点以使用模型为数据评分
使用 invoke 命令并传递 JSON 文件中存储的查询参数,调用终结点来为模型评分:
az ml online-endpoint invoke --local --name $ENDPOINT_NAME --request-file endpoints/online/model-1/sample-request.json
如果要使用 REST 客户端(例如 curl),必须具有评分 URI。 如要获取评分 URI,需要运行 az ml online-endpoint show --local -n $ENDPOINT_NAME。 在返回的数据中,找到 scoring_uri 属性。
使用 invoke 命令并传递 JSON 文件中存储的查询参数,调用终结点来为模型评分。
ml_client.online_endpoints.invoke(
    endpoint_name=endpoint_name,
    request_file="../model-1/sample-request.json",
    local=True,
)
如果要使用 REST 客户端(例如 curl),必须具有评分 URI。 要获取评分 URI,请运行以下代码。 在返回的数据中,找到 scoring_uri 属性。
endpoint = ml_client.online_endpoints.get(endpoint_name, local=True)
scoring_uri = endpoint.scoring_uri
工作室不支持本地终结点。 有关在本地测试终结点的步骤,请参阅 Azure CLI 或 Python 选项卡。
模板不支持本地终结点。 有关在本地测试终结点的步骤,请参阅 Azure CLI 或 Python 选项卡。
在日志中查看 invoke 操作的输出
在示例 score.py 文件中, 方法将一些输出记录到控制台run()。
可以使用 get-logs 命令查看此输出:
az ml online-deployment get-logs --local -n blue --endpoint $ENDPOINT_NAME
可以使用 get_logs 方法查看此输出:
ml_client.online_deployments.get_logs(
    name="blue", endpoint_name=endpoint_name, local=True, lines=50
)
工作室不支持本地终结点。 有关在本地测试终结点的步骤,请参阅 Azure CLI 或 Python 选项卡。
模板不支持本地终结点。 有关在本地测试终结点的步骤,请参阅 Azure CLI 或 Python 选项卡。
将联机终结点部署到 Azure
接下来,将联机终结点部署到 Azure。 作为生产最佳做法,我们建议注册部署中使用的模型和环境。
注册模型和环境
建议在部署到 Azure 之前注册模型和环境,以便在部署期间指定它们的注册名称和版本。 注册资产后,无需在每次创建部署时上传资产即可重复使用它们。 这种做法可提高可重现性和可追溯性。
与部署到 Azure 不同,本地部署不支持使用注册的模型和环境。 相反,本地部署使用本地模型文件,并且仅使用具有本地文件的环境。
若要部署到 Azure,可以使用本地或注册资产(模型和环境)。 在本文的这一小节中,我们使用注册资产部署到 Azure,但你也可以选择使用本地资产。 有关上传要用于本地部署的本地文件的部署配置示例,请参阅 “配置部署”。
若要注册模型和环境,请使用窗体 model: azureml:my-model:1 或 environment: azureml:my-env:1。
对于注册,可以将model和environment的 YAML 定义提取到endpoints/online/managed/sample 文件夹中的单独 YAML 文件中,并使用命令az ml model create和az ml environment create。 若要详细了解这些命令,请运行 az ml model create -h 和 az ml environment create -h。
为模型创建 YAML 定义。 将文件命名 为model.yml:
$schema: https://azuremlschemas.azureedge.net/latest/model.schema.json
name: my-model
path: ../../model-1/model/
注册模型:
az ml model create -n my-model -v 1 -f endpoints/online/managed/sample/model.yml
为环境创建 YAML 定义。 将文件命名 为environment.yml:
$schema: https://azuremlschemas.azureedge.net/latest/environment.schema.json
name: my-env
image: mcr.microsoft.com/azureml/openmpi4.1.0-ubuntu20.04:latest
conda_file: ../../model-1/environment/conda.yaml
注册环境:
az ml environment create -n my-env -v 1 -f endpoints/online/managed/sample/environment.yml
有关如何将模型注册为资产的详细信息,请参阅 使用 Azure CLI 或 Python SDK 注册模型。 有关创建环境的详细信息,请参阅 “创建自定义环境”。
注册模型:
from azure.ai.ml.entities import Model
from azure.ai.ml.constants import AssetTypes

file_model = Model(
    path="../model-1/model/",
    type=AssetTypes.CUSTOM_MODEL,
    name="my-model",
    description="Model created from local file.",
)
ml_client.models.create_or_update(file_model)
注册环境:
from azure.ai.ml.entities import Environment

env_docker_conda = Environment(
    image="mcr.microsoft.com/azureml/openmpi4.1.0-ubuntu20.04",
    conda_file="../model-1/environment/conda.yaml",
    name="my-env",
    description="Environment created from a Docker image plus Conda environment.",
)
ml_client.environments.create_or_update(env_docker_conda)
若要了解如何将模型注册为资产,以便可以在部署期间指定其注册名称和版本,请参阅 使用 Azure CLI 或 Python SDK 注册模型。
有关创建环境的详细信息,请参阅 “创建自定义环境”。
注册模型
模型注册是工作区中的逻辑实体,可能包含单个模型文件或具有多个文件的目录。 作为生产最佳做法,请注册模型和环境。 在本文中创建终结点和部署之前,请注册包含模型的 模型文件夹 。
若要注册示例模型,请执行以下步骤:
转到 Azure 机器学习工作室。
在左窗格中,选择“ 模型 ”页。
选择注册,然后选择从本地文件。
为“模型类型”选择“未指定的类型”。
选择“浏览”,然后选择“浏览文件夹”。
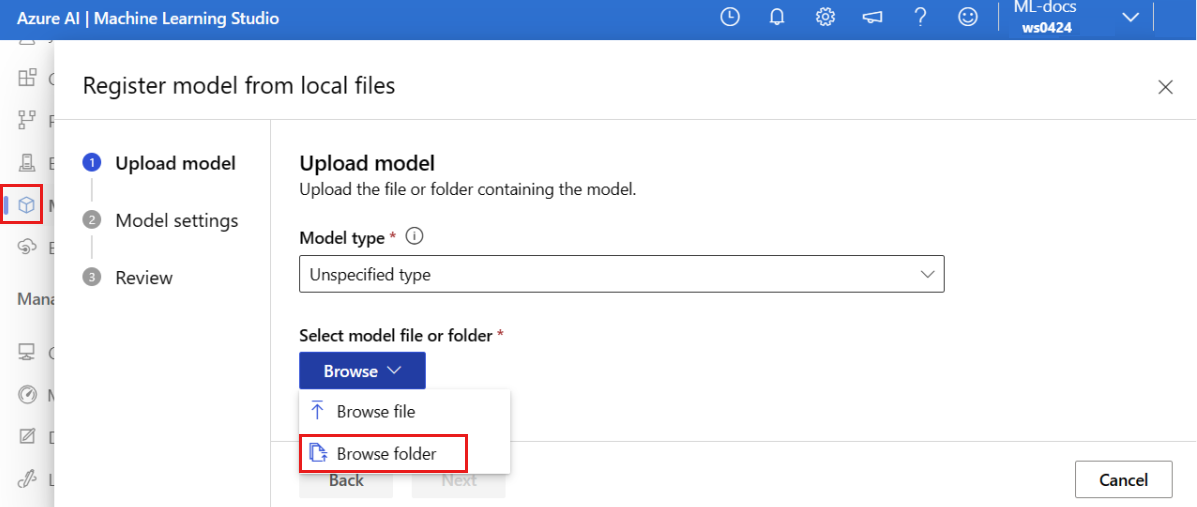
从之前克隆或下载的存储库的本地副本中选择 \azureml-examples\cli\endpoints\online\model-1\model 文件夹。 出现提示时,选择“ 上传 ”并等待上传完成。
选择“下一步”。
为模型输入一个易记名称。 本文中的步骤假定模型已命名 model-1。
选择“ 下一步”,然后选择“ 注册 ”以完成注册。
有关如何使用已注册模型的详细信息,请参阅 “使用已注册的模型”。
创建并注册环境
在左窗格中,选择“ 环境” 页。
选择“ 自定义环境 ”选项卡,然后选择“ 创建”。
在 “设置” 页上,输入一个名称,例如 适用于环境的 my-env 。
对于“选择环境源”,请选择“将现有 docker 映像与可选的 conda 源配合使用”。
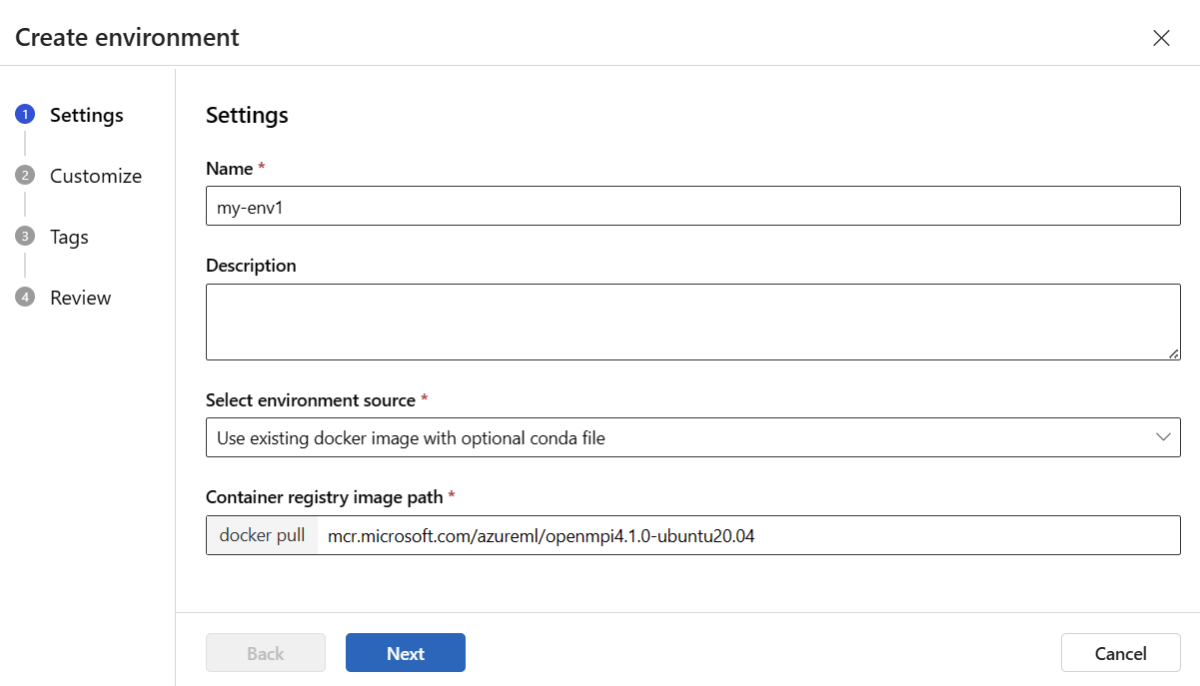
选择 “下一步 ”转到“ 自定义 ”页。
从之前克隆或下载的存储库中复制 \azureml-examples\cli\endpoints\online\model-1\environment\conda.yaml 文件的内容。
将内容粘贴到文本框中。
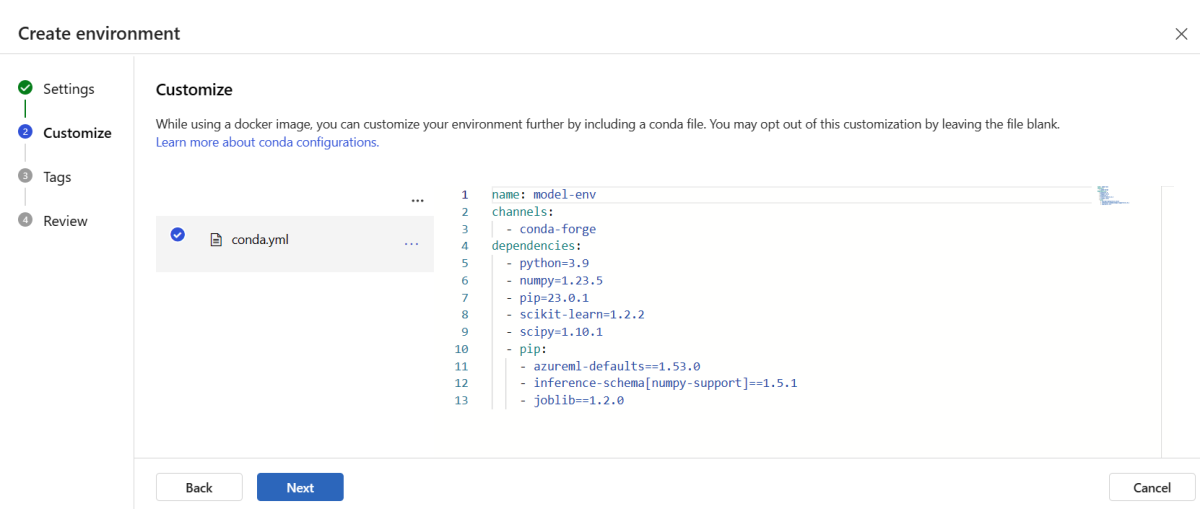
选择 “下一步 ”,直到到达 “创建 ”页面,然后选择“ 创建”。
有关如何在工作室中创建环境的详细信息,请参阅 “创建环境”。
- 若要使用模板注册模型,必须先将模型文件上传到 Blob 存储。 以下示例使用
az storage blob upload-batch 命令将文件上传到工作区的默认存储:
set -x

#<get_access_token>
TOKEN=$(az account get-access-token --query accessToken -o tsv)
#</get_access_token>

# <create_variables>
SUBSCRIPTION_ID=$(az account show --query id -o tsv)
LOCATION=$(az ml workspace show --query location -o tsv)
RESOURCE_GROUP=$(az group show --query name -o tsv)
WORKSPACE=$(az configure -l --query "[?name=='workspace'].value" -o tsv)
#</create_variables>

# <set_endpoint_name>
export ENDPOINT_NAME=endpoint-`echo $RANDOM`
# </set_endpoint_name>

#<api_version>
API_VERSION="2022-05-01"
#</api_version>

echo -e "Using:\nSUBSCRIPTION_ID=$SUBSCRIPTION_ID\nLOCATION=$LOCATION\nRESOURCE_GROUP=$RESOURCE_GROUP\nWORKSPACE=$WORKSPACE"

# define how to wait
wait_for_completion () {
    operation_id=$1
    status="unknown"

    if [[ $operation_id == "" || -z $operation_id  || $operation_id == "null" ]]; then
        echo "operation id cannot be empty"
        exit 1
    fi

    while [[ $status != "Succeeded" && $status != "Failed" ]]
    do
        echo "Getting operation status from: $operation_id"
        operation_result=$(curl --location --request GET $operation_id --header "Authorization: Bearer $TOKEN")
        # TODO error handling here
        status=$(echo $operation_result | jq -r '.status')
        echo "Current operation status: $status"
        sleep 5
    done

    if [[ $status == "Failed" ]]
    then
        error=$(echo $operation_result | jq -r '.error')
        echo "Error: $error"
    fi
}

# <get_storage_details>
# Get values for storage account
response=$(curl --location --request GET "https://management.chinacloudapi.cn/subscriptions/$SUBSCRIPTION_ID/resourceGroups/$RESOURCE_GROUP/providers/Microsoft.MachineLearningServices/workspaces/$WORKSPACE/datastores?api-version=$API_VERSION&isDefault=true" \
--header "Authorization: Bearer $TOKEN")
AZUREML_DEFAULT_DATASTORE=$(echo $response | jq -r '.value[0].name')
AZUREML_DEFAULT_CONTAINER=$(echo $response | jq -r '.value[0].properties.containerName')
export AZURE_STORAGE_ACCOUNT=$(echo $response | jq -r '.value[0].properties.accountName')
# </get_storage_details>

# <upload_code>
az storage blob upload-batch -d $AZUREML_DEFAULT_CONTAINER/score -s cli/endpoints/online/model-1/onlinescoring --account-name $AZURE_STORAGE_ACCOUNT
# </upload_code>

# <create_code>
az deployment group create -g $RESOURCE_GROUP \
--template-file arm-templates/code-version.json \
--parameters \
workspaceName=$WORKSPACE \
codeAssetName="score-sklearn" \
codeUri="https://$AZURE_STORAGE_ACCOUNT.blob.core.chinacloudapi.cn/$AZUREML_DEFAULT_CONTAINER/score"
# </create_code>

# <upload_model>
az storage blob upload-batch -d $AZUREML_DEFAULT_CONTAINER/model -s cli/endpoints/online/model-1/model --account-name $AZURE_STORAGE_ACCOUNT
# </upload_model>

# <create_model>
az deployment group create -g $RESOURCE_GROUP \
--template-file arm-templates/model-version.json \
--parameters \
workspaceName=$WORKSPACE \
modelAssetName="sklearn" \
modelUri="azureml://subscriptions/$SUBSCRIPTION_ID/resourceGroups/$RESOURCE_GROUP/workspaces/$WORKSPACE/datastores/$AZUREML_DEFAULT_DATASTORE/paths/model/sklearn_regression_model.pkl"
# </create_model>

# <read_condafile>
CONDA_FILE=$(cat cli/endpoints/online/model-1/environment/conda.yaml)
# </read_condafile>

# <create_environment>
ENV_VERSION=$RANDOM
az deployment group create -g $RESOURCE_GROUP \
--template-file arm-templates/environment-version.json \
--parameters \
workspaceName=$WORKSPACE \
environmentAssetName=sklearn-env \
environmentAssetVersion=$ENV_VERSION \
dockerImage=mcr.microsoft.com/azureml/openmpi3.1.2-ubuntu18.04:20210727.v1 \
condaFile="$CONDA_FILE"
# </create_environment>

# <create_endpoint>
az deployment group create -g $RESOURCE_GROUP \
--template-file arm-templates/online-endpoint.json \
--parameters \
workspaceName=$WORKSPACE \
onlineEndpointName=$ENDPOINT_NAME \
identityType=SystemAssigned \
authMode=AMLToken \
location=$LOCATION
# </create_endpoint>

# <get_endpoint>
response=$(curl --location --request GET "https://management.chinacloudapi.cn/subscriptions/$SUBSCRIPTION_ID/resourceGroups/$RESOURCE_GROUP/providers/Microsoft.MachineLearningServices/workspaces/$WORKSPACE/onlineEndpoints/$ENDPOINT_NAME?api-version=$API_VERSION" \
--header "Content-Type: application/json" \
--header "Authorization: Bearer $TOKEN")

operation_id=$(echo $response | jq -r '.properties.properties.AzureAsyncOperationUri')
wait_for_completion $operation_id
# </get_endpoint>

# <create_deployment>
resourceScope="/subscriptions/$SUBSCRIPTION_ID/resourceGroups/$RESOURCE_GROUP/providers/Microsoft.MachineLearningServices"
az deployment group create -g $RESOURCE_GROUP \
 --template-file arm-templates/online-endpoint-deployment.json \
 --parameters \
 workspaceName=$WORKSPACE \
 location=$LOCATION \
 onlineEndpointName=$ENDPOINT_NAME \
 onlineDeploymentName=blue \
 codeId="$resourceScope/workspaces/$WORKSPACE/codes/score-sklearn/versions/1" \
 scoringScript=score.py \
 environmentId="$resourceScope/workspaces/$WORKSPACE/environments/sklearn-env/versions/$ENV_VERSION" \
 model="$resourceScope/workspaces/$WORKSPACE/models/sklearn/versions/1" \
 endpointComputeType=Managed \
 skuName=Standard_F2s_v2 \
 skuCapacity=1
 # </create_deployment>

# <get_deployment>
response=$(curl --location --request GET "https://management.chinacloudapi.cn/subscriptions/$SUBSCRIPTION_ID/resourceGroups/$RESOURCE_GROUP/providers/Microsoft.MachineLearningServices/workspaces/$WORKSPACE/onlineEndpoints/$ENDPOINT_NAME/deployments/blue?api-version=$API_VERSION" \
--header "Content-Type: application/json" \
--header "Authorization: Bearer $TOKEN")

operation_id=$(echo $response | jq -r '.properties.properties.AzureAsyncOperationUri')
wait_for_completion $operation_id

scoringUri=$(echo $response | jq -r '.properties.scoringUri')
# </get_endpoint>

# <get_endpoint_access_token>
response=$(curl -H "Content-Length: 0" --location --request POST "https://management.chinacloudapi.cn/subscriptions/$SUBSCRIPTION_ID/resourceGroups/$RESOURCE_GROUP/providers/Microsoft.MachineLearningServices/workspaces/$WORKSPACE/onlineEndpoints/$ENDPOINT_NAME/token?api-version=$API_VERSION" \
--header "Authorization: Bearer $TOKEN")
accessToken=$(echo $response | jq -r '.accessToken')
# </get_endpoint_access_token>

# <score_endpoint>
curl --location --request POST $scoringUri \
--header "Authorization: Bearer $accessToken" \
--header "Content-Type: application/json" \
--data-raw @cli/endpoints/online/model-1/sample-request.json
# </score_endpoint>

# <get_deployment_logs>
curl --location --request POST "https://management.chinacloudapi.cn/subscriptions/$SUBSCRIPTION_ID/resourceGroups/$RESOURCE_GROUP/providers/Microsoft.MachineLearningServices/workspaces/$WORKSPACE/onlineEndpoints/$ENDPOINT_NAME/deployments/blue/getLogs?api-version=$API_VERSION" \
--header "Authorization: Bearer $TOKEN" \
--header "Content-Type: application/json" \
--data-raw "{ \"tail\": 100 }"
# </get_deployment_logs>

# <delete_endpoint>
curl --location --request DELETE "https://management.chinacloudapi.cn/subscriptions/$SUBSCRIPTION_ID/resourceGroups/$RESOURCE_GROUP/providers/Microsoft.MachineLearningServices/workspaces/$WORKSPACE/onlineEndpoints/$ENDPOINT_NAME?api-version=$API_VERSION" \
--header "Content-Type: application/json" \
--header "Authorization: Bearer $TOKEN" || true
# </delete_endpoint>
- 上传文件后,使用模板创建模型注册。 在以下示例中,
modelUri 参数包含模型的路径:
set -x

#<get_access_token>
TOKEN=$(az account get-access-token --query accessToken -o tsv)
#</get_access_token>

# <create_variables>
SUBSCRIPTION_ID=$(az account show --query id -o tsv)
LOCATION=$(az ml workspace show --query location -o tsv)
RESOURCE_GROUP=$(az group show --query name -o tsv)
WORKSPACE=$(az configure -l --query "[?name=='workspace'].value" -o tsv)
#</create_variables>

# <set_endpoint_name>
export ENDPOINT_NAME=endpoint-`echo $RANDOM`
# </set_endpoint_name>

#<api_version>
API_VERSION="2022-05-01"
#</api_version>

echo -e "Using:\nSUBSCRIPTION_ID=$SUBSCRIPTION_ID\nLOCATION=$LOCATION\nRESOURCE_GROUP=$RESOURCE_GROUP\nWORKSPACE=$WORKSPACE"

# define how to wait
wait_for_completion () {
    operation_id=$1
    status="unknown"

    if [[ $operation_id == "" || -z $operation_id  || $operation_id == "null" ]]; then
        echo "operation id cannot be empty"
        exit 1
    fi

    while [[ $status != "Succeeded" && $status != "Failed" ]]
    do
        echo "Getting operation status from: $operation_id"
        operation_result=$(curl --location --request GET $operation_id --header "Authorization: Bearer $TOKEN")
        # TODO error handling here
        status=$(echo $operation_result | jq -r '.status')
        echo "Current operation status: $status"
        sleep 5
    done

    if [[ $status == "Failed" ]]
    then
        error=$(echo $operation_result | jq -r '.error')
        echo "Error: $error"
    fi
}

# <get_storage_details>
# Get values for storage account
response=$(curl --location --request GET "https://management.chinacloudapi.cn/subscriptions/$SUBSCRIPTION_ID/resourceGroups/$RESOURCE_GROUP/providers/Microsoft.MachineLearningServices/workspaces/$WORKSPACE/datastores?api-version=$API_VERSION&isDefault=true" \
--header "Authorization: Bearer $TOKEN")
AZUREML_DEFAULT_DATASTORE=$(echo $response | jq -r '.value[0].name')
AZUREML_DEFAULT_CONTAINER=$(echo $response | jq -r '.value[0].properties.containerName')
export AZURE_STORAGE_ACCOUNT=$(echo $response | jq -r '.value[0].properties.accountName')
# </get_storage_details>

# <upload_code>
az storage blob upload-batch -d $AZUREML_DEFAULT_CONTAINER/score -s cli/endpoints/online/model-1/onlinescoring --account-name $AZURE_STORAGE_ACCOUNT
# </upload_code>

# <create_code>
az deployment group create -g $RESOURCE_GROUP \
--template-file arm-templates/code-version.json \
--parameters \
workspaceName=$WORKSPACE \
codeAssetName="score-sklearn" \
codeUri="https://$AZURE_STORAGE_ACCOUNT.blob.core.chinacloudapi.cn/$AZUREML_DEFAULT_CONTAINER/score"
# </create_code>

# <upload_model>
az storage blob upload-batch -d $AZUREML_DEFAULT_CONTAINER/model -s cli/endpoints/online/model-1/model --account-name $AZURE_STORAGE_ACCOUNT
# </upload_model>

# <create_model>
az deployment group create -g $RESOURCE_GROUP \
--template-file arm-templates/model-version.json \
--parameters \
workspaceName=$WORKSPACE \
modelAssetName="sklearn" \
modelUri="azureml://subscriptions/$SUBSCRIPTION_ID/resourceGroups/$RESOURCE_GROUP/workspaces/$WORKSPACE/datastores/$AZUREML_DEFAULT_DATASTORE/paths/model/sklearn_regression_model.pkl"
# </create_model>

# <read_condafile>
CONDA_FILE=$(cat cli/endpoints/online/model-1/environment/conda.yaml)
# </read_condafile>

# <create_environment>
ENV_VERSION=$RANDOM
az deployment group create -g $RESOURCE_GROUP \
--template-file arm-templates/environment-version.json \
--parameters \
workspaceName=$WORKSPACE \
environmentAssetName=sklearn-env \
environmentAssetVersion=$ENV_VERSION \
dockerImage=mcr.microsoft.com/azureml/openmpi3.1.2-ubuntu18.04:20210727.v1 \
condaFile="$CONDA_FILE"
# </create_environment>

# <create_endpoint>
az deployment group create -g $RESOURCE_GROUP \
--template-file arm-templates/online-endpoint.json \
--parameters \
workspaceName=$WORKSPACE \
onlineEndpointName=$ENDPOINT_NAME \
identityType=SystemAssigned \
authMode=AMLToken \
location=$LOCATION
# </create_endpoint>

# <get_endpoint>
response=$(curl --location --request GET "https://management.chinacloudapi.cn/subscriptions/$SUBSCRIPTION_ID/resourceGroups/$RESOURCE_GROUP/providers/Microsoft.MachineLearningServices/workspaces/$WORKSPACE/onlineEndpoints/$ENDPOINT_NAME?api-version=$API_VERSION" \
--header "Content-Type: application/json" \
--header "Authorization: Bearer $TOKEN")

operation_id=$(echo $response | jq -r '.properties.properties.AzureAsyncOperationUri')
wait_for_completion $operation_id
# </get_endpoint>

# <create_deployment>
resourceScope="/subscriptions/$SUBSCRIPTION_ID/resourceGroups/$RESOURCE_GROUP/providers/Microsoft.MachineLearningServices"
az deployment group create -g $RESOURCE_GROUP \
 --template-file arm-templates/online-endpoint-deployment.json \
 --parameters \
 workspaceName=$WORKSPACE \
 location=$LOCATION \
 onlineEndpointName=$ENDPOINT_NAME \
 onlineDeploymentName=blue \
 codeId="$resourceScope/workspaces/$WORKSPACE/codes/score-sklearn/versions/1" \
 scoringScript=score.py \
 environmentId="$resourceScope/workspaces/$WORKSPACE/environments/sklearn-env/versions/$ENV_VERSION" \
 model="$resourceScope/workspaces/$WORKSPACE/models/sklearn/versions/1" \
 endpointComputeType=Managed \
 skuName=Standard_F2s_v2 \
 skuCapacity=1
 # </create_deployment>

# <get_deployment>
response=$(curl --location --request GET "https://management.chinacloudapi.cn/subscriptions/$SUBSCRIPTION_ID/resourceGroups/$RESOURCE_GROUP/providers/Microsoft.MachineLearningServices/workspaces/$WORKSPACE/onlineEndpoints/$ENDPOINT_NAME/deployments/blue?api-version=$API_VERSION" \
--header "Content-Type: application/json" \
--header "Authorization: Bearer $TOKEN")

operation_id=$(echo $response | jq -r '.properties.properties.AzureAsyncOperationUri')
wait_for_completion $operation_id

scoringUri=$(echo $response | jq -r '.properties.scoringUri')
# </get_endpoint>

# <get_endpoint_access_token>
response=$(curl -H "Content-Length: 0" --location --request POST "https://management.chinacloudapi.cn/subscriptions/$SUBSCRIPTION_ID/resourceGroups/$RESOURCE_GROUP/providers/Microsoft.MachineLearningServices/workspaces/$WORKSPACE/onlineEndpoints/$ENDPOINT_NAME/token?api-version=$API_VERSION" \
--header "Authorization: Bearer $TOKEN")
accessToken=$(echo $response | jq -r '.accessToken')
# </get_endpoint_access_token>

# <score_endpoint>
curl --location --request POST $scoringUri \
--header "Authorization: Bearer $accessToken" \
--header "Content-Type: application/json" \
--data-raw @cli/endpoints/online/model-1/sample-request.json
# </score_endpoint>

# <get_deployment_logs>
curl --location --request POST "https://management.chinacloudapi.cn/subscriptions/$SUBSCRIPTION_ID/resourceGroups/$RESOURCE_GROUP/providers/Microsoft.MachineLearningServices/workspaces/$WORKSPACE/onlineEndpoints/$ENDPOINT_NAME/deployments/blue/getLogs?api-version=$API_VERSION" \
--header "Authorization: Bearer $TOKEN" \
--header "Content-Type: application/json" \
--data-raw "{ \"tail\": 100 }"
# </get_deployment_logs>

# <delete_endpoint>
curl --location --request DELETE "https://management.chinacloudapi.cn/subscriptions/$SUBSCRIPTION_ID/resourceGroups/$RESOURCE_GROUP/providers/Microsoft.MachineLearningServices/workspaces/$WORKSPACE/onlineEndpoints/$ENDPOINT_NAME?api-version=$API_VERSION" \
--header "Content-Type: application/json" \
--header "Authorization: Bearer $TOKEN" || true
# </delete_endpoint>
- 环境的一部分是一个 conda 文件,它指定托管模型所需的模型依赖项。 以下示例演示如何将 conda 文件的内容读取到环境变量中:
set -x

#<get_access_token>
TOKEN=$(az account get-access-token --query accessToken -o tsv)
#</get_access_token>

# <create_variables>
SUBSCRIPTION_ID=$(az account show --query id -o tsv)
LOCATION=$(az ml workspace show --query location -o tsv)
RESOURCE_GROUP=$(az group show --query name -o tsv)
WORKSPACE=$(az configure -l --query "[?name=='workspace'].value" -o tsv)
#</create_variables>

# <set_endpoint_name>
export ENDPOINT_NAME=endpoint-`echo $RANDOM`
# </set_endpoint_name>

#<api_version>
API_VERSION="2022-05-01"
#</api_version>

echo -e "Using:\nSUBSCRIPTION_ID=$SUBSCRIPTION_ID\nLOCATION=$LOCATION\nRESOURCE_GROUP=$RESOURCE_GROUP\nWORKSPACE=$WORKSPACE"

# define how to wait
wait_for_completion () {
    operation_id=$1
    status="unknown"

    if [[ $operation_id == "" || -z $operation_id  || $operation_id == "null" ]]; then
        echo "operation id cannot be empty"
        exit 1
    fi

    while [[ $status != "Succeeded" && $status != "Failed" ]]
    do
        echo "Getting operation status from: $operation_id"
        operation_result=$(curl --location --request GET $operation_id --header "Authorization: Bearer $TOKEN")
        # TODO error handling here
        status=$(echo $operation_result | jq -r '.status')
        echo "Current operation status: $status"
        sleep 5
    done

    if [[ $status == "Failed" ]]
    then
        error=$(echo $operation_result | jq -r '.error')
        echo "Error: $error"
    fi
}

# <get_storage_details>
# Get values for storage account
response=$(curl --location --request GET "https://management.chinacloudapi.cn/subscriptions/$SUBSCRIPTION_ID/resourceGroups/$RESOURCE_GROUP/providers/Microsoft.MachineLearningServices/workspaces/$WORKSPACE/datastores?api-version=$API_VERSION&isDefault=true" \
--header "Authorization: Bearer $TOKEN")
AZUREML_DEFAULT_DATASTORE=$(echo $response | jq -r '.value[0].name')
AZUREML_DEFAULT_CONTAINER=$(echo $response | jq -r '.value[0].properties.containerName')
export AZURE_STORAGE_ACCOUNT=$(echo $response | jq -r '.value[0].properties.accountName')
# </get_storage_details>

# <upload_code>
az storage blob upload-batch -d $AZUREML_DEFAULT_CONTAINER/score -s cli/endpoints/online/model-1/onlinescoring --account-name $AZURE_STORAGE_ACCOUNT
# </upload_code>

# <create_code>
az deployment group create -g $RESOURCE_GROUP \
--template-file arm-templates/code-version.json \
--parameters \
workspaceName=$WORKSPACE \
codeAssetName="score-sklearn" \
codeUri="https://$AZURE_STORAGE_ACCOUNT.blob.core.chinacloudapi.cn/$AZUREML_DEFAULT_CONTAINER/score"
# </create_code>

# <upload_model>
az storage blob upload-batch -d $AZUREML_DEFAULT_CONTAINER/model -s cli/endpoints/online/model-1/model --account-name $AZURE_STORAGE_ACCOUNT
# </upload_model>

# <create_model>
az deployment group create -g $RESOURCE_GROUP \
--template-file arm-templates/model-version.json \
--parameters \
workspaceName=$WORKSPACE \
modelAssetName="sklearn" \
modelUri="azureml://subscriptions/$SUBSCRIPTION_ID/resourceGroups/$RESOURCE_GROUP/workspaces/$WORKSPACE/datastores/$AZUREML_DEFAULT_DATASTORE/paths/model/sklearn_regression_model.pkl"
# </create_model>

# <read_condafile>
CONDA_FILE=$(cat cli/endpoints/online/model-1/environment/conda.yaml)
# </read_condafile>

# <create_environment>
ENV_VERSION=$RANDOM
az deployment group create -g $RESOURCE_GROUP \
--template-file arm-templates/environment-version.json \
--parameters \
workspaceName=$WORKSPACE \
environmentAssetName=sklearn-env \
environmentAssetVersion=$ENV_VERSION \
dockerImage=mcr.microsoft.com/azureml/openmpi3.1.2-ubuntu18.04:20210727.v1 \
condaFile="$CONDA_FILE"
# </create_environment>

# <create_endpoint>
az deployment group create -g $RESOURCE_GROUP \
--template-file arm-templates/online-endpoint.json \
--parameters \
workspaceName=$WORKSPACE \
onlineEndpointName=$ENDPOINT_NAME \
identityType=SystemAssigned \
authMode=AMLToken \
location=$LOCATION
# </create_endpoint>

# <get_endpoint>
response=$(curl --location --request GET "https://management.chinacloudapi.cn/subscriptions/$SUBSCRIPTION_ID/resourceGroups/$RESOURCE_GROUP/providers/Microsoft.MachineLearningServices/workspaces/$WORKSPACE/onlineEndpoints/$ENDPOINT_NAME?api-version=$API_VERSION" \
--header "Content-Type: application/json" \
--header "Authorization: Bearer $TOKEN")

operation_id=$(echo $response | jq -r '.properties.properties.AzureAsyncOperationUri')
wait_for_completion $operation_id
# </get_endpoint>

# <create_deployment>
resourceScope="/subscriptions/$SUBSCRIPTION_ID/resourceGroups/$RESOURCE_GROUP/providers/Microsoft.MachineLearningServices"
az deployment group create -g $RESOURCE_GROUP \
 --template-file arm-templates/online-endpoint-deployment.json \
 --parameters \
 workspaceName=$WORKSPACE \
 location=$LOCATION \
 onlineEndpointName=$ENDPOINT_NAME \
 onlineDeploymentName=blue \
 codeId="$resourceScope/workspaces/$WORKSPACE/codes/score-sklearn/versions/1" \
 scoringScript=score.py \
 environmentId="$resourceScope/workspaces/$WORKSPACE/environments/sklearn-env/versions/$ENV_VERSION" \
 model="$resourceScope/workspaces/$WORKSPACE/models/sklearn/versions/1" \
 endpointComputeType=Managed \
 skuName=Standard_F2s_v2 \
 skuCapacity=1
 # </create_deployment>

# <get_deployment>
response=$(curl --location --request GET "https://management.chinacloudapi.cn/subscriptions/$SUBSCRIPTION_ID/resourceGroups/$RESOURCE_GROUP/providers/Microsoft.MachineLearningServices/workspaces/$WORKSPACE/onlineEndpoints/$ENDPOINT_NAME/deployments/blue?api-version=$API_VERSION" \
--header "Content-Type: application/json" \
--header "Authorization: Bearer $TOKEN")

operation_id=$(echo $response | jq -r '.properties.properties.AzureAsyncOperationUri')
wait_for_completion $operation_id

scoringUri=$(echo $response | jq -r '.properties.scoringUri')
# </get_endpoint>

# <get_endpoint_access_token>
response=$(curl -H "Content-Length: 0" --location --request POST "https://management.chinacloudapi.cn/subscriptions/$SUBSCRIPTION_ID/resourceGroups/$RESOURCE_GROUP/providers/Microsoft.MachineLearningServices/workspaces/$WORKSPACE/onlineEndpoints/$ENDPOINT_NAME/token?api-version=$API_VERSION" \
--header "Authorization: Bearer $TOKEN")
accessToken=$(echo $response | jq -r '.accessToken')
# </get_endpoint_access_token>

# <score_endpoint>
curl --location --request POST $scoringUri \
--header "Authorization: Bearer $accessToken" \
--header "Content-Type: application/json" \
--data-raw @cli/endpoints/online/model-1/sample-request.json
# </score_endpoint>

# <get_deployment_logs>
curl --location --request POST "https://management.chinacloudapi.cn/subscriptions/$SUBSCRIPTION_ID/resourceGroups/$RESOURCE_GROUP/providers/Microsoft.MachineLearningServices/workspaces/$WORKSPACE/onlineEndpoints/$ENDPOINT_NAME/deployments/blue/getLogs?api-version=$API_VERSION" \
--header "Authorization: Bearer $TOKEN" \
--header "Content-Type: application/json" \
--data-raw "{ \"tail\": 100 }"
# </get_deployment_logs>

# <delete_endpoint>
curl --location --request DELETE "https://management.chinacloudapi.cn/subscriptions/$SUBSCRIPTION_ID/resourceGroups/$RESOURCE_GROUP/providers/Microsoft.MachineLearningServices/workspaces/$WORKSPACE/onlineEndpoints/$ENDPOINT_NAME?api-version=$API_VERSION" \
--header "Content-Type: application/json" \
--header "Authorization: Bearer $TOKEN" || true
# </delete_endpoint>
- 以下示例演示如何使用模板注册环境。 在上一步中,使用参数
condaFile 将 conda 文件的内容传递给模板。
set -x

#<get_access_token>
TOKEN=$(az account get-access-token --query accessToken -o tsv)
#</get_access_token>

# <create_variables>
SUBSCRIPTION_ID=$(az account show --query id -o tsv)
LOCATION=$(az ml workspace show --query location -o tsv)
RESOURCE_GROUP=$(az group show --query name -o tsv)
WORKSPACE=$(az configure -l --query "[?name=='workspace'].value" -o tsv)
#</create_variables>

# <set_endpoint_name>
export ENDPOINT_NAME=endpoint-`echo $RANDOM`
# </set_endpoint_name>

#<api_version>
API_VERSION="2022-05-01"
#</api_version>

echo -e "Using:\nSUBSCRIPTION_ID=$SUBSCRIPTION_ID\nLOCATION=$LOCATION\nRESOURCE_GROUP=$RESOURCE_GROUP\nWORKSPACE=$WORKSPACE"

# define how to wait
wait_for_completion () {
    operation_id=$1
    status="unknown"

    if [[ $operation_id == "" || -z $operation_id  || $operation_id == "null" ]]; then
        echo "operation id cannot be empty"
        exit 1
    fi

    while [[ $status != "Succeeded" && $status != "Failed" ]]
    do
        echo "Getting operation status from: $operation_id"
        operation_result=$(curl --location --request GET $operation_id --header "Authorization: Bearer $TOKEN")
        # TODO error handling here
        status=$(echo $operation_result | jq -r '.status')
        echo "Current operation status: $status"
        sleep 5
    done

    if [[ $status == "Failed" ]]
    then
        error=$(echo $operation_result | jq -r '.error')
        echo "Error: $error"
    fi
}

# <get_storage_details>
# Get values for storage account
response=$(curl --location --request GET "https://management.chinacloudapi.cn/subscriptions/$SUBSCRIPTION_ID/resourceGroups/$RESOURCE_GROUP/providers/Microsoft.MachineLearningServices/workspaces/$WORKSPACE/datastores?api-version=$API_VERSION&isDefault=true" \
--header "Authorization: Bearer $TOKEN")
AZUREML_DEFAULT_DATASTORE=$(echo $response | jq -r '.value[0].name')
AZUREML_DEFAULT_CONTAINER=$(echo $response | jq -r '.value[0].properties.containerName')
export AZURE_STORAGE_ACCOUNT=$(echo $response | jq -r '.value[0].properties.accountName')
# </get_storage_details>

# <upload_code>
az storage blob upload-batch -d $AZUREML_DEFAULT_CONTAINER/score -s cli/endpoints/online/model-1/onlinescoring --account-name $AZURE_STORAGE_ACCOUNT
# </upload_code>

# <create_code>
az deployment group create -g $RESOURCE_GROUP \
--template-file arm-templates/code-version.json \
--parameters \
workspaceName=$WORKSPACE \
codeAssetName="score-sklearn" \
codeUri="https://$AZURE_STORAGE_ACCOUNT.blob.core.chinacloudapi.cn/$AZUREML_DEFAULT_CONTAINER/score"
# </create_code>

# <upload_model>
az storage blob upload-batch -d $AZUREML_DEFAULT_CONTAINER/model -s cli/endpoints/online/model-1/model --account-name $AZURE_STORAGE_ACCOUNT
# </upload_model>

# <create_model>
az deployment group create -g $RESOURCE_GROUP \
--template-file arm-templates/model-version.json \
--parameters \
workspaceName=$WORKSPACE \
modelAssetName="sklearn" \
modelUri="azureml://subscriptions/$SUBSCRIPTION_ID/resourceGroups/$RESOURCE_GROUP/workspaces/$WORKSPACE/datastores/$AZUREML_DEFAULT_DATASTORE/paths/model/sklearn_regression_model.pkl"
# </create_model>

# <read_condafile>
CONDA_FILE=$(cat cli/endpoints/online/model-1/environment/conda.yaml)
# </read_condafile>

# <create_environment>
ENV_VERSION=$RANDOM
az deployment group create -g $RESOURCE_GROUP \
--template-file arm-templates/environment-version.json \
--parameters \
workspaceName=$WORKSPACE \
environmentAssetName=sklearn-env \
environmentAssetVersion=$ENV_VERSION \
dockerImage=mcr.microsoft.com/azureml/openmpi3.1.2-ubuntu18.04:20210727.v1 \
condaFile="$CONDA_FILE"
# </create_environment>

# <create_endpoint>
az deployment group create -g $RESOURCE_GROUP \
--template-file arm-templates/online-endpoint.json \
--parameters \
workspaceName=$WORKSPACE \
onlineEndpointName=$ENDPOINT_NAME \
identityType=SystemAssigned \
authMode=AMLToken \
location=$LOCATION
# </create_endpoint>

# <get_endpoint>
response=$(curl --location --request GET "https://management.chinacloudapi.cn/subscriptions/$SUBSCRIPTION_ID/resourceGroups/$RESOURCE_GROUP/providers/Microsoft.MachineLearningServices/workspaces/$WORKSPACE/onlineEndpoints/$ENDPOINT_NAME?api-version=$API_VERSION" \
--header "Content-Type: application/json" \
--header "Authorization: Bearer $TOKEN")

operation_id=$(echo $response | jq -r '.properties.properties.AzureAsyncOperationUri')
wait_for_completion $operation_id
# </get_endpoint>

# <create_deployment>
resourceScope="/subscriptions/$SUBSCRIPTION_ID/resourceGroups/$RESOURCE_GROUP/providers/Microsoft.MachineLearningServices"
az deployment group create -g $RESOURCE_GROUP \
 --template-file arm-templates/online-endpoint-deployment.json \
 --parameters \
 workspaceName=$WORKSPACE \
 location=$LOCATION \
 onlineEndpointName=$ENDPOINT_NAME \
 onlineDeploymentName=blue \
 codeId="$resourceScope/workspaces/$WORKSPACE/codes/score-sklearn/versions/1" \
 scoringScript=score.py \
 environmentId="$resourceScope/workspaces/$WORKSPACE/environments/sklearn-env/versions/$ENV_VERSION" \
 model="$resourceScope/workspaces/$WORKSPACE/models/sklearn/versions/1" \
 endpointComputeType=Managed \
 skuName=Standard_F2s_v2 \
 skuCapacity=1
 # </create_deployment>

# <get_deployment>
response=$(curl --location --request GET "https://management.chinacloudapi.cn/subscriptions/$SUBSCRIPTION_ID/resourceGroups/$RESOURCE_GROUP/providers/Microsoft.MachineLearningServices/workspaces/$WORKSPACE/onlineEndpoints/$ENDPOINT_NAME/deployments/blue?api-version=$API_VERSION" \
--header "Content-Type: application/json" \
--header "Authorization: Bearer $TOKEN")

operation_id=$(echo $response | jq -r '.properties.properties.AzureAsyncOperationUri')
wait_for_completion $operation_id

scoringUri=$(echo $response | jq -r '.properties.scoringUri')
# </get_endpoint>

# <get_endpoint_access_token>
response=$(curl -H "Content-Length: 0" --location --request POST "https://management.chinacloudapi.cn/subscriptions/$SUBSCRIPTION_ID/resourceGroups/$RESOURCE_GROUP/providers/Microsoft.MachineLearningServices/workspaces/$WORKSPACE/onlineEndpoints/$ENDPOINT_NAME/token?api-version=$API_VERSION" \
--header "Authorization: Bearer $TOKEN")
accessToken=$(echo $response | jq -r '.accessToken')
# </get_endpoint_access_token>

# <score_endpoint>
curl --location --request POST $scoringUri \
--header "Authorization: Bearer $accessToken" \
--header "Content-Type: application/json" \
--data-raw @cli/endpoints/online/model-1/sample-request.json
# </score_endpoint>

# <get_deployment_logs>
curl --location --request POST "https://management.chinacloudapi.cn/subscriptions/$SUBSCRIPTION_ID/resourceGroups/$RESOURCE_GROUP/providers/Microsoft.MachineLearningServices/workspaces/$WORKSPACE/onlineEndpoints/$ENDPOINT_NAME/deployments/blue/getLogs?api-version=$API_VERSION" \
--header "Authorization: Bearer $TOKEN" \
--header "Content-Type: application/json" \
--data-raw "{ \"tail\": 100 }"
# </get_deployment_logs>

# <delete_endpoint>
curl --location --request DELETE "https://management.chinacloudapi.cn/subscriptions/$SUBSCRIPTION_ID/resourceGroups/$RESOURCE_GROUP/providers/Microsoft.MachineLearningServices/workspaces/$WORKSPACE/onlineEndpoints/$ENDPOINT_NAME?api-version=$API_VERSION" \
--header "Content-Type: application/json" \
--header "Authorization: Bearer $TOKEN" || true
# </delete_endpoint>
重要
为部署定义自定义环境时,请确保 azureml-inference-server-http 包包含在 conda 文件中。 此包对于推理服务器正常运行至关重要。 如果你不熟悉如何创建自己的自定义环境,请使用我们的特选环境之一,例如 minimal-py-inference (对于不使用 mlflow的自定义模型)或 mlflow-py-inference (用于使用 mlflow模型)。 可以在 Azure 机器学习工作室实例的“ 环境 ”选项卡上找到这些特选环境。
部署配置使用要部署的已注册模型和已注册的环境。
在部署定义中使用注册资产(模型和环境)。 以下代码片段显示了 endpoints/online/managed/sample/blue-deployment-with-registered-assets.yml 文件,其中包含配置部署所需的所有输入:
$schema: https://azuremlschemas.azureedge.net/latest/managedOnlineDeployment.schema.json
name: blue
endpoint_name: my-endpoint
model: azureml:my-model:1
code_configuration:
  code: ../../model-1/onlinescoring/
  scoring_script: score.py
environment: azureml:my-env:1
instance_type: Standard_DS3_v2
instance_count: 1
若要配置部署,请使用注册的模型和环境:
model = "azureml:my-model:1"
env = "azureml:my-env:1"

blue_deployment_with_registered_assets = ManagedOnlineDeployment(
    name="blue",
    endpoint_name=endpoint_name,
    model=model,
    environment=env,
    code_configuration=CodeConfiguration(
        code="../model-1/onlinescoring", scoring_script="score.py"
    ),
    instance_type="Standard_DS3_v2",
    instance_count=1,
)
从工作室部署时,将创建一个终结点和一个要添加到其中的部署。 此时,系统会提示输入终结点和部署的名称。
使用不同的 CPU 和 GPU 实例类型及映像
可以在部署定义中为本地部署和部署到 Azure 指定 CPU 或 GPU 实例类型和映像。
blue-deployment-with-registered-assets.yml 文件中的部署定义使用了通用型 实例和非 GPU Docker 映像 Standard_DS3_v2。mcr.microsoft.com/azureml/openmpi4.1.0-ubuntu20.04:latest 对于 GPU 计算,请选择 GPU 计算类型版本和 GPU Docker 映像。
有关受支持的常规用途和 GPU 实例类型,请参阅 托管联机终结点 SKU 列表。 有关 Azure 机器学习 CPU 和 GPU 基础映像的列表,请参阅 Azure 机器学习基础映像。
可以在部署配置中为本地部署和部署到 Azure 指定 CPU 或 GPU 实例类型和映像。
你先前配置了一个使用通用类型 Standard_DS3_v2 实例和非 GPU Docker 映像 mcr.microsoft.com/azureml/openmpi4.1.0-ubuntu20.04:latest 的部署。 对于 GPU 计算,请选择 GPU 计算类型版本和 GPU Docker 映像。
有关受支持的常规用途和 GPU 实例类型,请参阅 托管联机终结点 SKU 列表。 有关 Azure 机器学习 CPU 和 GPU 基础映像的列表,请参阅 Azure 机器学习基础映像。
在前一个环境注册中,通过使用 mcr.microsoft.com/azureml/openmpi3.1.2-ubuntu18.04 参数将值传递给 environment-version.json 模板,指定了一个非 GPU 的 Docker 镜像 dockerImage。 对于 GPU 计算,将 GPU Docker 映像的值提供给模板(使用 dockerImage 参数),并向模板提供 GPU 计算类型版本 online-endpoint-deployment.json (使用 skuName 参数)。
有关受支持的常规用途和 GPU 实例类型,请参阅 托管联机终结点 SKU 列表。 有关 Azure 机器学习 CPU 和 GPU 基础映像的列表,请参阅 Azure 机器学习基础映像。
接下来,将联机终结点部署到 Azure。
“部署到 Azure”
在 Azure 云中创建终结点:
az ml online-endpoint create --name $ENDPOINT_NAME -f endpoints/online/managed/sample/endpoint.yml
创建终结点下名为 blue 的部署:
az ml online-deployment create --name blue --endpoint $ENDPOINT_NAME -f endpoints/online/managed/sample/blue-deployment-with-registered-assets.yml --all-traffic
创建此项部署最多可能需要约 15 分钟,具体取决于是否为首次构建基础环境或映像。 使用相同环境的后续部署将更快完成处理。
如果你不希望阻塞 CLI 控制台,可将 --no-wait 标志添加到命令中。 但是,此选项停止部署状态的交互式显示。
用于创建部署的代码 --all-traffic 中的 az ml online-deployment create 标志会将 100% 的终结点流量分配给新创建的蓝色部署。 使用此标志有助于开发和测试目的,但对于生产,你可能希望通过显式命令将流量路由到新部署。 例如,使用 az ml online-endpoint update -n $ENDPOINT_NAME --traffic "blue=100"。
创建终结点:
通过使用 endpoint 前面定义的参数和 MLClient 之前创建的参数,现在可以在工作区中创建终结点。 此命令会启动终结点创建操作,并在终结点创建操作继续时返回确认响应。
ml_client.online_endpoints.begin_create_or_update(endpoint)
创建部署:
通过使用 blue_deployment_with_registered_assets 前面定义的参数和 MLClient 之前创建的参数,现在可以在工作区中创建部署。 此命令将启动部署创建操作,并在部署创建操作继续时返回确认响应。
ml_client.online_deployments.begin_create_or_update(blue_deployment_with_registered_assets)
如果你不希望阻塞 Python 控制台,可以将 no_wait=True 标志添加到参数中。 但是,此选项停止部署状态的交互式显示。
# blue deployment takes 100 traffic
endpoint.traffic = {"blue": 100}
ml_client.online_endpoints.begin_create_or_update(endpoint)
创建托管联机终结点和部署
直接在浏览器中使用工作室创建托管联机终结点。 在工作室中创建托管联机终结点时,必须定义初始部署。 不能创建空的托管联机终结点。
创建托管联机终结点的一种方式是通过工作室中的“模型”页。 此方法也提供将模型添加到现有托管联机部署的简单方法。 若要部署之前在“注册您的模型和环境”部分中注册的名为 model-1 的模型,请执行以下操作:
转到 Azure 机器学习工作室。
在左窗格中,选择“ 模型 ”页。
选择名为 model-1 的模型。
选择“部署”>“实时终结点”。
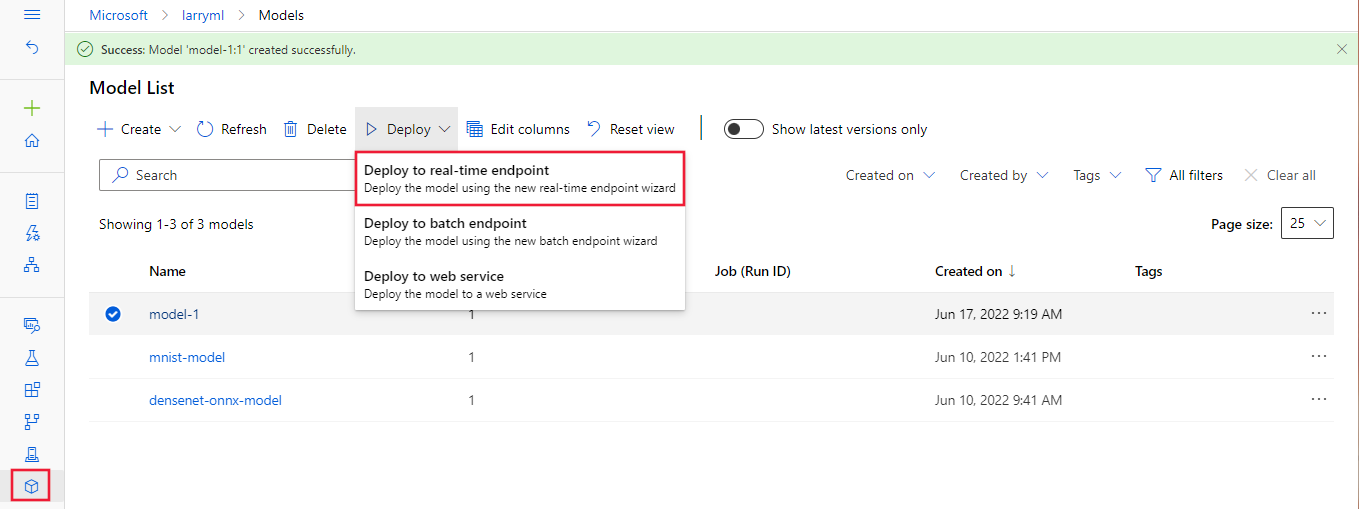
此操作将打开一个窗口,可在其中指定有关终结点的详细信息。
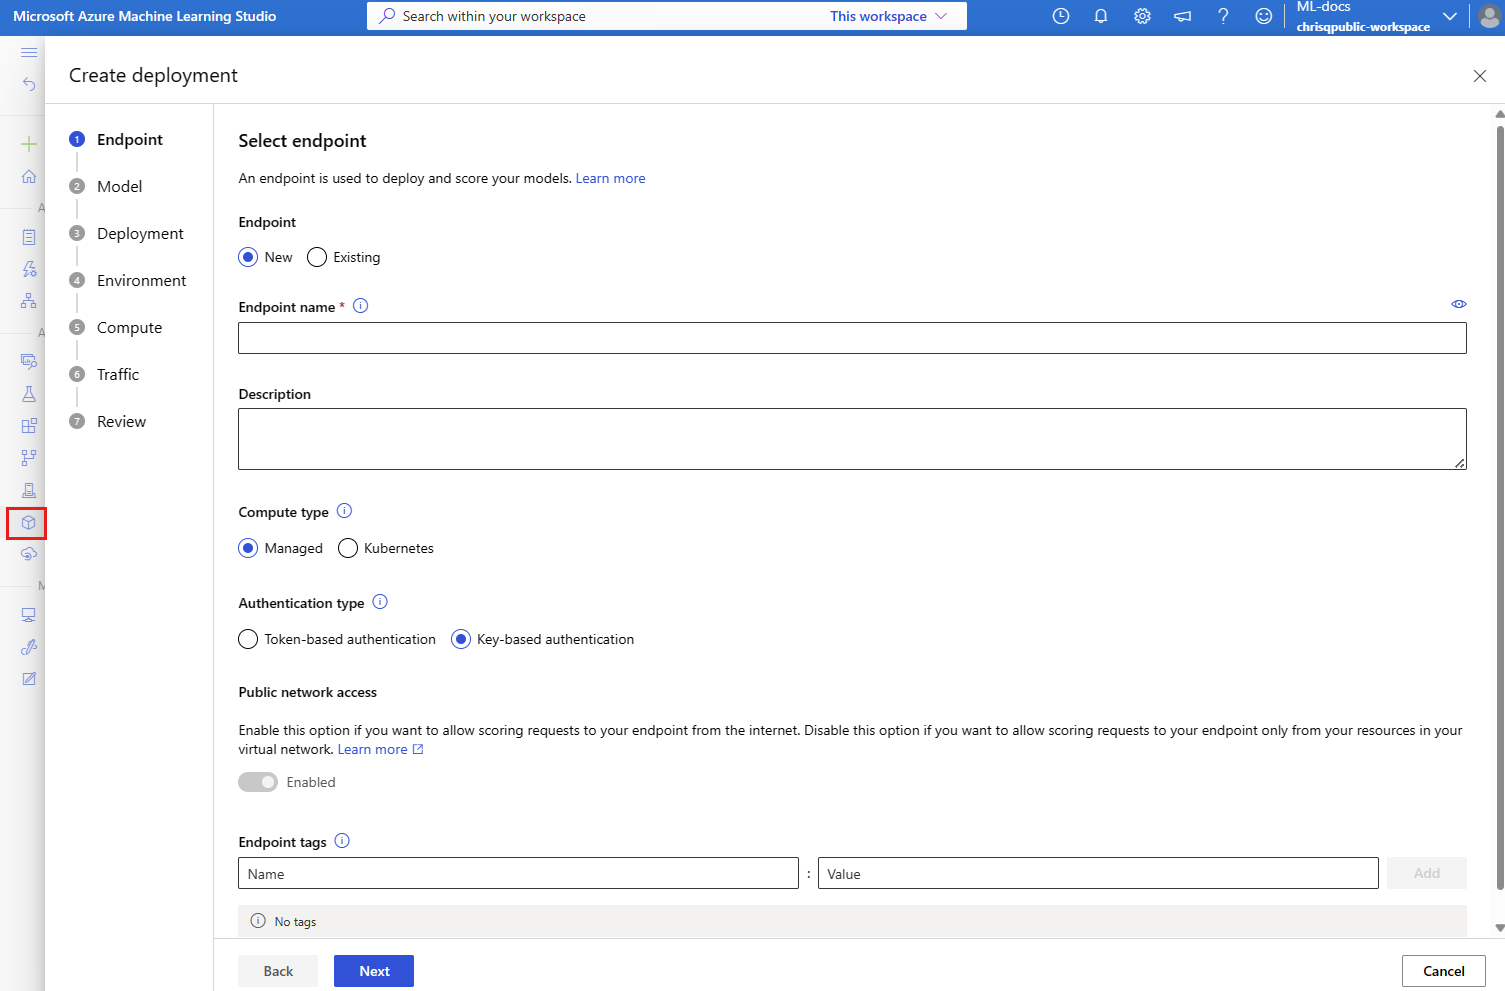
输入 Azure 区域中唯一的终结点名称。 有关命名规则的详细信息,请参阅 终结点限制。
保留默认选择:针对计算类型进行管理。
保留默认选择:身份验证类型为“基于密钥的身份验证”。 有关身份验证的详细信息,请参阅 对联机终结点的客户端进行身份验证。
选择 “下一步 ”,直到到达 “部署 ”页。 将 Application Insights 诊断 切换为 “已启用” ,以便以后可以在工作室中查看终结点活动的图形,并使用 Application Insights 分析指标和日志。
选择“下一步”以转到“代码 + 环境”页。 选择以下选项:
-
选择用于推理的评分脚本:浏览并从之前克隆或下载的存储库中选择 \azureml-examples\cli\endpoints\online\model-1\onlinescoring\score.py 文件。
- 选择环境 部分:选择“自定义环境”,然后选择前面创建的 my-env:1 环境。
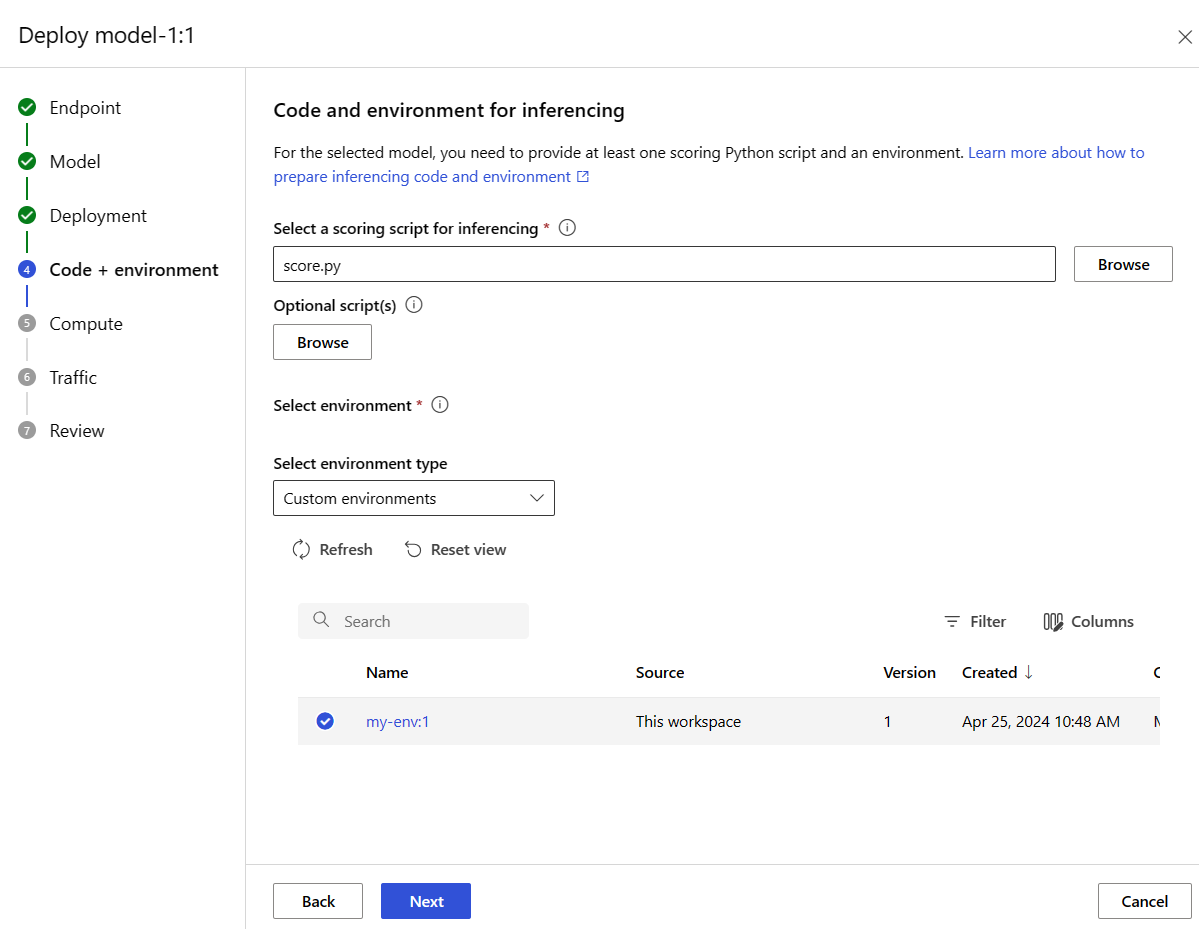
选择 “下一步”,接受默认值,直到系统提示你创建部署。
查看部署设置,然后选择“ 创建”。
或者,也可以通过工作室中的“终结点”页创建托管联机终结点。
转到 Azure 机器学习工作室。
在左窗格中,选择 “终结点 ”页。
选择“+ 新建”。
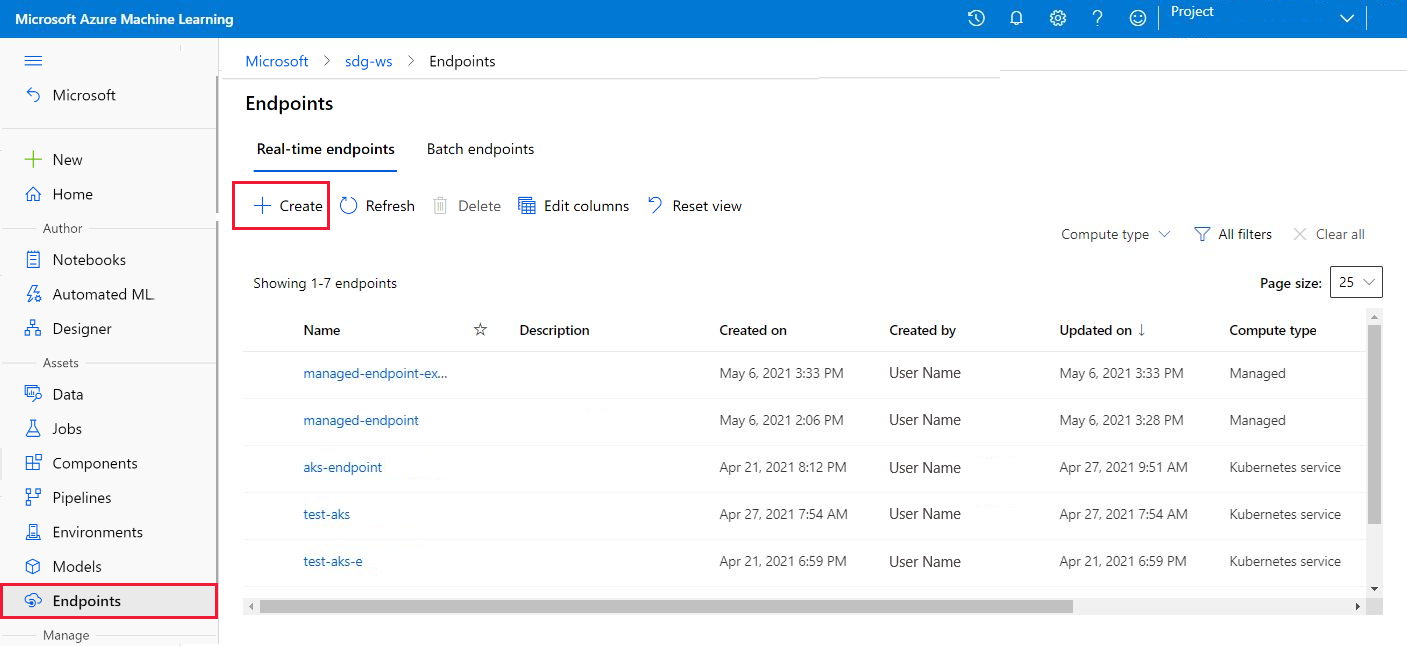
此操作将打开一个窗口,供你选择模型并指定有关终结点和部署的详细信息。 按前面所述输入终结点和部署的设置,然后选择“ 创建 ”以创建部署。
- 使用模板创建联机终结点:
set -x

#<get_access_token>
TOKEN=$(az account get-access-token --query accessToken -o tsv)
#</get_access_token>

# <create_variables>
SUBSCRIPTION_ID=$(az account show --query id -o tsv)
LOCATION=$(az ml workspace show --query location -o tsv)
RESOURCE_GROUP=$(az group show --query name -o tsv)
WORKSPACE=$(az configure -l --query "[?name=='workspace'].value" -o tsv)
#</create_variables>

# <set_endpoint_name>
export ENDPOINT_NAME=endpoint-`echo $RANDOM`
# </set_endpoint_name>

#<api_version>
API_VERSION="2022-05-01"
#</api_version>

echo -e "Using:\nSUBSCRIPTION_ID=$SUBSCRIPTION_ID\nLOCATION=$LOCATION\nRESOURCE_GROUP=$RESOURCE_GROUP\nWORKSPACE=$WORKSPACE"

# define how to wait
wait_for_completion () {
    operation_id=$1
    status="unknown"

    if [[ $operation_id == "" || -z $operation_id  || $operation_id == "null" ]]; then
        echo "operation id cannot be empty"
        exit 1
    fi

    while [[ $status != "Succeeded" && $status != "Failed" ]]
    do
        echo "Getting operation status from: $operation_id"
        operation_result=$(curl --location --request GET $operation_id --header "Authorization: Bearer $TOKEN")
        # TODO error handling here
        status=$(echo $operation_result | jq -r '.status')
        echo "Current operation status: $status"
        sleep 5
    done

    if [[ $status == "Failed" ]]
    then
        error=$(echo $operation_result | jq -r '.error')
        echo "Error: $error"
    fi
}

# <get_storage_details>
# Get values for storage account
response=$(curl --location --request GET "https://management.chinacloudapi.cn/subscriptions/$SUBSCRIPTION_ID/resourceGroups/$RESOURCE_GROUP/providers/Microsoft.MachineLearningServices/workspaces/$WORKSPACE/datastores?api-version=$API_VERSION&isDefault=true" \
--header "Authorization: Bearer $TOKEN")
AZUREML_DEFAULT_DATASTORE=$(echo $response | jq -r '.value[0].name')
AZUREML_DEFAULT_CONTAINER=$(echo $response | jq -r '.value[0].properties.containerName')
export AZURE_STORAGE_ACCOUNT=$(echo $response | jq -r '.value[0].properties.accountName')
# </get_storage_details>

# <upload_code>
az storage blob upload-batch -d $AZUREML_DEFAULT_CONTAINER/score -s cli/endpoints/online/model-1/onlinescoring --account-name $AZURE_STORAGE_ACCOUNT
# </upload_code>

# <create_code>
az deployment group create -g $RESOURCE_GROUP \
--template-file arm-templates/code-version.json \
--parameters \
workspaceName=$WORKSPACE \
codeAssetName="score-sklearn" \
codeUri="https://$AZURE_STORAGE_ACCOUNT.blob.core.chinacloudapi.cn/$AZUREML_DEFAULT_CONTAINER/score"
# </create_code>

# <upload_model>
az storage blob upload-batch -d $AZUREML_DEFAULT_CONTAINER/model -s cli/endpoints/online/model-1/model --account-name $AZURE_STORAGE_ACCOUNT
# </upload_model>

# <create_model>
az deployment group create -g $RESOURCE_GROUP \
--template-file arm-templates/model-version.json \
--parameters \
workspaceName=$WORKSPACE \
modelAssetName="sklearn" \
modelUri="azureml://subscriptions/$SUBSCRIPTION_ID/resourceGroups/$RESOURCE_GROUP/workspaces/$WORKSPACE/datastores/$AZUREML_DEFAULT_DATASTORE/paths/model/sklearn_regression_model.pkl"
# </create_model>

# <read_condafile>
CONDA_FILE=$(cat cli/endpoints/online/model-1/environment/conda.yaml)
# </read_condafile>

# <create_environment>
ENV_VERSION=$RANDOM
az deployment group create -g $RESOURCE_GROUP \
--template-file arm-templates/environment-version.json \
--parameters \
workspaceName=$WORKSPACE \
environmentAssetName=sklearn-env \
environmentAssetVersion=$ENV_VERSION \
dockerImage=mcr.microsoft.com/azureml/openmpi3.1.2-ubuntu18.04:20210727.v1 \
condaFile="$CONDA_FILE"
# </create_environment>

# <create_endpoint>
az deployment group create -g $RESOURCE_GROUP \
--template-file arm-templates/online-endpoint.json \
--parameters \
workspaceName=$WORKSPACE \
onlineEndpointName=$ENDPOINT_NAME \
identityType=SystemAssigned \
authMode=AMLToken \
location=$LOCATION
# </create_endpoint>

# <get_endpoint>
response=$(curl --location --request GET "https://management.chinacloudapi.cn/subscriptions/$SUBSCRIPTION_ID/resourceGroups/$RESOURCE_GROUP/providers/Microsoft.MachineLearningServices/workspaces/$WORKSPACE/onlineEndpoints/$ENDPOINT_NAME?api-version=$API_VERSION" \
--header "Content-Type: application/json" \
--header "Authorization: Bearer $TOKEN")

operation_id=$(echo $response | jq -r '.properties.properties.AzureAsyncOperationUri')
wait_for_completion $operation_id
# </get_endpoint>

# <create_deployment>
resourceScope="/subscriptions/$SUBSCRIPTION_ID/resourceGroups/$RESOURCE_GROUP/providers/Microsoft.MachineLearningServices"
az deployment group create -g $RESOURCE_GROUP \
 --template-file arm-templates/online-endpoint-deployment.json \
 --parameters \
 workspaceName=$WORKSPACE \
 location=$LOCATION \
 onlineEndpointName=$ENDPOINT_NAME \
 onlineDeploymentName=blue \
 codeId="$resourceScope/workspaces/$WORKSPACE/codes/score-sklearn/versions/1" \
 scoringScript=score.py \
 environmentId="$resourceScope/workspaces/$WORKSPACE/environments/sklearn-env/versions/$ENV_VERSION" \
 model="$resourceScope/workspaces/$WORKSPACE/models/sklearn/versions/1" \
 endpointComputeType=Managed \
 skuName=Standard_F2s_v2 \
 skuCapacity=1
 # </create_deployment>

# <get_deployment>
response=$(curl --location --request GET "https://management.chinacloudapi.cn/subscriptions/$SUBSCRIPTION_ID/resourceGroups/$RESOURCE_GROUP/providers/Microsoft.MachineLearningServices/workspaces/$WORKSPACE/onlineEndpoints/$ENDPOINT_NAME/deployments/blue?api-version=$API_VERSION" \
--header "Content-Type: application/json" \
--header "Authorization: Bearer $TOKEN")

operation_id=$(echo $response | jq -r '.properties.properties.AzureAsyncOperationUri')
wait_for_completion $operation_id

scoringUri=$(echo $response | jq -r '.properties.scoringUri')
# </get_endpoint>

# <get_endpoint_access_token>
response=$(curl -H "Content-Length: 0" --location --request POST "https://management.chinacloudapi.cn/subscriptions/$SUBSCRIPTION_ID/resourceGroups/$RESOURCE_GROUP/providers/Microsoft.MachineLearningServices/workspaces/$WORKSPACE/onlineEndpoints/$ENDPOINT_NAME/token?api-version=$API_VERSION" \
--header "Authorization: Bearer $TOKEN")
accessToken=$(echo $response | jq -r '.accessToken')
# </get_endpoint_access_token>

# <score_endpoint>
curl --location --request POST $scoringUri \
--header "Authorization: Bearer $accessToken" \
--header "Content-Type: application/json" \
--data-raw @cli/endpoints/online/model-1/sample-request.json
# </score_endpoint>

# <get_deployment_logs>
curl --location --request POST "https://management.chinacloudapi.cn/subscriptions/$SUBSCRIPTION_ID/resourceGroups/$RESOURCE_GROUP/providers/Microsoft.MachineLearningServices/workspaces/$WORKSPACE/onlineEndpoints/$ENDPOINT_NAME/deployments/blue/getLogs?api-version=$API_VERSION" \
--header "Authorization: Bearer $TOKEN" \
--header "Content-Type: application/json" \
--data-raw "{ \"tail\": 100 }"
# </get_deployment_logs>

# <delete_endpoint>
curl --location --request DELETE "https://management.chinacloudapi.cn/subscriptions/$SUBSCRIPTION_ID/resourceGroups/$RESOURCE_GROUP/providers/Microsoft.MachineLearningServices/workspaces/$WORKSPACE/onlineEndpoints/$ENDPOINT_NAME?api-version=$API_VERSION" \
--header "Content-Type: application/json" \
--header "Authorization: Bearer $TOKEN" || true
# </delete_endpoint>
- 创建终结点后,将模型部署到终结点:
set -x

#<get_access_token>
TOKEN=$(az account get-access-token --query accessToken -o tsv)
#</get_access_token>

# <create_variables>
SUBSCRIPTION_ID=$(az account show --query id -o tsv)
LOCATION=$(az ml workspace show --query location -o tsv)
RESOURCE_GROUP=$(az group show --query name -o tsv)
WORKSPACE=$(az configure -l --query "[?name=='workspace'].value" -o tsv)
#</create_variables>

# <set_endpoint_name>
export ENDPOINT_NAME=endpoint-`echo $RANDOM`
# </set_endpoint_name>

#<api_version>
API_VERSION="2022-05-01"
#</api_version>

echo -e "Using:\nSUBSCRIPTION_ID=$SUBSCRIPTION_ID\nLOCATION=$LOCATION\nRESOURCE_GROUP=$RESOURCE_GROUP\nWORKSPACE=$WORKSPACE"

# define how to wait
wait_for_completion () {
    operation_id=$1
    status="unknown"

    if [[ $operation_id == "" || -z $operation_id  || $operation_id == "null" ]]; then
        echo "operation id cannot be empty"
        exit 1
    fi

    while [[ $status != "Succeeded" && $status != "Failed" ]]
    do
        echo "Getting operation status from: $operation_id"
        operation_result=$(curl --location --request GET $operation_id --header "Authorization: Bearer $TOKEN")
        # TODO error handling here
        status=$(echo $operation_result | jq -r '.status')
        echo "Current operation status: $status"
        sleep 5
    done

    if [[ $status == "Failed" ]]
    then
        error=$(echo $operation_result | jq -r '.error')
        echo "Error: $error"
    fi
}

# <get_storage_details>
# Get values for storage account
response=$(curl --location --request GET "https://management.chinacloudapi.cn/subscriptions/$SUBSCRIPTION_ID/resourceGroups/$RESOURCE_GROUP/providers/Microsoft.MachineLearningServices/workspaces/$WORKSPACE/datastores?api-version=$API_VERSION&isDefault=true" \
--header "Authorization: Bearer $TOKEN")
AZUREML_DEFAULT_DATASTORE=$(echo $response | jq -r '.value[0].name')
AZUREML_DEFAULT_CONTAINER=$(echo $response | jq -r '.value[0].properties.containerName')
export AZURE_STORAGE_ACCOUNT=$(echo $response | jq -r '.value[0].properties.accountName')
# </get_storage_details>

# <upload_code>
az storage blob upload-batch -d $AZUREML_DEFAULT_CONTAINER/score -s cli/endpoints/online/model-1/onlinescoring --account-name $AZURE_STORAGE_ACCOUNT
# </upload_code>

# <create_code>
az deployment group create -g $RESOURCE_GROUP \
--template-file arm-templates/code-version.json \
--parameters \
workspaceName=$WORKSPACE \
codeAssetName="score-sklearn" \
codeUri="https://$AZURE_STORAGE_ACCOUNT.blob.core.chinacloudapi.cn/$AZUREML_DEFAULT_CONTAINER/score"
# </create_code>

# <upload_model>
az storage blob upload-batch -d $AZUREML_DEFAULT_CONTAINER/model -s cli/endpoints/online/model-1/model --account-name $AZURE_STORAGE_ACCOUNT
# </upload_model>

# <create_model>
az deployment group create -g $RESOURCE_GROUP \
--template-file arm-templates/model-version.json \
--parameters \
workspaceName=$WORKSPACE \
modelAssetName="sklearn" \
modelUri="azureml://subscriptions/$SUBSCRIPTION_ID/resourceGroups/$RESOURCE_GROUP/workspaces/$WORKSPACE/datastores/$AZUREML_DEFAULT_DATASTORE/paths/model/sklearn_regression_model.pkl"
# </create_model>

# <read_condafile>
CONDA_FILE=$(cat cli/endpoints/online/model-1/environment/conda.yaml)
# </read_condafile>

# <create_environment>
ENV_VERSION=$RANDOM
az deployment group create -g $RESOURCE_GROUP \
--template-file arm-templates/environment-version.json \
--parameters \
workspaceName=$WORKSPACE \
environmentAssetName=sklearn-env \
environmentAssetVersion=$ENV_VERSION \
dockerImage=mcr.microsoft.com/azureml/openmpi3.1.2-ubuntu18.04:20210727.v1 \
condaFile="$CONDA_FILE"
# </create_environment>

# <create_endpoint>
az deployment group create -g $RESOURCE_GROUP \
--template-file arm-templates/online-endpoint.json \
--parameters \
workspaceName=$WORKSPACE \
onlineEndpointName=$ENDPOINT_NAME \
identityType=SystemAssigned \
authMode=AMLToken \
location=$LOCATION
# </create_endpoint>

# <get_endpoint>
response=$(curl --location --request GET "https://management.chinacloudapi.cn/subscriptions/$SUBSCRIPTION_ID/resourceGroups/$RESOURCE_GROUP/providers/Microsoft.MachineLearningServices/workspaces/$WORKSPACE/onlineEndpoints/$ENDPOINT_NAME?api-version=$API_VERSION" \
--header "Content-Type: application/json" \
--header "Authorization: Bearer $TOKEN")

operation_id=$(echo $response | jq -r '.properties.properties.AzureAsyncOperationUri')
wait_for_completion $operation_id
# </get_endpoint>

# <create_deployment>
resourceScope="/subscriptions/$SUBSCRIPTION_ID/resourceGroups/$RESOURCE_GROUP/providers/Microsoft.MachineLearningServices"
az deployment group create -g $RESOURCE_GROUP \
 --template-file arm-templates/online-endpoint-deployment.json \
 --parameters \
 workspaceName=$WORKSPACE \
 location=$LOCATION \
 onlineEndpointName=$ENDPOINT_NAME \
 onlineDeploymentName=blue \
 codeId="$resourceScope/workspaces/$WORKSPACE/codes/score-sklearn/versions/1" \
 scoringScript=score.py \
 environmentId="$resourceScope/workspaces/$WORKSPACE/environments/sklearn-env/versions/$ENV_VERSION" \
 model="$resourceScope/workspaces/$WORKSPACE/models/sklearn/versions/1" \
 endpointComputeType=Managed \
 skuName=Standard_F2s_v2 \
 skuCapacity=1
 # </create_deployment>

# <get_deployment>
response=$(curl --location --request GET "https://management.chinacloudapi.cn/subscriptions/$SUBSCRIPTION_ID/resourceGroups/$RESOURCE_GROUP/providers/Microsoft.MachineLearningServices/workspaces/$WORKSPACE/onlineEndpoints/$ENDPOINT_NAME/deployments/blue?api-version=$API_VERSION" \
--header "Content-Type: application/json" \
--header "Authorization: Bearer $TOKEN")

operation_id=$(echo $response | jq -r '.properties.properties.AzureAsyncOperationUri')
wait_for_completion $operation_id

scoringUri=$(echo $response | jq -r '.properties.scoringUri')
# </get_endpoint>

# <get_endpoint_access_token>
response=$(curl -H "Content-Length: 0" --location --request POST "https://management.chinacloudapi.cn/subscriptions/$SUBSCRIPTION_ID/resourceGroups/$RESOURCE_GROUP/providers/Microsoft.MachineLearningServices/workspaces/$WORKSPACE/onlineEndpoints/$ENDPOINT_NAME/token?api-version=$API_VERSION" \
--header "Authorization: Bearer $TOKEN")
accessToken=$(echo $response | jq -r '.accessToken')
# </get_endpoint_access_token>

# <score_endpoint>
curl --location --request POST $scoringUri \
--header "Authorization: Bearer $accessToken" \
--header "Content-Type: application/json" \
--data-raw @cli/endpoints/online/model-1/sample-request.json
# </score_endpoint>

# <get_deployment_logs>
curl --location --request POST "https://management.chinacloudapi.cn/subscriptions/$SUBSCRIPTION_ID/resourceGroups/$RESOURCE_GROUP/providers/Microsoft.MachineLearningServices/workspaces/$WORKSPACE/onlineEndpoints/$ENDPOINT_NAME/deployments/blue/getLogs?api-version=$API_VERSION" \
--header "Authorization: Bearer $TOKEN" \
--header "Content-Type: application/json" \
--data-raw "{ \"tail\": 100 }"
# </get_deployment_logs>

# <delete_endpoint>
curl --location --request DELETE "https://management.chinacloudapi.cn/subscriptions/$SUBSCRIPTION_ID/resourceGroups/$RESOURCE_GROUP/providers/Microsoft.MachineLearningServices/workspaces/$WORKSPACE/onlineEndpoints/$ENDPOINT_NAME?api-version=$API_VERSION" \
--header "Content-Type: application/json" \
--header "Authorization: Bearer $TOKEN" || true
# </delete_endpoint>
要对部署中的错误进行调试,请参阅联机终结点部署故障排除。
检查联机终结点的状态
对于终结点和部署,使用 show 命令以显示 provisioning_state 中的信息:
az ml online-endpoint show -n $ENDPOINT_NAME
使用 list 命令以表格格式列出工作区中的所有终结点:
az ml online-endpoint list --output table
检查终结点的状态,查看模型是否已部署且未出错:
ml_client.online_endpoints.get(name=endpoint_name)
使用 list 方法以表格格式列出工作区中的所有终结点:
for endpoint in ml_client.online_endpoints.list():
    print(endpoint.name)
该方法返回 ManagedOnlineEndpoint 实体的列表(迭代器)。
可以通过指定 更多参数来获取详细信息。 例如,像表格一样输出终结点列表:
print("Kind\tLocation\tName")
print("-------\t----------\t------------------------")
for endpoint in ml_client.online_endpoints.list():
    print(f"{endpoint.kind}\t{endpoint.location}\t{endpoint.name}")
查看托管联机终结点
可以在 终结点 页上查看所有您所管理的在线终结点。 转到终结点 的详细信息 页,查找关键信息,例如终结点 URI、状态、测试工具、活动监视器、部署日志和示例使用代码。
在左窗格中,选择 “终结点 ”以查看工作区中所有终结点的列表。
(可选)在 计算类型 上创建筛选器,以仅显示 托管 计算类型。
选择端点名称以查看端点的详细信息页。
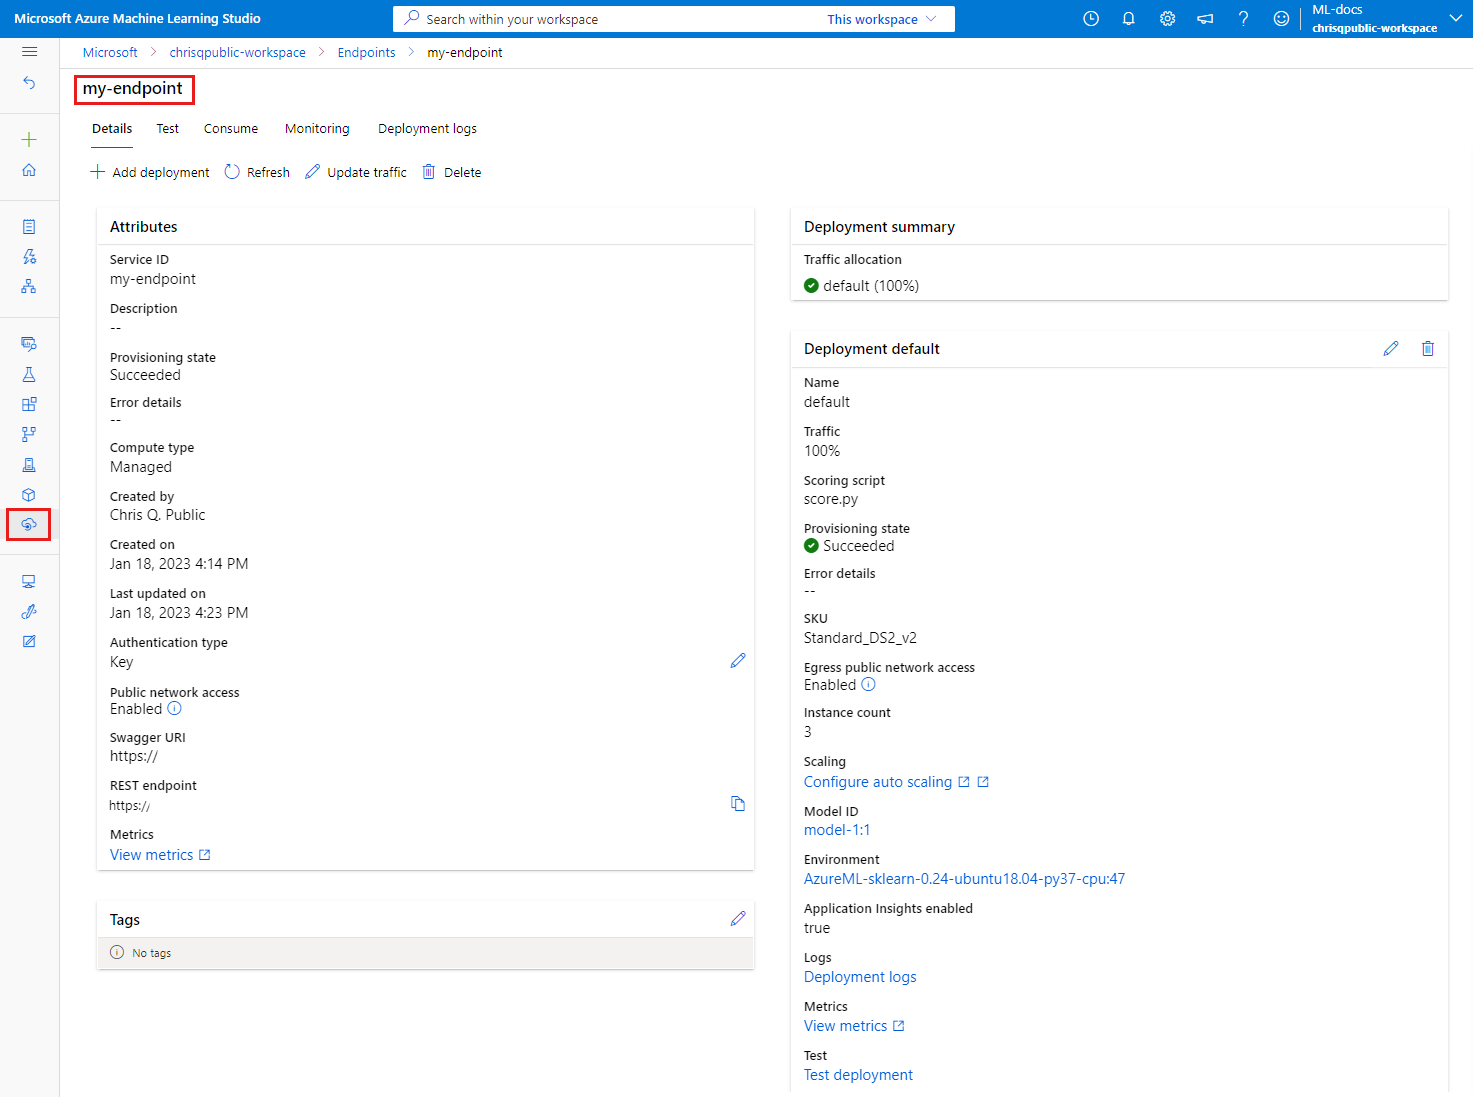
模板可用于部署资源,但不能使用它们列出、显示或调用资源。 使用 Azure CLI、Python SDK 或工作室执行这些操作。 以下代码使用 Azure CLI。
使用show命令在provisioning_state参数中显示终结点和部署的信息:
az ml online-endpoint show -n $ENDPOINT_NAME
使用 list 命令以表格格式列出工作区中的所有终结点:
az ml online-endpoint list --output table
检查联机部署的状态
检查日志,查看模型是否已部署且未出错。
若要查看容器的日志输出,请使用以下 CLI 命令:
az ml online-deployment get-logs --name blue --endpoint $ENDPOINT_NAME
默认情况下,日志是从推理服务器容器拉取的。 若要查看存储初始化表达式容器中的日志,请添加 --container storage-initializer 标志。 有关部署日志的详细信息,请参阅 “获取容器日志”。
可以使用 get_logs 方法查看日志输出:
ml_client.online_deployments.get_logs(
    name="blue", endpoint_name=endpoint_name, lines=50
)
默认情况下,日志是从推理服务器容器拉取的。 若要查看存储初始化表达式容器中的日志,请添加 container_type="storage-initializer" 选项。 有关部署日志的详细信息,请参阅 “获取容器日志”。
ml_client.online_deployments.get_logs(
    name="blue", endpoint_name=endpoint_name, lines=50, container_type="storage-initializer"
)
若要查看日志输出,请从端点页面中选择“日志”选项卡。 如果终结点中有多个部署,请使用下拉列表选择要查看其日志的部署。
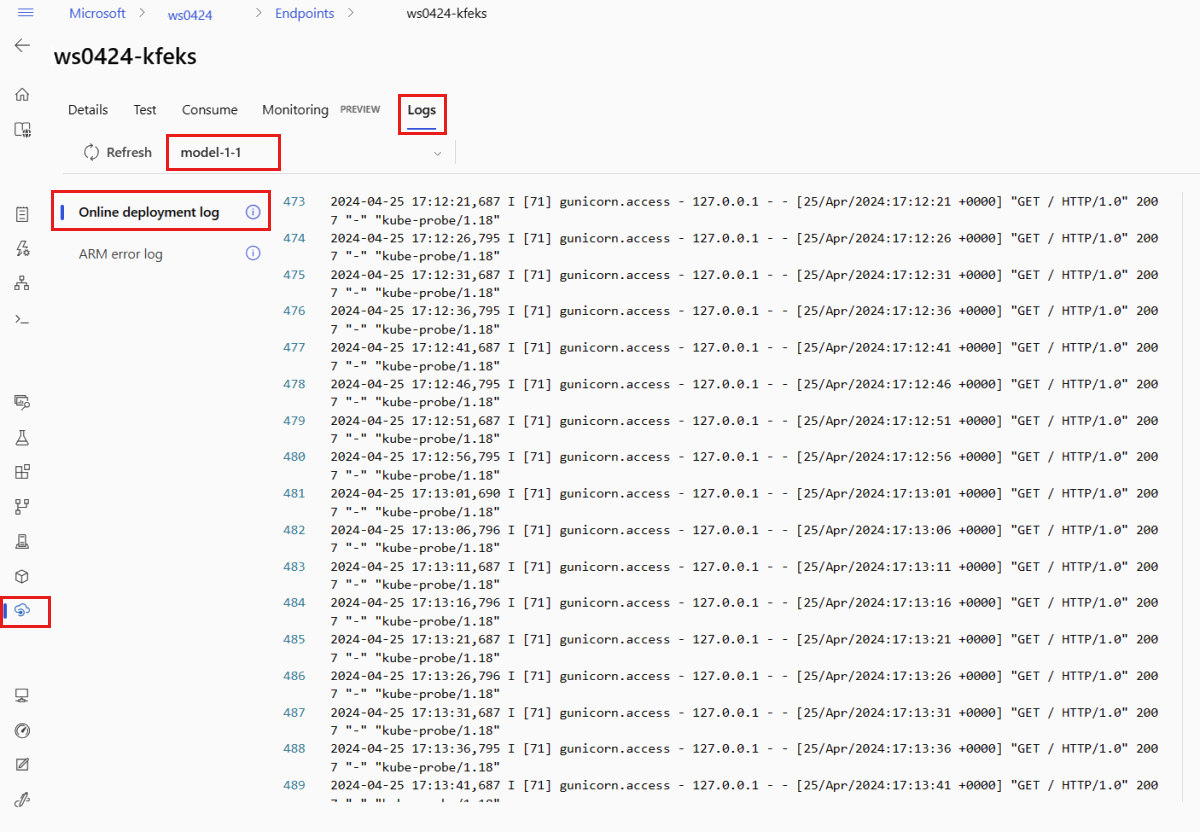
默认情况下,日志是从推理服务器拉取的。 若要查看存储初始化表达式容器的日志,请使用 Azure CLI 或 Python SDK(有关详细信息,请参阅每个选项卡)。 存储初始化容器中的日志提供了有关代码和模型数据是否已成功下载到容器的信息。 有关部署日志的详细信息,请参阅 “获取容器日志”。
模板可用于部署资源,但不能使用它们列出、显示或调用资源。 使用 Azure CLI、Python SDK 或工作室执行这些操作。 以下代码使用 Azure CLI。
若要查看容器的日志输出,请使用以下 CLI 命令:
az ml online-deployment get-logs --name blue --endpoint $ENDPOINT_NAME
默认情况下,日志是从推理服务器容器拉取的。 若要查看存储初始化表达式容器中的日志,请添加 --container storage-initializer 标志。 有关部署日志的详细信息,请参阅 “获取容器日志”。
调用终结点,以使用模型为数据评分
使用 invoke 命令或你选择的 REST 客户端来调用终结点并为一些数据评分:
az ml online-endpoint invoke --name $ENDPOINT_NAME --request-file endpoints/online/model-1/sample-request.json
获取用于向终结点进行身份验证的密钥:
你可以对哪些 Microsoft Entra 安全主体能够获取身份验证密钥进行控制,方法是将其分配到一个允许 Microsoft.MachineLearningServices/workspaces/onlineEndpoints/token/action 和 Microsoft.MachineLearningServices/workspaces/onlineEndpoints/listkeys/action 的自定义角色。 有关如何管理对工作区的授权的详细信息,请参阅 管理对 Azure 机器学习工作区的访问权限。
 ENDPOINT_KEY=$(az ml online-endpoint get-credentials -n $ENDPOINT_NAME -o tsv --query primaryKey)
 SCORING_URI=$(az ml online-endpoint show -n $ENDPOINT_NAME -o tsv --query scoring_uri)

 curl --request POST "$SCORING_URI" --header "Authorization: Bearer $ENDPOINT_KEY" --header 'Content-Type: application/json' --data @endpoints/online/model-1/sample-request.json
使用 curl 对数据进行评分。
 SCORING_URI=$(az ml online-endpoint show -n $ENDPOINT_NAME -o tsv --query scoring_uri)

 curl --request POST "$SCORING_URI" --header "Authorization: Bearer $ENDPOINT_KEY" --header 'Content-Type: application/json' --data @endpoints/online/model-1/sample-request.json
请注意,使用 show 和 get-credentials 命令获取身份验证凭据。 另请注意,使用 --query 标志仅筛选所需的属性。 若要详细了解 --query 标志的信息,请参阅 查询 Azure CLI 命令输出。
若要查看调用日志,请再次运行 get-logs。
通过使用之前创建的 MLClient 参数,可以获得指向终结点的句柄。 然后,可以通过使用invoke命令结合以下参数来调用终结点:
-
endpoint_name:终结点的名称。
-
request_file:包含请求数据的文件。
-
deployment_name:用于在终结点测试的特定部署名称。
使用 JSON 文件发送示例请求。
# test the blue deployment with some sample data
ml_client.online_endpoints.invoke(
    endpoint_name=endpoint_name,
    deployment_name="blue",
    request_file="../model-1/sample-request.json",
)
使用终结点详细信息页上的“ 测试 ”选项卡测试托管联机部署。 提供示例输入并查看结果。
选择终结点详细信息页上的“ 测试 ”选项卡。
使用下拉列表选择要测试的部署。
输入 示例输入。
选择“测试”。
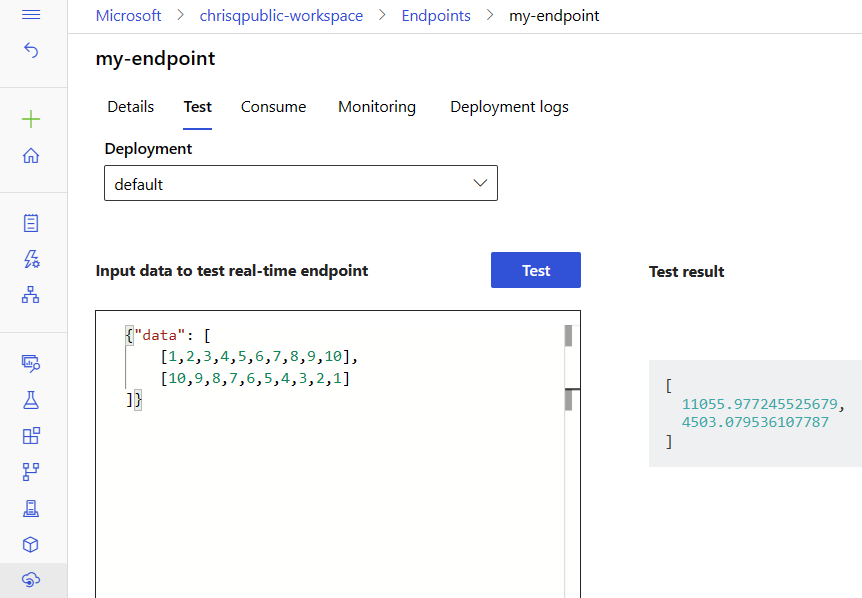
模板可用于部署资源,但不能使用它们列出、显示或调用资源。 使用 Azure CLI、Python SDK 或工作室执行这些操作。 以下代码使用 Azure CLI。
使用 invoke 命令或你选择的 REST 客户端来调用终结点并为一些数据评分:
az ml online-endpoint invoke --name $ENDPOINT_NAME --request-file cli/endpoints/online/model-1/sample-request.json
(可选)更新部署
如果要更新代码、模型或环境,请更新 YAML 文件。 然后运行 命令 az ml online-endpoint update 。
如果在单个 update 命令中更新实例数量(以扩展您的部署)以及其他模型设置(如代码、模型或环境),则首先执行扩展操作。 接下来将应用其他更新。 在生产环境中单独执行这些操作是一个很好的做法。
若要了解 update 的工作原理,请执行以下操作:
打开 文件 online/model-1/onlinescoring/score.py。
更改 init() 函数的最后一行:在 logging.info("Init complete") 后面,添加 logging.info("Updated successfully")。
保存文件。
运行以下命令:
az ml online-deployment update -n blue --endpoint $ENDPOINT_NAME -f endpoints/online/managed/sample/blue-deployment-with-registered-assets.yml
使用 YAML 进行更新是声明性的。 也就是说,YAML 中的更改反映在基础资源管理器资源(终结点和部署)中。 声明性方法促进了 GitOps:所有对终结点和部署的更改(即使是 )都通过 YAML 实现。
可以使用 泛型更新参数(如 --set 参数)和 CLI update 命令替代 YAML 中的属性 ,或 设置特定属性,而无需在 YAML 文件中传递它们。 在开发和测试方案中,为单个特性使用 --set,这种做法特别有用。 例如,若要纵向扩展第一个部署的 instance_count 值,可以使用标志 --set instance_count=2。 由于 YAML 未更新,这种技术并不支持 GitOps。
指定 YAML 文件 并不 是必需的。 例如,如果想要测试特定部署的不同并发设置,可以尝试类似 az ml online-deployment update -n blue -e my-endpoint --set request_settings.max_concurrent_requests_per_instance=4 environment_variables.WORKER_COUNT=4的东西。 此方法保留所有现有配置,但仅更新指定的参数。
由于修改了 init() 在创建或更新终结点时运行的函数,因此消息 Updated successfully 将显示在日志中。 运行以下命令检索日志:
az ml online-deployment get-logs --name blue --endpoint $ENDPOINT_NAME
update 命令也适用于本地部署。 将同一个 az ml online-deployment update 命令与标志 --local 配合使用。
如果要更新代码、模型或环境,请更新配置,然后运行 MLClient's online_deployments.begin_create_or_update 方法来创建 或更新部署。
如果在单个 begin_create_or_update 方法中同时更新实例计数(以扩展您的部署)以及其他模型设置(例如代码、模型或环境),那么将首先执行扩展操作。 然后应用其他更新。 在生产环境中单独执行这些操作是一个很好的做法。
若要了解 begin_create_or_update 的工作原理,请执行以下操作:
打开 文件 online/model-1/onlinescoring/score.py。
更改 init() 函数的最后一行:在 logging.info("Init complete") 后面,添加 logging.info("Updated successfully")。
保存文件。
运行方法:
ml_client.online_deployments.begin_create_or_update(blue_deployment_with_registered_assets)
由于修改了 init() 在创建或更新终结点时运行的函数,因此消息 Updated successfully 将显示在日志中。 运行以下命令检索日志:
ml_client.online_deployments.get_logs(
    name="blue", endpoint_name=endpoint_name, lines=50
)
begin_create_or_update 方法也适用于本地部署。 将同一方法与 local=True 标志配合使用。
目前,只能对部署的实例计数进行更新。 使用以下说明,通过调整实例数来纵向扩展或缩减单个部署:
- 打开终结点的 详细信息 页面,找到您想要更新的部署项卡。
- 选择部署名称旁边的编辑图标(铅笔图标)。
- 更新与部署关联的实例计数。 在部署规模类型中选择默认或目标利用率。
- 如果选择 “默认值”,还可以为 实例计数指定数值。
- 如果选择 “目标利用率”,可以在自动缩放部署时指定要用于参数的值。
- 选择“更新”以完成部署的实例计数的更新。
注意
本部分中的部署更新是就地滚动更新的示例。
- 对于托管联机终结点,系统会将部署一次更新为具有 20% 节点的新配置。 也就是说,如果部署有 10 个节点,则一次将更新 2 个节点。
- 对于 Kubernetes 联机终结点,系统将使用新配置以迭代方式创建新的部署实例,并删除旧部署实例。
- 对于生产使用情况,请考虑 使用蓝绿部署,该部署为更新 Web 服务提供了更安全的替代方法。
自动缩放会自动运行适量的资源来处理应用程序的负载。 托管联机终结点支持通过与 Azure Monitor 自动缩放功能的集成进行自动缩放。 若要配置自动缩放,请参阅自动缩放联机终结点。
(可选)使用 Azure Monitor 监视 SLA
若要查看指标并基于 SLA 设置警报,请遵循 “监视联机终结点”中所述的步骤。
(可选)与 Log Analytics 集成
get-logs CLI 的命令或 get_logs SDK 方法仅提供自动选择实例的最后几百行日志。 但是,Log Analytics 提供一种用于持久存储和分析日志的方式。 有关如何使用日志记录的详细信息,请参阅 “使用日志”。
删除终结点和部署
使用以下命令删除终结点及其所有基础部署:
az ml online-endpoint delete --name $ENDPOINT_NAME --yes --no-wait
使用以下命令删除终结点及其所有基础部署:
ml_client.online_endpoints.begin_delete(name=endpoint_name)
如果不打算使用终结点和部署,请删除它们。 删除终结点时,也会删除其所有基础部署。
- 转到 Azure 机器学习工作室。
- 在左窗格中,选择 “终结点 ”页。
- 选择终结点。
- 选择“删除”。
或者,可以通过选择终结点详细信息页上的“删除”图标直接删除托管联机终结点。
使用以下命令删除终结点及其所有基础部署:
az ml online-endpoint delete --name $ENDPOINT_NAME --yes --no-wait
相关内容


